Introduction
Street Fighter 3: 3rd Strike is the latest revision of the SF3 series. The two previous games were SF3: New Generation and SF3: Second Impact. The main differences found in 3rd Strike include a new way of performing throws (done by pressing LP+LK), universal overheads (MP+MK), a "choose your opponent"-style path in Arcade mode, the return of the "Crush the Car" bonus round, a new soundtrack, stages and 5 new characters. In this game, the new characters are Chun Li, Q, Twelve, Remy and Makoto.
Home versions of Street fighter 3: 3rd Strike can be found on the Dreamcast, PS2 and X-Box. The Dreamcast version was released in 2000 with some slight differences to the arcade version. In 2004, Capcom released 3rd Strike as part of the "Street Fighter Anniversary Collection" for the X-Box and PS2 which also included Hyper Street Fighter 2. Today, the PS2 and X-Box versions of the game are widely considered the tournament standard since those two versions are very close ports of the original arcade game.
Notation
Joystick Notation
- F - Forward - Tilt stick forward/towards the opponent. (X-axis)
- B - Backward/Back - Tilt stick backward/away from the opponent. (X-axis)
- U - Up - Tilt stick upwards. (Y-axis)
- D - Down - Tilt stick downwards. (Y-axis)
- QCF - Quarter circle forward/Hadouken/Fireball - Tilt stick downwards, then to downwards and forward, then forward.
- QCB - Quarter circle backward - Tilt stick downwards, then to downwards and backward, then backward.
- HCF - Half circle forward - Tilt stick backwards, then to downwards and backward, then to downward, then to downwards and forward, then forward.
- HCB - Half circle backward - Tilt stick forwards, then to downwards and forward, then to downward, then to downwards and backward, then backward.
- DP - Dragon punch - Tilt stick forwards, then to downward, then to downward and forward.
- 360/FC - Full circle - Complete a full rotation of the stick.
- 720 - N/A - Complete a 720 degree rotation of the stick.
- Charge - Hold a tilt - Hold the stick in either B or D (Depending) then move to F or U respectively.
X-axis functions can be used interchangably with Y-axis functions and vice versa. X-axis functions cannot be used in conjunction with another X-axis function and vice versa.
Six Button Notation
Expressed in the form: Notation - Move - (X-box Default Map) - (PS2 Default Map)
- LP - Low Punch - (X) - (Square)
- MP - Medium/Strong Punch - (Y) - (Triangle)
- HP - High/Fierce Punch - (Right Trigger/White) - (R1)
- LK - Low Kick - (A) - (X)
- MK - Medium/Strong Kick - (B) - (Circle)
- HK - High/Roundhouse Kick - (Left Trigger/Black) - (R2)
Occasionally people may use "Notation" and "Move" interchangeably.
Descriptors
Connectors
- +: Used between two other pieces of notation to signify that they should be performed at the same time. i.e. "X" + "Y", "X" should be performed at the same time as "Y".
e.g. F + MP
- -> (Sometimes >): Indicates the next part of a sequence. i.e. "X" -> "Y" -> "Z", After "X" is performed, "Y" should follow, then "Z".
e.g. Dash -> Fierce Jet Uppercut
- x: Used between two other pieces of notation to signify that the first should be cancelled (interuppted earlier than it would finish otherwise) into the second. i.e. "X" x "Y", "X" should be cancelled into "Y".
e.g. MP x Fierce Shoryuken
- ~: Indicates that the preceeding action should link (immediately follow with) into the next action. i.e. "X" ~ "Y", "X" should be followed immediately by "Y"
e.g. LK ~ MP ~ HP
- /: Used to show when two or more options are available at that point in a sequence, invariably to show that they both produce similar if not identical results.
State Modifiers
- s. - The following move should be performed in the standing position (neutral in the Y-axis). i.e. s."X", perform "X" whilst standing.
- c. - The following move should be performed in the crouched position (held down in the Y-axis). i.e. c."X", perform "X" whilst crouching.
- j. - The following move should be performed in the "in the air" position (After having held up in the Y-axis). i.e. j."X", perform "X" whilst in the air.
Miscellaneous Notation
- [EX] - EX Special - Used to show that a special move can be "EX-ed". i.e. Two of the same appendage buttons pressed at the same time during a special motion to produce a better version of it. (Consumes Super Meter)
- twds - ?????
- x(Integer) - Number of times - Shows how many times that particular part of a sequence can be repeated.
- Tap/Rapidly - Repeatedly press a button.
- Deep/Close - How close a move is performed - When the sprites are overlapping.
- Far - How close a move is performed - When the sprites aren't overlapping.
Game Mechanics
Parrying
(Also known as "Blocking" or "Teching" in Japan) A defense mechanic that gives a slight frame advantage to the defender and leaves the opponent open for a counterattack. The Parry can also be done in the air.
As a general rule:
- Against High/Mid attacks: Tap F
- Against Low attacks: Tap D
However some moves can be parried with either.
Throw
A close-ranged grappling maneuver. Throws can be also be Teched (avoided) by pressing the throw command when your opponent reaches for a throw. Holding a direction while doing the command launches the opponent in that direction.
- LP+LK
- (B/F + LP+LK)
Universal Overhead
A quick mid/overhead attack that hits crouching opponents. Low attacks will miss your character when the UOH is performed.
- MP+MK
Personal Action
(Commonly abbreviated as "PA") A taunt that gives your character a stat bonus in either attack power (except throws), defense, stun ability, etc. The bonus is different for each character and only lasts until the round is over.
- HP+HK
Akuma - Attack up, Stun Damage up
Alex - Attack up, max 4 per round
Chun-Li = Recovers stun meter (when she yawns) and either Attack up (cracks her neck), Defense up (shoulder pat), or both (arch forward). Her taunt actions are random.
Dudley - Attack up
Elena - Stun Damage up
Gill (Console versions Only) - Attack up
Hugo - Attack and Defense up, max 4 per round. Holding HP+HK = Throw damage up.
Ibuki - Attack up (Only if Taunt connects -- Ibuki must leap over her opponent)
Ken - Attack up
Makoto - Attack and Recovers stun meter. Holding HP+HK = Up to 2 more Stun Recocery bonuses + Attack up
Necro - Attack up
Oro - Recovers stun meter
Q - Defense up, max 3 per round
Remy - Stun Damage up
Ryu - Recovers stun, max 3 per round
Sean - Stun Damage up (Only if Taunt connects), max 3 per round
Twelve - Disappears
Urien - Attack up (If Taunt connects, no bonus given)
Yang - Attack up (Throws get +1 damage)
Yun - Attack up (Throws get minor increase), max 8 per round
Dash
A method of moving your character quickly over a short distance. You cannot block whilst you are dashing.
- Forward Dash: Tap F, F
- Backward Dash: Tap B, B
Super Jump
Similar to a regular jump, except that it carries you furthur, and takes longer to start up.
- Tap D,U
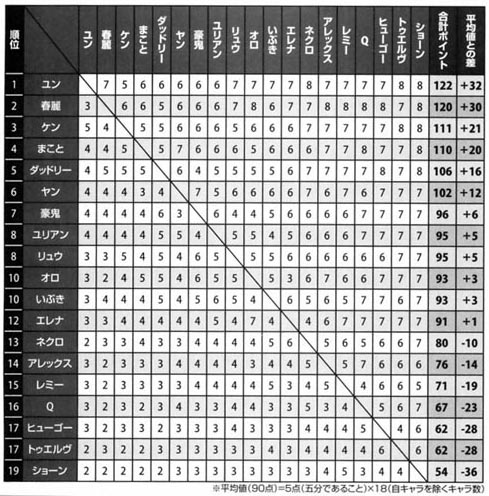
Tier list
Please note: Tiers are HIGHLY debatable so all lists should be taken with a grain of salt. If a character is only a place or two away from where they "should" be, please refrain from wildly editing this section.
Top Tier:
Yun
Chun-Li
Ken
Makoto (ARGUABLY -- she is said to be considered top tier in Japan, but non-Japanese players generally argue that her playstyle is too unpredictable and inconsistent to be top tier)
Upper Tier:
Dudley
Yang
Akuma
Urien (Urien is considered dead even with Ryu in terms of matchups in Japan)
Middle Tier:
Ryu
Oro
Ibuki
Elena
Necro
Low Tier:
Alex
Remy
Q
Hugo
Twelve
Sean
Strategy
Strategy is a very basic concept. It is the principle of using X to beat Y, where X has some sort of advantage over Y. Be it a flat statistic superiority, or a mind game.
Here are some general tips to help you begin.
- Know your options (and your opponent's). Consider how easy a move might be to super counter. If you keep doing a c.HK with Ryu, sooner or later, your opponent will catch on and punish you, and you DON'T want it to be a super that they choose to punish with.
- Super after Parry, if you have been parried by someone, hope is not all lost! Try supering. If you are against someone who parry-counters excessively, it can really throw them off, as invariably a super will beat the move they attempt. This is very risky however, as the opponent always has the option to block.
- Bait Throws. Particularily basic players will try to throw whenever you are close to them. So get close to them, avoid their throw, then punish it. Justin Wong, to name just one name, does that all the time.
- Mix-up (whilst difficult to encapsulate in one sentence) can roughly be interpretted as: "Doing something that is different to what you have just done, to force the opponent to change his block zone". If you aren't hitting high, try hitting low!

