Introduction
Moves List
Normal Moves
Throws
| H.U.G. | LP + LK |
| F.L.G. | http://www.shoryuken.com/wiki/images/2/29/Right.gif + LP + LK |
| T.R.W. | http://www.shoryuken.com/wiki/images/8/8e/Left.gif + LP + LK |
Command Normals
| B.M.K. | http://www.shoryuken.com/wiki/images/8/8e/Left.gif + MK |
| Kabe Haritsuki | While against wall, hold http://www.shoryuken.com/wiki/images/2/29/Right.gif |
| Kokkuu | In air, press http://www.shoryuken.com/wiki/images/8/8e/Left.gif, http://www.shoryuken.com/wiki/images/8/8e/Left.gif or http://www.shoryuken.com/wiki/images/2/29/Right.gif, http://www.shoryuken.com/wiki/images/2/29/Right.gif |
Target Combos
- None.
Special Moves
| N.D.L. | http://www.shoryuken.com/wiki/images/1/1e/Qcf.gif + P | (EX) |
| A.X.E. | http://www.shoryuken.com/wiki/images/d/da/Qcb.gif + P * | (EX) |
| * can also be done in air | ||
| D.R.A. | While jumping, http://www.shoryuken.com/wiki/images/d/da/Qcb.gif + K | (EX) |
Super Arts
| I | X.N.D.L. | http://www.shoryuken.com/wiki/images/1/1e/Qcf.gif http://www.shoryuken.com/wiki/images/1/1e/Qcf.gif + P | 2 stocks |
| II | X.F.L.A.T. | While jumping, http://www.shoryuken.com/wiki/images/1/1e/Qcf.gif http://www.shoryuken.com/wiki/images/1/1e/Qcf.gif + K | 1 stocks |
| III | X.C.O.P.Y. | http://www.shoryuken.com/wiki/images/1/1e/Qcf.gif http://www.shoryuken.com/wiki/images/1/1e/Qcf.gif + P | 1 stock |
Move Analysis
Combos
| Crouching LK, A.X.E. (LP) |
| Kokkuu deep HK, A.X.E. (LP) |
| Mid-screen, EX N.D.L., standing HK |
| Kokkuu deep HK, X.N.D.L. |
| Crouching LKx2, X.N.D.L. |
| Crouching LK, A.X.E. (LP), xx, X.N.D.L. |
| Standing close MK, X.N.D.L. |
| B.M.K., X.N.D.L. |
| UOH, link crouching LK, X.N.D.L. |
| Crouching MP, link crouching LK, X.N.D.L. |
| Standing close MK, super jump cancel, X.F.L.A.T. |
Frame Data
Normals
Throws
Command Normals
Special Moves
Super Arts
Additional Frame Data
Strategies
Overview
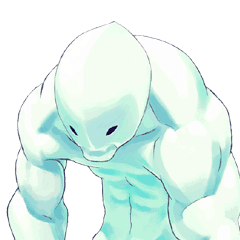
Twelve is one of the weakest character in the game. His defense and stamina are low, adding to this is his lack of options to land damage without bar. Twelve does make up for this with his high mobility and his arsenal of decent pokes.
Basics
Super Art Selection
X.N.D.L. offers Twelve the most options. Resets, EX moves, simple combos and an anti-air. The gauge is composed of two average sized gauges. So upon executing a super, Twelve still has one gauge for EX moves. You may find yourself using EX D.R.A.'s and EX N.D.L.s over X.N.D.L. however. But unlike X.F.L.A.T., Twelve can verify a super from a low hit (crouching LK, A.X.E. (LP) and a high hit (standing close MP).
X.F.L.A.T. is a second possibility but landing a succesful hit is hard in high-level play. There is some speculation with X.C.O.P.Y. since every other character can offer more damage than Twelve, plus the damage and defense bonus Twelve gets during X.C.O.P.Y. At the same time many characters rely on their super or EX moves to land big damage ala Chun-Li, Urien, etc. X.C.O.P.Y. does not offer Twelve the ability to execute his opponent's EX and super moves. Yet, both super arts only offer one gauge meaning no room for EX moves.
Kara-Techniques
Kara-Throw - standing MP
Twelve's kara-throw has nothing to offer to his game, including that the range on his throw is already good.
Resets
Anti-air LP, X.N.D.L.
Anti-Air IAD MP, X.N.D.L.
Anti-air A.X.E. (LP) (1-hit) walk-up standing MK, X.N.D.L.
Anti-Air IAD MP, Instant X.F.L.A.T.
Anti-air A.X.E. (LP) (1-hit), walk-up standing MK, super jump cancel, X.F.L.A.T.
Zoning
Standing MP
crouching MK
standing HK
Jump-back HP
N.D.L.
Mixups
Kokkuu HK
- hit from front
- hit behind
- whiff in front
- whiff behind
- fake cross-up
>Kokkuu HK (hit), X.N.D.L.
>Kokkuu HK (whiff), walk-up, throw or walk-up crouching LK, A.X.E. (LP), xx, X.N.D.L.
>Kokkuu HK (block), walk-up, throw or walk-up crouching LK, A.X.E. (LP), xx, X.N.D.L.
Standing close MK (blocked), Super Jump Cancel
- IAD, D.R.A.
- IAD, EX D.R.A.
- IAD MK (whiff), throw
- IAD MK (whiff) crouching LK, A.X.E. (LP), xx, X.N.D.L.
- IAD MK, X.N.D.L.
When the opponent is in the corner, sweep range, EX N.D.L., standing LP (reset)
- UOH, X.N.D.L.
- Walk-up, crouching LK, X.N.D.L.
Additional Notes
Personal Action: Invisibility.
After landing a H.U.G. on Hugo at mid-screen, Twelve can OTG Hugo with SA1 or an instant SA2. However, this does not combo and Hugo can avoid both supers by quick recovering from the H.U.G.
Cross-Ups:
- Twelve can cross-up a cornered Hugo
- Twelve can ground cross-up a cornered Hugo
IAD (Instant Air-Dash) - Twelve can execute a IAD by simple inputting http://www.shoryuken.com/wiki/images/5/57/Upleft.gif, http://www.shoryuken.com/wiki/images/8/8e/Left.gif or http://www.shoryuken.com/wiki/images/9/9a/Upright.gif, http://www.shoryuken.com/wiki/images/2/29/Right.gif quickly. The game will register this as if you jumped and immediatley pressed http://www.shoryuken.com/wiki/images/8/8e/Left.gif, http://www.shoryuken.com/wiki/images/8/8e/Left.gif or http://www.shoryuken.com/wiki/images/2/29/Right.gif, http://www.shoryuken.com/wiki/images/2/29/Right.gif. The IAD keeps Twelve close to ground. Due to the low altitude his normals will hit deeper, while his HP and HK will whiff everytime. For there is not enough time for both attacks to fully animate. IAD allows you to create high/low/faint/throw mix-ups while keeping the pressure on. Upon executing a normal or not, Twelve cant act immediatley upon landing from a IAD. Aside from quick reversals and supers, a blocked IAD normal is usually safe since Twelve will be grouned upon recovery. This allows Twelve to easily land tick-throws.
Match-ups
Serious Advantage Match-ups
Advantage Match-ups
Sean
Fair Match-ups
Q
Hugo
Disadvantage Match-ups
Chun-Li
Urien
Serious Disadvantage Match-ups
Elena
Akuma
Ken

