Necalli
| ||||||||||||||||||||||||||||||||||||||||||||||||||||||||||||||||||||||||||||||
Summary
Bio
TBW
Why Pick Necalli?
(As Street Fighter V is new, this section will be filled out after we learn more about how this character plays most effectively.)
Players To Watch
{{{5}}}
Move List
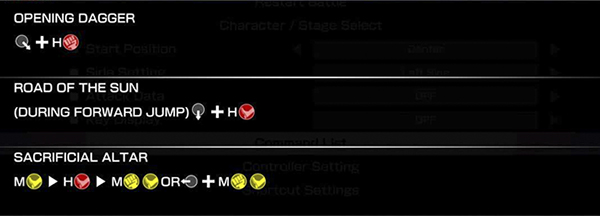
Unique Attacks
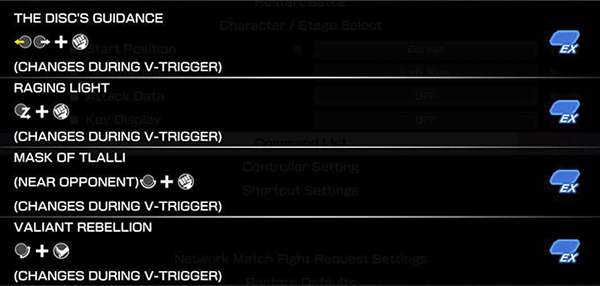
Special Moves
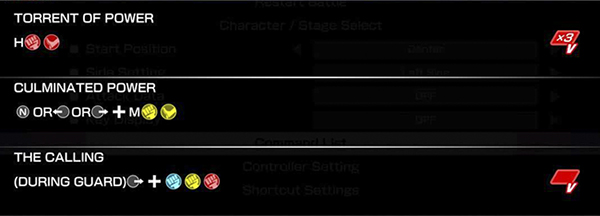
V-System (V-Trigger / V-Skill / V-Reversal)
Critical Art
Necalli Discussions
Discussions regarding Necalli
Necalli Discord Link
Video Guides
Official Capcom Character Breakdown
Sajam's Character Breakdown
Frame Data
- Champion Edition data courtesy of @D4RK_ONION, @HatsonFGC, @Arlieth, @Frostdiener, BananaCyclone and the Frame Assist Tool team. - Huge thanks for their efforts! - See https://fullmeter.com/fatonline/#/home for more information
| Move Name | Command | Startup | Active | Rcvry | Adv Guard |
Adv Hit |
Adv Counter |
Damage | Stun | Hit Level |
Cancel Ability |
KD Adv Normal |
KD Adv Rise |
KD Adv Roll |
Chip Damage |
Counter Damage |
Counter Stun |
|---|---|---|---|---|---|---|---|---|---|---|---|---|---|---|---|---|---|
| stand LP | 3 | 30 | 70 | 2 | 9 | 3 | 1 | {{{21}}} | {{{22}}} | {{{23}}} | {{{24}}} | {{{25}}} | {{{26}}} | ||||
| stand MP | 6 | 60 | 100 | 3 | 14 | 5 | 2 | {{{21}}} | {{{22}}} | {{{23}}} | {{{24}}} | {{{25}}} | {{{26}}} | ||||
| stand HP | 9 | 80 | 150 | 4 | 19 | 1 | -2 | {{{21}}} | {{{22}}} | {{{23}}} | {{{24}}} | {{{25}}} | {{{26}}} | ||||
| stand LK | 4 | 40 | 70 | 4 | 8 | 4 | 2 | {{{21}}} | {{{22}}} | {{{23}}} | {{{24}}} | {{{25}}} | {{{26}}} | ||||
| stand MK | 5 | 60 | 100 | 2 | 13 | 6 | 2 | {{{21}}} | {{{22}}} | {{{23}}} | {{{24}}} | {{{25}}} | {{{26}}} | ||||
| stand HK | 12 | 90 | 150 | 4 | 21 | 3 | -4 | {{{21}}} | {{{22}}} | {{{23}}} | {{{24}}} | {{{25}}} | {{{26}}} | ||||
| crouch LP | 3 | 20 | 70 | 2 | 8 | 3 | 1 | {{{21}}} | {{{22}}} | {{{23}}} | {{{24}}} | {{{25}}} | {{{26}}} | ||||
| crouch MP | 5 | 60 | 100 | 2 | 13 | 4 | 2 | {{{21}}} | {{{22}}} | {{{23}}} | {{{24}}} | {{{25}}} | {{{26}}} | ||||
| crouch HP | 9 | 80 | 150 | 3 | 21 | 1 | -4 | {{{21}}} | {{{22}}} | {{{23}}} | {{{24}}} | {{{25}}} | {{{26}}} | ||||
| crouch LK | 4 | 20 | 70 | 2 | 9 | 3 | 1 | {{{21}}} | {{{22}}} | {{{23}}} | {{{24}}} | {{{25}}} | {{{26}}} | ||||
| crouch MK | 8 | 50 | 100 | 3 | 15 | 0 | -4 | {{{21}}} | {{{22}}} | {{{23}}} | {{{24}}} | {{{25}}} | {{{26}}} | ||||
| crouch HK | 7 | 100 | 150 | 72 | 4 | 21 | KD | -10 | {{{21}}} | {{{22}}} | {{{23}}} | {{{24}}} | {{{25}}} | {{{26}}} | |||
| jump LP | 3 | 40 | 70 | 6 | - | - | - | {{{21}}} | {{{22}}} | {{{23}}} | {{{24}}} | {{{25}}} | {{{26}}} | ||||
| jump MP | 7 | 60 | 100 | 4 | - | - | - | {{{21}}} | {{{22}}} | {{{23}}} | {{{24}}} | {{{25}}} | {{{26}}} | ||||
| jump HP | 7 | 90 | 150 | 5 | - | - | - | {{{21}}} | {{{22}}} | {{{23}}} | {{{24}}} | {{{25}}} | {{{26}}} | ||||
| jump LK | 4 | 40 | 70 | 6 | - | - | - | {{{21}}} | {{{22}}} | {{{23}}} | {{{24}}} | {{{25}}} | {{{26}}} | ||||
| jump MK | 6 | 60 | 100 | 5 | - | - | - | {{{21}}} | {{{22}}} | {{{23}}} | {{{24}}} | {{{25}}} | {{{26}}} | ||||
| jump HK | 7 | 90 | 150 | 6 | - | - | - | {{{21}}} | {{{22}}} | {{{23}}} | {{{24}}} | {{{25}}} | {{{26}}} | ||||
| opening dagger | 23 | 80 | 100 | 3 | 24 | 1 | -4 | {{{21}}} | {{{22}}} | {{{23}}} | {{{24}}} | {{{25}}} | {{{26}}} | ||||
| road of the sun | 14 | 80 | 100 | 12 | - | - | - | {{{21}}} | {{{22}}} | {{{23}}} | {{{24}}} | {{{25}}} | {{{26}}} | ||||
| sacrificial altar | 5 | 60*54*32 | 100*90*40 | 94 | - | - | KD | -9 | {{{21}}} | {{{22}}} | {{{23}}} | {{{24}}} | {{{25}}} | {{{26}}} | |||
| soul sealer | 5 | 50*70 | 20*150 | 74 | 2 | 18 | KD | - | {{{21}}} | {{{22}}} | {{{23}}} | {{{24}}} | {{{25}}} | {{{26}}} | |||
| soul discriminator | 5 | 55*65 | 0*170 | 81 | 2 | 18 | KD | - | {{{21}}} | {{{22}}} | {{{23}}} | {{{24}}} | {{{25}}} | {{{26}}} | |||
| torrent of power | 56 | - | {{{21}}} | {{{22}}} | {{{23}}} | {{{24}}} | {{{25}}} | {{{26}}} | |||||||||
| culminated power | 25 | 50 | 100 | 78 | 3 | 29 | KD | -2 | {{{21}}} | {{{22}}} | {{{23}}} | {{{24}}} | {{{25}}} | {{{26}}} | |||
| the calling | 16 | 60 | 0 | 2 | 24 | KD | -2 | {{{21}}} | {{{22}}} | {{{23}}} | {{{24}}} | {{{25}}} | {{{26}}} | ||||
| The Disc's Guidance LP | 18 | 90 | 150 | 88 | 3 | 25 | KD | -6 | {{{21}}} | {{{22}}} | {{{23}}} | {{{24}}} | {{{25}}} | {{{26}}} | |||
| The Disc's Guidance MP | 21 | 110 | 150 | 87 | 3 | 26 | KD | -6 | {{{21}}} | {{{22}}} | {{{23}}} | {{{24}}} | {{{25}}} | {{{26}}} | |||
| The Disc's Guidance HP | 24 | 130 | 150 | 87 | 3 | 26 | KD | -6 | {{{21}}} | {{{22}}} | {{{23}}} | {{{24}}} | {{{25}}} | {{{26}}} | |||
| The Disc's Guidance EX | 17 | 35*35*90 | 25*25*150 | 82 | KD | -13 | {{{21}}} | {{{22}}} | {{{23}}} | {{{24}}} | {{{25}}} | {{{26}}} | |||||
| Raging Light LP | 3 | 80 | 150 | 82 | 2(3)2 | 35 | KD | -24 | {{{21}}} | {{{22}}} | {{{23}}} | {{{24}}} | {{{25}}} | {{{26}}} | |||
| Raging Light MP | 5 | 30*70 | 30*120 | 87 | 3(3)3 | 37 | KD | -28 | {{{21}}} | {{{22}}} | {{{23}}} | {{{24}}} | {{{25}}} | {{{26}}} | |||
| Raging Light HP | 7 | 30*30*60 | 30*30*90 | 77 | 4(2)2 | 45 | KD | -33 | {{{21}}} | {{{22}}} | {{{23}}} | {{{24}}} | {{{25}}} | {{{26}}} | |||
| Raging Light EX | 3 | 20x4*70 | 20x4*120 | 83 | 10(1)3 | 42 | KD | -36 | {{{21}}} | {{{22}}} | {{{23}}} | {{{24}}} | {{{25}}} | {{{26}}} | |||
| Mask of Tlalli LP | 8 | 120 | 200 | 50 | 2 | 52 | KD | - | {{{21}}} | {{{22}}} | {{{23}}} | {{{24}}} | {{{25}}} | {{{26}}} | |||
| Mask of Tlalli MP | 8 | 130 | 200 | 52 | 2 | 52 | KD | - | {{{21}}} | {{{22}}} | {{{23}}} | {{{24}}} | {{{25}}} | {{{26}}} | |||
| Mask of Tlalli HP | 8 | 140 | 200 | 57 | 2 | 52 | KD | - | {{{21}}} | {{{22}}} | {{{23}}} | {{{24}}} | {{{25}}} | {{{26}}} | |||
| Mask of Tlalli EX | 8 | 60 | 50 | 92 | 2 | 52 | KD | - | {{{21}}} | {{{22}}} | {{{23}}} | {{{24}}} | {{{25}}} | {{{26}}} | |||
| Valiant Rebellion LK | 14 | 60 | 100 | 3 | 20 | 2 | -4 | {{{21}}} | {{{22}}} | {{{23}}} | {{{24}}} | {{{25}}} | {{{26}}} | ||||
| Valiant Rebellion MK | 19 | 70 | 100 | 3 | 30 | 5 | -2 | {{{21}}} | {{{22}}} | {{{23}}} | {{{24}}} | {{{25}}} | {{{26}}} | ||||
| Valiant Rebellion HK | 23 | 100 | 200 | 95 | 3 | 16 | KD | 0 | {{{21}}} | {{{22}}} | {{{23}}} | {{{24}}} | {{{25}}} | {{{26}}} | |||
| Valiant Rebellion EX | 10 | 50*70 | 100*100 | 2 | -2 | {{{21}}} | {{{22}}} | {{{23}}} | {{{24}}} | {{{25}}} | {{{26}}} | ||||||
| Ceremony of Honor | 7 | 340 | 0 | 61 | 2 | 45 | KD | -25 | {{{21}}} | {{{22}}} | {{{23}}} | {{{24}}} | {{{25}}} | {{{26}}} | |||
| soul offering | {{{21}}} | {{{22}}} | {{{23}}} | {{{24}}} | {{{25}}} | {{{26}}} | |||||||||||
| Move Name | Command | Startup | Active | Rcvry | Adv Guard |
Adv Hit |
Adv Counter |
Damage | Stun | Hit Level |
Cancel Ability |
KD Adv Normal |
KD Adv Rise |
KD Adv Roll |
Chip Damage |
Counter Damage |
Counter Stun |


