Introduction
Moves List
Normal Moves
Ground Normals
- Close Standing Jab:
| Damage | 3 |  |
 |

|
| Chain Cancel | No | |||
| Special Cancel | Yes | |||
| Super Cancel | Yes | |||
| Frame Count | 2 | 4 | 5 | |
ORyu performs an elbow smash in front and above his head. Fast start-up anti-air up close, with just OK priority.
- Far Standing Jab:
| Damage | 3 |  |
 |
 |

|
| Chain Cancel | Yes | ||||
| Special Cancel | Yes | ||||
| Super Cancel | Yes | ||||
| Frame Count | 2 | 4 | 4 | 1 | |
| Simplified | 2 | 4 | 5 | ||
Rapid-fire Jab that has very good priority (ORyu's arm is completely invulnerable) but just acceptable reach and very low damage.
- Crouching Jab:
| Damage | 3 |  |
 |
 |

|
| Chain Cancel | Yes | ||||
| Special Cancel | Yes | ||||
| Super Cancel | Yes | ||||
| Frame Count | 2 | 4 | 4 | 1 | |
| Simplified | 2 | 4 | 5 | ||
Rapid-fire ducking Jab with OK reach and very good priority. ORyu's arm is completely invincible.
- Close Standing Strong:
| Damage | 14 |  |
 |
 |
 |
 |
 |

|
| Chain Cancel | No | |||||||
| Special Cancel | Yes | |||||||
| Super Cancel | Yes | |||||||
| Frame Count | 1 | 2 | 2 | 6 | 4 | 3 | 4 | |
| Simplified | 3 | 2 | 17 | |||||
ORyu performs a hook. This move has a not very good recovery, so try canceling it into some special such as the hadouken to avoid punishment.
- Far Standing Strong:
| Damage | 14 |  |
 |
 |
 |
 |

|
| Chain Cancel | No | ||||||
| Special Cancel | Yes | ||||||
| Super Cancel | Yes | ||||||
| Frame Count | 1 | 2 | 4 | 3 | 3 | 1 | |
| Simplified | 3 | 4 | 7 | ||||
ORyu performs a straight punch. This move has very good recovery, reach and priority. Works as anti-air against some moves, but notice ORyu's body moves forward a bit, so you need some room to use it correctly. ORyu's whole arm is invincible in this attack.
- Crouching Strong:
| Damage | 14 |  |
 |
 |
 |
 |

|
| Chain Cancel | No | ||||||
| Special Cancel | Yes | ||||||
| Super Cancel | Yes | ||||||
| Frame Count | 1 | 2 | 4 | 3 | 3 | 1 | |
| Simplified | 3 | 4 | 7 | ||||
ORyu does a crouching straight. Good damage, stun, recovery and priority. ORyu's whole arm is completely invincible.
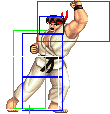
- Close Standing Fierce:
| Damage | 18 |  |
 |
 |
 |

|
| Chain Cancel | No | |||||
| Special Cancel | Yes | |||||
| Super Cancel | Yes | |||||
| Frame Count | 3 | 2 | 6 | 10 | 13 | |
| Simplified | 3 | 8 | 23 | |||
ORyu does a close upper. Good priority anti-air if the enemy is on top of you, and if he is close it can be canceled into any special attack for a basic but damaging combo. Bad recovery.
- Far Standing Fierce:
| Damage | 18 |  |
 |
 |
 |
 |

|
| Chain Cancel | No | ||||||
| Special Cancel | No | ||||||
| Super Cancel | Yes | ||||||
| Frame Count | 3 | 2 | 6 | 10 | 12 | 1 | |
| Simplified | 5 | 6 | 23 | ||||
Similar to far.strong, but with higher damage and longer reach, but the head hitbox moves forward just as much and the recovery is hideous. This move can not be canceled into specials, so make sure it hits or you will pay the price.
- Crouching Fierce:
| Damage | 18 |  |
 |
 |
 |
 |

|
| Chain Cancel | No | ||||||
| Special Cancel | Yes | ||||||
| Super Cancel | Yes | ||||||
| Frame Count | 3 | 3 | 8 | 10 | 12 | 1 | |
| Simplified | 3 | 11 | 23 | ||||
Uppercut from crouching position. It does good damage and has a deceptively long horizontal reach, but just average to low priority and quite long recovery. This move is unsafe on block or hit and is mainly used in combos or as close-up anti-air. Favor standing Fierce if you can for the latter.
- Close Standing Short:
| Damage | 8 |  |
 |
 |
 |
 |

|
| Chain Cancel | Yes | ||||||
| Special Cancel | No | ||||||
| Super Cancel | Yes | ||||||
| Frame Count | 2 | 3 | 2 | 4 | 3 | 1 | |
| Simplified | 5 | 2 | 8 | ||||
ORyu performs a low kick that can be canceled into a far Short or crouching Short. This move must be blocked low.
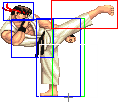
- Far Standing Short:
| Damage | 9 |  |
 |
 |
 |

|
| Chain Cancel | No | |||||
| Special Cancel | Yes | |||||
| Super Cancel | Yes | |||||
| Frame Count | 2 | 2 | 8 | 4 | 1 | |
| Simplified | 4 | 8 | 5 | |||
High side kick with good priority, but sort of slow. Good anti-air.
- Crouching Short:
| Damage | 3 |  |
 |
 |

|
| Chain Cancel | Yes | ||||
| Special Cancel | Yes | ||||
| Super Cancel | Yes | ||||
| Frame Count | 3 | 4 | 4 | 1 | |
| Simplified | 3 | 4 | 5 | ||
Rapid fire crouching low kick. Mediocre priority but good reach.
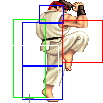
- Close Standing Forward:
| Damage | 15 |  |
 |
 |
 |
 |

|
| Chain Cancel | No | ||||||
| Special Cancel | Yes | ||||||
| Super Cancel | Yes | ||||||
| Frame Count | 2 | 1 | 6 | 4 | 4 | 1 | |
| Simplified | 3 | 6 | 9 | ||||
Knee bash with a good recovery.
- Far Standing Forward:
| Damage | 15 |  |
 |
 |
 |

|
| Chain Cancel | No | |||||
| Special Cancel | No | |||||
| Super Cancel | No | |||||
| Frame Count | 3 | 4 | 8 | 6 | 1 | |
| Simplified | 7 | 8 | 7 | |||
High side kick with good priority, but very slow start-up. Good anti-air if you can hit the button early enough.
- Crouching Forward:
| Damage | 14 |  |
 |
 |
 |
 |

|
| Chain Cancel | No | ||||||
| Special Cancel | Yes | ||||||
| Super Cancel | Yes | ||||||
| Frame Count | 1 | 2 | 6 | 4 | 4 | 1 | |
| Simplified | 3 | 6 | 9 | ||||
Crouching side kick. This move has good reach and recovery, but is has projected vulnerable hitboxes before it becomes active. It is an important tool when closing the gap on the enemy and trying to push him into the corner as it can be canceled into Hadoukens. It is also used in bread and butter combos.
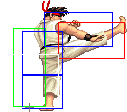
- Close Standing Roundhouse:
| Damage | 19 + 3 |  |
 |
 |
 |
 |

|
| Chain Cancel | No | ||||||
| Special Cancel | No | ||||||
| Super Cancel | No | ||||||
| Frame Count | 3 | 4 | 8 | 4 | 10 | 1 | |
| Simplified | 7 | 8 | 4 | 11 | |||
ORyu performs an axe kick that hits twice if the enemy is close enough. This is not a very useful move, but it is safe on block from point-blank range and often trades with aerial attacks. If you use it as a meaty, you can combo a crouching kick for two or three hits. you often have better options, though.
- Far Standing Roundhouse:
| Damage | 19 |  |
 |
 |
 |

|
| Chain Cancel | No | |||||
| Special Cancel | Yes | |||||
| Super Cancel | Yes | |||||
| Frame Count | 2 | 4 | 8 | 10 | 7 | |
| Simplified | 2 | 12 | 17 | |||
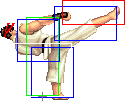
ORyu's staple Roundhouse kick. Mediocre anti-air that can be canceled in the odd event that it hits during the first active part. This move can not be canceled into specials if it hits while the leg is fully extended.
- Crouching Roundhouse:
| Damage | 17 |  |
 |
 |
 |

|
| Chain Cancel | No | |||||
| Special Cancel | Yes | |||||
| Super Cancel | Yes | |||||
| Frame Count | 3 | 6 | 6 | 8 | 11 | |
| Simplified | 3 | 6 | 25 | |||
ORyu's sweep kick. This move generates a fast knockdown if it hits. It has good range and the priority is such that it beats or trades with a number of moves. The recovery, however, is very long, so good players will try to bait this move so as to punish it afterward. This can be canceled into Hadoukens so you can push the enemy towards his corner or ShoORyukens and Short tatsus for super meter.
