mNo edit summary |
m (fix motion tags) |
||
| Line 12: | Line 12: | ||
{{SSFIVMoveListHeader}} | {{SSFIVMoveListHeader}} | ||
{{SSFIVMoveListRow | Vulture Kick | f + mk | high }} | {{SSFIVMoveListRow | Vulture Kick | {{f}} + {{mk}} | {{high}} }} | ||
{{SSFIVMoveListRow | Glory Kick | df + mk | low }} | {{SSFIVMoveListRow | Glory Kick | {{df}} + {{mk}} | {{low}} }} | ||
{{SSFIVMoveListRow | Fragrance Palm | f + hp | }} | {{SSFIVMoveListRow | Fragrance Palm | {{f}} + {{hp}} | }} | ||
{{SSFIVMoveListRow | Falcon Kick | (in air) df + mk | }} | {{SSFIVMoveListRow | Falcon Kick | (in air) {{df}} + {{mk}} | }} | ||
{{SSFIVMoveListRow | Target Combo | (near opponent) lk --- hk | }} | {{SSFIVMoveListRow | Target Combo | (near opponent) {{lk}} {{---}} {{hk}} | }} | ||
{{MoveListFooter}} | {{MoveListFooter}} | ||
| Line 22: | Line 22: | ||
{{SSFIVMoveListHeader}} | {{SSFIVMoveListHeader}} | ||
{{SSFIVMoveListRow | Head Bazooka | f or n + lp + lk | throw }} | {{SSFIVMoveListRow | Head Bazooka | {{f}} or {{n}} + {{lp}} + {{lk}} | {{throw}} }} | ||
{{SSFIVMoveListRow | Hand Machinegun | b + lp + lk | throw }} | {{SSFIVMoveListRow | Hand Machinegun | {{b}} + {{lp}} + {{lk}} | {{throw}} }} | ||
{{MoveListFooter}} | {{MoveListFooter}} | ||
| Line 29: | Line 29: | ||
{{SSFIVMoveListHeader}} | {{SSFIVMoveListHeader}} | ||
{{SSFIVMoveListRow | Messiah Kick | qcf + k | }} | {{SSFIVMoveListRow | Messiah Kick | {{qcf}} + {{k}} | }} | ||
{{SSFIVMoveListRow | High Attack | lk | Perform after Messiah Kick; armorbreak }} | {{SSFIVMoveListRow | High Attack | {{lk}} | Perform after Messiah Kick; {{armorbreak}} }} | ||
{{SSFIVMoveListRow | Low Attack | mk | Perform after Messiah Kick; low }} | {{SSFIVMoveListRow | Low Attack | {{mk}} | Perform after Messiah Kick; {{low}} }} | ||
{{SSFIVMoveListRow | Mid Attack | hk | Perform after Messiah Kick; high }} | {{SSFIVMoveListRow | Mid Attack | {{hk}} | Perform after Messiah Kick; {{high}} }} | ||
{{SSFIVMoveListRow | Galactic Tornado | qcf + p | Only for mp and hp versions, f or b controls distance; ex armorbreak }} | {{SSFIVMoveListRow | Galactic Tornado | {{qcf}} + {{p}} | Only for {{mp}} and {{hp}} versions, {{f}} or {{b}} controls distance; {{ex}} {{armorbreak}} }} | ||
{{SSFIVMoveListRow | Snake Strike | dp + p | ex }} | {{SSFIVMoveListRow | Snake Strike | {{dp}} + {{p}} | {{ex}} }} | ||
{{MoveListFooter}} | {{MoveListFooter}} | ||
==== Super Combo ==== | ==== Super Combo ==== | ||
{{SSFIVMoveListHeader}} | {{SSFIVMoveListHeader}} | ||
{{SSFIVMoveListRow | Spectacle Romance | qcf qcf + p | armorbreak }} | {{SSFIVMoveListRow | Spectacle Romance | {{qcf}} qcf + {{p}} | {{armorbreak}} }} | ||
{{MoveListFooter}} | {{MoveListFooter}} | ||
==== Ultra Combos ==== | ==== Ultra Combos ==== | ||
{{SSFIVMoveListHeader}} | {{SSFIVMoveListHeader}} | ||
{{SSFIVMoveListRow | Space Opera Symphony | qcf qcf + 3p | armorbreak }} | {{SSFIVMoveListRow | Space Opera Symphony | {{qcf}} qcf + {{3p}} | {{armorbreak}} }} | ||
{{SSFIVMoveListRow | Big Bang Typhoon | qcb qcb + 3p | armorbreak }} | {{SSFIVMoveListRow | Big Bang Typhoon | {{qcb}} qcb + {{3p}} | {{armorbreak}} }} | ||
{{MoveListFooter}} | {{MoveListFooter}} | ||
| Line 106: | Line 106: | ||
{{SSFIVFrameDataSubHeader | Throws}} | {{SSFIVFrameDataSubHeader | Throws}} | ||
{{SSFIVFrameDataRow | Forward Throw | 0.9 | 150 | 120 | 40 | - | 3 | 2 | 20 | - | - | - | - |}} | {{SSFIVFrameDataRow | Forward Throw | 0.9 | 150 | 120 | 40 | - | 3 | 2 | 20 | - | - | - | - |}} | ||
{{SSFIVFrameDataRow | Back throw | 0.9 | 130 | 160 | 40 | - | 3 | 2 | 20 | - | - | - | - |}} | {{SSFIVFrameDataRow | Back {{throw}} | 0.9 | 130 | 160 | 40 | - | 3 | 2 | 20 | - | - | - | - |}} | ||
{{SSFIVFrameDataSubHeader | Special Moves}} | {{SSFIVFrameDataSubHeader | Special Moves}} | ||
| Line 147: | Line 147: | ||
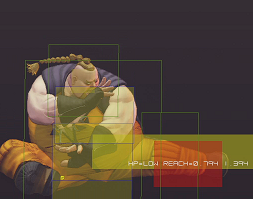
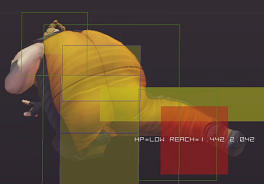
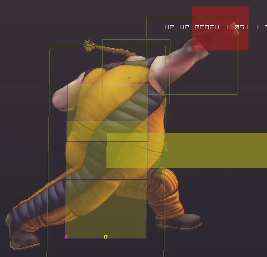
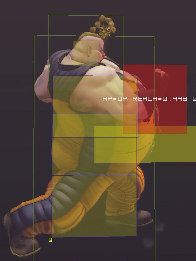
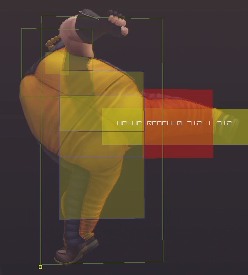
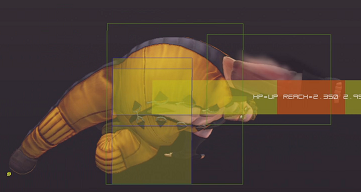
[[Image:RufusCrouchHP.PNG|frame|left|Crouch HP is a very slow but very long range poke. Even if your opponent blocks, you build about as much meter as whiffing three LP Snake Strikes, so it can be useful to gain some advantage against a zoning opponent. It is quite unsafe on block and vulnerable to focus absorb dashes, so use it carefully!]]<br> | [[Image:RufusCrouchHP.PNG|frame|left|Crouch HP is a very slow but very long range poke. Even if your opponent blocks, you build about as much meter as whiffing three LP Snake Strikes, so it can be useful to gain some advantage against a zoning opponent. It is quite unsafe on block and vulnerable to focus absorb dashes, so use it carefully!]]<br> | ||
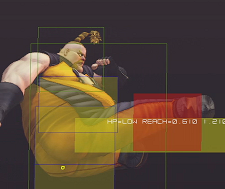
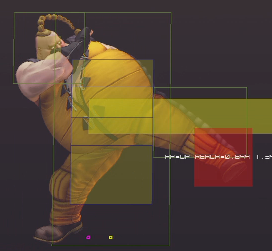
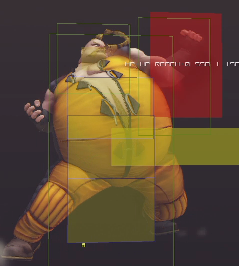
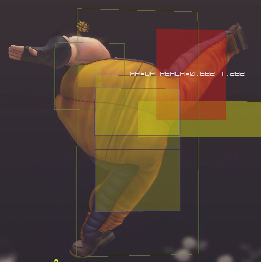
[[Image:RufusCrouchHK.PNG|frame|none|Crouch HK is a slow but long range sweep; it moves Rufus' hitbox forward significantly, so be wary of counter hits.]]<br> | [[Image:RufusCrouchHK.PNG|frame|none|Crouch HK is a slow but long range sweep; it moves Rufus' hitbox forward significantly, so be wary of counter hits.]]<br> | ||
==== Far Normals ==== | ==== Far Normals ==== | ||
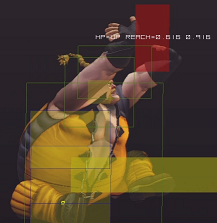
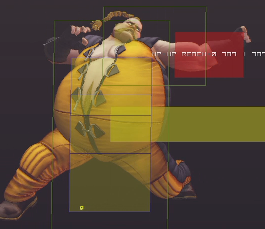
[[Image:RufusFarLP.PNG|frame|left|Far LP is a fast poke which gives great frame advantage on block (+4). With good reactions and spacing, you can hitconfirm and combo into Far MP afterwards for an additional 90 damage and +3 frame advantage on hit. An altogether great normal.]]<br> | [[Image:RufusFarLP.PNG|frame|left|Far LP is a fast poke which gives great frame advantage on block (+4). With good reactions and spacing, you can hitconfirm and combo into Far MP afterwards for an additional 90 damage and +3 frame advantage on hit. An altogether great normal.]]<br> | ||
| Line 157: | Line 156: | ||
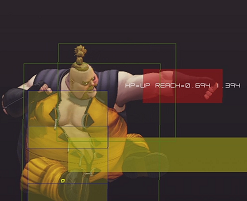
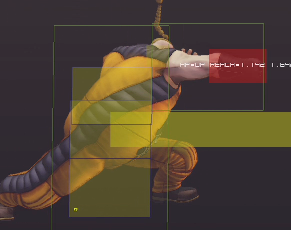
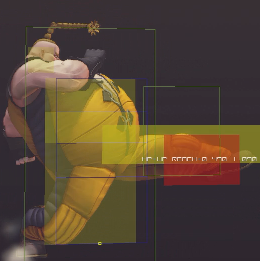
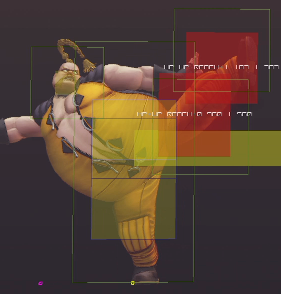
[[Image:RufusFarMK.PNG|frame|center|Far MK is Rufus' longest range standing poke; it has the same range as Crouch HK, but is slightly faster, has a somewhat better hitbox, does less damage, and doesn't knock down.]]<br> | [[Image:RufusFarMK.PNG|frame|center|Far MK is Rufus' longest range standing poke; it has the same range as Crouch HK, but is slightly faster, has a somewhat better hitbox, does less damage, and doesn't knock down.]]<br> | ||
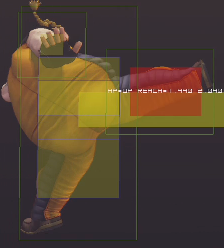
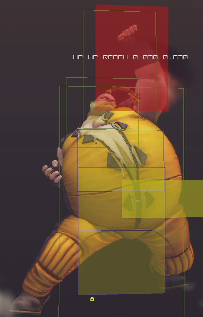
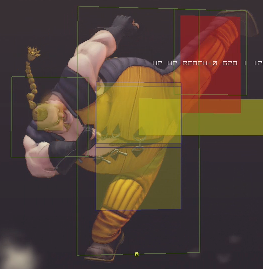
[[Image:RufusFarHK.PNG|frame|none|Far HK is a slow medium-range poke with several special characteristics. For example, it can combo into either Ultra (though under limited circumstances for U2). It can step over some low pokes and punish harder than Far LK, but with more risk. It can combo into EX Snake Strike for full or near-full hits on some characters anywhere, or on most characters if it catches them out of the air or hits them into the corner. It can combo into Crouch HK for an untechable knockdown.]]<br> | [[Image:RufusFarHK.PNG|frame|none|Far HK is a slow medium-range poke with several special characteristics. For example, it can combo into either Ultra (though under limited circumstances for U2). It can step over some low pokes and punish harder than Far LK, but with more risk. It can combo into EX Snake Strike for full or near-full hits on some characters anywhere, or on most characters if it catches them out of the air or hits them into the corner. It can combo into Crouch HK for an untechable knockdown.]]<br> | ||
==== Close Normals ==== | ==== Close Normals ==== | ||
[[Image:RufusCloseLP.png|frame|left|Close LP is a fast normal which covers Rufus' face with a good hitbox. It can safely hit mistimed crossups, though in some situations a turnaround Close HP does the same job better. It can miss on crouching opponents, so beware.]]<br> | [[Image:RufusCloseLP.png|frame|left|Close LP is a fast normal which covers Rufus' face with a good hitbox. It can safely hit mistimed crossups, though in some situations a turnaround Close HP does the same job better. It can miss on crouching opponents, so beware.]]<br> | ||
| Line 168: | Line 166: | ||
[[Image:RufusCloseMKHitbox2.PNG|frame|left|The second part of Close MK, its second hit, which can be used to go through an opponent's one-hit armor up close, though other options are generally better.]]<br> | [[Image:RufusCloseMKHitbox2.PNG|frame|left|The second part of Close MK, its second hit, which can be used to go through an opponent's one-hit armor up close, though other options are generally better.]]<br> | ||
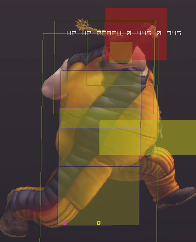
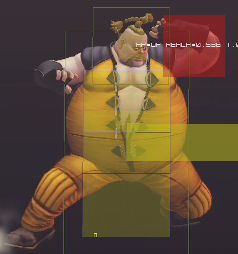
[[Image:RufusCloseHK.png|frame|none|Close HK is almost never seen outside of Rufus' Target Combo, though it does have one legitimate use - Close HK canceled to Super is the most effective way to use Rufus' super, or in other words, the most likely to do enough damage to finish your opponent and win the game.]]<br> | [[Image:RufusCloseHK.png|frame|none|Close HK is almost never seen outside of Rufus' Target Combo, though it does have one legitimate use - Close HK canceled to Super is the most effective way to use Rufus' super, or in other words, the most likely to do enough damage to finish your opponent and win the game.]]<br> | ||
==== Angled Jumping Normals ==== | ==== Angled Jumping Normals ==== | ||
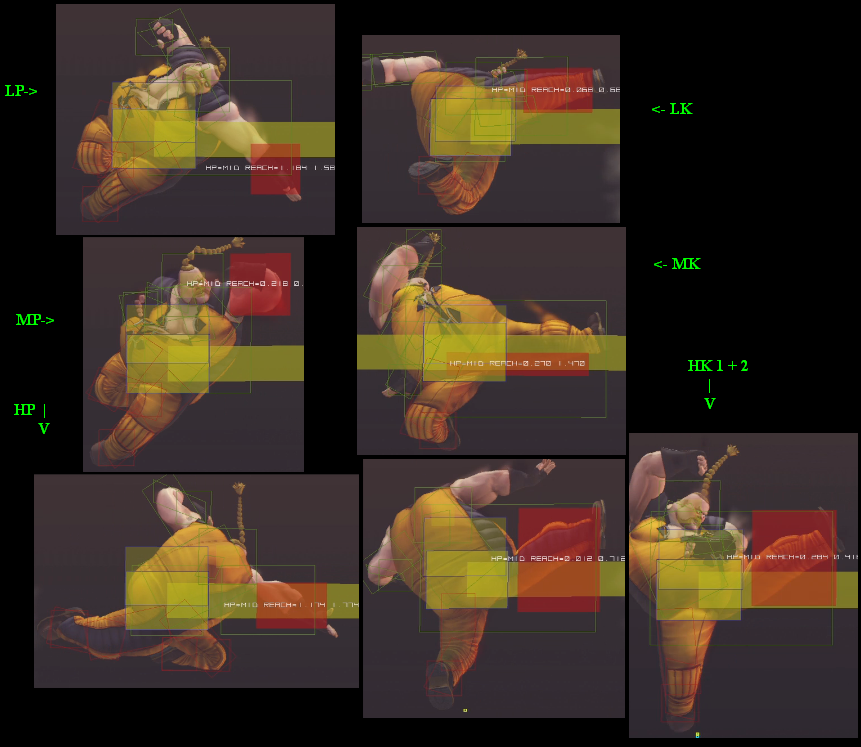
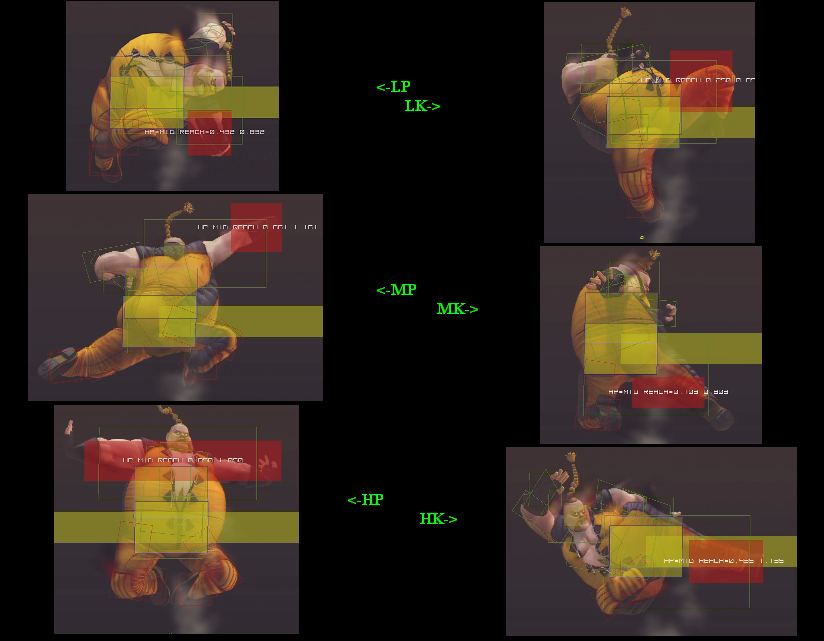
[[Image:Rufus-j.PNG]]<br> | [[Image:Rufus-j.PNG]]<br> | ||
| Line 406: | Line 403: | ||
TBW | TBW | ||
[[Category: Super Street Fighter IV]] | [[Category:Super Street Fighter IV]] | ||
Revision as of 01:20, 9 December 2020

Rufus
Despite his appearances, Rufus's speed and mastery of his self-taught martial arts have managed to help Rufus make a name for himself in the Street Fighting circuit. Though he has yet to truly prove himself, Rufus has declared himself America's best warrior. However, he knows the only way to truly prove this is a match with Ken Masters, the true champion of America's Street Fighting circuit. But, as he is willing to tell anyone (in many, many, many, many words), there is no way he will lose that fight.
In a nutshell
The epitome of the Dive Kick character, Rufus's strength lies almost entirely in his Dive Kick game. Also aiding in Rufus's strategy is his myriad of ways to combo his Ultra I for big damage and big comebacks. Rufus is perhaps one of the easiest characters to pick up in the game, but it turns out at the highest levels RUfus may be one of the trickiest characters to use. Defeating opponents is not simple with his weak set of Normal Moves, but if you can get into your opponent's head properly with his Dive Kick mix-up game and extremely powerful EX Messiah Kick, you can go very far with Rufus.
Moves
Unique Attacks
Throws
Special Moves
Super Combo
Ultra Combos
Frame Data
Move Analysis
Normal Moves
Crouching Normals
Far Normals
Close Normals
Angled Jumping Normals
Neutral Jumping Normals
Unique Attacks
N/A
Normal Throws
N/A
Focus Attack
N/A
Special Moves
N/A
Super Combos
N/A
Ultra Combos
N/A
The Basics
N/A
Advanced Strategy
N/A
Combos
Bread and Butters
- N/A
Hit Confirm Combos
- N/A
Dizzy / Focus Crumple Combos
- N/A
FADC Combos
- N/A
Advanced Combos
- N/A
Combos Into Supers
- N/A
Combos Into Ultras
- N/A
Matchups
- Vs. Abel
To Be Written (TBW)
- Vs. Adon
TBW
- Vs. Akuma
TBW
- Vs. Balrog
TBW
- Vs. Blanka
TBW
- Vs. C. Viper
TBW
- Vs. Cammy
TBW
- Vs. Chun Li
TBW
- Vs. Cody
TBW
- Vs. Dan
TBW
- Vs. Dee Jay
TBW
- Vs. Dhalsim
TBW
- Vs. Dudley
TBW
- Vs. E. Honda
TBW
- Vs. El Fuerte
TBW
- Vs. Fei Long
TBW
- Vs. Gen
TBW
- Vs. Gouken
TBW
- Vs. Guile
TBW
- Vs. Guy
TBW
- Vs. Hakan
TBW
- Vs. Ibuki
TBW
- Vs. Juri
TBW
- Vs. Ken
TBW
- Vs. M. Bison
TBW
- Vs. Makoto
TBW
- Vs. Rose
TBW
- Vs. Rufus
TBW
- Vs. Ryu
TBW
- Vs. Sagat
TBW
- Vs. Sakura
TBW
- Vs. Seth
TBW
- Vs. T. Hawk
TBW
- Vs. Vega
TBW
- Vs. Zangief
TBW

