| (34 intermediate revisions by 2 users not shown) | |||
| Line 5: | Line 5: | ||
===Super/Special/Command Normal Cancels=== | ===Super/Special/Command Normal Cancels=== | ||
You can interrupt a normal attack of your own and cancel it into a command normal, a special move or a super move if the move connects (hit or block) with an opponent. Only certain moves are | You can interrupt a normal attack of your own and cancel it into a command normal, a special move or a super move if the move connects (hit or block) with an opponent. Only certain moves are cancellable. Some moves can be cancelled even on whiff. | ||
===Tech rolling=== | ===Tech rolling=== | ||
| Line 11: | Line 11: | ||
===Dashing=== | ===Dashing=== | ||
All characters except for Condor can perform a dash. To dash, simply tap the joystick twice in the direction you wish to dash. Invulnerability on backdashes varies from character to character. Dashes are typically a fixed length, though some characters run. Some dashes can be interrupted by a jump which will make your character jump farther. Some characters can attack out of a dash | [[File:Breakers Wordart1b.png|650px|frame|center]] | ||
All characters except for Condor can perform a dash. To dash, simply tap the joystick twice in the direction you wish to dash. Invulnerability on backdashes varies from character to character. Dashes are typically a fixed length, though some characters run. Some dashes can be interrupted by a jump which will make your character jump farther. Some characters can attack or block out of a dash. | |||
'''Footnote: Foward dashes build meter too.''' | |||
===Dizzying=== | ===Dizzying=== | ||
| Line 17: | Line 20: | ||
===Throws=== | ===Throws=== | ||
Throws are performed by pressing forward or backward and C. Some characters have air | Throws are performed by pressing forward or backward and C. Some characters have additional throws with different inputs or in the air. Check the character section to find out about your character's throws. You cannot throw an opponent that is currently in hit or blockstun or that was very recently in hit or blockstun. | ||
* Throws cannot be performed on recently-risen opponents and opponents just landing from a reset. | * Throws cannot be performed on recently-risen opponents and opponents just landing from a reset. | ||
* Wakeup throws will beat a meaty attack if in the throw range. | * Wakeup throws will beat a meaty attack if in the throw range. | ||
* Mashable throws have a set amount of hits, the throw will automatically reach the maximum number of hits if neither player mashes. | |||
**When the defending player mashes (counter mash), the attacking player must mash to keep the throw going for more damage. | |||
===Damage Scaling=== | ===Damage Scaling=== | ||
Damage | Damage scales based on length of combo, similar to most games. Damage is also modified based on life totals of both characters, time between attacks (Risk), and win streaks. | ||
{| class="wikitable" | {| class="wikitable" | ||
|- | |+ Scaling based on life: | ||
|- | |||
! Life !! Attack !! Defense | ! Life !! Attack !! Defense | ||
|- | |- | ||
| Line 36: | Line 42: | ||
The | '''Risk, Scaling based on time''':<br> | ||
* | The longer you don't hit the opponent, the more you increase your damage (up to around double). | ||
* Blocked attacks do not reset Risk | |||
* Capped at about 30 seconds | * Capped at about 30 seconds | ||
* If the difference in health is great enough, | * If the difference in health is great enough, Risk bonus will not apply! | ||
'''Scaling based on winstreaks''':<br> | |||
The winner of a round receives lower resistance to damage in the following round while the loser receives a slight buff in defense values. Additionally, winstreaks will also cause the winner's defense to lower and the other player's defense to increase. This caps at 20 games for the opponent and 64 games for the winner's side. | The winner of a round receives lower resistance to damage in the following round while the loser receives a slight buff in defense values. Additionally, winstreaks will also cause the winner's defense to lower and the other player's defense to increase. This caps at 20 games for the opponent and 64 games for the winner's side. [https://wiki.supercombo.gg/w/Breakers_Revenge/System#Defense_Modifier See Character Specific Data for more.] | ||
===Chip Damage=== | ===Chip Damage=== | ||
When you block a special move or super move, you will receive chip damage, typical of a fighting game. When low on life, special moves can chip you to death. Super moves can be extremely difficult to kill with via chip though. By default, super moves do next to no chip damage. At 0 pixels of life, you can block a great many hits of supers and not die, whereas blocking one special would cause death. It is generally a good idea to block super moves if they try to "chip" you to death if you are low on life, but be aware of the | When you block a special move or super move, you will receive chip damage, typical of a fighting game. When low on life, special moves can chip you to death. Super moves can be extremely difficult to kill with via chip though. By default, super moves do next to no chip damage. At 0 pixels of life, you can block a great many hits of supers and not die, whereas blocking one special would cause death. It is generally a good idea to block super moves if they try to "chip" you to death if you are low on life, but be aware of the Risk bonus. | ||
===Juggle System=== | ===Juggle System=== | ||
| Line 56: | Line 64: | ||
An example juggle is, vs an aerial opponent, Tia st.a, j.lk, qcb+k, land, super. This follows the basic rule of juggles, normal -> special -> super. | An example juggle is, vs an aerial opponent, Tia st.a, j.lk, qcb+k, land, super. This follows the basic rule of juggles, normal -> special -> super. | ||
===Breakering=== | ===Breakering=== | ||
[[Image:Tiabreaker.jpg|right|frame|Banana Tia performing a | [[Image:Tiabreaker.jpg|right|frame|'''Fig. 1'''<br>Banana Tia performing a Breaker with her backdash against Strawberry Sweet Tia's BD. Note the green circle.]] | ||
"Breakering" | "Breaker" or "Breakering" are unofficial terms coined for this game. A Breaker is any move used by the defender to cancel out of the end of hitstun and blockstun. If done correctly you will see the reversal animation indicated by a green circle underneath their sprite for 9 frames.<br> | ||
''It is important to note that while both Reversal and Breaker look the same, they have different rules. Additionally, Breaker jump is a special case and does not show the green circle.<br> | |||
'' | |||
====Breaker Rules==== | |||
* Must be performed near the end of an attack's hit or blockstun | |||
* Can only be done on the ground | |||
* Will reset the combo counter to zero | |||
* Applies to any normal, special, super, backdash, or jump, (or taunt) | |||
* Does not add any special properties to moves | |||
During a combo, if an attack hits before the Breaker window at the end of a move, that combo is referred to as "Unbreakable". This is a true or real combo. Combos that can be interrupted by a Breaker are referred to as "Breakable" or a fake combo. Often combos with long links or gaps in the strings are Breakable and several command moves are multi-hits attacks that are Breakerable in between. For instance, Tia's BD is two hits. You can Breaker in between the two hits with anything you like. If you choose not to Breaker, the two hits will combo and the combo meter will go up to 2. ''See fig. 1'' | |||
In-depth strategies for using breakers will be discussed in the strategies section. | Note that Breakering with any move will probably lead to getting hit again, but with extra damage. It is recommended to use fast moves or moves with invincibility to properly Breaker. | ||
In-depth strategies for using breakers will be discussed in the [https://wiki.supercombo.gg/w/Breakers_Revenge/Strategy#On_Breakers_and_Breakering strategies] section. | |||
===Reversals=== | ===Reversals=== | ||
Reversals can be performed in a very large window as you are reset from the air or getting up from the ground. This is notable as the window is much larger than it is in other games. Upon reversing, the green circle you get from breakering will appear. This does not mean you have breakered, but this is because all breakers are reversals, they get the green circle as well. | Reversals can be performed in a very large window as you are reset from the air or getting up from the ground. This is notable as the window is much larger than it is in other games. Upon reversing, the green circle you get from breakering will appear. This does not mean you have breakered, but this is because all breakers are reversals, they get the green circle as well. | ||
== | ==Character Specific Data== | ||
=== | ===Defense Modifier=== | ||
* Win streaks will affect the defense. [https://twitter.com/kenzzy_grc/status/1052208669473923072?s=20&t=GHw6gf_b2zX6KNIC1ojmmw See this chart for full details.] | |||
{| class="wikitable" | |||
|+ Defense | |||
|- | |||
| Bai-Hu || 136 | |||
|- | |||
| Condor || 132 | |||
|- | |||
| Maherl || 130 | |||
|- | |||
| Saizo || 128 | |||
|- | |||
| Sho || 126 | |||
|- | |||
| Dao-Long || 120 | |||
|- | |||
| Pielle || 118 | |||
|- | |||
| Rila || 118 | |||
|- | |||
| Tia || 118 | |||
|- | |||
| Alsion III || 116 | |||
|} | |||
===Stun Modifier=== | |||
''Using default first round Stun Point Value (4096 Total) and Saizo 214A to test character stun modifiers.'' | |||
* Dizzy increases Stun Modifier by 2048 Points | |||
* Loser of round will receive bonus Stun points | |||
= | {| class="wikitable" | ||
|+ How quick to dizzy | |||
|- | |||
| Saizo || 3456 | |||
|- | |||
| Bai-Hu || 3296 | |||
|- | |||
| Condor || 3216 | |||
|- | |||
| Rila, Maherl || 3136 | |||
|- | |||
| Tia, Sho || 2976 | |||
|- | |||
| Pielle, Dao-Long || 2896 | |||
|- | |||
| Alsion III || 2814 | |||
|} | |||
===Wakeup duration=== | |||
* | * All characters have the same time to get up when knocked down; Saizo, ever the exception, takes a few extra frames to get up. | ||
* When doing Ukemi, all characters have unique times to get up. Bai-hu interestingly has the same timing for both normal and ukemi. | |||
{| class="wikitable" | |||
|+ Frames to stand | |||
|- | |||
! Character !! Normal !! Ukemi | |||
|- | |||
| Bai-Hu || 24 || 24 | |||
|- | |||
| Rila || 24 || 32 | |||
|- | |||
| Sho || 24 || 32 | |||
|- | |||
| Pielle || 24 || 38 | |||
|- | |||
| Tia || 24 || 38 | |||
|- | |||
| Maherl || 24 || 39 | |||
|- | |||
| Alsion III || 24 || 40 | |||
|- | |||
| Condor || 24 || 40 | |||
|- | |||
| Dao-Long || 24 || 40 | |||
|- | |||
| Saizo || 28 || 32 | |||
|} | |||
===Counter Hit Scaling=== | |||
* Counter hit damage depends on the characters involved; some get more damage from normals, some from specials. [https://wiki.supercombo.gg/w/File:BreakersR_CHScaling.jpeg See this chart for more info (good luck).] [https://twitter.com/kenzzy_grc/status/1048229851054858241 Source for chart.] | |||
=== | ===Fireball Duration=== | ||
* Total time to perform a projectile special, from startup to recovery. | |||
{| class="wikitable" | |||
|+ Total fireball duration | |||
|- | |||
! Character !! Light !! Heavy | |||
|- | |||
| Saizo || 37 || 31 | |||
|- | |||
| Tia || 40 || 43 | |||
|- | |||
| Dao-Long || 41 || 41 | |||
|- | |||
| Sho || 42 || 45 | |||
|- | |||
| Bai-Hu || 45 || 47 | |||
|- | |||
| Pielle || 47 || 48 | |||
|- | |||
| Alsion III || 82 || 103 | |||
|} | |||
{{Navbox-BreakersR}} | {{Navbox-BreakersR}} | ||
[[Category:Breakers Revenge]] | [[Category:Breakers Revenge]] | ||
Latest revision as of 16:18, 19 January 2023
Game Mechanics
Supers
All characters have three super bars and a handful of supers, at least two per character. To gain super meter you can perform special moves, certain normals, or dash. Getting hit or blocking moves also builds meter. When a hit connects (on hit or block) with an opponent, more meter is gained than if it whiffed. Even supers themselves regenerate small amounts of super meter.
Super/Special/Command Normal Cancels
You can interrupt a normal attack of your own and cancel it into a command normal, a special move or a super move if the move connects (hit or block) with an opponent. Only certain moves are cancellable. Some moves can be cancelled even on whiff.
Tech rolling
Press 3 buttons when your character touches the ground after a non-super hit to perform a tech roll. Your character will roll backwards and they will get up faster. You can and should use this technique to make your opponent's pressure more difficult to perform. The timing can be varied to make you harder to cross up, mess with mixups, or avoid OTG combos.
Dashing

All characters except for Condor can perform a dash. To dash, simply tap the joystick twice in the direction you wish to dash. Invulnerability on backdashes varies from character to character. Dashes are typically a fixed length, though some characters run. Some dashes can be interrupted by a jump which will make your character jump farther. Some characters can attack or block out of a dash.
Footnote: Foward dashes build meter too.
Dizzying
All characters can be dizzied after repeated hits. When a character is dizzied, a big cloud is released from their body and a distorted noise plays. To recover from a dizzy, mash the buttons and wiggle the joystick. Upon recovering from a dizzy, your character will be invulnerable while they recover, after which you can block. If you can mash fast enough, you will jump straight into the recovery animation and spend no time in the dizzy state. Since you are invulnerable during your recovery, this can completely negate any effects of the dizzy. It seems that combos done on a dizzied opponent do less damage. If someone becomes dizzy during a combo they will be put in a juggle state and continuing to hit the opponent will knock them out of dizzy. As combos against dizzied opponents do less damage, your combo with a dizzy occurring mid-combo will also do less damage.
Throws
Throws are performed by pressing forward or backward and C. Some characters have additional throws with different inputs or in the air. Check the character section to find out about your character's throws. You cannot throw an opponent that is currently in hit or blockstun or that was very recently in hit or blockstun.
- Throws cannot be performed on recently-risen opponents and opponents just landing from a reset.
- Wakeup throws will beat a meaty attack if in the throw range.
- Mashable throws have a set amount of hits, the throw will automatically reach the maximum number of hits if neither player mashes.
- When the defending player mashes (counter mash), the attacking player must mash to keep the throw going for more damage.
Damage Scaling
Damage scales based on length of combo, similar to most games. Damage is also modified based on life totals of both characters, time between attacks (Risk), and win streaks.
| Life | Attack | Defense |
|---|---|---|
| 33% | +1% | +0 |
| 25% | +5% | +10% |
| 10% | +15% | +25% |
Risk, Scaling based on time:
The longer you don't hit the opponent, the more you increase your damage (up to around double).
- Blocked attacks do not reset Risk
- Capped at about 30 seconds
- If the difference in health is great enough, Risk bonus will not apply!
Scaling based on winstreaks:
The winner of a round receives lower resistance to damage in the following round while the loser receives a slight buff in defense values. Additionally, winstreaks will also cause the winner's defense to lower and the other player's defense to increase. This caps at 20 games for the opponent and 64 games for the winner's side. See Character Specific Data for more.
Chip Damage
When you block a special move or super move, you will receive chip damage, typical of a fighting game. When low on life, special moves can chip you to death. Super moves can be extremely difficult to kill with via chip though. By default, super moves do next to no chip damage. At 0 pixels of life, you can block a great many hits of supers and not die, whereas blocking one special would cause death. It is generally a good idea to block super moves if they try to "chip" you to death if you are low on life, but be aware of the Risk bonus.
Juggle System
The juggle system in Breakers Revenge is very simple. The general rule is that once an opponent is airborne, they can be hit with a normal, then a special, and then a super. The trick to juggles in Breakers is is that once an opponent becomes airborne, they will slowly start to flip backwards, and then be reset standing. If they do flip, you cannot combo them with anything but a super. Generally, for the first few hits of a combo, all normals used against aerial opponents will cause a flip and all specials will cause a knockdown. After a few hits (it seems to change based on the moves used) a player will be unable to be juggled with anything but a super.
For example, if Sho uses his cr.C to anti-air Tia, he can cancel it into his flame kick to combo. If he waits too long, and Tia starts to flip before being hit by the flame kick, the flame kick will whiff completely. If Sho does cr.C, and then performs a super after Tia has flipped, the super will connect.
Following the rules of juggling, a theoretical combo would be Sho anti-airing with cr.C, flamekick, st.a, j.lp x4, land, super. However, this is impossible. The reason is that because the opponent has been airborne for multiple hits, the st.a places them into a knockdown state and they can only be hit by supers. They cannot be hit by specials either.
An example juggle is, vs an aerial opponent, Tia st.a, j.lk, qcb+k, land, super. This follows the basic rule of juggles, normal -> special -> super.
Breakering

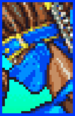
Banana Tia performing a Breaker with her backdash against Strawberry Sweet Tia's BD. Note the green circle.
"Breaker" or "Breakering" are unofficial terms coined for this game. A Breaker is any move used by the defender to cancel out of the end of hitstun and blockstun. If done correctly you will see the reversal animation indicated by a green circle underneath their sprite for 9 frames.
It is important to note that while both Reversal and Breaker look the same, they have different rules. Additionally, Breaker jump is a special case and does not show the green circle.
Breaker Rules
- Must be performed near the end of an attack's hit or blockstun
- Can only be done on the ground
- Will reset the combo counter to zero
- Applies to any normal, special, super, backdash, or jump, (or taunt)
- Does not add any special properties to moves
During a combo, if an attack hits before the Breaker window at the end of a move, that combo is referred to as "Unbreakable". This is a true or real combo. Combos that can be interrupted by a Breaker are referred to as "Breakable" or a fake combo. Often combos with long links or gaps in the strings are Breakable and several command moves are multi-hits attacks that are Breakerable in between. For instance, Tia's BD is two hits. You can Breaker in between the two hits with anything you like. If you choose not to Breaker, the two hits will combo and the combo meter will go up to 2. See fig. 1
Note that Breakering with any move will probably lead to getting hit again, but with extra damage. It is recommended to use fast moves or moves with invincibility to properly Breaker.
In-depth strategies for using breakers will be discussed in the strategies section.
Reversals
Reversals can be performed in a very large window as you are reset from the air or getting up from the ground. This is notable as the window is much larger than it is in other games. Upon reversing, the green circle you get from breakering will appear. This does not mean you have breakered, but this is because all breakers are reversals, they get the green circle as well.
Character Specific Data
Defense Modifier
- Win streaks will affect the defense. See this chart for full details.
| Bai-Hu | 136 |
| Condor | 132 |
| Maherl | 130 |
| Saizo | 128 |
| Sho | 126 |
| Dao-Long | 120 |
| Pielle | 118 |
| Rila | 118 |
| Tia | 118 |
| Alsion III | 116 |
Stun Modifier
Using default first round Stun Point Value (4096 Total) and Saizo 214A to test character stun modifiers.
- Dizzy increases Stun Modifier by 2048 Points
- Loser of round will receive bonus Stun points
| Saizo | 3456 |
| Bai-Hu | 3296 |
| Condor | 3216 |
| Rila, Maherl | 3136 |
| Tia, Sho | 2976 |
| Pielle, Dao-Long | 2896 |
| Alsion III | 2814 |
Wakeup duration
- All characters have the same time to get up when knocked down; Saizo, ever the exception, takes a few extra frames to get up.
- When doing Ukemi, all characters have unique times to get up. Bai-hu interestingly has the same timing for both normal and ukemi.
| Character | Normal | Ukemi |
|---|---|---|
| Bai-Hu | 24 | 24 |
| Rila | 24 | 32 |
| Sho | 24 | 32 |
| Pielle | 24 | 38 |
| Tia | 24 | 38 |
| Maherl | 24 | 39 |
| Alsion III | 24 | 40 |
| Condor | 24 | 40 |
| Dao-Long | 24 | 40 |
| Saizo | 28 | 32 |
Counter Hit Scaling
- Counter hit damage depends on the characters involved; some get more damage from normals, some from specials. See this chart for more info (good luck). Source for chart.
Fireball Duration
- Total time to perform a projectile special, from startup to recovery.
| Character | Light | Heavy |
|---|---|---|
| Saizo | 37 | 31 |
| Tia | 40 | 43 |
| Dao-Long | 41 | 41 |
| Sho | 42 | 45 |
| Bai-Hu | 45 | 47 |
| Pielle | 47 | 48 |
| Alsion III | 82 | 103 |


