Introduction
Korean thunder thighssssss
Yungmie is one of the two new characters introduced in Dynamite. She is a fairly unique character, being the only one in the game with a proper air fireball, and wall jump capability. Unfortunately she's also a very limited character, only having two bufferable ground moves, neither of which are very safe. She's not very high up in the tiers, so you're going to have to work for your wins - it seems that the best way to play her is runaway style. With her air moves and high jump she excels at running away from the opponent, and if she gets into trouble she can potentially get out thanks to her uppercut kick.
Weak Spot
 |
 |
 |
 | |
| Frame count | - | 2 | 2 | - |
The weakspot is the cloth (or coat?) tied around her hip. It's pretty mediocre or not great depending on the matchup, but it's certainly not the worst.
Color Options
| Punch | Kick |
 |
 |
Moves List
Quick Reference
Normal Moves
Light Punch 
- Standing LP (Close/Far):
| Damage | 6 | Startup | 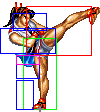 |
Recovery |
| Chain cancel | yes | |||
| Special cancel | yes | |||
| On hit | +3 | |||
| On block | +4 | |||
| Frame count | 2 | 3 | 6 | |
A quick high kick, functionally identical to st.LK. Decent for anti-air if necessary. Chainable.
- Crouching LP:
| Damage | 6 | Startup |  |
Recovery |
| Chain cancel | yes | |||
| Special cancel | yes | |||
| On hit | +6 | |||
| On block | +7 | |||
| Frame count | 2 | 3 | 3 | |
Low kick angled slightly upward. Can be blocked high, so there's no real reason to use this instead of crouching LK. Chainable.
- Jumping LP (Diagonal):
| Damage | 12 | Startup | 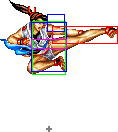 |
| Chain cancel | no | ||
| Special cancel | yes | ||
| Frame count | 4 | ∞ | |
A jump kick angled up, kinda like the crouching version. Decent for air-to-air.
- Jumping LP (Neutral):
| Damage | 12 | Startup |  |
| Chain cancel | no | ||
| Special cancel | yes | ||
| Frame count | 6 | ∞ | |
Kicks straight up. Not surprisingly, range kinda sucks on this.
Heavy Punch 
- Standing HP (Close): activation range = 63
| Damage | 28 total | Startup | 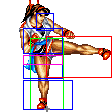 |
 |
Recovery | |
| Chain cancel | no/no | |||||
| Special cancel | yes/yes | |||||
| On hit | -3/+2 | |||||
| On block | -8/-3 | |||||
| Frame count | 3 | 1 | 4 | 3 | 16 | |
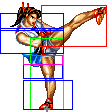
A two-hit kick! Great move for comboing into her flame kick when they're dizzy. But first be sure that you stand close enough, this move has an annoying tendency to miss the 2nd hit.
- Standing HP (Far):
| Damage | 28 | Startup | 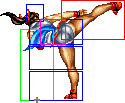 |
 |
Recovery |
| Chain cancel | no | ||||
| Special cancel | yes | ||||
| On hit | -3 | ||||
| On block | -8 | ||||
| Frame count | 4 | 6 | (4) 18 | ||
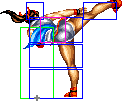
Very good attack for poking on the ground, surprisingly good range. Definitely worth using a lot.
- Crouching HP:
| Damage | 28 | Startup |  |
Recovery |
| Chain cancel | no | |||
| Special cancel | yes | |||
| On hit | -3 | |||
| On block | -8 | |||
| Frame count | 4 | 6 | 18 | |
Odd-looking ground kick. Not quite as much range as the standing HP, but still pretty good. Amazing as anti-air.
- Jumping HP (Diagonal):
| Damage | 28 | Startup | 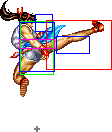 |
Recovery |
| Chain cancel | no | |||
| Special cancel | yes | |||
| Frame count | 4 | 6 | ∞ | |
A jump kick angled upwards... Yungmie's quite good at this air-to-air business, huh.
- Jumping HP (Neutral):
| Damage | 28 | Startup | 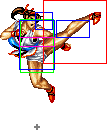 |
Recovery |
| Chain cancel | no | |||
| Special cancel | yes | |||
| Frame count | 6 | 6 | ∞ | |
ANOTHER kick that aims up! Why!
Light Kick 
- Standing LK (Close/Far):
| Damage | 6 | Startup | 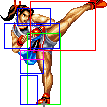 |
Recovery |
| Chain cancel | yes | |||
| Special cancel | yes | |||
| On hit | +3 | |||
| On block | +4 | |||
| Frame count | 2 | 3 | 6 | |
A quick high kick, functionally identical to st.LP. Decent for anti-air if necessary. Chainable.
- Crouching LK:
| Damage | 6 | Startup |  |
Recovery |
| Chain cancel | yes | |||
| Special cancel | yes | |||
| On hit | +6 | |||
| On block | +7 | |||
| Frame count | 2 | 3 | 3 | |
Ground kick that can only be blocked low, so use it to start your chain combos. Chainable.
- Jumping LK (Diagonal):
| Damage | 12 | Startup | 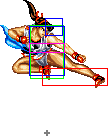 |
| Chain cancel | no | ||
| Special cancel | yes | ||
| Frame count | 4 | ∞ | |
A jump kick angled downwards?? Holy shit! Of course it's a light attack so you won't get much damage, but still!!!
- Jumping LK (Neutral):
| Damage | 12 | Startup |  |
| Chain cancel | no | ||
| Special cancel | yes | ||
| Frame count | 4 | ∞ | |
Exact same animation as LP version but here hitbox is moved lower.
Heavy Kick 
- Standing HK (Close): activation range = 47
| Damage | 28 | Startup | 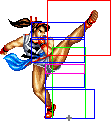 |
Recovery |
| Chain cancel | no | |||
| Special cancel | yes | |||
| On hit | -3 | |||
| On block | -8 | |||
| Frame count | 6 | 4 | 20 | |
Somewhat awkward-looking close high kick. The one single hit of this does just as much as both hits combined of the standing HP, so it too is obviously good for combos.
- Standing HK (Far):
| Damage | 28 | Startup | 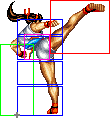 |
 |
Recovery |
| Chain cancel | no | ||||
| Special cancel | yes | ||||
| On hit | -1 | ||||
| On block | -6 | ||||
| Frame count | 6 | 4 | (6) 18 | ||
Roundhouse kick, nowhere near as much range as standing HP. Seems ok for anti-air purposes though.
- Crouching HK:
| Damage | 28 | Startup |  |
Recovery |
| Chain cancel | no | |||
| Special cancel | yes | |||
| On hit | kd | |||
| On block | -8 | |||
| Frame count | 4 | 6 | 18 | |
It's a sweep. Range is really good and it's what you'll be ending most of your chain combos with anyway.
- Jumping HK (Diagonal):
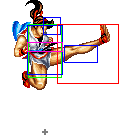
| Damage | 35 total | Startup |  |
 |
Recovery | |
| Chain cancel | no/no | |||||
| Special cancel | yes/yes | |||||
| Frame count | 4 | 2 | 1 | 3 | ∞ | |
A two-hit jump kick. Not really the best idea if your opponent has good anti-air normal moves, but if you can connect this it makes for pretty flashy combos.
- Jumping HK (Neutral):
| Damage | 28 | Startup | 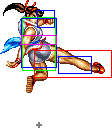 |
Recovery |
| Chain cancel | no | |||
| Special cancel | yes | |||
| Frame count | 4 | 6 | ∞ | |
The best of her neutral jump attacks, as she actually aims a kick downward and with some horizontal range! Who woulda thunk it!
Throws
| Damage | 32 |  |
| Range (From pushbox) |
32 |
Yungmie back-tosses the opponent away. Perfect for creating distance between you and opponent.
Special Moves
 | |
| Frame count | 12 |
Yungmie clings on the wall for a bit (gaining invul while on it) and then jumps off of it towards the location of her opponent. The jump can be steered so you can do very quick jumps even behind opponents. It's a pretty important move for Yungmie's runaway gameplan, hiving her great air mobility. After doing the wall jump, you can obviously do any of her regular jump kicks, but she also has one additional attack in this situation - ![]() +
+ ![]() , a split kick (shown below)! It has the same implication as Vega's (Claw's) Flying Barcelona Attack, being used for amiguous crossups. This move also can be cancelled into fireball, but unfortunatelly it deals the same amount of hitstun as light attacks so it will not combo into fireball...
, a split kick (shown below)! It has the same implication as Vega's (Claw's) Flying Barcelona Attack, being used for amiguous crossups. This move also can be cancelled into fireball, but unfortunatelly it deals the same amount of hitstun as light attacks so it will not combo into fireball...
Additional quirk wall jump has is that you can jump off the wall earlier by hitting any attack button (without any directional input), but by doing this Yungmie will do air attack immediately and she will lose ability to steer the jump.
| Damage | 28 | Startup | 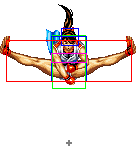 |
 |
Recovery |
| Chain cancel | no | ||||
| Special cancel | yes | ||||
| Frame count | 4 | 1 | 5 | ∞ | |
| Damage | 16 | Startup | 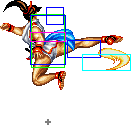 |
Recovery | Landing | |
| On hit | ? | |||||
| On block | ? | |||||
| Frame count | 13 | 1 | (float) 5 | (fall) 5 min | 2 | |
Yungmie kicks out a Sonic Boom-like projectile. This is the only air fireball in the game, and it follows a regular horizontal path (instead of angled downwards, a la Akuma). This means you can toss one out at any point on the screen - most of the time you'll want to keep them low to the ground, but if you anticipate a jump you can toss one into the air, to either counter their jump or keep them grounded. To throw Aura Smashes as low to the ground as possible, start the motion from the ground but continue to the ![]() position and then press Punch (kinda like doing Sagat's Tiger Knee in the SF2 series). This is a very important technique to master.
position and then press Punch (kinda like doing Sagat's Tiger Knee in the SF2 series). This is a very important technique to master.
| Damage | 24/24 |  |
 |
 |
 |
 |
Recovery | |
| On hit | Light kd/kd Heavy -13*/kd | |||||||
| On block | Light -3*/-5 Heavy -18*/+6 | |||||||
| Frame count | Light | 3 | 3 | 2 | 2 | 12 | 2 | 19 |
| Heavy | 3 | 3 | 2 | 2 | 27 | 2 | 8 |
*Frame advantage is measured relatively from the first hit to the second hit
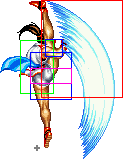
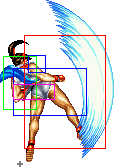
Yungmie leaps straight up into the air with one kick, and then comes down with a second kick.
The LK version will knockdown on either hit, and the second hit comes almost immediately after the first hit (but most opponents can crouch it).
The HK version will only knockdown on the second hit, and there is a longer delay between the two hits - but the 2nd one is guaranteed to connect against a crouching opponent.
The very beginning of this move has invincibility, making it perfect for outprioritizing enemy attacks. At first this move seems too good, being that it's a DP that hits on its way down as well as up. But you have to realize that the LK version often misses crouchers making Yungmie a sitting duck when she lands, and the delay between hits on the HK version makes it possible for an alert opponent to tag you between hits with a move that has more priority, since it has no invincibility on the way down. Although this is an important move in Yungmie's repertoire, you can't overuse it against experienced players or it will get you killed.
Also, if you're having problems doing the somewhat odd motion, there is a slightly longer method you can use - ![]() ,
, ![]() +
+ ![]() .
.
| Damage | 40 | Startup | 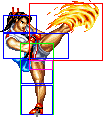 |
 |
Recovery | |
| On hit | kd | |||||
| On block | -2/+8 | |||||
| Frame count | 2 | 2 | 8 | 2 | 6 | |
| Loop cycle | 20 | |||||
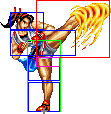
Yungmie kicks rapidly, foot ablaze. To activate exactly one cycle you must quickly do the input 6 times. Light and Heavy versions are identical. It doesn't have the "instant" version. This is the worst of the "mash button" special moves in this game, because for some bizarre reason you need to mash two of the same strength attack. Plus the range/priority on it is quite bad, making you susceptible to sweeps if you're not close enough. But, it does knockdown on hit and does pretty good damage. Definitely her best combo ender, if you're close enough...
The Basics
Yungmie is usually best played as a defensive "runaway" character. Thanks to her Aura Smash she can often effectively zone an opponent and keep them locked down away from her. Even if they get in, a well-timed Nerichagi can knock them down and put distance between the two again. Besides those options, a cornered Yungmie has the ability to wall jump and put herself on the other side of the opponent (although her safety in the air is anything but guaranteed). With all these ways of keeping away from the opponent, it's very possible to run out the clock and antagonize the hell out of your opponent.
Which is all well and good if you're ahead on life, but what do you do if the opponent has a life lead on you? This is Yungmie's downfall, as it's quite difficult for her to mount an offensive as she has limited ways of buffering her normal moves on the ground. It may sound like obvious advice, but if you get an opening you need to find a way to dizzy your opponent as soon as possible. Chaining a few light attacks into either her standing HP or crouching HK can do wonders, depending on where their weak point is located. If you want to get closer to the opponent, try doing an immediate LP Aura Smash off the ground, and then follow it in.
The Nerichagi is an important special move, but I must stress that it is not a good idea to overuse it, because depending on the opponent they may have very effective ways of punishing you before the second hit comes out on the HK version. If you know for sure that an attack is coming, use the LK version for an instant knockdown. If you guessed wrong and they blocked, you can sometimes get away with doing another immediate LK version to punish their counterattack, but this is a very gimmicky trick that you probably won't be able to get off again. Then again, if you can successfully bait a counterattack like that, they may not feel as inclined to stick out an immediate attack again when you throw out LK Nerichagis.
Combos
- st.HP (2 hits) xx HP+HK Fire Kick
- cr.LP/LK (x4), cr.HK
- cr.LP/LK (x3) xx LK Nerichagi
- j.LK, st.HP (2 hits) xx LK Nerichagi
- j.HK (2 hits) xx Aura Smash, c. HK
- j.HK (2 hits), st.HP (1 hit only) xx Fire Kick [corner only]
- j.HK (2 hits) xx LP Aura Smash, walk forward, st.LK x2 xx LP+LK Fire Kick [corner only]
- j.HK (2 hits) xx LP Aura Smash, walk forward, cr.HP xx LK Nerichagi [corner only]
- Aura Smash, land, immediate Aura Smash, land, immediate Aura Smash, etc... [corner only. This is an infinite combo, but is very difficult to perform because the game has a tendency to eat inputs during the slowdown from an Aura Smash.]
Information on executing the Aura Smash infinite: During slowdown the game runs at half speed, and every tk Aura Smash input has a 50/50 chance to fail (success/failure alternating every frame), UNLESS the punch input is only pressed for a single frame. Slowdown eats directional inputs in the opposite way, so you must hold the directions for at least 2 frames each to ensure they register.
(Tested as player 2, but fireballs do not have player 2 advantage) From a minimum height Aura Smash there is a 7 frame window where the second one can combo, the window is 31-38 frames after the first Aura Smash is input. The third and all following Aura Smashes must be done 45-52 frames after the previous one was input, however, because the game is running at half speed, half of the time the window will be 44-51 frames after the last input (alternating each frame).
All Aura Smashes must be done at the minimum jump height, which during slowdown is a 2 frame window 6-7 frames after jumpsquat starts. If starting with jHK the jHK(2) must hit at the last possible frame, it is no easier than starting with a raw tk Aura Smash (but it does more damage).
You are able to combo after an Aura Smash done at the next to lowest height, but they only the last two frames of the normal window will be available and the next Aura Smash must be done at minimum height (this is true for starting with jHK(2) as well).
Advanced Strategy
There isn't character specific combos but advanced game is centered on Aura Smash use depending which is your opponent, big hitbox characters like Zazie and Mastorius can had more crossup RFWA cr.LK or a close HP probabilites, and that will bring a lot of stun points in their weakpoints, best tactic for projectiles characters its about Triangle Jump and hit them with a deep Aura Smash to fool their anti air strategies.
Yungmie only and advanced offensive objective can be about cornering his/her opponent and then take advantage of an Aura Smash post projectile slowdown hit to walk forward for a crouching HK for resets, or bring another TK Aura Smash and abuse of the infinite.
Aura Smash spam zone will depend of the weak point of the opponent, commonly the are useful for mid and high located ones.
Match-ups
| Ray | Lee | Zaz | Kar | Jea | Miz | Sam | Yun | Mat | Clo | Fei | Mar | Ryo | |
| Yungmie | - | - | - | - | - | - | - | - | - | - | - | - | - |
Vs. Clown:
Pick a Card? Aura Smash it or try to trade hits with Nerichagi if he rolls to you or if he wants to Head Stomp you or walk forward because you don't had good reversal moves after a high block, medium distance combat is your best distance
Vs. Jean:
Rose is a good Aura Smash counter, also he had a good anti air, Yungmie will play about wait for a Rose,Triangle Jump and frustrate his Flash Kick with Aura Smash, if he Rondato Nerichagi it after the first carthwheel jump
Vs. Ryoko:
An easy matchup, Aura Smash her or keep her away with Flame Kicks
Vs. Karnov:
Fair matchup, try to start the round with Nerichagi and watch out with Balloon, jump his Fireballs and Low Fire Breath, counter the High Flame Breath with crouching HK, and punish a blocked 100 Kicks Rush
Vs. Lee:
One of her 4-6 matchups, Senkyutai can counter your Aura Smash easily.
Vs. Feilin:
Aura Smash defeat her downward projectile always.
Vs. Yungmie (self):
Aura Smash!
Vs. Marstorius:
Big hitbox and great advantage, if he gets close to you is over.
Vs. Matlok:
Good matchup, Aura Smash tactic will fool his Overhead Kick easily, weakpoint is the best one
Vs. Mizoguchi:
He is a highschool flunk but good at school of life, but you are a Tae Kwon Do Master, another fair matchup, Nerichagi its a good trade hit for flaming combo kicks and counter a Uppercut with crouching HK always the best
Vs. Ray:
Wheel Kick can counter Aura Smash or Neri Chagi, try to wait for a Dynamite Tackle and whiff it wih a jumping combo punish,
Vs. Samchay:
Fair matchup about masters of their respective martial arts, Pap Sokap punished with crouching HK
Vs. Zazie:
Big hitbox and good matchup, until he evades your Aura Smash, try to crouching HK and Flame Kick him if he is near to you.


