Introduction
Guile is a all-around balanced character. He can pressure his enemies by shielding his advances with Sonic Booms and also use them as a barrier, together with his Flash Kick, to apply chip damage while holding a defensive position. However, he has been toned down quite a bit, compared to his CPS-1 versions. His Sonic Booms have projected vulnerable hitboxes, his main poke - the crouching Forward kick - has worse priority and he has lost his dangerous CPS-1 chains. Similarly to other characters, his aerial normal moves have worse priority.
Competitive Overview
Strengths & Weaknesses
New & Old Versions Comparison
To select O.Guile, choose Guile and then press ↑ ↓ ↓ ↓ Jab/Fierce, pressing Short simultaneously with the punch button for the alternate color.
Here is the list of differences:
- Obvious stuff: O.Guile can not tech throws and does not have a Super;
- O.Guile has some differences in some of his normals:
- Far Standing Strong does not have an anti-air hitbox (the first part is better, but he does not has a second active part like N.Guile has) but it does more damage;
- Crouching Strong does more damage;
- Close Standing Fierce does more damage;
- Crouching Fierce does more damage;
- Far Standing Fierce is the back fist (N.Guile has a straight punch instead, his back fist that is now a command normal also does less damage);
- Close Standing Forward does more damage;
- Far Standing Forward has worse feet vulnerability during start-up (plus he does not have the command normal versions) but it does more damage;
- Crouching Forward does more damage;
- Both Standing Roundhouse kicks are the classic kicks from the CPS-1, while N.Guile has a mediocre anti-air one for the close version and a donkey kick as the far one;
- Crouching Roundhouse does more damage;
- Both Jumping Fierces does more damage;
- Diagonal Jumping Short is not a cross-up attack;
- Both Jumping Forwards does more damage;
- Both Jumping Roundhouses does more damage;
- The Knee Bazooka is performed with Short instead of Forward. It also does more damage;
- The Reverse Spin Kick does more damage;
O.Guile has some benefits like the ability to do the back fist and the standing short while charging for Booms, his standing Roundhouse is a decent anti-air, plus most of his normals are more damaging, but all in all N.Guile is slightly better due to the cross-up and most of the normal moves he has gained.
Color Options
| Jab | Strong | Fierce | Start | Old |
 |
 |
 |
 |

|
 |
 |
 |
 |

|
| Short | Forward | Roundhouse | Hold | Old Alternative |
--Born2SPD
Moves Analysis
Disclaimer: To better understand the diagrams, read this.
Normal Moves
Ground Normals
- Close/Far Standing Jab:
| Damage | 4 |  |
 |
 |

|
| Stun | 0~5 | ||||
| Stun Timer | 40 | ||||
| Chain Cancel | Yes | ||||
| Special Cancel | Yes | ||||
| Super Cancel | Yes | ||||
| Frame Advantage | ? | ||||
| Frame Count | 3 | 4 | 2 | 3 | |
| Simplified | 1 + 3 | 4 | 5 | ||
Rapid-fire jab. Guile's arm is fully invincible, but it does not have much reach, just like other such Jabs. It is a good move.
- Crouching Jab:
| Damage | 4 |  |
 |

|
| Stun | 0~5 | |||
| Stun Timer | 40 | |||
| Chain Cancel | Yes | |||
| Special Cancel | Yes | |||
| Super Cancel | Yes | |||
| Frame Advantage | ? | |||
| Frame Count | 3 | 4 | 5 | |
| Simplified | 1 + 3 | 4 | 5 | |
The crouching version also has rapid-fire properties, and similar priority.
- Close Standing Strong:
| Damage | 19 |  |
 |
 |
 |
 |

|
| Stun | 5~11 | ||||||
| Stun Timer | 60 | ||||||
| Chain Cancel | No | ||||||
| Special Cancel | Yes | ||||||
| Super Cancel | Yes | ||||||
| Frame Advantage | ? | ||||||
| Frame Count | 3 | 3 | 3 | 3 | 3 | 3 | |
| Simplified | 1 + 3 | 3 | 12 | ||||
This is not very safe if you do not cancel. It mostly spoils the anti-air properties of far standing Strong, which is not really good for Guile.
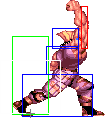
- Far Standing Strong:
| Damage | 19 |  |
 |
 |
 |
 |

|
| Stun | 5~11 | ||||||
| Stun Timer | 60 | ||||||
| Chain Cancel | No | ||||||
| Special Cancel | Yes/No | ||||||
| Super Cancel | Yes/No | ||||||
| Frame Advantage | ? | ||||||
| Frame Count | 4 | 2 | 4 | 3 | 3 | 3 | |
| Simplified | 1 + 4 | 6 | 9 | ||||
Uppercut punch. This has good range and recovery, and work as anti-air, from the right range.
- Crouching Strong:
| Damage | 17 |  |
 |
 |

|
| Stun | 5~11 | ||||
| Stun Timer | 60 | ||||
| Chain Cancel | No | ||||
| Special Cancel | Yes | ||||
| Super Cancel | Yes | ||||
| Frame Advantage | ? | ||||
| Frame Count | 3 | 4 | 4 | 4 | |
| Simplified | 1 + 3 | 4 | 8 | ||
This has just acceptable range for a crouching Strong move. The priority is poor, so this is mostly used in combos and to punish moves such as whiffed Tatsumakis.
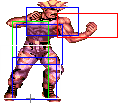
- Close Standing Fierce:
| Damage | 21 |  |
 |
 |
 |
 |

|
| Stun | 10~16 | ||||||
| Stun Timer | 80 | ||||||
| Chain Cancel | No | ||||||
| Special Cancel | Yes | ||||||
| Super Cancel | Yes | ||||||
| Frame Advantage | ? | ||||||
| Frame Count | 3 | 3 | 10 | 8 | 6 | 5 | |
| Simplified | 1 + 3 | 3 | 29 | ||||
Upper that has long recovery, but more damage. It can be canceled into special attacks so as not to be punished on block.
- Far Standing Fierce:
| Damage | 21 |  |
 |
 |
 |
 |
 |
 |

|
| Stun | 1~7 | ||||||||
| Stun Timer | 70 | ||||||||
| Chain Cancel | No | ||||||||
| Special Cancel | No | ||||||||
| Super Cancel | No | ||||||||
| Frame Advantage | ? | ||||||||
| Frame Count | 2 | 2 | 2 | 3 | 3 | 3 | 3 | 4 | |
| Simplified | 1 + 6 | 6 | 10 | ||||||
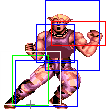
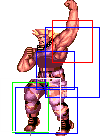
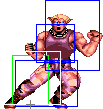
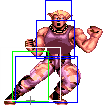
- Crouching Fierce:
| Damage | 21 |  |
 |
 |
 |
 |
|
| Stun | 10~16 | ||||||
| Stun Timer | 80 | ||||||
| Chain Cancel | No | ||||||
| Special Cancel | No | ||||||
| Super Cancel | Yes/No | ||||||
| Frame Advantage | ? | ||||||
| Frame Count | 2 | 3 | 4 | 12 | 9 | 1 | |
| Simplified | 1 + 5 | 16 | 10 | ||||
The main anti air to use when being jumped on and you aren't charged for a flash kick. This takes training to time: you want it to trade if the enemy attacks the right time. It can also be used as a feint, tricking the enemy into thinking you stood up and lost charge.
- Close/Far Standing Short:
| Damage | 11 |  |
 |
 |
 |

|
| Stun | 0~5 | |||||
| Stun Timer | 40 | |||||
| Chain Cancel | Yes | |||||
| Special Cancel | Yes | |||||
| Super Cancel | Yes | |||||
| Frame Advantage | ? | |||||
| Frame Count | 2 | 2 | 4 | 3 | 3 | |
| Simplified | 1 + 4 | 4 | 6 | |||
- Crouching Short:
| Damage | 12 |  |
 |
 |
 |

|
| Stun | 0~5 | |||||
| Stun Timer | 40 | |||||
| Chain Cancel | Yes | |||||
| Special Cancel | No | |||||
| Super Cancel | No | |||||
| Frame Advantage | ? | |||||
| Frame Count | 3 | 3 | 4 | 3 | 3 | |
| Simplified | 1 + 6 | 4 | 6 | |||
This move combos into itself. A fast attack to push a close opponent away to ideal c.mk range.
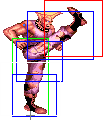
- Close Standing Forward:
| Damage | 19 |  |
 |
 |
 |

|
| Stun | 5~11 | |||||
| Stun Timer | 60 | |||||
| Chain Cancel | No | |||||
| Special Cancel | No | |||||
| Super Cancel | No | |||||
| Frame Advantage | ? | |||||
| Frame Count | 3 | 3 | 4 | 3 | 3 | |
| Simplified | 1 + 6 | 4 | 6 | |||
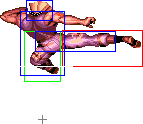
- Far Standing Forward:
| Damage | 19 |  |
 |
 |
 |
 |
 |
 |
 |
 |

|
| Stun | 5~11 | ||||||||||
| Stun Timer | 60 | ||||||||||
| Chain Cancel | No | ||||||||||
| Special Cancel | No | ||||||||||
| Super Cancel | No | ||||||||||
| Frame Advantage | ? | ||||||||||
| Frame Count | 2 | 2 | 2 | 3 | 5 | 4 | 3 | 2 | 2 | 2 | |
| Simplified | 1 + 9 | 5 | 13 | ||||||||
- Crouching Forward:
| Damage | 19 |  |
 |
 |
 |

|
| Stun | 5~11 | |||||
| Stun Timer | 60 | |||||
| Chain Cancel | No | |||||
| Special Cancel | No | |||||
| Super Cancel | No | |||||
| Frame Advantage | ? | |||||
| Frame Count | 3 | 4 | 5 | 4 | 4 | |
| Simplified | 1 + 7 | 5 | 8 | |||
Guile's main poke. It has a very good range, but poor priority. The key to using this attack well is not using it all the time, but positioning yourself so that it will hit or control space when the enemy is not throwing his pokes, which often beat Guile's.
- Close Standing Roundhouse:
| Damage | 22 |  |
 |
 |
 |
 |
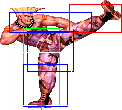 |
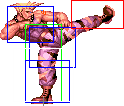
|
| Stun | 1~7 | |||||||
| Stun Timer | 70 | |||||||
| Chain Cancel | No | |||||||
| Special Cancel | No | |||||||
| Super Cancel | No | |||||||
| Frame Advantage | ? | |||||||
| Frame Count | 2 | 2 | 2 | 1 | 1 | 4 | 4 | |
| Simplified | 1 + 8 | 8 | ||||||
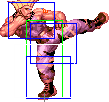 |
 |
 |
 |

| |
| Frame Count | 3 | 3 | 3 | 3 | 3 |
| Simplified | 15 | ||||
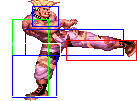
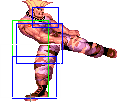
- Far Standing Roundhouse:
| Damage | 21 |  |
 |
 |
 |
 |
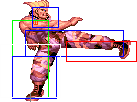 |
|
| Stun | 1~7 | |||||||
| Stun Timer | 70 | |||||||
| Chain Cancel | No | |||||||
| Special Cancel | No | |||||||
| Super Cancel | No | |||||||
| Frame Advantage | ? | |||||||
| Frame Count | 6 | 2 | 1 | 3 | 1 | 3 | 3 | |
| Simplified | 1 + 13 | 6 | ||||||
 |
 |
 |

| |
| Frame Count | 3 | 3 | 3 | 4 |
| Simplified | 13 | |||
- Crouching Roundhouse:
| Damage | 21 |  |
 |
 |
 |
 |
 |
 |

|
| Stun | 5~11 | ||||||||
| Stun Timer | 130 | ||||||||
| Chain Cancel | No | ||||||||
| Special Cancel | No | ||||||||
| Super Cancel | No | ||||||||
| Frame Advantage | ? | ||||||||
| Frame Count | 3 | 4 | 5 | 4 | 6 | 8 | 6 | 4 | |
| Simplified | 1 + 7 | 5 | 28 | ||||||
 |
 |

| |
| Frame Count | 5 | 4 | 6 |
| Simplified | 5 | 10 | |
Used as an anti air at a certain range. The second active part of the move has very good range, which can be used to control space in specific situations, such as on the enemy's wake-up or after forcing him to block a Sonic Boom, with noticeable frame advantage.
Aerial normals
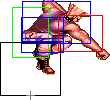
- Neutral Jumping Jab:
| Damage | 11 |  |
 |
|
| Stun | 1~7 | |||
| Stun Timer | 40 | |||
| Frame Count | 3 | 4 | ∞ | |
| Simplified | 7 | ∞ | ||
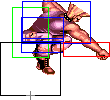
- Diagonal Jumping Jab:
| Damage | 11 |  |
 |
 |
 |

|
| Stun | 1~7 | |||||
| Stun Timer | 40 | |||||
| Frame Count | 3 | 4 | 24 | 4 | ∞ | |
| Simplified | 7 | 24 | ∞ | |||
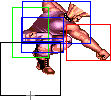
- Neutral Jumping Strong:
| Damage | 19 |  |
 |
 |
 |

|
| Stun | 5~11 | |||||
| Stun Timer | 50 | |||||
| Frame Count | 3 | 4 | 20 | 4 | ∞ | |
| Simplified | 7 | 20 | ∞ | |||
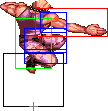
- Diagonal Jumping Strong:
| Damage | 19 |  |
 |
 |
 |

|
| Stun | 5~11 | |||||
| Stun Timer | 50 | |||||
| Frame Count | 3 | 4 | 20 | 4 | ∞ | |
| Simplified | 7 | 20 | ∞ | |||
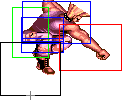
- Neutral Jumping Fierce:
| Damage | 21 |  |
 |
 |
 |

|
| Stun | 11~17 | |||||
| Stun Timer | 60 | |||||
| Frame Count | 3 | 4 | 8 | 4 | ∞ | |
| Simplified | 7 | 8 | ∞ | |||
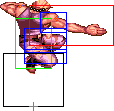
- Diagonal Jumping Fierce:
| Damage | 21 |  |
 |
 |
 |

|
| Stun | 3~9 | |||||
| Stun Timer | 40 | |||||
| Frame Count | 3 | 4 | 8 | 3 | ∞ | |
| Simplified | 7 | 8 | ∞ | |||
A good air to air move. It can be used as anti-air with good reactions or to mix-up moves. Also used when jumping backwards to counter Dictator's stomps or Claw's wall dives.
- Neutral Jumping Short:
| Damage | 12 |  |
 |

|
| Stun | 1~7 | |||
| Stun Timer | 40 | |||
| Frame Count | 3 | 4 | ∞ | |
| Simplified | 7 | ∞ | ||
- Diagonal Jumping Short:
| Damage | 12 |  |
 |

|
| Stun | 1~7 | |||
| Stun Timer | 40 | |||
| Frame Count | 3 | 4 | ∞ | |
| Simplified | 7 | ∞ | ||
For crossups and ticks.
- Neutral Jumping Forward:
| Damage | 19 |  |
 |
 |
 |
 |
 |
 |

|
| Stun | 5~11 | ||||||||
| Stun Timer | 50 | ||||||||
| Frame Count | 1 | 2 | 2 | 3 | 5 | 4 | 3 | ∞ | |
| Simplified | 8 | 5 | ∞ | ||||||
- Diagonal Jumping Forward:
| Damage | 19 |  |
 |
 |
 |

|
| Stun | 5~11 | |||||
| Stun Timer | 50 | |||||
| Frame Count | 3 | 4 | 20 | 4 | ∞ | |
| Simplified | 7 | 20 | ∞ | |||
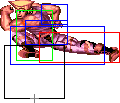
Good jump-in move with acceptable range and priority. It stays active for quite some time, which is good or control space while airborne.
- Neutral/Diagonal Jumping Roundhouse:
| Damage | 21 |  |
 |
 |
 |
 |

|
| Stun | 11~17 | ||||||
| Stun Timer | 60 | ||||||
| Frame Count | 2 | 4 | 5 | 4 | 4 | ∞ | |
| Simplified | 6 | 5 | ∞ | ||||
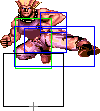
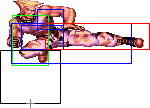
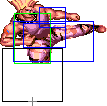
A jump-in move with very good range, but poor priority. It is very useful to hit extended limbs due to long recovery projectiles such as Hadoukens or Tigers. It can also be used as a punishing tool while the enemy is in the air after Shoryukens, Condor Dives and jumps in general. If you get lucky or time it well and the enemy is close enough, it will become Guile's most damaging throw: the Flying Buster Drop a.k.a. the back-breaker.
--Tataki 21:44, 1 September 2007 (UTC)
Command Normals
- Spinning Back Knuckle a.k.a. Back Fist: (On ground, → + Fierce)
| Damage | 21 |  |
 |
 |
 |
 |

|
| Stun | 10~16 | ||||||
| Stun Timer | 80 | ||||||
| Frame Advantage | ? | ||||||
| Frame Count | 2 | 3 | 4 | 5 | 10 | 8 | |
| Simplified | 1 + 9 | 5 | 18 | ||||
Guile's patented backfist punch. Its awesome range makes this Guile's best punish normal move. It can used at anti air at certain ranges, but mostly to punish projectile recovery after you canceled the projectile itself with a Sonic Boom and the opponent is left open. This move has relatively low priority and can by punished if whiffed.
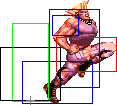
- Knee Bazooka: (On ground, ←/→ + Short)
| Damage | 19 |  |
 |
 |
 |
 |

|
| Stun | 5~11 | ||||||
| Stun Timer | 60 | ||||||
| Frame Advantage | ? | ||||||
| Frame Count | 1 | 2 | 2 | 5 | 14 | 7 | |
| Simplified | 1 + 5 | 5 | 21 | ||||
This allows you to advance while charging a Sonic Boom, and hits extended limbs from Low Tigers.
- Rolling Sobat a.k.a. Hop Kick: (On ground, ←/→ + Forward)
- Backwards:
| Damage | 19 |  |
 |
 |
 |
 |
 |
 |
 |
 |

|
| Stun | 5~11 | ||||||||||
| Stun Timer | 60 | ||||||||||
| Frame Advantage | ? | ||||||||||
| Frame Count | 2 | 2 | 2 | 3 | 5 | 4 | 3 | 2 | 2 | 2 | |
| Simplified | 1 + 9 | 5 | 13 | ||||||||
- Forwards:
| Damage | 19 |  |
 |
 |
 |
 |
 |
 |
 |
 |

|
| Stun | 5~11 | ||||||||||
| Stun Timer | 60 | ||||||||||
| Frame Advantage | ? | ||||||||||
| Frame Count | 2 | 2 | 2 | 3 | 5 | 4 | 3 | 2 | 2 | 2 | |
| Simplified | 1 + 9 | 5 | 13 | ||||||||
A great kick. It allows you to move forwards or backwards while attacking, and also goes above low hits like shoto's crouching kicks or Guile's cr.Forward. At certain ranges, it can be used as an anti air.
NOTE: You can kara cancel this move into flash kick for additional range!
Thats a trick Muteki uses, here is a example video. It indeed gives Flash kick a bit little more range, if hopping forward since it will push guile forward a bit, the timing is tricky though.
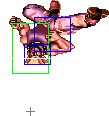
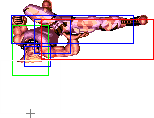
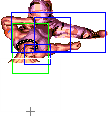
- Reverse Spin Kick: (On ground and close, ←/→ + Roundhouse)
| Damage | 22 |  |
 |
 |
 |
 |
|
| Stun | 1~7 | ||||||
| Stun Timer | 70 | ||||||
| Frame Advantage | ? | ||||||
| Frame Count | 3 | 3 | 2 | 3 | 4 | 6 | |
| Simplified | 1 + 15 | 6 | |||||
 |
 |
 |
 |

| |
| Frame Count | 4 | 3 | 3 | 3 | 3 |
| Simplified | 16 | ||||
Guile performs an upside-down version of his crouching kick. This is a command normal, but it also demands you to be close enough to the opponent, so you can not take advantage of the reach. It is very good to trick the enemy into throwing a crouching move and punishing it by prediction, though.
--Tataki 21:44, 1 September 2007 (UTC)
Throws
Guile can throw using Strong and Fierce. If in air, he can throw with Forward and Roundhouse too. The direction of the joystick determines the direction the enemy gets thrown at. All his ground throws have the same range and do 32 points of damage (plus two more if behind in rounds).
- Ground Throws Throwboxes:
| Damage | 32 |  |
 |

| |
| Stun | 7~13 | ||||
| Stun Timer | 100 | ||||
| Range | (from axis) | 48 | |||
| (from throwable box) | 18 | ||||
- Judo Throw: (←/→ + Strong)
- Dragon Suplex: (←/→ + Fierce)
- Flying Mare: (Guile and opponent in air, ↖/↙/←/→/↘/↗ + Strong/Fierce)
| Damage | 34 | 
| |
| Stun | 7~13 | ||
| Stun Timer | 100 | ||
| Range | (from axis) | 54 | |
| (from throwable box) | 24 | ||
- Flying Buster Drop: (Guile and opponent in air, ↖/↙/←/→/↘/↗ + Forward/Roundhouse)
| Damage | 46 | 
| |
| Stun | 7~13 | ||
| Stun Timer | 100 | ||
| Range | (from axis) | 54 | |
| (from throwable box) | 24 | ||
Special Moves
- Sonic Boom: (Charge ←, →, P)
Detailed Input: (Charge ← for at least 60f, [0~7f] → [0~11/9/7f] Jab/Strong/Fierce. It is needed to wait at least 1 frame after leaving the charge direction to enter with the P button)
- Startup:
| Super Meter | 7 |  |
 |
 |
 |

|
| Frame Count | 2 | 2 | 2 | 2 | 1 | |
| Simplified | 9 | |||||
- Active:
- Jab Version:
| Damage | 15 |  |
 |
 |
 |

|
| Stun | 5~11 | |||||
| Stun Timer | 100 | |||||
| Frame Count | 1 | 1 | 1 | 1 | 1... | |
| Simplified | 21 | |||||
- Strong Version:
| Damage | 16 |  |
 |
 |
 |

|
| Stun | 5~11 | |||||
| Stun Timer | 100 | |||||
| Frame Count | 1 | 1 | 1 | 1 | 1... | |
| Simplified | 21 | |||||
- Fierce Version:
| Damage | 17 |  |
 |
 |
 |

|
| Stun | 5~11 | |||||
| Stun Timer | 100 | |||||
| Frame Count | 1 | 1 | 1 | 1 | 1... | |
| Simplified | 21 | |||||
Guile's projectile. The punch strength determines the projectile's speed, being Jab the slowest and Fierce the fastest. This move recovers fast, giving Guile time to walk up to apply pressure or punish jump-ins or long recovery moves. You can use ↙ so as to charge both Sonic Booms and Flash Kicks at the same time.
- Somersault Kick a.k.a. Flash Kick: (Charge ↓, ↑, K)
Detailed Input: (Charge ↓ for 60f, [0~7f] ↑ [0~11/9/7/2f] Short/Forward/Roundhouse/any K if you are at a jumpable state. It is needed to wait at least 1 frame after leaving the charge direction to enter with the K button)
- Startup:
| Super Meter | 8 |  |
 |

|
| Frame Count (Short) | 1 | 2 | 2 | |
| Frame Count (Forward) | 2 | 2 | 1 | |
| Frame Count (Rh) | 3 | 1 | 1 | |
| Simplified | 5 | |||
- Active:
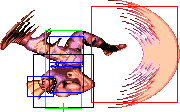
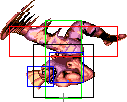
| Damage | 27/19 |  |
Short | Forward & Rh |  |
 |
|
| Stun | 7~13 |  |

| ||||
| Stun Timer | 100 | ||||||
| Frame Count (Short) | 4 | 1 | 1 | 1 | 2 | ||
| Frame Count (Forward) | 3 | 1 | 1 | 1 | 3 | ||
| Frame Count (Rh) | 2 | 1 | 1 | 1 | 4 | ||
| Simplified | 9 | ||||||
- Recovery:
 |
 |
 |

| |
| Frame Count (Short) | 2 | 2 | 25 | 5 |
| Simplified (Short) | 34 | |||
| Frame Count (Forward) | 4 | 4 | 28 | 7 |
| Simplified (Forward) | 43 | |||
| Frame Count (Rh) | 5 | 5 | 31 | 8 |
| Simplified (Rh) | 49 | |||
Guile becomes invulnerable for a split second, performing an acrobatic aerial kick that has good range and causes a full knockdown, however leaving himself vulnerable during a long recovery. The kick version determines how high the move hits and how much longer the recovery is, but the damage are all the same. Short gives the fastest recovery while Roundhouse makes Guile jump higher, however yielding a longer recovery. It is recommended that one charges with ↙ so as to have a Sonic Boom available, if needed.
Super Move
- Double Somersault Kick: (Charge ↓, → ← ↑ + K)
Detailed Input: (Charge ↓ for at least 60f, [0~7f] → [0~7f] ← [0~7f] ↑ [0~8/2f] K/if you are at a jumpable state)
| Damage | 14*6 |  |
 |
 |
 |
 |
 |
 |
 |

|
| Stun | 0~4*6 | |||||||||
| Stun Timer | 20*6 | |||||||||
| Frame Count | 1 + [18] + 3 | 1 | 1 | 2 | 1 | 1 | 4 | 2 | 2 | |
| Simplified | 6 | 2 | 1 | 5 | 4... (15) | |||||
 |
 |
 |
 |
 |
 |
 |
| |
| Frame Count | 9 | 1 | 1 | 2 | 1 | 1 | 4 | 1 |
| Simplified | ...11 (15) | 2 | 6 | 1 | ||||
 |
 |
 |

| |
| Frame Count | 5 | 5 | 22 | 8 |
| Simplified | 30 | |||
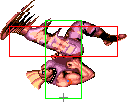
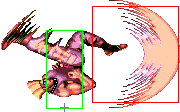
Guile becomes invulnerable and does a relatively fast Flash Kick that hits up to three times if up close, then a longer recovery one that also hits up to three times. Similarly to an ordinary Flash Kick, Guile is left vulnerable during the recovery.
This is a risky move, in general. It must be done from point-blank range to get hits to connect. It juggles air opponents for 4 hits. It is also a good wake-up tool, but generally unsafe. If the enemy blocks the move and last flash kick does not connect from a distance, all characters will be able to punish Guile for free.
The Basics
Guile needs just about a second (60 frames) to charge his moves. This allows him to keep a constant wave of Sonic Booms coming, controling the space in front of him, while leaving himself vulnerable for little time, as the Sonic Boom is the fastest recovery projectile move in the game. His long range pokes allow him to punish mistakes and apply pressure of he decides to follow the Sonic Booms.
Guile wants to force characters without a projectile to jump or otherwise use some longer recovery move to avoid his Sonic Booms, then punish accordingly. Against motion projectile characters, Guile wants to take advantage of his fast charge time to throw as many Booms as possible, forcing the motion character to either throw too many projectiles as a counter, leaving themselves vulnerable for prediction attacks such as a jump-in, or throwing a projectile too late, getting punished by the reviled backfist punch or the knee bazooka (in case of Sagat's Low Tigers).
Even though Guile's Sonic Boom recovers fast, it has been given vulnerable hitboxes in front of the move. Also, most often he will not have a charge ready for the Flash Kick if the enemy jumps as you throw one. Finally, some moves such as Ryu's Tatsu can punish Guile for using a Sonic Boom, if close enough or as a prediction. As a result, Guile must feint while throwing projectiles, tricking the enemy into jumping over no Sonic Booms (eating a Flash Kick) or staying on the ground, getting pushed by the wave of Sonic Booms while accepting chip damage. Guile can feint or disturb his enemy by throwing different fast pokes while crouching, such as Jabs and Shorts, and using a cr.Fierce punch, which makes it look like Guile is on neutral position, apparently losing his vertical charge.
Advanced Strategy
Combos
These the the only combos you should be trying to do.
- j.Fierce/RH, cl.Fierce/cr.Strong xx Flash Kick;
- j.Fierce/RH, Fierce xx Sonic Boom, Backfist (corner only);
- X-up Short, cr.Strong xx Flash Kick (for O.Guile you can swap the X-up LK to X-up MK but i think that only works on crouching opponents);
- X-up Short, cr.Short/cr.Jab x2 xx Flash Kick (chain cancel)
- cr.Forward (meaty), cr.Strong xx Sonic Boom or Flash Kick
The best way to land the super is on a cross-up aerial Short kick
- X-up Short, cr.Short/cr.Jab x2 xx Super (chain cancel)
- j.Rierce/Roundhouse, cr.Fierce xx super (super cancel)
You gotta be a superman to land this one. Dump the jumping attack and do the C.Fierce cancelled into super as a meaty If you really want to do the super off a forward jumping attack do it like this:
- j.Fierce/Roundhouse, cr.Strong xx Super
Extra notes All combos that end in a Sonic Boom can be followed by a Backfist (+Fierce) or donkey kick (far Roundhouse) if the enemy is cornered, for more damage and, most certainly, a dizzy. The X-up Short-cr.Strong and safe-jump-cr.Strong combos can be hit-confirmed, so you cancel into a Flash Kick if it hits, or apply some mix-ups if it does not. Possible actions are throw, cr.Short-cr.Forward block string, delayed Flash Kick or canceling into a Sonic Boom (non-cross-up safe-jump, only). With faster reflexes, you may also not use cr.Strong if it does not hit, but use cr.Short instead, which hits low, or got for the throw immediately. Diagonal aerial Roundhouse deals much higher stun damage than other similar attacks. Favor this move if you have mastered the timing or if you are sure it will hit (e.g., you have just guessed right that your enemy would throw a projectile).
Match-ups
Matchups classified with this diagram in mind. For the old characters i guessed the positions.
--Born2SPD
Serious Advantage Match-ups
Vs. Cammy:
- 8 - 2
Vs. E. Honda:
- 8 - 2
Vs. Fei Long:
- 7.5 - 2.5
Vs. Zangief:
- 8 - 2
Advantage Match-ups
Vs. Blanka:
- 6 - 4
Beat the Slide Punch
1) Standing short
Standing short beats not only the slide punch but also horizontal balls and Blanka's super. One of the sweetest things Guile can do is jab sonic -> standing short. If Blanka tries to slide under the sonic at max-range your short will hit him into it for a 2 hit combo.
2) Standing roundhouse
Try to catch him as he goes into the punch. Especially good if Blanka tries two slide punches in a row -- hit him with roundhouse in between. Blanka can beat Guile's standing roundhouse with his standing jab but if he's doing those jabs you can hit him with an old fashioned crouching forward.
3) Fierce Sonic
Mix these in with the jab sonic booms sometimes to try to catch him flinching.
No-charge Air Defense (Standard)
Any given option can be beat, so good anti-air is a matter of knowing the proper spacing and reading your opponent.
1) Crouching forward/roundhouse
Loses to a late Blanka jump fierce. You can also do the crouching forward a little late looking for a blocked hit. If Blanka is really sneaky he could forward hop over that one but you should have a Flash Kick charged by then so...
2) Vertical jump roundhouse / climbing jump fierce
If you're backed into the corner and you get beat air-to-air by a Blanka jump jab, note that you're vulnerable to his fierce ball trickery so be careful.
3) Crouching fierce
This usually loses to Blanka's jump short but that ain't the end of the world. Do it early such that Blanka hits you high, and you can do a defensive two-way mix-up on the back end: sac-throw or Flash Kick. Crouching fierce a little later if you're trying to trade.
No-charge Air Defense (Non-standard)
1) Backfist
At long range this is not unlike Sagat's standing fierce. Do it as late as possible to try to trade or beat Blanka's jumping jab/jumping roundhouse.
2) Far standing strong
3) Neutral or back+medium kick Sobat
4) Standing roundhouse
5) Standing short (!?)
Cross-up Short
Blanka is a huge target for an ambiguous jump short -> crouching strong -> (hit confirm) flash kick. If your opponent has a reliable reversal vertical ball this doesn't mean much but...
Whiff -> Throw Trickery
Up close, joystick plus roundhouse (the upside down kick) and joystick plus medium kick (sobat) both miss. Whiff the kick and throw the beast. (nohoho)
Vs. Ken:
- 6.5 - 3.5
Vs. T. Hawk:
- 6.5 - 3.5
Vs. O. T. Hawk:
Vs. Sagat:
- 6.5 - 3.5
Fair Match-ups
Vs. Dee Jay:
- 5.5 - 4.5
Vs. Guile (self):
Vs. M. Bison (dictator):
- 5.5 - 4.5
Controlling space is very important. Do not let him trap you in the corner and start his mixups and tick throws. Zone him out with sonic booms, if he tries to jump at you knock him out of the air with jumping fierce or roundhouse. Be careful with your booms when he has super. If he does a psycho crusher that puts you in the corner, you can throw before he does right as you come out of blockstun, same thing with scissor kick. Sometimes you can backfist him after he passes through you with a psycho crusher but the timing is kind of iffy. If he tries to slide at you and stops right next to you, you can flash kick him as you come out of blockstun for a knockdown. Once you have him on the ground you can go for j. short, cr. strong xx flash kick pretty safely since he doesn't have a good reversal on wake up.
As long as you can keep him from getting close enough to harass you with standing forward and out of the corner then this matchup isn't too bad. You just have to be able to zone properly. Ideally you want to keep him at fullscreen. Sometimes I will do pre-emptive jumping fierce/roundhouse in between booms to discourage him from even trying to jump at me but this can be punished with psycho crusher as you come down.
Akagi
Disadvantage Match-ups
Vs. Balrog (boxer):
- 4 - 6
Vs. Chun-Li:
- 4 - 6
Vs. O. Ken:
Vs. Ryu:
- 3.5 - 6.5
Objective: Get into the range just outside of sweep distance. Punish whatever he tries to do while trying to pressure him and baiting risky moves. Sonic Booms are a great tool due to low recovery.
Full screen: Throw booms and move forward by using bazooka knee or standing roundhouse.
Optimal range: Poke and throw booms to pressure while looking for a mistake to punish. If your projectiles cancel each other out, punish with backfist. If he tries a psychic DP, punish on the way down. Punish jump ins with Flash Kick or crouching fierce.You can jump in to punish a fireball with jumping Fierce/Roundhouse, crouching strong xx Flash Kick. Risky but sometimes worth it.
In the corner: Block and wait for an opportunity to throw a boom and backfist or punish him for a psychic DP/jump in.
Mix ups: After a knockdown use ambiguous jumping short, crouching strong xx Flash Kick. Hit confirm it and either finish the combo or go for a throw. Another is throwing a Sonic to make him block and then going for a throw mixing this up with low forward to punish counter throw attempts.
Things to look out for:
Tatsu: These go over booms. Try to bait them out with jabs to feint Sonics. Flash Kick him or use crouching fierce to trade in your favor if you don't have a charge. Look out for short tatsu immediately followed by jab dp.
Juice Kick: He can do this to cross you up and hit you out of a flash kick. Don't take the bait and punish him on the way down.
Super: Be careful with your booms and pokes. Try to bait him into wasting it by feinting Sonics and jumping or blocking.
Serious Disadvantage Match-ups
Vs. Dhalsim:
- 1.5 - 8.5
Vs. O. Sagat:
Objective: Get into just outside sweep range to safely apply pressure and bait mistakes to punish. Be patient getting in but take enough risks to not eat chip damage all day.
Getting in: Throw as many Booms as you can while using bazooka knee or standing roundhouse to move yourself forward while retaining charge. Use neutral jumps to avoid getting pushed back by blocked Tigers. Be patient and don't jump in or you will eat standing fierce or Tiger Uppercut. If you must jump, do it when he is throwing a low Tiger and hit him with jumping forward (risky.)
Optimal range: You must apply enough pressure to bait him into doing something unsafe but not so much that he tiger uppercuts you and then tigers you back to fullscreen, it's a delicate balance. Use your sobat kick to punish him for throwing low Tigers, use low forward or sweep to punish high Tigers. If you cancel a Tiger with a Sonic hit him with one of your forward moving normals usually bazooka knee. You can use neutral jump fierce to punish low Tigers. Bait out psychic DPs and punish him as he lands. Look out for his sweep and standing short cancelled into Tiger Shot.
Video examples: Kurahashi vs Choi: http://youtu.be/xidXHA8c7Ic Kurahashi vs Valle: http://youtu.be/Wum5MqwWJek
Akagi
Vs. Vega (claw):
- 3 - 7
- Sliding is annoying
- No air defense when he jumps a sonic [from close]
- Difficult to okiseme
Pinned in the corner
- Use flash kick vs. chip damage attempt [rolling claw]
- Gamble flash kick vs. Izuna/Barcelona
- When you predict a wall dive fake out, fierce sonic
Anti Slide Kick
Unless he's right on top of you there's no good way to stop the slide kick.
Gamble flash kick misses. Sonic trades unfavorably. Towards+medium kick sometimes works but you have to predict and Guile's down on a trade.
[Far standing roundhouse works here and there, too.]
Keeping quiet and blocking is safest. At least it doesn't do chip damage.
Also, after a blocked slide, sonic is not recommended. You'll eat crouching strong. If he gets predictable with blocked slide -> crouching strong you can flash kick but don't get carried away.
Bad range for Vega
Get into a more favorable position with jab sonics. Some breathing room. [half screen ish]
- Counter the jump in with crouching roundhouse.
- If he vertical jumps the sonic, use crouching forward. (Try to meet him in the air [w/ jump roundhouse or whatever] and you'll eat his vertical jab)
- If he blocks it, move back with back+medium kick and throw the next sonic.
Okiseme
[when you knock Vega down you want to try to tick but:]
- Very difficult to time safe jump in vs. Vega.
- Doesn't mean much since he's got standing flip kick.
- If he backflips you can't throw him.
- Even when you do get the throw he'll tech hit.
Risk reward stinks.
Ultimately, a blocked jab sonic might be best.(T.Akiba via nohoho)
