

Blanka
One day long ago, a young boy named Jimmy was aboard a plane, on his way to visit his uncle. Unfortunately some government officials who were also on the plane were the targets of an assassination attempt by Shadaloo, and the plane crashed into the Brazilian Jungle. However, Jimmy survived the crash and began to live amongst the animals in the jungle. One day, he unwittingly hitched a ride on a poacher's car. Curious and excited, Blanka began to venture into the outside world. It was probably during this time that he met Dan as well as Dan's 'student', Sakura, before he went back to the jungle. He later resurfaced again to compete in the World Warrior tounament, where his mother happened to be a spectator. There is a tearful reunion as mother and son were finally reunited. Blanka probably now lives a happy (ab)normal life with his mother.
In a nutshell
Blanka is a powerful character with excellent jumping attacks, useful special moves and some great normals. Able to keep offensive pressure on as well as play a defensive role. A very solid character in Hyper Fighting.
Character Specific Information
Color Options
| Default | Start |
 |

|
Moves List
Note: All frame data gathered by using the method described at http://code.google.com/p/macrolua/wiki/FrameDataExamples. Some differs from TAkiba's, and is noted by a *.
Normal Moves
- Standing Normal Moves (st.)
- Close Standing Normal Moves (cl.)
- Crouching Normal Moves (cr.)
- Jumping Normal Moves (nj.)
- Diagonal Jumping Normal Moves (j.)
Unique Moves
Throws
Special Moves
Requires 5 button presses }}
Requires 5 button presses }}
Requires 5 button presses }}
The Basics
Advanced Strategy
From Jeff Schaefer:
Blanka is real tough primarily because of the confusion and speed.
Take this for example....
His j.LK LOOKS the same as j.MK.
you jump on somebodies head or straight up with j.LK, you can bite them SUPER fast. You push j.MK sometimes, then bite a split second later, it looks the same but it throws off their "counter" timing and distance perception.
Its complicated, but trust me, it works real good.
The Blanka train is a mixup of the following that I used back in 1992ish.
It is preceded by a BITE (HP throw). Then:
- Roll
- s.MP or cr.MK...
- BITE
---
You can repeat that or you can do these variations...
- Roll
- j.HP right away. It hits every character if they are standing and push anything, like if they are trying to counter, etc, and some characters it hits them if they are crouching...
- Then you land and BITE.
OR when you land on other side, you jump OVER them AGAIN with HP right away, stunning them.
- Roll
- cr.MK
- nj.LK
- Vertical ball behind head
- cr.MK
then either bite, ball again, or nj.LK, bite, repeat.
- Roll
- Electricity for split second....
- Vertical ball behind their neck out of electricity then you can do what I listed.
You can mix up a variety of about 6 things from the bite, to throw them off badly, keep them guessing, and just dominate people.
Against some characters, just roll, s.MP, bite was UNCOUNTERABLE game over.
From Decoy:
"Spacers" are blocked moves that position Blanka perfectly for a ball into throw attempt. They work best when setup with a c.HP or a c.HK at the end of a blocked attack string.
For example:
I jump-in with a standard j.HP, s.MP, c.HK. If you're like me, you charge at every opportunity. I have a charge ready after the c.HK and I go into an LP horizontal ball into throw. It's almost free every time.
And let's not forget about the double-charge method. You can do horizontal ball attacks right into vertical ball attacks seamlessly (by ending the horizontal ball motion in down-forward you maintain down charge for the vertical ball). This is great for closing the gap on someone who is across the screen and jumping in the corner. Or a surprise cross-up with the ball hitting on the way down on the opposite side. Then the fun begins.
http://www.youtube.com/watch?feature=player_embedded&v=A0wCzcs32lw
http://www.youtube.com/watch?feature=player_embedded&v=DAXCxVF2EjE
Combos
Match-ups
- Vs. Balrog (boxer):
From Decoy: Blanka's options if Balrog does any rush punch:
1. A well timed c.HK for a knockdown into an early LP horizontal ball for a cross-up meaty electricity.
2. Trade hits with a well timed surprise electricity then do the follow-up moves as above because Blanka's get-up speed is faster than anyone else in the game.
Blanka can also sneak in horizontal ball into throw. If there is one thing that Rog players like to do, it's counter attack after a horizontal ball. You can pretty much pencil this to work at least once per round against Rog.
- Vs. Blanka (self):
- Vs. Chun-Li:
- Vs. Dhalsim:
- Vs. E. Honda:
Blanka's crouching hitbox is low enough that Honda's standing lp and mp will whiff over Blanka's head.
- Vs. Guile:
- Vs. Ken:
- Vs. M. Bison (dictator):
- Vs. Ryu:
- Vs. Sagat:
Blanka has an advantage against Sagat that most characters don't: he can dizzy him with a full range jump-in against a low tiger shot. The combo is simply j.HK, c.HP. Massive range. Jump straight up, HK on the way down can beat tiger uppercut clean, or make it whiff. And j.MP can beat it clean once the uppercut is in the air. Keep up the normal ground pressure, trade c.HP/c.HK with low tiger shots, crouch under high tiger shots, and then (if you're close enough) whack his outstretched hands with s.MP.
From Decoy: I walk Sagat down till I'm just outside of his extended HP range. Then I like to do c.HP on the ground or jump straight up into HP. This beats his Tiger uppercut clean.
I also do LK vertical ball all over low tiger shots to bait him into taking a step forward to counter, then I land and do c.HK for a knockdown. After that, I use Blanka's getup speed to get-in on Sagat and finish him off.
- Vs. Vega (claw):
- Vs. Zangief:
Stay grounded and just within reach of a crouching fierce punch.
Hitboxes
Standing Normals
- Standing LP:
 |
File:Sf2hf-blanka-lp-sup1.png | File:Sf2hf-blanka-lp-a.png | File:Sf2hf-blanka-lp-r1.png | File:Sf2hf-blanka-lp-r2.png | File:Sf2hf-blanka-lp-sup1.png | 
|
| 3 | 2 | 3 | 4 | 3 | 3 | 1 |
| 5 | 3 | 11* | ||||
- Standing MP:
 |
File:Sf2hf-blanka-mp-s1.png | File:Sf2hf-blanka-mp-a.png | File:Sf2hf-blanka-mp-r1.png | File:Sf2hf-blanka-mp-r2.png | 
|
| 4 | 2 | 2 | 3 | 3 | 1 |
| 6 | 2 | 7* | |||
- Standing HP:
 |
File:Sf2hf-blanka-hp-s1.png | File:Sf2hf-blanka-hp-a1.png | File:Sf2hf-blanka-hp-a2.png | File:Sf2hf-blanka-hp-r1.png | File:Sf2hf-blanka-hp-s1.png | 
|
| 3 | 3 | 4 | 6 | 10 | 7 | 1 |
| 6 | 10 | 18* | ||||
- Standing LK:
 |
File:Sf2hf-blanka-lk-s1.png | File:Sf2hf-blanka-lk-s2.png | File:Sf2hf-blanka-lk-a.png | File:Sf2hf-blanka-lk-s2.png | File:Sf2hf-blanka-lk-s1.png | 
|
| 3 | 2 | 2 | 4 | 3 | 3 | 1 |
| 7 | 4 | 7* | ||||
- Standing MK:
 |
File:Sf2hf-blanka-mk-s1.png | File:Sf2hf-blanka-mk-s2.png | File:Sf2hf-blanka-mk-a.png | File:Sf2hf-blanka-mk-s2.png | File:Sf2hf-blanka-mk-s1.png | 
|
| 3 | 2 | 2 | 4 | 3 | 3 | 1 |
| 7 | 4 | 7* | ||||
- Standing HK:
 |
File:Sf2hf-blanka-hk-s1.png | File:Sf2hf-blanka-hk-a.png | File:Sf2hf-blanka-hk-a2.png |
| 4 | 3 | 6 | 5 |
| 7 | 11 | ||
| File:Sf2hf-blanka-hk-r1.png | File:Sf2hf-blanka-hk-r2.png | File:Sf2hf-blanka-hk-r3.png | File:Sf2hf-blanka-cllk-s1.png | 
|
| 5 | 5 | 5 | 5 | 1 |
| 21* | ||||
Close Standing Normals
- Close Standing LP:
 |
File:Sf2hf-blanka-cllp-s.png | File:Sf2hf-blanka-cllp-a.png | File:Sf2hf-blanka-cllp-r1.png | File:Sf2hf-blanka-cllp-r2.png | File:Sf2hf-blanka-cllp-s.png | 
|
| 3 | 2 | 2 | 4 | 2 | 2 | 1 |
| 5 | 2 | 9* | ||||
- Close Standing MP:
 |
File:Sf2hf-blanka-clmp-s.png | File:Sf2hf-blanka-clmp-a.png | File:Sf2hf-blanka-clmp-s.png | 
|
| 1 | 2 | 4 | 2 | 1 |
| 3 | 4 | 3* | ||
- Close Standing LK:
 |
File:Sf2hf-blanka-cllk-s0.png | File:Sf2hf-blanka-cllk-s2.png | File:Sf2hf-blanka-cllk-s3.png | File:Sf2hf-blanka-cllk-s4.png | File:Sf2hf-blanka-cllk-s5.png | File:Sf2hf-blanka-cllk-a.png |
| 1 | 3 | 3 | 3 | 2 | 2 | 4 |
| 14 | 4 | |||||
| File:Sf2hf-blanka-cllk-s5.png | File:Sf2hf-blanka-cllk-s4.png | File:Sf2hf-blanka-cllk-s3.png | File:Sf2hf-blanka-cllk-s1.png | 
|
| 3 | 3 | 3 | 3 | 1 |
| 13* | ||||
- Close Standing MK:
 |
File:Sf2hf-blanka-cllk-s0.png | File:Sf2hf-blanka-cllk-s2.png | File:Sf2hf-blanka-cllk-s3.png | File:Sf2hf-blanka-cllk-s4.png | File:Sf2hf-blanka-clmk-a1.png | File:Sf2hf-blanka-clmk-a2.png |
| 1 | 3 | 3 | 3 | 2 | 2 | 4 |
| 12 | 6 | |||||
| File:Sf2hf-blanka-cllk-s5.png | File:Sf2hf-blanka-cllk-s4.png | File:Sf2hf-blanka-cllk-s3.png | File:Sf2hf-blanka-cllk-s1.png | 
|
| 3 | 3 | 3 | 3 | 1 |
| 13* | ||||
Crouching Normals
- Crouching LP:
 |
File:Sf2hf-blanka-crlp-s1.png | File:Sf2hf-blanka-crlp-s2.png | File:Sf2hf-blanka-crlp-a.png |
| 3 | 2 | 4 | 3 |
| 9 | 3 | ||
| File:Sf2hf-blanka-crlp-s2.png | File:Sf2hf-blanka-crlp-s1.png | 
|
| 3 | 3 | 1 |
| 7* | ||
- Crouching MP:
 |
File:Sf2hf-blanka-crmp-s1.png | File:Sf2hf-blanka-crmp-s2.png | File:Sf2hf-blanka-crmp-a.png |
| 1 | 3 | 3 | 3 |
| 7 | 3 | ||
| File:Sf2hf-blanka-crmp-r1.png | File:Sf2hf-blanka-crmp-r2.png | File:Sf2hf-blanka-crmp-s2.png | File:Sf2hf-blanka-crmp-s1.png | 
|
| 7 | 3 | 3 | 3 | 1 |
| 17* | ||||
- Crouching HP:
 |
File:Sf2hf-blanka-crhp-s1.png | File:Sf2hf-blanka-crhp-s2.png | File:Sf2hf-blanka-crhp-a.png | File:Sf2hf-blanka-crhp-s2.png | File:Sf2hf-blanka-crhp-s1.png | 
|
| 1 | 3 | 4 | 6 | 10 | 7 | 1 |
| 8 | 6 | 18* | ||||
- Crouching LK:
 |
File:Sf2hf-blanka-crlk-s1.png | File:Sf2hf-blanka-crlk-s2.png | File:Sf2hf-blanka-crlk-a.png | File:Sf2hf-blanka-crlk-s2.png | File:Sf2hf-blanka-crlk-s1.png | 
|
| 1 | 2 | 2 | 4 | 3 | 3 | 1 |
| 5 | 4 | 7* | ||||
- Crouching MK:
 |
File:Sf2hf-blanka-crlk-s1.png | File:Sf2hf-blanka-crlk-s2.png | File:Sf2hf-blanka-crmk-a.png | File:Sf2hf-blanka-crlk-s2.png | File:Sf2hf-blanka-crlk-s1.png | 
|
| 1 | 2 | 2 | 4 | 3 | 3 | 1 |
| 5 | 4 | 7* | ||||
- Crouching HK:
 |
File:Sf2hf-blanka-crhk-s1.png | File:Sf2hf-blanka-crhk-s2.png | File:Sf2hf-blanka-crhk-a.png | File:Sf2hf-blanka-crhk-s2.png | File:Sf2hf-blanka-crhk-s1.png | 
|
| 3 | 2 | 3 | 4 | 10 | 7 | 1 |
| 8 | 4 | 18* | ||||
Aerial Normals
- Neutral/Diagonal Jumping LP:
 |
 |
 |
 |

|
| 2 | 3 | 20 | 3 | ∞ |
| 5 | 20 | ∞ | ||
- Neutral/Diagonal Jumping MP:
 |
 |
 |
 |

|
| 2 | 3 | 12 | 3 | ∞ |
| 5 | 12 | ∞ | ||
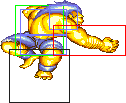
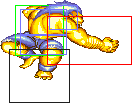
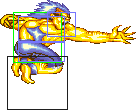
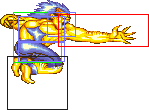
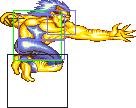
- Neutral Jumping HP:
 |
 |
 |
 |
 |
 |

|
| 1 | 3 | 3 | 6 | 3 | 3 | ∞ |
| 1* | 3* | ∞ | ||||
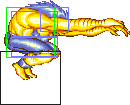
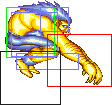
- Diagonal Jumping HP:
 |
 |
 |

|
| 2 | 3 | 6 | ∞ |
| 5 | 6 | ∞ | |
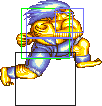
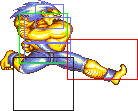
- Neutral Jumping LK:
 |
 |
 |
 |

|
| 2 | 3 | 20 | 3 | ∞ |
| 5 | 20 | ∞ | ||
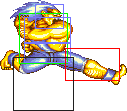
- Diagonal Jumping LK:
 |
 |
 |
 |

|
| 2 | 3 | 20 | 3 | ∞ |
| 5 | 20 | ∞ | ||
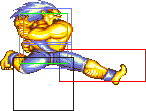
- Neutral Jumping MK:
 |
 |
 |
 |

|
| 2 | 3 | 12 | 3 | ∞ |
| 5 | 12 | ∞ | ||
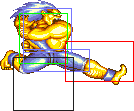
- Diagonal Jumping MK:
 |
 |
 |
 |

|
| 2 | 3 | 12 | 3 | ∞ |
| 5 | 12 | ∞ | ||
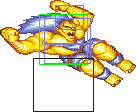
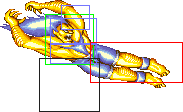
- Neutral Jumping HK:
 |
 |
 |
 |

|
| 2 | 3 | 6 | 3 | ∞ |
| 5 | 6 | ∞ | ||
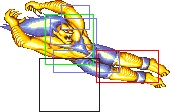
- Diagonal Jumping HK:
 |
 |
 |
 |

|
| 2 | 3 | 6 | 3 | ∞ |
| 5 | 6 | ∞ | ||
Unique Moves
- Rock Crush a.k.a. Headbutt: (On ground and close, ←/→ + MP)
 |
File:Sf2hf-blanka-fmp-s1.png | File:Sf2hf-blanka-fmp-a1.png | File:Sf2hf-blanka-fmp-a2.png | File:Sf2hf-blanka-fmp-a3.png |
| 5 | 4 | 4 | 3 | 2 |
| 9 | 7 | 2 | ||
| File:Sf2hf-blanka-fmp-r1.png | File:Sf2hf-blanka-fmp-r2.png | File:Sf2hf-blanka-fmp-s1.png | 
|
| 5 | 4 | 3 | 1 |
| 13 | |||
Throws
- Wild Fang a.k.a. Bite: (←/→ + HP)
| Damage | 20+(4*n) | File:Sf2hf-blanka-throw.png | |
| Duration | 130 | ||
| Stun | 5~11 | ||
| Stun Timer | 60 | ||
| Range (from axis) | 64 | ||
| Range advantage | 35 | ||
Special Moves
- Electric Thunder: press any single Punch repeatedly
LP version:
 |

|
| 3 | 52+ |
MP version:
 |

|
| 5 | 34+ |
HP version:
 |

|
| 7 | 25+ |
+9 on block if is blocked 3 times (point blank). +4 for 2 blocks.
- Rolling Attack: charge ←, → + Punch (charge 60f)
LP/MP versions (whiff):

|
| 25 |
HP version (whiff):

|
| ∞ |
- Vertical Rolling Attack: charge ↓, ↑ + Kick (charge 60f)
LP version (whiff):
 |
 |

|
| 45 | 6 | 1 |
| 45 | 7 | |
Recovery is unthrowable except for the final frame.
MP version (whiff):
 |
 |

|
| 50 | 6 | 1 |
| 50 | 7 | |
Recovery is unthrowable except for the final frame.
HP version (whiff):
 |
 |

|
| 56 | 6 | 1 |
| 56 | 7 | |
Recovery is unthrowable except for the final frame.
Misc Animations
| Walk back | Neutral | Walk Fwd | Crouch |
 |
 |
 |

|
- Standing reel:
 |
 |
 |

|
- Standing gut reel:
 |
 |
 |

|
- Crouching reel:
 |
 |

|
- Dizzy:
 |
 |
 |
 |

|
| General | Game Mechanics | Strategy | Tiers | |
| The Characters | Balrog (Boxer) | Blanka | Chun-Li | Dhalsim | E. Honda | Guile | Ken | M. Bison (Dictator) | Ryu | Sagat | Vega (Claw) | Zangief |
