Introduction
Misc Animations
| Walk back | Neutral | Walk Fwd | Crouch |
 |
 |
 |

|
- Standing reel:
 |

|
- Standing gut reel:
 |
 |

|
- Crouching reel:
 |
 |

|
- Dizzy:
 |
 |

|
Moves List
Note: All frame data gathered by using the method described at http://code.google.com/p/macrolua/wiki/FrameDataExamples. Some differs from TAkiba's, and is noted by a *.
Normal Moves
Ground Normals
- Standing Jab:
| Damage | 4 |  |
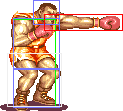 |

|
| Rnd Dmg Table | 0x020 | |||
| Stun | 1~7 | |||
| Stun Timer | 40 | |||
| Chain Cancel | Yes | |||
| Special Cancel | Yes | |||
| On Hit | +5 | |||
| Frame Count | 4 | 4 | 5 | |
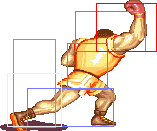
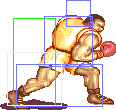
- Standing Strong (far):
| Damage | 14 |  |
 |
 |
 |

|
| Rnd Dmg Table | 0x020 | |||||
| Stun | 5~11 | |||||
| Stun Timer | 60 | |||||
| Chain Cancel | No | |||||
| Special Cancel | No | |||||
| On Hit | +8 | |||||
| Frame Count | 3 | 4 | 4 | 3 | 4 | |
| Simplified | 7 | 4 | 7 | |||
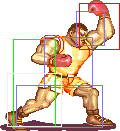
- Standing Strong (close):
| Damage | 16 |  |
 |

|
| Rnd Dmg Table | 0x080 | |||
| Stun | 5~11 | |||
| Stun Timer | 60 | |||
| Chain Cancel | No | |||
| Special Cancel | No | |||
| On Hit | +8 | |||
| Frame Count | 6 | 4 | 7 | |
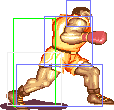
- Standing Fierce (far):
| Damage | 22 |  |
 |
 |
 |

|
| Rnd Dmg Table | 0x020 | |||||
| Stun | 11~17 | |||||
| Stun Timer | 80 | |||||
| Chain Cancel | No | |||||
| Special Cancel | No | |||||
| On Hit | +2 | |||||
| Frame Count | 6 | 3 | 6 | 9 | 6 | |
| Simplified | 9 | 6 | 15 | |||
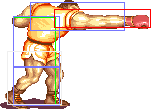
- Standing Fierce (close):
| Damage | 4 |  |
 |
 |
 |

|
| Rnd Dmg Table | 0x080 | |||||
| Stun | 11~17 | |||||
| Stun Timer | 80 | |||||
| Chain Cancel | No | |||||
| Special Cancel | No | |||||
| On Hit | +2 | |||||
| Frame Count | 6 | 3 | 6 | 9 | 6 | |
| Simplified | 9 | 6 | 15 | |||
Strangely low base damage. High variability in random damage, however cl.MP has the same random damage and far higher base damage. Hard to understand why to use this over cl.MP or cl.HK
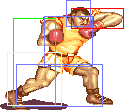
- Standing Short:
| Damage | 4 |  |
 |

|
| Rnd Dmg Table | 0x020 | |||
| Stun | 1~7 | |||
| Stun Timer | 40 | |||
| Chain Cancel | No | |||
| Special Cancel | Yes | |||
| On Hit | +5 | |||
| Frame Count | 4 | 4 | 5 | |
- Standing Forward (far):
| Damage | 14 | 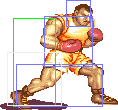 |
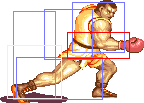 |

|
| Rnd Dmg Table | 0x020 | |||
| Stun | 5~11 | |||
| Stun Timer | 60 | |||
| Chain Cancel | No | |||
| Special Cancel | No | |||
| On Hit | +8 | |||
| Frame Count | 6 | 4 | 7 | |
- Standing Forward (close):
| Damage | 16 |  |
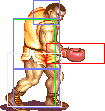 |

|
| Rnd Dmg Table | 0x080 | |||
| Stun | 5~11 | |||
| Stun Timer | 60 | |||
| Chain Cancel | No | |||
| Special Cancel | No | |||
| On Hit | +8 | |||
| Frame Count | 5 | 4 | 7 | |
Close standing Forward and close standing Roundhouse share the same animation.
- Standing Roundhouse (far):
| Damage | 22 |  |
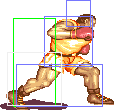 |
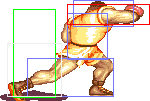 |
 |

|
| Rnd Dmg Table | 0x020 | |||||
| Stun | 11~17 | |||||
| Stun Timer | 80 | |||||
| Chain Cancel | No | |||||
| Special Cancel | No | |||||
| On Hit | +2 | |||||
| Frame Count | 6 | 3 | 6 | 9 | 6 | |
| Simplified | 9 | 6 | 15 | |||
- Standing Roundhouse (close):
| Damage | 24 |  |
 |

|
| Rnd Dmg Table | 0x080 | |||
| Stun | 11~17 | |||
| Stun Timer | 80 | |||
| Chain Cancel | No | |||
| Special Cancel | No | |||
| On Hit | +2 | |||
| Frame Count | 7 | 6 | 15 | |
Close standing Roundhouse and close standing Forward share the same animation.
Aerial Normals
Throws
- Headbutt: (←/→ + Strong or Fierce)
| Damage | 22+(4*n) | 
|
| Duration | 300 | |
| Stun | 1~7 | |
| Stun Timer | 40 | |
| Range (from axis) | 64 | |
| Range advantage | 36 |
Special Moves
- Dashing Straight: (Charge ←, →, P) [charge time: 69f]
| Damage (Jab) | 22 | File:Sf2hf-rog-ds1.png | File:Sf2hf-rog-ds2.png | File:Sf2hf-rog-ds3.png | File:Sf2hf-rog-ds4.png | File:Sf2hf-rog-ds5.png |
| Damage (Strong) | 24 | |||||
| Damage (Fierce) | 26 | |||||
| Random dmg table | 0x080 | |||||
| Stun | 13~19 | |||||
| Stun Timer | 120 | |||||
| Frame Advantage | +5 | |||||
| Frame Count | 1~8/1~16/1~24 | 3 | 8 | 6 | 4 | |
| Simplified | 4~11/4~19/4~27 | 8 | 10 | |||
Startup is 4 frames for all versions point blank, stronger punches can travel further (and thus can have longer startup).
- Dashing Uppercut: (Charge ←, →, K) [charge time: 39f]
| Damage (Short) | 20 | File:Sf2hf-rog-du1.png | File:Sf2hf-rog-du2.png | File:Sf2hf-rog-du3.png | File:Sf2hf-rog-du4.png | |
| Damage (Forward) | 22 | |||||
| Damage (Roundhouse) | 26 | |||||
| Random dmg table | 0x080 | |||||
| Stun | 13~19 | |||||
| Stun Timer | 120 | |||||
| Frame Advantage | +9 | |||||
| Frame Count | 1~8/1~16/1~24 | 3 | 8 | 6 | ||
| Simplified | 4~11/4~19/4~27 | 8 | 6 | |||
Startup is 4 frames for all versions point blank, stronger kicks can travel further (and thus can have longer startup). VERY short charge time, also amazing frame advantage.
- Turn Around Punch (lvl 1 & 2): Hold all 3 Punch or Kick buttons for at least 30f (lvl1) or 120f (lvl2), then release.
Startup
Active/Recovery
| Damage (lvl1) | 22 | File:Sf2hf-rog-tap-a.png | File:Sf2hf-rog-ds4.png | File:Sf2hf-rog-ds5.png |
| Damage (lvl2) | 28 | |||
| Random dmg (lvl1) | 0 | |||
| Random dmg (lvl2) | 6 | |||
| Stun | 13~19 | |||
| Stun Timer | 120 | |||
| Frame Advantage | +1 | |||
| Frame Count | 12 | 6 | 4 | |
| Simplified | 12 | 10 | ||
Level 2 TAP has higher overall damage (22 vs 34), and slightly more range.
- Turn Around Punch (lvl 3,4,5,6,7,final): Hold all 3 Punch or Kick buttons for at least 240f (lvl3), 480f (lvl4), 960f (lvl5), 1440f (lvl6), 1920f (lvl7), or 2400f (final), then release.
Startup
Active/Recovery
| Damage | 28 | File:Sf2hf-rog-tap-a.png | File:Sf2hf-rog-ds4.png | File:Sf2hf-rog-ds5.png |
| Random dmg (lvl3) | 13 | |||
| Random dmg (lvl4) | 21 | |||
| Random dmg (lvl5) | 30 | |||
| Random dmg (lvl6) | 40 | |||
| Random dmg (lvl7) | 51 | |||
| Random dmg (final) | 64 | |||
| Stun | 13~19 | |||
| Stun Timer | 120 | |||
| Frame Advantage | +1 | |||
| Frame Count | 12 | 6 | 4 | |
| Simplified | 12 | 10 | ||
Level 3 and above TAPs lose startup invincibility. Higher levels travel further, and do more damage.
The Basics
Advanced Strategy
Balrog is a character that demands to be played aggressively. Keep pressure on the opponent with Dashing Straights and standing Fierce (Dashing Straight, (charge) s.Fierce, Dashing Straight, (charge) s.Fierce, etc.). Charge Turn Punches (PPP or KKK) in the background often while using the other buttons to mount an offense. The more aggressive you are, the more effectively you can bait (Shoryukens) and punish.
Turn Punch has a pretty big window of invincibility at the beginning. You can use the invincibility to pass through attacks such as:
- Fireballs - All character fireballs can be passed through. Guile's slow Sonic Boom is more difficult.
- E. Honda Headbutt - When Balrog rolls just before getting hit, Honda's headbutt recoils in place. As Honda recovers, Balrog's punch comes out and hits.
- Blanka roll - If Turn Punch is timed correctly, Blanka will simply continue through Balrog.
- Psycho Crusher - If Turn Punch is timed correctly, Bison will simply continue through Balrog. Timing must be very close because of Bison's long legs during the Psycho Crusher.
- Most normals - Good counter for Dhalsim limbs and/or sweeps
Another good tactic, once you've got the opponent on the defensive, is to rush with Dashing Uppercuts (B, F + K) that whiffs overhead against crouching opponents. Immediately after the whiff, follow with a throw.
After a successful throw, hold towards the opponent to pass under them as they fall back to the ground. You can cross-up with a normal or tick into another throw.
Standing Fierce connects with some crouching opponents but whiffs overhead against others. Known whiffs include:
- Ryu
- Ken
Known connects include:
- Sagat
- Zangief
- Dhalsim
- Chun Li (?)
Match-ups
Vs. Balrog (boxer-self):
Vs. Blanka:
Vs. Chun-Li:
Vs. Dhalsim:
Vs. E. Honda:
Vs. Guile:
Vs. Ken:
Vs. M. Bison (dictator):
Vs. Ryu:
Vs. Sagat:
Vs. Vega (claw):
Vs. Zangief:
| General | Game Mechanics | Strategy | Tiers | |
| The Characters | Balrog (Boxer) | Blanka | Chun-Li | Dhalsim | E. Honda | Guile | Ken | M. Bison (Dictator) | Ryu | Sagat | Vega (Claw) | Zangief |