Introduction
Lee comes from a long line of Bajiquan masters, so he strives for perfection. He wanted to get revenge on Karnov for the death of his father Gentoku, but has learned that revenge does not make you strong, and wants to prove himself by fighting Karnov with honor. This doesn't come through in his gameplay.
A hardcore rushdown character, Lee is a contender for #1 in the game, though he's in competition with Zazie. You can expect the simplest combos to lead to staggering damage with Lee. He demolishes most weak points in the game with ease. His speed is unmatched thanks to his Dagger Punch, which hits weak points easily along with its knockdown followup, TetsuzanKou. Lee is easy to pick up, and he becomes absolutely deadly in the hands of a skilled player.
His main weakness is fireballs, as he lacks a move designed to get around them like some characters. However, you can often get the jump on people with his quick rekka.
Weak Spot
| Stand/crouch |  |
 |
 |
 |
| Frame count | - | 2 | 2 | - |
| All jumps |  |
 |
 |
| Frame count | 2 | 33 | 1 |
Lee's weak point is interesting, and that means hard to hit for most characters. It's slightly too high for crouching LKs, but still so low that the majority of standing buttons don't hit it. When jumping, it's common for it to be hit by anti-airs or fireballs, which is the one downside.
Color Options
| Punch | Kick |
 |
 |
Moves List
Quick Reference
Normal Moves
Light Punch 
- Standing LP (Close): activation range = 39
| Damage | 12 | Startup |  |
Recovery |
| Chain cancel | yes | |||
| Special cancel | yes | |||
| On hit | +6 | |||
| On block | +7 | |||
| Frame count | 2 | 3 | 3 | |
Lee's jabs all do more damage than his cr.LK, so they're good for combos. Taller hitbox than far LP lets it hit more weak points.
Standing weak: Ray, Feilin
Crouching weak: Matlok, Mizoguchi, Zazie
Always weak: Ryoko, Samchay, Clown, Karnov
- Standing LP (Far):
| Damage | 12 | Startup |  |
Recovery |
| Chain cancel | yes | |||
| Special cancel | yes | |||
| On hit | +6 | |||
| On block | +7 | |||
| Frame count | 2 | 3 | 3 | |
Good disjointed jab used to interrupt attacks like Dynamite (and Dagger Punch in the mirror). Unlike a lot of st.LPs, this one can't be crouched entirely.
- Crouching LP:
| Damage | 12 | Startup |  |
Recovery |
| Chain cancel | yes | |||
| Special cancel | yes | |||
| On hit | +6 | |||
| On block | +7 | |||
| Frame count | 2 | 3 | 3 | |
Slightly less range than standing far LP. You will be using this inside of BnBs.
- Jumping LP (Diagonal):
| Damage | 12 | Startup | 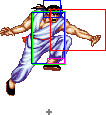 |
| Chain cancel | no | ||
| Special cancel | no | ||
| Frame count | 4 | ∞ | |
This has good range to stuff attacks, but usually you'll prefer j.LK as it hits deeper.
- Jumping LP (Neutral):
| Damage | 12 | Startup |  |
| Chain cancel | no | ||
| Special cancel | no | ||
| Frame count | 4 | ∞ | |
Situational air-to-air with a better vertical hitbox than diagonal jump LP, and just 1px less horizontal range.
Heavy Punch 
- Standing (Close): activation range = 47
| Damage | 30 | Startup |  |
 |
Recovery |
| Chain cancel | no | ||||
| Special cancel | yes | ||||
| On hit | -3 | ||||
| On block | -8 | ||||
| Frame count | 4 | 3 | 3 | 18 | |
Somewhat unreliable in combos because of its short range, but it hits a lot of weak points. Misses weak points on Marstorius, standing Matlok, Mizoguchi, Zazie, and crouching Lee.
- Standing HP (Far):
| Damage | 30 | Startup |  |
 |
Recovery |
| Chain cancel | no | ||||
| Special cancel | yes | ||||
| On hit | -3 | ||||
| On block | -8 | ||||
| Frame count | 4 | 6 | (16) 18 | ||
This is ridiculous. Because of FHD's often tendency to adjust hurtboxes after active frames, this allows such a thing to exist. This is one of your best tools so far. It's a poke, it's an anti-air, it's a meaty. But after the active frames your hurtboxes extends like crazy (on the whole 16 frames!) and whiffing this move will be really painful.
- Crouching HP:
| Damage | 30 | Startup |  |
 |
Recovery |
| Chain cancel | no | ||||
| Special cancel | yes | ||||
| On hit | -3 | ||||
| On block | -8 | ||||
| Frame count | 4 | 6 | (6) 18 | ||
One of the longest-reaching buttons in the game. This makes it very reliable in combos and at beating other normals in footsies. It's harder to whiff punish than standing HP.
- Jumping HP (Diagonal/Neutral):
| Damage | 28 | Startup | 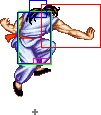 |
Recovery |
| Chain cancel | no | |||
| Special cancel | no | |||
| Frame count | 4 | 6 | ∞ | |
This attack has a unique trait. Unlike standing hard normals, aerial attacks in this game always have properly adjusted priority. But in case of this normal, hand doesn't becomes vulnerable at all. This attach has better range than d.jump LP, so maybe you can preffer it as an air-to-air.
Light Kick 
- Standing (Close): activation range = 47
| Damage | 6 | Startup | 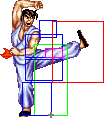 |
Recovery |
| Chain cancel | no | |||
| Special cancel | yes | |||
| On hit | +4 | |||
| On block | +5 | |||
| Frame count | 2 | 3 | 5 | |
Doesn't really have any use.
- Standing LK (Far):
| Damage | 6 | Startup |  |
Recovery |
| Chain cancel | no | |||
| Special cancel | yes | |||
| On hit | +2 | |||
| On block | +3 | |||
| Frame count | 2 | 4 | 6 | |
May be useful to target specific weak spots.
- Crouching LK:
| Damage | 6 | Startup |  |
Recovery |
| Chain cancel | yes | |||
| Special cancel | yes | |||
| On hit | +6 | |||
| On block | +7 | |||
| Frame count | 2 | 3 | 3 | |
Another tool used in chains. Quick with acceptable range.
- Jumping LK (Diagonal):
| Damage | 12 | Startup |  |
| Chain cancel | no | ||
| Special cancel | no | ||
| Frame count | 4 | ∞ | |
Most excellent for crossups, this attack stays out forever and has good priority to boot.
- Jumping LK (Neutral):
| Damage | 12 | Startup |  |
| Chain cancel | no | ||
| Special cancel | no | ||
| Frame count | 4 | ∞ | |
You have much better air-to-airs than this. Don't use it.
Heavy Kick 
- Standing HK (Close): activation range = 47
| Damage | 28 | Startup |  |
Recovery |
| Chain cancel | no | |||
| Special cancel | yes | |||
| On hit | -5 | |||
| On block | -10 | |||
| Frame count | 4 | 6 | 20 | |
Solid move. Hits really high it can easily hit Zazie standing weak spot. Use it for target such weak spots.
- Standing HK (Far):
| Damage | 28 | Startup | 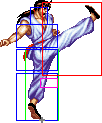 |
Recovery |
| Chain cancel | no | |||
| Special cancel | no | |||
| On hit | +1 | |||
| On block | -4 | |||
| Frame count | 6 | 6 | 14 | |
Also a solid attack that hits as high as the one above. The leg never becomes vulnerable, so it's a possible anti-air option. Startup is longer than usual, but recovery is surprisingly fast.
- Crouching HK:
| Damage | 28 | Startup |  |
Recovery |
| Chain cancel | no | |||
| Special cancel | yes | |||
| On hit | kd | |||
| On block | -8 | |||
| Frame count | 4 | 6 | 18 | |
Sweep with a little more range than you would think. But the leg has a weak spot on it, so it's risky to use.
- Jumping HK (Diagonal):
| Damage | 28 | Startup | 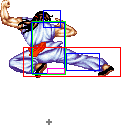 |
Recovery |
| Chain cancel | no | |||
| Special cancel | no | |||
| Frame count | 4 | 6 | ∞ | |
Excellent jump-in and crossup with good priority.
- Jumping HK (Neutral):
| Damage | 28 | Startup | 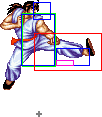 |
Recovery |
| Chain cancel | no | |||
| Special cancel | no | |||
| Frame count | 4 | 6 | ∞ | |
Not worth your time.
Throws
| Damage | 32 |  |
| Range (From pushbox) |
32 |
Lee tosses the opponent over his shoulder. Leaves them pretty far outside of the corner, but you can use HP Quick Dagger Punch to close in.
Special Moves
| Damage | 32 | Startup |  |
Recovery |
| On hit | +4 | |||
| On block | -1 | |||
| Frame count | Light | 9 | 5 | 12 |
| Hard | 14 | 5 | 12 |
A rushing punch. LP version travels around 1/4 of the screen and HP version almost 1/2. Hitbox appears only after dash is over. This is your main combo ender, it's very damaging after you do a follow-up and is fairly safe on block (be careful against Marstorius though, you'll be begging to get Double Germaned). This move hits on the middle, so doing a combo against characters with weak points in that zone like Ray and Yungmie gives you a free dizzy and, usually, the match. At active frames and a bit before them Lee's feet are can't be hit with any character's crouching LKs. But that doesn't mean you're safe! Don't mindlessly spam this move or your opponent will start counter it one after another (analogy with E.Honda's Headbutt in SF2) and probably wipe out your weak spot.
| Damage | 32 | Startup |  |
Recovery |
| On hit | +4 | |||
| On block | -1 | |||
| Frame count | Light | 5 | 5 | 12 |
| Hard | 10 | 5 | 12 |
A faster version of the rekka. The LP version barely moves you forward, but the HP version covers nearly the entire screen at a blazing fast speed. They both have a better hitbox than the normal rekka by a bit.
This move is your best tool to deal with zoners. It's so fast that projectile characters have to be extremely careful to not get caught during their projectile's startup against Lee. If one of these connects, you can score a knockdown (after the follow-up) and get the control of the match.
You'll rarely use it in combos, as Quick Dagger Punch tends to whiff the opponent and cross him up leaving you open for punishment. You can abuse this if people block too much though.
| Damage | 16 | Startup |  |
Recovery |
| On hit | +2 | |||
| On block | -3 | |||
| Frame count | 6 | 6* | 16 | |
- *As soon as active frame hits opponent, Lee holds 2f of active frame animation and then goes straight into recovery frames
- Does a tiny bit more damage than the HP follow-up, but doesn't knockdown. This is reason enough to stick to the HP version.
| Damage | 14 | Startup |  |
Recovery |
| On hit | kd | |||
| On block | -3 | |||
| Frame count | 6 | 8* | 16 | |
- *As soon as active frame hits opponent, Lee holds 2f of active frame animation and then goes straight into recovery frames
- A bit less damaging than the LP version, but it has the huge benefit of a knockdown, which lets you continue the pressure, go for a crossup, etc. It also has a bigger hitbox, which means it covers more dizzy spots than the LP version.
| Damage | Light 22 Hard 33 total |
 |
 |
 |
 |
 |
Recovery | Landing |
| On hit | Light kd/kd Hard -19/kd | |||||||
| On block | Light -17/-13 Hard -24/-20 | |||||||
| Frame count | Light | 2 | 3 | 1 | 1 | 8 | 14 | 6 |
| Hard | 2 | 3 | 1 | 1 | 10 | 19 | 6 |
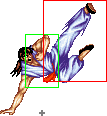
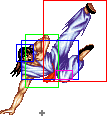
A solid anti-air, works well to deal with Balloons and other aerial assaults. You can also use it to catch an opponent trying to retaliate after a blocked rekka, but of course be careful when doing this. Both hits of LK version does knockdown, in HK version only 2nd hit knockdowns. Opponent may fall from the 2nd hit.
Hidden Move
| Damage | 72 total | Startup |  |
 |
 |
 |
 |
Recovery | ||||
| On hit | +14 | |||||||||||
| On block | +9 | |||||||||||
| Frame count | 4 | 1 | 1 | 1 | 1 | 1 | 1 | 1 | 1 | 15* | 18 | |
*As soon as active frame hits opponent, Lee holds 2f of active frame animation and then goes straight into recovery frames
Lee steps forward and performs a powerful multi-hit palm blast. The input is pretty hard to master as you have to end up in ![]() . If you continue to
. If you continue to ![]() you'll get a Dagger Punch instead. This move is well worth the effort of mastering its motion though, as it is excellent to kill dizzied opponents. You can combo it after HK and follow up with even more stuff like a HP Quick rekka or cr.HP xx LP rekka in the corner. It makes Lee a really scary character since one dizzy usually means death. This move is especially painful to characters like Ray since it hits middle weak points multiple times. Up to 5 hits to be exact. The last hit treats as projectile and have more vertical range than previous hits. Projectile priority gives Lee a huge benefit by adding impact freeze frames to opponent's hitstun/blockstun animation, thus making this move safe both on hit and block.
you'll get a Dagger Punch instead. This move is well worth the effort of mastering its motion though, as it is excellent to kill dizzied opponents. You can combo it after HK and follow up with even more stuff like a HP Quick rekka or cr.HP xx LP rekka in the corner. It makes Lee a really scary character since one dizzy usually means death. This move is especially painful to characters like Ray since it hits middle weak points multiple times. Up to 5 hits to be exact. The last hit treats as projectile and have more vertical range than previous hits. Projectile priority gives Lee a huge benefit by adding impact freeze frames to opponent's hitstun/blockstun animation, thus making this move safe both on hit and block.
The Basics
Lee Diendo is a full rushdown character, your main objective is to use your Dagger Punch to carry your opponent to the corner and then use your Energy Palm for cheap damage.
Dragon Kick is a good anti air and reversal, but it's pretty easy to punish. You can also use it to cross up after a rekka knockdown.
The Dagger Punch variations depends of the distance of your opponent, regular rekka for close ones or quick rekka for far ones, follow ups are optional but TetsuzanKou is preferred for knockdown.
Energy Palm had a weird secuence but its had a good low and medium hurtbox and multihits for cheap damage.
More of his normals are decent for medium to short poking, anyway, use your Dagger Punch for long distances.
Combos
- cr.LK xx LP Rekka or LP/HP Quick Rekka xx LP/HP Followup
- Lee is able to link lights into lunge punch (except normal HP version), this allows him to convert any successfull low into a simple bnb with adequate damage.
- cr.LK x3~4, cr.HP xx LP Rekka or LP/HP Quick Rekka xx LP/HP Followup
- Standart combo with multiple lights, heavy punch and Rekka as ender.
- j.HP/HK, cr.HP xx Any Rekka xx LP/HP Followup
- Standart bnb from a jump-in, pretty easy to hit because of cr.HP's great horisontal reach.
- Palm Blast, LP Rekka or HP Quick Rekka xx LP/HP Followup
- Lee's hidden move is very powerful and also can be linked into certain versions of Rekkas afterwards, though it could be difficult due to input drops after Palm Blast's projectile part.
- cl.HP/HK xx Palm Blast, LP Rekka or HP Quick Rekka xx LP/HP Followup
- Essentially the same combo as above but with close heavy at start. Special cancelling into Palm Blast is difficult because of lengthy input but it grants additional unscaled damage in combo.
- j.HK, st.LP xx Palm Blast, HP Quick Rekka xx LP/HP Followup
- (Corner only) cl.HP/HK xx Palm Blast, (walk-in) cr.HP xx LP Rekka or HP Quick Rekka xx LP/HP Followup
- Corner version of a combo above. Adds cr.HP link after Palm Blast, though to do this you need to walk-in first to be able to land cr.HP. Easier to land on P2 side due to lesser pushback.
- (Corner only) cr.LK xx HP Quick Rekka, cr.LK xx HP Quick Rekka, cr.LK xx HP Quick Rekka...
- Lee's corner infinite where you need to link Rekka into low light.
- (Corner only) Palm Blast, (walk-in) Palm Blast, (walk-in) Palm Blast
- With reeally precise walk-ins it is possible to link several Palm Blasts, TAS level difficulty.
Advanced Strategy
This is tough, but it's game over when you land this...
- cl.HK xx Palm blast, HP Quick rekka > Light followup
This is 70% plus on most characters. If you really want your Lee to shine, this the combo that will take you to the top. Link between Palm blast and HP Quick rekka is very tight, but in corner you can use Quick LP Rekka instead, it's easier.
Match-ups
| Ray | Lee | Zaz | Kar | Jea | Miz | Sam | Yun | Mat | Clo | Fei | Mar | Ryo | |
| Lee | - | - | - | - | - | - | - | - | - | - | - | - | - |
Vs. Clown:
Lee can beat Pick-a-Card with his Palm Blast or trade hitting Head Stomp with Senkyutai, Lee must get close to him to had advantage in the match
Vs. Jean:
Vs. Ryoko:
A matchup in your favour. Look for crouching and standing Hard Punches. Be cautious about getting too close to Ryoko because she does have the slide tackle to worry about.
Vs. Karnov:
Senkyutai will beat his charge kicks. Make sure you Senkyutai his Balloon after the invincibility has worn off. You don't have that much to worry about in this matchup.
Vs. Lee (self):
turtle
Vs. Feilin:
Vs. Yungmie:
Vs. Marstorius:
You need to be able to play a careful spacing game against Mars. His Double German will own your Dagger Punch on block, so don't resort to spam. Look for openings to plant his C.HP and S.HP, this will be your formula for winning. A final note: Don't jump in at all. Just don't.
Vs. Matlok:
Vs. Mizoguchi:
Vs. Ray:
If you get a dizzy, this match is over. Your Fireball corner combo will take full advantage of Ray's weakness for 60%+ damage. Zetsu hits his weak spot. You can wait for a Wheel Kick to SenkyuTai back for a solid counter. Lee definately has the edge here.
Vs. Samchay:
Similar to the Ray matchup, minus Wheel Kick. Samchay *can* Ti Kau Koon your Dagger Punch, but if you stay unpredictable this will almost never happen.


