

Introduction
Ken is Ryu's best friend and rival. They trained in the same dojo under the same master's guidance so both have similar fighting techniques. However, while Ken and Ryu were pretty much the same in the World Warrior version, they're very different in Champion Edition and have distinct gameplay.
Compared to Ryu, Ken has a slower fireball, a faster and more efficient Shoryuken and a weaker Hurricane Kick. There are some differences regarding hitboxes, as for example the Hurricane Kick start up that has no invincibility. But the most interesting is the diagonal jumping HP, that has a smaller hurtbox making this one of the most important normal attacks on Ken's arsenal, with high priority. His Back Roll is good for putting adversaries on the corner from far distances. Also, due to his Shoryuken nature, Ken can't be safe jumped.
Color Options
| Start | Default |
 |

|
Moves List
Normal Moves
- Axe Kick: close, Hard Kick
- Drop Knee: Light Kick in air
- Arm Throw (Seoi Nage): close, b or f + Medium or Hard Punch
- Back Roll (Tomoe Nage): close, b or f + Medium or Hard Kick
Special Moves
- Fireball (Hadouken): d, df, f + Punch (slower than Ryu's)
- Dragon Punch (Shoryuken): f, d, df + Punch (wider range than Ryu's)
- Hurricane Kick (Tatsumaki Senpuu Kyaku): d, db, b + Kick
The Basics
- Anti-Airs: Shoryuken, crouching High Punch, standing Hard Kick
- High Pokes: standing Medium Punch
- Low Pokes: crouching Medium Kick
Combos
- cr.MK xx Hadouken or Shoryuken
- s.HP xx Shoryuken (the third hit whiffs on Honda and Chun Li)
- Diagonal Jumping HK s.HP xx Shoryuken (a.k.a. Touch of Dead or simply ToD)
- cr.LP CPS1 Chain s.HP xx Shoryuken
Hitboxes
Standing Normals
- Standing LP:
| Damage | 6 |  |
 |
 |

|
| Stun | 1~7 | ||||
| Stun Timer | 40 | ||||
| Chain Cancel | Yes | ||||
| Special Cancel | Yes | ||||
| Frame Advantage | +6 | ||||
| Frame Count | 2 | 4 | 4 | 1 | |
| Simplified | 1+2 | 4 | 5 | ||
- Standing MP:
| Damage | 16 |  |
 |
 |
 |
 |

|
| Stun | 5~11 | ||||||
| Stun Timer | 60 | ||||||
| Chain Cancel | No | ||||||
| Special Cancel | Yes | ||||||
| Frame Advantage | +10 | ||||||
| Frame Count | 1 | 2 | 4 | 3 | 3 | 1 | |
| Simplified | 1+3 | 4 | 7 | ||||
- Standing HP:
| Damage | 26 |  |
 |
 |
 |
 |

|
| Stun | 11~17 | ||||||
| Stun Timer | 80 | ||||||
| Chain Cancel | No | ||||||
| Special Cancel | No | ||||||
| Frame Advantage | -6 | ||||||
| Frame Count | 3 | 2 | 6 | 10 | 12 | 1 | |
| Simplified | 1+5 | 6 | 23 | ||||
- Standing LK:
| Damage | 8 |  |
 |
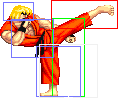 |
 |

|
| Stun | 1~7 | |||||
| Stun Timer | 40 | |||||
| Chain Cancel | Yes | |||||
| Special Cancel | No | |||||
| Frame Advantage | +3 | |||||
| Frame Count | 3 | 3 | 8 | 4 | 1 | |
| Simplified | 1+6 | 8 | 5 | |||
- Standing MK:
| Damage | 16 |  |
 |
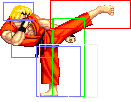 |
 |

|
| Stun | 5~11 | |||||
| Stun Timer | 60 | |||||
| Chain Cancel | No | |||||
| Special Cancel | No | |||||
| Frame Advantage | +1 | |||||
| Frame Count | 5 | 6 | 12 | 6 | 1 | |
| Simplified | 1+11 | 12 | 7 | |||
- Standing HK:
| Damage | 22 |  |
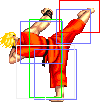 |
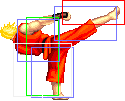 |
 |

|
| Stun | 11~17 | |||||
| Stun Timer | 80 | |||||
| Chain Cancel | No | |||||
| Special Cancel | No | |||||
| Frame Advantage | -2 | |||||
| Frame Count | 2 | 4 | 8 | 10 | 7 | |
| Simplified | 2+1 | 12 | 17 | |||
Close Standing Normals
- Close Standing LP:
| Damage | 6 |  |
 |

|
| Stun | 1~7 | |||
| Stun Timer | 40 | |||
| Chain Cancel | Yes | |||
| Special Cancel | Yes | |||
| Frame Advantage | +6 | |||
| Frame Count | 1+2 | 4 | 5 | |
- Close Standing MP:
| Damage | 16 |  |
 |
 |
 |
 |
 |

|
| Stun | 5~11 | |||||||
| Stun Timer | 60 | |||||||
| Chain Cancel | No | |||||||
| Special Cancel | Yes | |||||||
| Frame Advantage | +2 | |||||||
| Frame Count | 1 | 2 | 2 | 6 | 4 | 3 | 4 | |
| Simplified | 1+3 | 2 | 17 | |||||
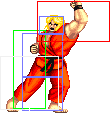
- Close Standing HP:
| Damage | 26 |  |
 |
 |
 |

|
| Stun | 11~17 | |||||
| Stun Timer | 80 | |||||
| Chain Cancel | No | |||||
| Special Cancel | Yes | |||||
| Frame Advantage | -8 | |||||
| Frame Count | 3 | 2 | 6 | 10 | 13 | |
| Simplified | 1+3 | 8 | 23 | |||
- Close Standing LK:
| Damage | 8 |  |
 |
 |
 |

| |
| Stun | 1~7 | ||||||
| Stun Timer | 40 | ||||||
| Chain Cancel | Yes | ||||||
| Special Cancel | No | ||||||
| Frame Advantage | +5 | ||||||
| Frame Count | 2 | 3 | 6 | 3 | 1 | ||
| Simplified | 1+5 | 6 | 4 | ||||
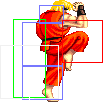
- Close Standing MK:
| Damage | 16 |  |
 |
 |
 |
 |

|
| Stun | 5~11 | ||||||
| Stun Timer | 60 | ||||||
| Chain Cancel | No | ||||||
| Special Cancel | No | ||||||
| Frame Advantage | +6 | ||||||
| Frame Count | 2 | 1 | 6 | 4 | 4 | 1 | |
| Simplified | 1+3 | 6 | 9 | ||||
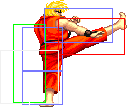
- Close Standing HK:
| Damage | 24,6 |  |
 |
 |
 |
 |

|
| Stun | 11~17 | ||||||
| Stun Timer | 80 | ||||||
| Chain Cancel | No | ||||||
| Special Cancel | Yes/No | ||||||
| Frame Advantage | +8 | ||||||
| Frame Count | 3 | 4 | 8 | 4 | 10 | 1 | |
| Simplified | 1+7 | 12 | 11 | ||||
Crouching Normals
- Crouching LP:
| Damage | 6 |  |
 |
 |

|
| Stun | 1~7 | ||||
| Stun Timer | 40 | ||||
| Chain Cancel | Yes | ||||
| Special Cancel | Yes | ||||
| Frame Advantage | +6 | ||||
| Frame Count | 2 | 4 | 4 | 1 | |
| Simplified | 1+2 | 4 | 5 | ||
- Crouching MP:
| Damage | 14 |  |
 |
 |
 |
 |

|
| Stun | 5~11 | ||||||
| Stun Timer | 60 | ||||||
| Chain Cancel | No | ||||||
| Special Cancel | Yes | ||||||
| Frame Advantage | +10 | ||||||
| Frame Count | 1 | 2 | 4 | 3 | 3 | 1 | |
| Simplified | 1+3 | 4 | 7 | ||||
- Crouching HP:
| Damage | 22 |  |
 |
 |
 |
 |

|
| Stun | 11~17 | ||||||
| Stun Timer | 80 | ||||||
| Chain Cancel | No | ||||||
| Special Cancel | Yes,No | ||||||
| Frame Advantage | -11 | ||||||
| Frame Count | 3 | 3 | 8 | 10 | 12 | 1 | |
| Simplified | 1+3 | 11 | 23 | ||||
- Crouching LK:
| Damage | 6 |  |
 |
 |

|
| Stun | 1~7 | ||||
| Stun Timer | 40 | ||||
| Chain Cancel | Yes | ||||
| Special Cancel | Yes | ||||
| Frame Advantage | +6 | ||||
| Frame Count | 2 | 4 | 4 | 1 | |
| Simplified | 1+2 | 4 | 5 | ||
- Crouching MK:
| Damage | 14 |  |
 |
 |
 |
 |

|
| Stun | 5~11 | ||||||
| Stun Timer | 60 | ||||||
| Chain Cancel | No | ||||||
| Special Cancel | Yes | ||||||
| Frame Advantage | +6 | ||||||
| Frame Count | 1 | 2 | 6 | 4 | 4 | 1 | |
| Simplified | 1+3 | 6 | 9 | ||||
- Crouching HK:
| Damage | 22 |  |
 |
 |
 |

|
| Stun | 11~17 | |||||
| Stun Timer | 80 | |||||
| Chain Cancel | No | |||||
| Special Cancel | Yes | |||||
| Frame Advantage | +2 | |||||
| Frame Count | 3 | 6 | 6 | 8 | 11 | |
| Simplified | 1+3 | 6 | 25 | |||
Aerial Normals
- Neutral Jumping LP:
| Damage | 10 |  |

|
| Stun | 1~7 | ||
| Stun Timer | 40 | ||
| Frame Count | 2 | ∞ | |
- Diagonal Jumping LP:
| Damage | 8 |  |

|
| Stun | 1~7 | ||
| Stun Timer | 40 | ||
| Frame Count | 2 | ∞ | |
- Neutral/Diagonal Jumping MP:
| Damage | 16 |  |
 |
 |
 |
 |
 |

|
| Stun | 5~11 | |||||||
| Stun Timer | 50 | |||||||
| Frame Count | 2 | 2 | 20 | 4 | 4 | 4 | ∞ | |
| Simplified | 4 | 20 | ∞ | |||||
- Neutral Jumping HP:
| Damage | 24 |  |
 |
 |
 |
 |
 |

|
| Stun | 11~17 | |||||||
| Stun Timer | 60 | |||||||
| Frame Count | 2 | 2 | 20 | 4 | 4 | 4 | ∞ | |
| Simplified | 4 | 20 | ∞ | |||||
- Diagonal Jumping HP:
| Damage | 22 |  |
 |
 |
 |
 |
 |

|
| Stun | 11~17 | |||||||
| Stun Timer | 60 | |||||||
| Frame Count | 2 | 2 | 8 | 4 | 4 | 4 | ∞ | |
| Simplified | 4 | 8 | ∞ | |||||
- Neutral Jumping LK:
| Damage | 10 |  |
 |

|
| Stun | 1~7 | |||
| Stun Timer | 40 | |||
| Frame Count | 3 | 40 | ∞ | |
- Diagonal Jumping LK:
| Damage | 8 |  |
 |

|
| Stun | 1~7 | |||
| Stun Timer | 40 | |||
| Frame Count | 2 | 3 | ∞ | |
| Simplified | 5 | ∞ | ||
- Neutral Jumping MK:
| Damage | 16 |  |
 |
 |
 |

|
| Stun | 5~11 | |||||
| Stun Timer | 50 | |||||
| Frame Count | 5 | 13 | 6 | 6 | ∞ | |
| Simplified | 5 | 13 | ∞ | |||
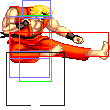
- Diagonal Jumping MK:
| Damage | 16 |  |
 |
 |
 |
 |
 |

|
| Stun | 5~11 | |||||||
| Stun Timer | 50 | |||||||
| Frame Count | 2 | 3 | 13 | 3 | 3 | 3 | ∞ | |
| Simplified | 5 | 13 | ∞ | |||||
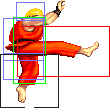
- Neutral Jumping HK:
| Damage | 24 |  |
 |
 |
 |
 |
 |

|
| Stun | 11~17 | |||||||
| Stun Timer | 60 | |||||||
| Frame Count | 2 | 4 | 4 | 3 | 3 | 3 | ∞ | |
| Simplified | 2 | 8 | ∞ | |||||
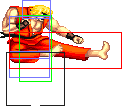
- Diagonal Jumping HK:
| Damage | 22 |  |
 |
 |
 |
 |
 |

|
| Stun | 11~17 | |||||||
| Stun Timer | 60 | |||||||
| Frame Count | 2 | 3 | 7 | 3 | 3 | 3 | ∞ | |
| Simplified | 5 | 7 | ∞ | |||||
Throws
- Normal Throw Boxes (←/→ + HP) and (←/→ + HK)
| Damage | 32 | 
| |
| Duration | 130 | ||
| Stun | 7~13 | ||
| Stun Timer | 100 | ||
| Range (from axis) | 48 | ||
| Range advantage | 19 | ||
Special Moves
- Hadoken: (↓↘→ + P)
Startup:
 |
 |
 |

| |
| Frame Count | 2 | 7 | 2 | 1 |
Active:
LP version:
| Damage | 12 |  |
 |
 |

|
| Stun | 13~19 | ||||
| Stun Timer | 120 | ||||
| Frame Advantage | - | ||||
| Frame Count | 1 | 1 | 2 | 2.. | |
| Simplified | 40 | ||||
MP version:
| Damage | 12 |  |
 |
 |

|
| Stun | 13~19 | ||||
| Stun Timer | 120 | ||||
| Frame Advantage | - | ||||
| Frame Count | 1 | 1 | 2 | 2.. | |
| Simplified | 40 | ||||
HP version:
| Damage | 12 |  |
 |
 |

|
| Stun | 13~19 | ||||
| Stun Timer | 120 | ||||
| Frame Advantage | - | ||||
| Frame Count | 1 | 1 | 2 | 2.. | |
| Simplified | 40 | ||||
- Shoryuken: →↓↘ + Punch
Startup:
| Damage | 32/32,16 |  |
 |
 |
 |
 |

|
| Stun | 13~19 | ||||||
| Stun Timer | 120 | ||||||
| Frame Advantage | -11/-22/-33 | ||||||
| Jab | 4 | 4 | 14 | 6 | 11 | 5 | |
| Strong | 4 | 4 | 22 | 6 | 14 | 5 | |
| Fierce | 4 | 4 | 26 | 6 | 21 | 5 | |
- Tatsumaki Senpuu Kyaku: ↓↙← + Kick
Startup:
| Damage | 10 |  |
 |

|
| Stun | 13~19 | |||
| Stun Timer | 120 | |||
| Frame Advantage | -1 | |||
| Frame Count | 4 | 4 | 3 | |
Active:
 |
 |
 |

| |
| Frame Count | 1 | 1 | 2 | 2 |
Short: 2 Times
Foward: 3 Times
Rounhouse: 4 Times
Recovery:
 |
 |
 |

| |
| Frame Count | 4 | 4 | 4 | 0 |
Misc Animations
| Walk back | Neutral | Walk Fwd | Crouch |
 |
 |
 |

|
- Standing reel:
 |
 |
 |

|
- Standing gut reel:
 |
 |
 |

|
- Crouching reel:
 |
 |

|
- Dizzy:
 |
 |

|
Advanced Strategy
Ken isn't meant to be played defensively. The very nature of his moves don't allow him to sit on the corner and wait his opponent to make a mistake. Ken's ideal play area is the middle of the battle arena, half screen to close to his adversary. Ken will lose most of the fireball wars so don't engage them unless you're planning to get closer soon. Ken gameplay involves a lot of risk takings and most of time you'll try something that won't work at all. But remember: Ken has the most deadly combo in the game (the ToD) and it's easy to turn the tide once you connect it. Summing up: a ToD means a win, in most cases. Or, at least, an advantage that it's hard for your opponent to revert. Other good techniques are his footsies, pokes and cross ups. And don't be ashamed of being dirty because Ken has some tough adversaries like Ryu, Dhalsim, Blanka, Sagat and M.Bison (Dictator). Abuse the tick throws whenever possible.
It worths to mention that according the game version, Ken's Hurricane Kick works in different manners. USA and World have the "egg beater" Tatsu and catches the opponent on a whirlwind of kicks that can reach up to 9 hits if timed right. The Japanese version, however, doesn't have this feature, making Ken a slightly weaker char than his USA/World counterpart.
Match-Ups
Vs. Ryu
Acording to the Ryu player's style, this match can be more or less difficult for Ken. Ryu's Hurricane Kick can be used to trade hits with Ken's fireball for Ryu's advantage, so avoid throwing fireballs at short range. Work you way with footsies, jump Ryu's short ranged fireballs and punish with combos (jumping HP + LP/MP Shoryuken is a good option). Ken isn't as efficient as Ryu regarding fireball traps but with the right distance and pokes, you can corner Ryu and inflict chip damage until Ryu try to get away with his nasty Hurricane Kick. Tick throws and safe jumps can be used but with moderation.
Vs. Ken
Ken's slower fireball is an invitation for jump in and punish. But do it fast because the lightspeed Shoryuken may frustrate your plans. As against Ryu, be clever with your footsies and mixups, the LK Hurricane Kick being a good one. At the right range, it can trick your opponent into whiffed counter attacks. Punish dizzies with a ToD.
Vs. E.Honda
Vs. Chun Li
Vs. Blanka
Vs. Zangief
Vs. Guile
Vs. Dhalsim
Vs. Boxer
Vs. Claw
Vs. Sagat
Vs. Dictador
| General | Game Mechanics | Strategy | Tiers | |
| The Characters | Balrog (Boxer) | Blanka | Chun-Li | Dhalsim | E. Honda | Guile | Ken | M. Bison (Dictator) | Ryu | Sagat | Vega (Claw) | Zangief |
