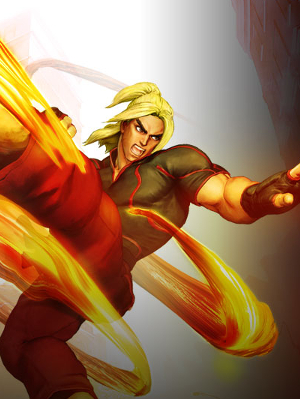
Ken
| ||||||||||||||||||||||||||||||||||||||||||||||||||||||||||||||||||||||||||||||
Summary
Bio
TBW
Why Pick Ken?
(As Street Fighter V is new, this section will be filled out after we learn more about how this character plays most effectively.)
Players To Watch
{{{5}}}
Move List
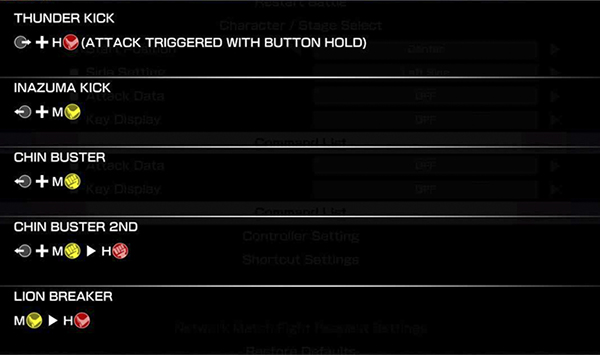
Unique Attacks
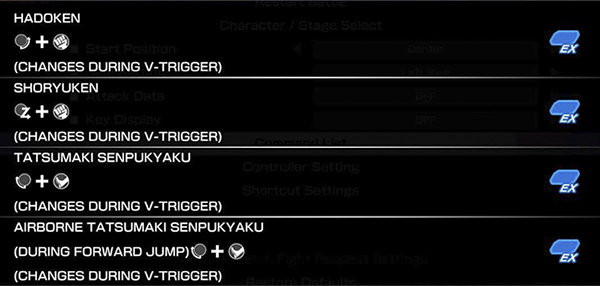
Special Moves
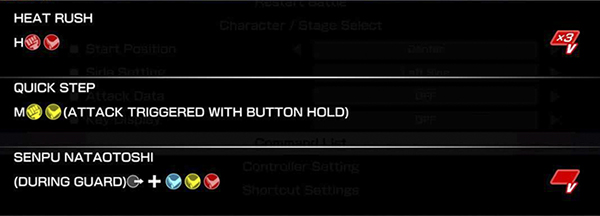
V-System (V-Trigger / V-Skill / V-Reversal)
Critical Art
Ken Discussions
Discussions regarding Ken
Ken Discord Link
Video Guides
Official Capcom Character Breakdown
Sajam's Character Breakdown
Frame Data
- Champion Edition data courtesy of @D4RK_ONION, @HatsonFGC, @Arlieth, @Frostdiener, BananaCyclone and the Frame Assist Tool team. - Huge thanks for their efforts! - See https://fullmeter.com/fatonline/#/home for more information
| Move Name | Command | Startup | Active | Rcvry | Adv Guard |
Adv Hit |
Adv Counter |
Damage | Stun | Hit Level |
Cancel Ability |
KD Adv Normal |
KD Adv Rise |
KD Adv Roll |
Chip Damage |
Counter Damage |
Counter Stun |
|---|---|---|---|---|---|---|---|---|---|---|---|---|---|---|---|---|---|
| stand LP | 4 | 30 | 70 | 2 | 7 | 4 | 2 | {{{21}}} | {{{22}}} | {{{23}}} | {{{24}}} | {{{25}}} | {{{26}}} | ||||
| stand MP | 7 | 60 | 100 | 2 | 15 | 3 | 0 | {{{21}}} | {{{22}}} | {{{23}}} | {{{24}}} | {{{25}}} | {{{26}}} | ||||
| stand HP | 9 | 80 | 150 | 2 | 20 | 5 | -3 | {{{21}}} | {{{22}}} | {{{23}}} | {{{24}}} | {{{25}}} | {{{26}}} | ||||
| stand LK | 4 | 30 | 70 | 2 | 9 | 3 | -1 | {{{21}}} | {{{22}}} | {{{23}}} | {{{24}}} | {{{25}}} | {{{26}}} | ||||
| stand MK | 8 | 60 | 100 | 3 | 17 | 1 | -2 | {{{21}}} | {{{22}}} | {{{23}}} | {{{24}}} | {{{25}}} | {{{26}}} | ||||
| stand HK | 13 | 90 | 150 | 2 | 25 | 3 | -4 | {{{21}}} | {{{22}}} | {{{23}}} | {{{24}}} | {{{25}}} | {{{26}}} | ||||
| crouch LP | 4 | 30 | 70 | 2 | 8 | 3 | 2 | {{{21}}} | {{{22}}} | {{{23}}} | {{{24}}} | {{{25}}} | {{{26}}} | ||||
| crouch MP | 5 | 60 | 100 | 3 | 12 | 4 | 1 | {{{21}}} | {{{22}}} | {{{23}}} | {{{24}}} | {{{25}}} | {{{26}}} | ||||
| crouch HP | 6 | 90[70] | 150 | 5 | 22 | -4 | -9 | {{{21}}} | {{{22}}} | {{{23}}} | {{{24}}} | {{{25}}} | {{{26}}} | ||||
| crouch LK | 4 | 20 | 70 | 2 | 7 | 3 | 1 | {{{21}}} | {{{22}}} | {{{23}}} | {{{24}}} | {{{25}}} | {{{26}}} | ||||
| crouch MK | 6 | 50 | 100 | 2 | 14 | 0 | -4 | {{{21}}} | {{{22}}} | {{{23}}} | {{{24}}} | {{{25}}} | {{{26}}} | ||||
| crouch HK | 7 | 100 | 150 | 73 | 3 | 23 | KD | -12 | {{{21}}} | {{{22}}} | {{{23}}} | {{{24}}} | {{{25}}} | {{{26}}} | |||
| jump LP | 3 | 40 | 70 | 6 | - | - | - | {{{21}}} | {{{22}}} | {{{23}}} | {{{24}}} | {{{25}}} | {{{26}}} | ||||
| jump MP | 5 | 70 | 100 | 6 | - | - | - | {{{21}}} | {{{22}}} | {{{23}}} | {{{24}}} | {{{25}}} | {{{26}}} | ||||
| jump HP | 8 | 90 | 150 | 4 | - | - | - | {{{21}}} | {{{22}}} | {{{23}}} | {{{24}}} | {{{25}}} | {{{26}}} | ||||
| jump LK | 4 | 40 | 70 | 7 | - | - | - | {{{21}}} | {{{22}}} | {{{23}}} | {{{24}}} | {{{25}}} | {{{26}}} | ||||
| jump MK | 6 | 60 | 100 | 5 | - | - | - | {{{21}}} | {{{22}}} | {{{23}}} | {{{24}}} | {{{25}}} | {{{26}}} | ||||
| jump HK | 8 | 90 | 150 | 5 | - | - | - | {{{21}}} | {{{22}}} | {{{23}}} | {{{24}}} | {{{25}}} | {{{26}}} | ||||
| thunder kick | 23 | 80 | 150 | 3 | 22 | 0 | -4 | {{{21}}} | {{{22}}} | {{{23}}} | {{{24}}} | {{{25}}} | {{{26}}} | ||||
| thunder kick (feint) | - | - | 31 | - | - | {{{21}}} | {{{22}}} | {{{23}}} | {{{24}}} | {{{25}}} | {{{26}}} | ||||||
| inazuma kick | 21 | 60 | 100 | 3 | 19 | 0 | -4 | {{{21}}} | {{{22}}} | {{{23}}} | {{{24}}} | {{{25}}} | {{{26}}} | ||||
| chin buster | 4 | 50 | 80 | 2 | 15 | 0 | -2 | {{{21}}} | {{{22}}} | {{{23}}} | {{{24}}} | {{{25}}} | {{{26}}} | ||||
| chin buster 2nd | 6 | 50*54 | 80*72 | 88 | 3 | 27 | KD | -13 | {{{21}}} | {{{22}}} | {{{23}}} | {{{24}}} | {{{25}}} | {{{26}}} | |||
| lion breaker | 8 | 60*60 | 100*100 | 87 | 4 | 23 | KD | -6 | {{{21}}} | {{{22}}} | {{{23}}} | {{{24}}} | {{{25}}} | {{{26}}} | |||
| knee bash | 5 | 30*30*60 | 0*0*170 | 78 | 2 | 18 | KD | - | {{{21}}} | {{{22}}} | {{{23}}} | {{{24}}} | {{{25}}} | {{{26}}} | |||
| hell wheel | 5 | 130 | 200 | 69 | 2 | 18 | KD | - | {{{21}}} | {{{22}}} | {{{23}}} | {{{24}}} | {{{25}}} | {{{26}}} | |||
| heat rush | - | 51 | - | - | - | {{{21}}} | {{{22}}} | {{{23}}} | {{{24}}} | {{{25}}} | {{{26}}} | ||||||
| quick step | 24 | 70 | 150 | 22 | 89 | 2 | KD | -6 | {{{21}}} | {{{22}}} | {{{23}}} | {{{24}}} | {{{25}}} | {{{26}}} | |||
| senpu nataotoshi | 10 | 40 | 0 | 4 | 22 | 2 | 0 | {{{21}}} | {{{22}}} | {{{23}}} | {{{24}}} | {{{25}}} | {{{26}}} | ||||
| hadouken LP | 14 | 50 | 100 | - | 34 | -4 | -10 | {{{21}}} | {{{22}}} | {{{23}}} | {{{24}}} | {{{25}}} | {{{26}}} | ||||
| hadouken MP | 14 | 50 | 100 | - | 34 | -4 | -10 | {{{21}}} | {{{22}}} | {{{23}}} | {{{24}}} | {{{25}}} | {{{26}}} | ||||
| hadouken HP | 14 | 50 | 100 | - | 34 | -4 | -10 | {{{21}}} | {{{22}}} | {{{23}}} | {{{24}}} | {{{25}}} | {{{26}}} | ||||
| hadouken EX | 12 | 40*50 | 0*150 | - | 33 | 3 | 1 | {{{21}}} | {{{22}}} | {{{23}}} | {{{24}}} | {{{25}}} | {{{26}}} | ||||
| shoryuken LP | 3 | 100[70] | 150 | 89 | 11 | 30 | KD | -23 | {{{21}}} | {{{22}}} | {{{23}}} | {{{24}}} | {{{25}}} | {{{26}}} | |||
| shoryuken MP | 4 | 80*50 | 75*75 | 89 | 12 | 35 | KD | -26 | {{{21}}} | {{{22}}} | {{{23}}} | {{{24}}} | {{{25}}} | {{{26}}} | |||
| shoryuken HP | 4 | 60*50*30 | 50*50*50 | 85 | 13 | 43 | KD | -34 | {{{21}}} | {{{22}}} | {{{23}}} | {{{24}}} | {{{25}}} | {{{26}}} | |||
| shoryuken EX | 4 | 20x6*30 | 20x5*50*50 | 83 | 8(18)7 | 60 | KD | -45 | {{{21}}} | {{{22}}} | {{{23}}} | {{{24}}} | {{{25}}} | {{{26}}} | |||
| tatsumaki senpukyaku LK | 3 | 40*30 | 50*50 | 96 | 2(5)2(4)2 | 19 | KD | -8 | {{{21}}} | {{{22}}} | {{{23}}} | {{{24}}} | {{{25}}} | {{{26}}} | |||
| tatsumaki senpukyaku MK | 6 | 40*30*30 | 50*50*50 | 95 | 2(5)2(6)2(6)2(4)2 | 18 | KD | -9 | {{{21}}} | {{{22}}} | {{{23}}} | {{{24}}} | {{{25}}} | {{{26}}} | |||
| tatsumaki senpukyaku HK | 16 | 50*30x3 | 60*40*40*60 | 77 | 4(12)2(10)2(10)3 | 21 | KD | -43 | {{{21}}} | {{{22}}} | {{{23}}} | {{{24}}} | {{{25}}} | {{{26}}} | |||
| tatsumaki senpukyaku EX | 8 | 40x4 | 50x4 | 88 | 5(9)3(4)3(3)3(5)2 | 45 | KD | -59 | {{{21}}} | {{{22}}} | {{{23}}} | {{{24}}} | {{{25}}} | {{{26}}} | |||
| air tatsumaki senpukyaku LK | 9 | 80 | 100 | - | 2(6)2(6)2 | - | - | - | {{{21}}} | {{{22}}} | {{{23}}} | {{{24}}} | {{{25}}} | {{{26}}} | |||
| air tatsumaki senpukyaku MK | 9 | 80 | 100 | - | 2(5)2(5)2 | - | - | - | {{{21}}} | {{{22}}} | {{{23}}} | {{{24}}} | {{{25}}} | {{{26}}} | |||
| air tatsumaki senpukyaku HK | 9 | 80 | 100 | - | 2(4)2(4)2 | - | - | - | {{{21}}} | {{{22}}} | {{{23}}} | {{{24}}} | {{{25}}} | {{{26}}} | |||
| air tatsumaki senpukyaku EX | 9 | 90 | 100 | - | 2(6)2(7)2 | - | - | - | {{{21}}} | {{{22}}} | {{{23}}} | {{{24}}} | {{{25}}} | {{{26}}} | |||
| guren enjikyaku | 5 | 340 | 0 | 31 | 2 | 44 | KD | -26 | {{{21}}} | {{{22}}} | {{{23}}} | {{{24}}} | {{{25}}} | {{{26}}} | |||
| Move Name | Command | Startup | Active | Rcvry | Adv Guard |
Adv Hit |
Adv Counter |
Damage | Stun | Hit Level |
Cancel Ability |
KD Adv Normal |
KD Adv Rise |
KD Adv Roll |
Chip Damage |
Counter Damage |
Counter Stun |


