Laura
| ||||||||||||||||||||||||||||||||||||||||||||||||||||||||||||||||||||||||||||||
Summary
Bio
TBW
Why Pick Laura?
(As Street Fighter V is new, this section will be filled out after we learn more about how this character plays most effectively.)
Players To Watch
{{{5}}}
Move List
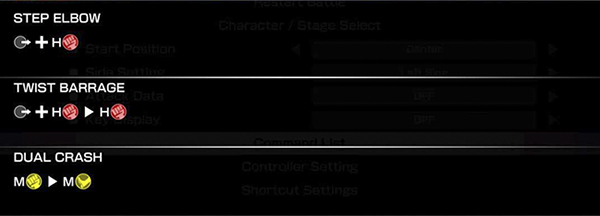
Unique Attacks
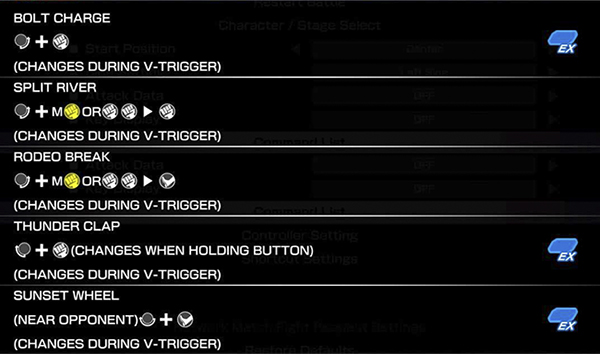
Special Moves
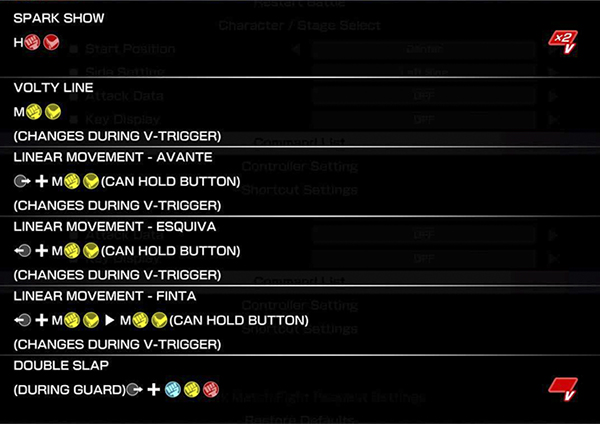
V-System (V-Trigger / V-Skill / V-Reversal)
Critical Art
Laura Discussions
Discussions regarding Laura
Laura Discord Link
Video Guides
Sajam's Character Breakdown
Frame Data
- Champion Edition data courtesy of @D4RK_ONION, @HatsonFGC, @Arlieth, @Frostdiener, BananaCyclone and the Frame Assist Tool team. - Huge thanks for their efforts! - See https://fullmeter.com/fatonline/#/home for more information
| Move Name | Command | Startup | Active | Rcvry | Adv Guard |
Adv Hit |
Adv Counter |
Damage | Stun | Hit Level |
Cancel Ability |
KD Adv Normal |
KD Adv Rise |
KD Adv Roll |
Chip Damage |
Counter Damage |
Counter Stun |
|---|---|---|---|---|---|---|---|---|---|---|---|---|---|---|---|---|---|
| stand LP | 3 | 30 | 70 | 2 | 9 | 3 | 2 | {{{21}}} | {{{22}}} | {{{23}}} | {{{24}}} | {{{25}}} | {{{26}}} | ||||
| stand MP | 6 | 60 | 100 | 5 | 11 | 4 | 3 | {{{21}}} | {{{22}}} | {{{23}}} | {{{24}}} | {{{25}}} | {{{26}}} | ||||
| stand HP | 8 | 80 | 150 | 3 | 18 | 3 | -2 | {{{21}}} | {{{22}}} | {{{23}}} | {{{24}}} | {{{25}}} | {{{26}}} | ||||
| stand LK | 4 | 30 | 70 | 3 | 9 | 4 | 3 | {{{21}}} | {{{22}}} | {{{23}}} | {{{24}}} | {{{25}}} | {{{26}}} | ||||
| stand MK | 6 | 60 | 100 | 4 | 14 | 2 | -1 | {{{21}}} | {{{22}}} | {{{23}}} | {{{24}}} | {{{25}}} | {{{26}}} | ||||
| stand HK | 12 | 90 | 150 | 3 | 19 | 1 | -4 | {{{21}}} | {{{22}}} | {{{23}}} | {{{24}}} | {{{25}}} | {{{26}}} | ||||
| crouch LP | 4 | 30 | 70 | 2 | 7 | 4 | 2 | {{{21}}} | {{{22}}} | {{{23}}} | {{{24}}} | {{{25}}} | {{{26}}} | ||||
| crouch MP | 5 | 60 | 100 | 2 | 15 | 3 | 2 | {{{21}}} | {{{22}}} | {{{23}}} | {{{24}}} | {{{25}}} | {{{26}}} | ||||
| crouch HP | 7 | 90 | 150 | 4 | 17 | 2 | -2 | {{{21}}} | {{{22}}} | {{{23}}} | {{{24}}} | {{{25}}} | {{{26}}} | ||||
| crouch LK | 4 | 20 | 70 | 2 | 8 | 2 | -2 | {{{21}}} | {{{22}}} | {{{23}}} | {{{24}}} | {{{25}}} | {{{26}}} | ||||
| crouch MK | 7 | 50 | 100 | 3 | 13 | 0 | -2 | {{{21}}} | {{{22}}} | {{{23}}} | {{{24}}} | {{{25}}} | {{{26}}} | ||||
| crouch HK | 9 | 100 | 150 | 74 | 3 | 20 | KD | -12 | {{{21}}} | {{{22}}} | {{{23}}} | {{{24}}} | {{{25}}} | {{{26}}} | |||
| jump LP | 3 | 40 | 70 | 5 | - | - | - | {{{21}}} | {{{22}}} | {{{23}}} | {{{24}}} | {{{25}}} | {{{26}}} | ||||
| jump MP | 4 | 60 | 100 | 3 | - | - | - | {{{21}}} | {{{22}}} | {{{23}}} | {{{24}}} | {{{25}}} | {{{26}}} | ||||
| jump HP | 7 | 90 | 150 | 5 | - | - | - | {{{21}}} | {{{22}}} | {{{23}}} | {{{24}}} | {{{25}}} | {{{26}}} | ||||
| jump LK | 4 | 40 | 70 | 10 | - | - | - | {{{21}}} | {{{22}}} | {{{23}}} | {{{24}}} | {{{25}}} | {{{26}}} | ||||
| jump MK | 5 | 60 | 100 | 7 | - | - | - | {{{21}}} | {{{22}}} | {{{23}}} | {{{24}}} | {{{25}}} | {{{26}}} | ||||
| jump HK | 5 | 90 | 150 | 6 | - | - | - | {{{21}}} | {{{22}}} | {{{23}}} | {{{24}}} | {{{25}}} | {{{26}}} | ||||
| step elbow | 18 | 80 | 120 | 2 | 17 | 4 | -2 | {{{21}}} | {{{22}}} | {{{23}}} | {{{24}}} | {{{25}}} | {{{26}}} | ||||
| twist barrage | 9 | 54 | 90 | 93 | 3 | 19 | KD | -8 | {{{21}}} | {{{22}}} | {{{23}}} | {{{24}}} | {{{25}}} | {{{26}}} | |||
| dual crash | 7 | 60*54 | 100*90 | 3 | 16 | 1 | -2 | {{{21}}} | {{{22}}} | {{{23}}} | {{{24}}} | {{{25}}} | {{{26}}} | ||||
| seoi throw | 5 | 130 | 200 | 66 | 2 | 18 | KD | - | {{{21}}} | {{{22}}} | {{{23}}} | {{{24}}} | {{{25}}} | {{{26}}} | |||
| pullback hold | 5 | 120 | 170 | 68 | 2 | 18 | KD | - | {{{21}}} | {{{22}}} | {{{23}}} | {{{24}}} | {{{25}}} | {{{26}}} | |||
| volty line | 22 | 90 | 150 | 6 | 22 | 0 | -7 | {{{21}}} | {{{22}}} | {{{23}}} | {{{24}}} | {{{25}}} | {{{26}}} | ||||
| linear movement avante | - | - | 21 | - | - | {{{21}}} | {{{22}}} | {{{23}}} | {{{24}}} | {{{25}}} | {{{26}}} | ||||||
| linear movement equiva | - | - | 26 | - | - | {{{21}}} | {{{22}}} | {{{23}}} | {{{24}}} | {{{25}}} | {{{26}}} | ||||||
| linear movement finta | - | - | 30 | - | - | {{{21}}} | {{{22}}} | {{{23}}} | {{{24}}} | {{{25}}} | {{{26}}} | ||||||
| spark show | - | - | 57 | - | - | {{{21}}} | {{{22}}} | {{{23}}} | {{{24}}} | {{{25}}} | {{{26}}} | ||||||
| double slap | 15 | 60 | 0 | 2 | 24 | KD | -2 | {{{21}}} | {{{22}}} | {{{23}}} | {{{24}}} | {{{25}}} | {{{26}}} | ||||
| bolt charge LP | 13 | 60 | 100 | 3 | 18 | 2 | -2 | {{{21}}} | {{{22}}} | {{{23}}} | {{{24}}} | {{{25}}} | {{{26}}} | ||||
| bolt charge MP | 15 | 60 | 50 | 3 | 20 | 2 | -7 | {{{21}}} | {{{22}}} | {{{23}}} | {{{24}}} | {{{25}}} | {{{26}}} | ||||
| bolt charge HP | 7 | 60*90 | 50*150 | 66 | 8 | 30 | KD | - | {{{21}}} | {{{22}}} | {{{23}}} | {{{24}}} | {{{25}}} | {{{26}}} | |||
| bolt charge EX | 14 | 70 | 50 | 3 | 22 | 0 | -11 | {{{21}}} | {{{22}}} | {{{23}}} | {{{24}}} | {{{25}}} | {{{26}}} | ||||
| split river | - | 81 | 135 | 58 | - | - | KD | - | {{{21}}} | {{{22}}} | {{{23}}} | {{{24}}} | {{{25}}} | {{{26}}} | |||
| rodeo break | - | 81 | 135 | 66 | - | - | KD | - | {{{21}}} | {{{22}}} | {{{23}}} | {{{24}}} | {{{25}}} | {{{26}}} | |||
| thunder clap LP | 19 | 60 | 60 | - | 28 | 0 | -5 | {{{21}}} | {{{22}}} | {{{23}}} | {{{24}}} | {{{25}}} | {{{26}}} | ||||
| thunder clap LP | 70 | 60*30*30 | 60*30*30 | - | 13 | 31 | 18 | {{{21}}} | {{{22}}} | {{{23}}} | {{{24}}} | {{{25}}} | {{{26}}} | ||||
| thunder clap MP | 19 | 60 | 60 | - | 28 | 0 | -5 | {{{21}}} | {{{22}}} | {{{23}}} | {{{24}}} | {{{25}}} | {{{26}}} | ||||
| thunder clap MP | 70 | 60*30*30 | 60*30*30 | - | 13 | 31 | 18 | {{{21}}} | {{{22}}} | {{{23}}} | {{{24}}} | {{{25}}} | {{{26}}} | ||||
| thunder clap HP | 19 | 60 | 60 | - | 28 | 0 | -5 | {{{21}}} | {{{22}}} | {{{23}}} | {{{24}}} | {{{25}}} | {{{26}}} | ||||
| thunder clap HP | 70 | 60*30*30 | 60*30*30 | - | 13 | 31 | 18 | {{{21}}} | {{{22}}} | {{{23}}} | {{{24}}} | {{{25}}} | {{{26}}} | ||||
| thunder clap EX | 17 | 60*30 | 60*30 | 105 | - | 24 | KD | 3 | {{{21}}} | {{{22}}} | {{{23}}} | {{{24}}} | {{{25}}} | {{{26}}} | |||
| sunset wheel LK | 6 | 60*90 | 100*100 | 62 | 2 | 52 | KD | - | {{{21}}} | {{{22}}} | {{{23}}} | {{{24}}} | {{{25}}} | {{{26}}} | |||
| sunset wheel MK | 6 | 60*100 | 100*100 | 62 | 2 | 52 | KD | - | {{{21}}} | {{{22}}} | {{{23}}} | {{{24}}} | {{{25}}} | {{{26}}} | |||
| sunset wheel HK | 6 | 60*110 | 100*100 | 62 | 2 | 52 | KD | - | {{{21}}} | {{{22}}} | {{{23}}} | {{{24}}} | {{{25}}} | {{{26}}} | |||
| sunset wheel EX | 19 | 80*100 | 100*100 | 62 | 2 | 52 | KD | - | {{{21}}} | {{{22}}} | {{{23}}} | {{{24}}} | {{{25}}} | {{{26}}} | |||
| inazuma spin hold | 4 | 350 | 0 | 50 | 2 | 52 | KD | - | {{{21}}} | {{{22}}} | {{{23}}} | {{{24}}} | {{{25}}} | {{{26}}} | |||
| Move Name | Command | Startup | Active | Rcvry | Adv Guard |
Adv Hit |
Adv Counter |
Damage | Stun | Hit Level |
Cancel Ability |
KD Adv Normal |
KD Adv Rise |
KD Adv Roll |
Chip Damage |
Counter Damage |
Counter Stun |


