

Introduction
Color Options
| Start | Default |
 |

|
Moves List
Normal Moves
Bear Hug: close, b or f + Hard Punch
Sumo Throw: close, b or f + Medium Punch
Knee Bash: close, b or f + Hard Kick
Special Moves
Hundred Hand Slap: Punch button rapidly
Sumo Headbutt: b~f + Punch
The Basics
Anti-Airs:far standing Hard Punch,close standing Hard Kick
High Pokes: standing Medium Punch
Low Pokes: crouching Hard Punch
Combos
- j.MP,s.HK/cr.HP/MP H.Harite
- cross up j.MK,(s.MP,c.HP)
- LP,LP H.Harite
Hitboxes
Standing Normals
- Standing LP:
| Damage | 16 |  |
 |
 |
 |

|
| Stun | 1~7 | |||||
| Stun Timer | 40 | |||||
| Chain Cancel | No | |||||
| Special Cancel | Yes | |||||
| Frame Advantage | +7 | |||||
| Frame Count | 2 | 2 | 4 | 2 | 1 | |
| Frame Count | 1+4 | 4 | 3 | |||
- Standing MP:
| Damage | 20 |  |
 |
 |
 |
 |
 |

|
| Stun | 5~11 | |||||||
| Stun Timer | 60 | |||||||
| Chain Cancel | No | |||||||
| Special Cancel | No | |||||||
| Frame Advantage | +10 | |||||||
| Frame Count | 2 | 2 | 2 | 4 | 2 | 2 | 1 | |
| Frame Count | 1+6 | 4 | 5 | |||||
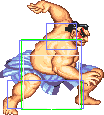
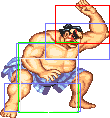
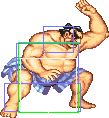
- Standing HP:
| Damage | 26 |  |
 |
 |
 |
 |
 |
 |
 |

|
| Stun | 11~17 | |||||||||
| Stun Timer | 80 | |||||||||
| Chain Cancel | No | |||||||||
| Special Cancel | No | |||||||||
| Frame Advantage | -2 | |||||||||
| Frame Count | 3 | 3 | 3 | 4 | 7 | 5 | 3 | 2 | 1 | |
| Frame Count | 1+6 | 4 | 18 | |||||||
- Standing LK:
| Damage | 14 |  |
 |
 |
 |
 |
 |

|
| Stun | 1~7 | |||||||
| Stun Timer | 40 | |||||||
| Chain Cancel | No | |||||||
| Special Cancel | No | |||||||
| Frame Advantage | +4 | |||||||
| Frame Count | 3 | 3 | 3 | 4 | 3 | 3 | 1 | |
| Frame Count | 1+9 | 4 | 7 | |||||
- Standing MK:
| Damage | 18 |  |
 |
 |
 |
 |
 |

|
| Stun | 5~11 | |||||||
| Stun Timer | 60 | |||||||
| Chain Cancel | No | |||||||
| Special Cancel | No | |||||||
| Frame Advantage | +4 | |||||||
| Frame Count | 3 | 3 | 3 | 4 | 5 | 6 | 1 | |
| Frame Count | 1+9 | 4 | 12 | |||||
- Standing HK:
| Damage | 24 |  |
 |
 |
 |
 |
 |

|
| Stun | 11~17 | |||||||
| Stun Timer | 80 | |||||||
| Chain Cancel | No | |||||||
| Special Cancel | No | |||||||
| Frame Advantage | -1 | |||||||
| Frame Count | 3 | 3 | 3 | 6 | 8 | 10 | 1 | |
| Frame Count | 1+9 | 6 | 19 | |||||
Close Standing Normals
- Close LK:
| Damage | 16 |  |
 |
 |
 |

|
| Stun | 1~7 | |||||
| Stun Timer | 40 | |||||
| Chain Cancel | No | |||||
| Special Cancel | No | |||||
| Frame Advantage | +7 | |||||
| Frame Count | 3 | 3 | 3 | 3 | 1 | |
| Frame Count | 1+6 | 3 | 4 | |||
- Close MK:
| Damage | 20 |  |
 |
 |
 |

|
| Stun | 5~11 | |||||
| Stun Timer | 60 | |||||
| Chain Cancel | No | |||||
| Special Cancel | No | |||||
| Frame Advantage | +6 | |||||
| Frame Count | 3 | 3 | 5 | 7 | 1 | |
| Frame Count | 1+6 | 5 | 8 | |||
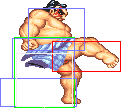
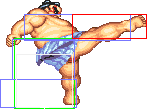
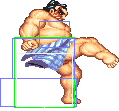
- Close HK:
| Damage | 26,18 |  |
 |
 |
 |
 |
 |
 |
 |

|
| Stun | 11~17 | |||||||||
| Stun Timer | 80 | |||||||||
| Chain Cancel | No | |||||||||
| Special Cancel | No | |||||||||
| Frame Advantage | +1 | |||||||||
| Frame Count | 2 | 2 | 3 | 3 | 5 | 8 | 6 | 3 | 1 | |
| Frame Count | 1+7 | 8 | 18 | |||||||
Crouching Normals
- Crouching LP:
| Damage | 14 |  |
 |
 |
 |

|
| Stun | 1~7 | |||||
| Stun Timer | 40 | |||||
| Chain Cancel | No | |||||
| Special Cancel | No | |||||
| Frame Advantage | +3 | |||||
| Frame Count | 2 | 2 | 8 | 2 | 1 | |
| Frame Count | 1+4 | 8 | 3 | |||
- Crouching MP:
| Damage | 18 |  |
 |
 |
 |
 |
 |

|
| Stun | 5~11 | |||||||
| Stun Timer | 60 | |||||||
| Chain Cancel | No | |||||||
| Special Cancel | No | |||||||
| Frame Advantage | +0 | |||||||
| Frame Count | 2 | 2 | 2 | 8 | 6 | 4 | 1 | |
| Frame Count | 1+6 | 8 | 11 | |||||
- Crouching HP:
| Damage | 24 |  |
 |
 |
 |
 |
 |
 |
 |

|
| Stun | 11~17 | |||||||||
| Stun Timer | 80 | |||||||||
| Chain Cancel | No | |||||||||
| Special Cancel | No | |||||||||
| Frame Advantage | -8 | |||||||||
| Frame Count | 2 | 3 | 4 | 6 | 8 | 6 | 4 | 3 | 1 | |
| Frame Count | 1+5 | 4 | 28 | |||||||
- Crouching LK:
| Damage | 14 |  |
 |
 |
 |
 |
 |

|
| Stun | 1~7 | |||||||
| Stun Timer | 40 | |||||||
| Chain Cancel | No | |||||||
| Special Cancel | No | |||||||
| Frame Advantage | +4 | |||||||
| Frame Count | 3 | 3 | 3 | 3 | 3 | 3 | 1 | |
| Frame Count | 1+9 | 3 | 7 | |||||
- Crouching MK:
| Damage | 18,18 |  |
 |
 |
 |
 |
 |

|
| Stun | 5~11 | |||||||
| Stun Timer | 60 | |||||||
| Chain Cancel | No | |||||||
| Special Cancel | No | |||||||
| Frame Advantage | +2 | |||||||
| Frame Count | 3 | 3 | 3 | 6 | 5 | 4 | 1 | |
| Frame Count | 1+6 | 9 | 10 | |||||
- Crouching HK:
| Damage | 24 |  |
 |
 |
 |
 |
 |

|
| Stun | 11~17 | |||||||
| Stun Timer | 80 | |||||||
| Chain Cancel | No | |||||||
| Special Cancel | No | |||||||
| Frame Advantage | -1 | |||||||
| Frame Count | 3 | 4 | 6 | 4 | 8 | 6 | 1 | |
| Frame Count | 1+7 | 18 | 7 | |||||
Aerial Normals
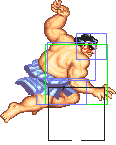
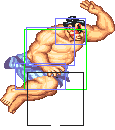
- Neutral Jumping LP:
| Damage | 18 |  |
 |
 |
 |
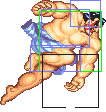
|
| Stun | 1~7 | |||||
| Stun Timer | 40 | |||||
| Frame Count | 3 | 4 | 4 | 30 | ∞ | |
| Simplified | 11 | 30 | ∞ | |||
- Neutral Jumping MP:
| Damage | 22 |  |
 |
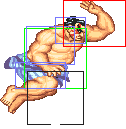 |
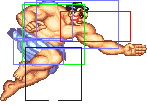 |
 |
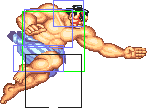 |
 |

|
| Stun | 5~11 | ||||||||
| Stun Timer | 50 | ||||||||
| Frame Count | 3 | 4 | 4 | 12 | 8 | 4 | 4 | ∞ | |
| Simplified | 7 | 16 | ∞ | ||||||
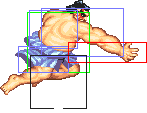
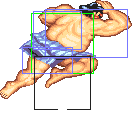
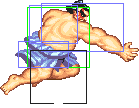
- Neutral Jumping HP:
| Damage | 28 |  |
 |
 |
 |
 |
 |

|
| Stun | 11~17 | |||||||
| Stun Timer | 60 | |||||||
| Frame Count | 3 | 4 | 6 | 8 | 4 | 4 | ∞ | |
| Simplified | 7 | 6 | ∞ | |||||
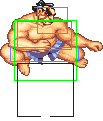
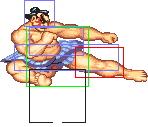
- Neutral Jumping LK:
| Damage | 18 |  |
 |
 |
 |

| |
| Stun | 1~7 | ||||||
| Stun Timer | 40 | ||||||
| Frame Count | 3 | 4 | 30 | 4 | ∞ | ||
| Simplified | 7 | 30 | ∞ | ||||
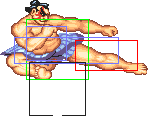
- Neutral Jumping MK:
| Damage | 22 |  |
 |
 |
 |
 |
 |
 |
 |

|
| Stun | 5~11 | |||||||||
| Stun Timer | 50 | |||||||||
| Frame Count | 3 | 4 | 12 | 4 | 4 | 4 | 4 | 4 | ∞ | |
| Simplified | 7 | 12 | ∞ | |||||||
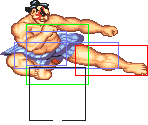
- Neutral Jumping HK:
| Damage | 28 |  |
 |
 |
 |
 |
 |
 |
 |

|
| Stun | 11~17 | |||||||||
| Stun Timer | 60 | |||||||||
| Frame Count | 2 | 4 | 6 | 4 | 4 | 4 | 4 | 4 | ∞ | |
| Frame Count | 7 | 6 | ∞ | |||||||
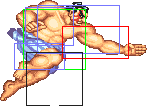
- Diagonal Jumping LP:
| Damage | 18 |  |
 |
 |
 |

|
| Stun | 1~7 | |||||
| Stun Timer | 40 | |||||
| Frame Count | 3 | 4 | 4 | 30 | ∞ | |
| Simplified | 11 | 30 | ∞ | |||
- Diagonal Jumping MP:
| Damage | 22 |  |
 |
 |
 |
 |
 |
 |

|
| Stun | 5~11 | ||||||||
| Stun Timer | 50 | ||||||||
| Frame Count | 3 | 4 | 4 | 12 | 8 | 4 | 4 | ∞ | |
| Simplified | 7 | 16 | ∞ | ||||||
- Diagonal Jumping HP:
| Damage | 28 |  |
 |
 |
 |
 |
 |

|
| Stun | 11~17 | |||||||
| Stun Timer | 60 | |||||||
| Frame Count | 3 | 4 | 6 | 8 | 4 | 4 | ∞ | |
| Simplified | 7 | 6 | ∞ | |||||
- Diagonal Jumping LK:
| Damage | 18 | 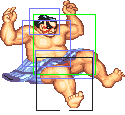 |
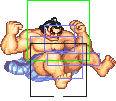 |

|
| Stun | 1~7 | |||
| Stun Timer | 40 | |||
| Frame Count | 3 | 4 | ∞ | |
| Simplified | 7 | ∞ | ||
- Diagonal Jumping MK:
| Damage | 22 | 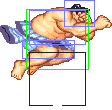 |
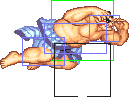 |
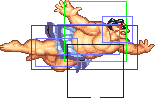
|
| Stun | 5~11 | |||
| Stun Timer | 50 | |||
| Frame Count | 3 | 4 | ∞ | |
| Simplified | 7 | ∞ | ||
- Diagonal Jumping HK:
| Damage | 28 |  |
 |
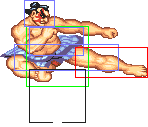 |
 |
 |
 |
 |
 |

|
| Stun | 11~17 | |||||||||
| Stun Timer | 60 | |||||||||
| Frame Count | 3 | 4 | 12 | 4 | 4 | 4 | 4 | 4 | ∞ | |
| Simplified | 7 | 12 | ∞ | |||||||
Unique Normals
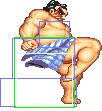
- Hiza Geri aka Double Knee:
| Damage | 22,22 |  |
 |
 |
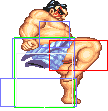 |
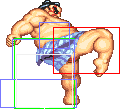 |
 |
 |
 |

|
| Stun | 5~11,8 | |||||||||
| Stun Timer | 60,60 | |||||||||
| Chain Cancel | No | |||||||||
| Special Cancel | No | |||||||||
| Frame Advantage | +8 | |||||||||
| Frame Count | 3 | 3 | 3 | 3 | 3 | 2 | 2 | 2 | 1 | |
| Simplified | 1+9 | 6 | 7 | |||||||
Throw
Tawara Nage: (←/→ + Strong) , Saba Ori: (←/→ + Fierce) and Sekkan Kyaku: (←/→ + Roundhouse)
| Throw | Hold | 
| ||
| Damage | 32 | Damage | 22+(4*n) | |
| Duration | - | Duration | 300 | |
| Stun | 7~13 | Stun | 7~13 | |
| Stun Timer | 100 | Stun Timer | - | |
| Range (from axis) | 64 | Range (from axis) | 64 | |
| Range advantage | 36 | Range advantage | 36 | |
Special Moves
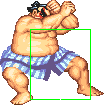
- Sumo Headbutt: (Charge ←, →, P) [charge time: 59f]
| Damage | 18/26/28 |  |
 |
 |
 |
 |

| |
| Stun | 13~19 | |||||||
| Stun Timer | 120 | |||||||
| Frame Advantage | -11/-14,KD/-4 | |||||||
| Jab | 3 | 4 | 6 | 3 | 3 | 22 | ||
| Jab Simplified | 13 | 28 | ||||||
| Strong | 1 | 3 | 4 | 2 | 2 | 53 | ||
| Strong Simplified | 9 | 55 | ||||||
| Fierce | 1 | 4 | 1 | 1 | 63 | |||
| Fierce Simplified | 5 | 65 | ||||||
 |
 |
 |
 |
 |
 |

| |
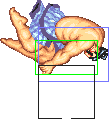
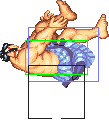
| Jab | 4 | 4 | 4 | 8 | 2 | 2 | 1 |
| 25 | |||||||
| Strong | 4 | 4 | 4 | 8 | 2 | 2 | 1 |
| 25 | |||||||
| Fierce | 4 | 4 | 4 | 8 | 2 | 2 | 1 |
| 25 | |||||||
- One Hundred Slaps: Press Punch Repeatedly
Startup:
 |

| |
| Jab | 1 | 3 |
| Strong | 3 | 4 |
| Fierce | 4 | 6 |
Active:
| Damage | 24/26/28 |  |
 |
 |
 |
 |

|
| Stun | 13~19 | ||||||
| Stun Timer | 120 | ||||||
| Frame Advantage | ? | ||||||
| Jab | 4 | 4 | 4 | 4 | 4 | 4 | |
| Strong | 2 | 2 | 2 | 2 | 2 | 2 | |
| Fierce | 1 | 1 | 1 | 1 | 1 | 1 | |
Recovery
 |

| |
| Jab | 1 | 1 |
| Strong | 3 | 1 |
| Fierce | 5 | 1 |
Misc Animations
| Walk back | Neutral | Walk Fwd | Crouch |
 |
 |
 |

|
- Standing reel:
 |
 |

|
- Standing gut reel:
 |
 |

|
- Crouching reel:
 |

|
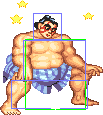
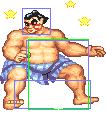
- Dizzy:
 |
 |
|
Advanced Strategy
He is a poke and throw character based in heavy hits and turtling at the same time.
Your main objetive is to keep away your opponent with Hunred Slaps in medium range, and use holds when opponent is near and made cross up setups,E.Honda is a bit buffered from World Warrior,his Hunred Hands Slaps have better start up and also easier to connect a Jumping Attack with it,and also gains the ability to move to made pressure and cheap damage.
Long range combat isn't a problem because his Sumo Headbutt is useful to counter projectiles ,and also as an anti air due to his auto-block frames, mades nice damage and knocks down now compared to World Warrior, but isn't powerful as Dictador Psycho Crusher.
The only problem is his Jump-in game,its slow but not as Dhalsim one,but can made 2-in-1 heavy attacks with Jumping Strong or Fierce with Close or Far Roundhouse and mades great damage and stun,anyway you can reserve jump in for hold-to-crossup setups and your main attack can be Diagonal Jumpin Forward or Roundhouse.
Match-Ups
Vs. Ryu
Vs. Ken
Vs. E.Honda
Vs. Chun Li
Vs. Blanka
Vs. Zangief
Vs. Guile
Vs. Dhalsim
Vs. Boxer
Vs. Claw
Vs. Sagat
Vs. Dictador
| General | Game Mechanics | Strategy | Tiers | |
| The Characters | Balrog (Boxer) | Blanka | Chun-Li | Dhalsim | E. Honda | Guile | Ken | M. Bison (Dictator) | Ryu | Sagat | Vega (Claw) | Zangief |
