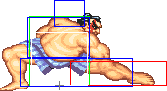
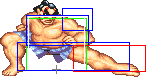
Why pick Old Honda? Old Honda loses ST Honda's 360 grab mixups, but gains important things as well:
- Regains his standing sweep kicks
- Has better ground fierce attacks
- Retains moving handslap
So the basics are HF-style grabby-into-slappy mixups.
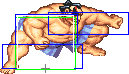
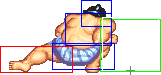
Picking Old E.Honda
To select O.E.Honda, choose E.Honda and then press ↑ ↑ ↑ ↓ Jab/Fierce, pressing Short simultaneously with the punch button for the alternate color.
| Normal |
Secondary
|
 |

|
--Born2SPD
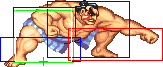
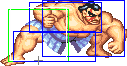
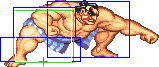
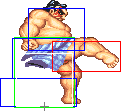
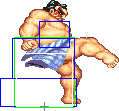
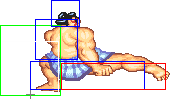
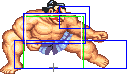
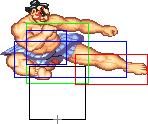
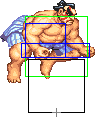
Normal Moves
Ground Normals
| Damage |
? |
 |
 |
 |
|
|
| Stun |
?-?
|
| Stun Timer |
?
|
| Chain Cancel |
No
|
| Special Cancel |
Yes
|
| Frame Count |
? |
? |
? |
? |
?
|
| Simplified |
? |
? |
?
|
| Damage |
? |
 |
 |
 |
|
|
| Stun |
?-?
|
| Stun Timer |
?
|
| Chain Cancel |
No
|
| Special Cancel |
Yes
|
| Frame Count |
? |
? |
? |
? |
?
|
| Simplified |
? |
? |
?
|
- Close/Far Standing Strong:
| Damage |
? |
|
 |
 |
 |
|
|
|
| Stun |
?-?
|
| Stun Timer |
?
|
| Chain Cancel |
No
|
| Special Cancel |
No
|
| Frame Count |
? |
? |
? |
? |
? |
? |
?
|
| Simplified |
? |
? |
?
|
| Damage |
? |
|
 |
 |
 |
|
|
|
| Stun |
?-?
|
| Stun Timer |
?
|
| Chain Cancel |
No
|
| Special Cancel |
No
|
| Frame Count |
? |
? |
? |
? |
? |
? |
?
|
| Simplified |
? |
? |
?
|
- Close/Far Standing Fierce:
| Damage |
? |
|
 |
 |

|
| Stun |
?-?
|
| Stun Timer |
?
|
| Chain Cancel |
No
|
| Special Cancel |
No
|
| Frame Count |
? |
? |
? |
?
|
| Simplified |
? |
?
|
|
 |
 |
 |
|
|
| Frame Count |
? |
? |
? |
? |
?
|
| Simplified |
?
|
| Damage |
? |
|
 |
|
| Stun |
?-?
|
| Stun Timer |
?
|
| Chain Cancel |
No
|
| Special Cancel |
Yes
|
| Frame Count |
? |
? |
?
|
| Simplified |
? |
?
|
|
 |
 |
|
 |
 |
|
| Frame Count |
? |
? |
? |
? |
? |
?
|
| Simplified |
?
|
| Damage |
? |
|
 |
 |
|
|
| Stun |
?-?
|
| Stun Timer |
?
|
| Chain Cancel |
No
|
| Special Cancel |
Yes
|
| Frame Count |
? |
? |
? |
? |
?
|
| Simplified |
? |
? |
?
|
| Damage |
? |
|
 |
 |
 |
|
|
|
| Stun |
?-?
|
| Stun Timer |
?
|
| Chain Cancel |
No
|
| Special Cancel |
No
|
| Frame Count |
? |
? |
? |
? |
? |
? |
?
|
| Simplified |
? |
? |
?
|
| Damage |
? |
|
 |
 |
 |
|
|
|
| Stun |
?-?
|
| Stun Timer |
?
|
| Chain Cancel |
No
|
| Special Cancel |
No
|
| Frame Count |
? |
? |
? |
? |
? |
? |
?
|
| Simplified |
? |
? |
?
|
| Damage |
? |
|
 |
 |
|
|
| Stun |
?-?
|
| Stun Timer |
?
|
| Chain Cancel |
No
|
| Special Cancel |
No
|
| Frame Count |
? |
? |
? |
? |
?
|
| Simplified |
? |
? |
?
|
| Damage |
? |
|
|
|
 |
|
|
|
| Stun |
?-?
|
| Stun Timer |
?
|
| Chain Cancel |
No
|
| Special Cancel |
No
|
| Frame Count |
? |
? |
? |
? |
? |
? |
?
|
| Simplified |
? |
? |
?
|
| Damage |
? |
|
|
 |
 |
|
|
|
| Stun |
?-?
|
| Stun Timer |
?
|
| Chain Cancel |
No
|
| Special Cancel |
No
|
| Frame Count |
? |
? |
? |
? |
? |
? |
?
|
| Simplified |
? |
? |
? |
?
|
- Close Standing Roundhouse:
| Damage |
? |
|
|
 |
 |

|
| Stun |
?-?
|
| Stun Timer |
?
|
| Chain Cancel |
No
|
| Special Cancel |
No
|
| Frame Count |
? |
? |
? |
? |
?
|
| Simplified |
? |
? |
?
|
|
 |
|
|
|
| Frame Count |
? |
? |
? |
?
|
| Simplified |
?
|
| Damage |
? |
|
|
|
 |
|
|
|
| Stun |
?-?
|
| Stun Timer |
?
|
| Chain Cancel |
No
|
| Special Cancel |
No
|
| Frame Count |
? |
? |
? |
? |
? |
? |
?
|
| Simplified |
? |
? |
?
|
| Damage |
? |
|
 |
 |
 |
 |
 |
|
| Stun |
?-?
|
| Stun Timer |
?
|
| Chain Cancel |
No
|
| Special Cancel |
No
|
| Frame Count |
? |
? |
? |
? |
? |
? |
?
|
| Simplified |
? |
? |
? |
? |
?
|
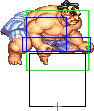
Aerial Normals
| Damage |
? |
 |
 |
 |
 |
|
| Stun |
?-?
|
| Stun Timer |
?
|
|
|
| Frame Count |
? |
? |
? |
? |
∞
|
| Simplified |
? |
? |
∞
|
| Damage |
? |
|
|
|
 |
|
| Stun |
?-?
|
| Stun Timer |
?
|
|
|
| Frame Count |
? |
? |
? |
? |
∞
|
| Simplified |
? |
? |
∞
|
| Damage |
? |
|
|
 |
|
| Stun |
?-?
|
| Stun Timer |
?
|
|
|
| Frame Count |
? |
? |
? |
?
|
| Simplified |
? |
?
|
|
|
 |
|
|
| Frame Count |
? |
? |
? |
∞
|
| Simplified |
∞
|
| Damage |
? |
 |
|
|
|
| Stun |
?-?
|
| Stun Timer |
?
|
|
|
| Frame Count |
? |
? |
? |
?
|
| Simplified |
? |
? |
?
|
|
|
|
|
|
| Frame Count |
? |
? |
? |
∞
|
| Simplified |
∞
|
- Neutral/Diagonal Jumping Fierce:
| Damage |
? |
|
 |
 |
 |
 |
|
|
| Stun |
?-?
|
| Stun Timer |
?
|
|
|
| Frame Count |
? |
? |
? |
? |
? |
? |
∞
|
| Simplified |
? |
? |
∞
|
| Damage |
? |
 |
 |
 |
|
|
| Stun |
?-?
|
| Stun Timer |
?
|
|
|
| Frame Count |
? |
? |
? |
? |
∞
|
| Simplified |
? |
? |
∞
|
| Damage |
? |
 |
 |

|
| Stun |
?-?
|
| Stun Timer |
?
|
|
|
| Frame Count |
? |
? |
∞
|
| Simplified |
? |
∞
|
| Damage |
? |
 |
 |
 |
|
|
 |
 |
 |
|
| Stun |
?-?
|
| Stun Timer |
?
|
|
|
| Frame Count |
? |
? |
? |
? |
? |
? |
? |
? |
∞
|
| Simplified |
? |
? |
∞
|
- Diagonal Jumping Forward:
| Damage |
? |
|
|
 |
|
|
 |
 |
 |
|
| Stun |
?-?
|
| Stun Timer |
?
|
|
|
| Frame Count |
? |
? |
? |
? |
? |
? |
? |
? |
∞
|
| Simplified |
? |
? |
∞
|
- Neutral Jumping Roundhouse:
| Damage |
? |
|
|
 |
|
|
|
|
|
|
| Stun |
?-?
|
| Stun Timer |
?
|
|
|
| Frame Count |
? |
? |
? |
? |
? |
? |
? |
? |
∞
|
| Simplified |
? |
? |
∞
|
- Diagonal Jumping Roundhouse:
| Damage |
? |
|
|
 |
|
|
|
|
|
|
| Stun |
?-?
|
| Stun Timer |
?
|
|
|
| Frame Count |
? |
? |
? |
? |
? |
? |
? |
? |
∞
|
| Simplified |
? |
? |
∞
|
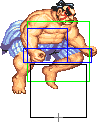
Command Normals
- Double Knee Attack: (On ground and close, ←/→ + Forward)
| Damage |
? |
 |
 |
 |
 |
|
| Stun |
?-?
|
| Stun Timer |
?
|
| Chain Cancel |
No
|
| Special Cancel |
No
|
| Frame Count |
? |
? |
? |
? |
?
|
| Simplified |
? |
? |
?
|
|
 |
|
|
|
| Frame Count |
? |
? |
? |
?
|
| Simplified |
?
|
- Flying Sumo Press: (Jump diagonally, ↙/↓/↘ + Forward)
| Damage |
? |
 |
 |

|
| Stun |
?-?
|
| Stun Timer |
?
|
|
|
| Frame Count |
? |
? |
∞
|
| Simplified |
? |
∞
|
Throws
E.Honda can throw using Strong, Fierce and Roundhouse. All his throws have the same range, which happens to be the best normal throw range in the game.
- Tawara Nage: (←/→ + Strong)
| Damage |
?(+?) |
 |
 |
|
| Stun |
?-?
|
| Stun Timer |
100
|
| Range (from axis) |
64
|
| Range advantage |
36
|
E.Honda tosses the opponent. The direction of the joystick determines the direction the enemy gets tossed at. Better used in the rare cases where you find yourself cornered and want to corner the opponent.
| Damage |
? + ?*n |
|
|
|
| Stun |
?-?
|
| Stun Timer |
0
|
| Range (from axis) |
64
|
| Range advantage |
36
|
This is the throw you will be using the most. It's untechable, does nice damage, and sets up crossup / walk under / tick shenanigans. You can even crossup / walk under when in the corner after a fierce grab (you can walk under, cr. RH for a crossup, or go for a crossup d + Forward, cr.Jab, Oicho, etc).
Note that some characters (Balrog, Cammy, DeeJay, Vega, Fei Long) cannot be walked under outside of the corner.
- Sekkan Kyaku: (←/→ + Roundhouse)
| Damage |
? + ?*n |
|
|
|
| Stun |
?-?
|
| Stun Timer |
0
|
| Range (from axis) |
64
|
| Range advantage |
36
|
E.Honda's knee bash. The only use I see in this throw is for throw mashing (so an HHS will not come out) because the Fierce throw gives you a better positioning when the opponent releases himself from the grab.
Special Moves
All motions are listed under the assumption that E.Honda is facing right.
- Super Hyakkan Otoshi a.k.a. Butt Drop: (Charge ↓, ↑, K)
- Startup:
|
 |
 |
 |
 |
 |
|
| Frame Count (Shrt) |
? |
? |
? |
? |
? |
?
|
| Simplified (Shrt) |
?
|
| Frame Count (Frwrd) |
? |
? |
? |
? |
? |
?
|
| Simplified (Frwrd) |
?
|
| Frame Count (Rh) |
? |
? |
? |
? |
? |
?
|
| Simplified (Rh) |
?
|
- Active+Recovery:
- Short/Forward Version:
Short version hits on the way up (so it's a decent antiand is useful to get over projectiles from far away. Also, it's a good mixup in Oicho setups. Forward hits on the way up too, can be used to stuff projectile attempts at the right distance, and is a risky way to get over projectiles (can be punished by sweeps -shotos- and jumping attacks -Guile, DeeJay- if they see it coming). Roundhouse should be used mainly for crossups, mixups and setting ticks rather than as a way to avoid projectiles, as it is extremely easy to punish in those situations. It hits only on the way down unlike the other versions.
To use as a pressure / mixup tool, it's a good idea to do cr.Short xx Smash, varying strenghts to make the opponent guess if you are going to cross-up or not, and mixing up ticks in-between.


