m (→Normal Moves) |
(jumping normals) |
||
| Line 54: | Line 54: | ||
{{SF2HFMoveListHeader}} | {{SF2HFMoveListHeader}} | ||
{{SF2HFMoveListRow | Standing Light Punch | lp | 14 | - | 4 | 40 | +1 | }} | {{SF2HFMoveListRow | Standing Light Punch | lp | 14 | - | 4 | 40 | +1 | }} | ||
{{SF2HFMoveListRow | Close Light Punch | | {{SF2HFMoveListRow | Close Light Punch | (near opponent) lp | 14 | - | 4 | 40 | +4 | }} | ||
{{SF2HFMoveListRow | Standing Medium Punch | mp | 18 | [[Damage_Scaling_(HF)#0x020|0x020]] | 8 | 60 | +11 | }} | {{SF2HFMoveListRow | Standing Medium Punch | mp | 18 | [[Damage_Scaling_(HF)#0x020|0x020]] | 8 | 60 | +11 | }} | ||
{{SF2HFMoveListRow | Close Medium Punch | | {{SF2HFMoveListRow | Close Medium Punch | (near opponent) mp | 16 | [[Damage_Scaling_(HF)#0x020|0x020]] | 8 | 60 | +13 | specialcancel }} | ||
{{SF2HFMoveListRow | Standing Hard Punch | hp | 22 | [[Damage_Scaling_(HF)#0x040|0x040]] | 14 | 80 | -4 | }} | {{SF2HFMoveListRow | Standing Hard Punch | hp | 22 | [[Damage_Scaling_(HF)#0x040|0x040]] | 14 | 80 | -4 | }} | ||
{{SF2HFMoveListRow | Standing Light Kick | lk | 14 | - | 4 | 40 | +4 | }} | {{SF2HFMoveListRow | Standing Light Kick | lk | 14 | - | 4 | 40 | +4 | }} | ||
{{SF2HFMoveListRow | Close Light Kick | | {{SF2HFMoveListRow | Close Light Kick | (near opponent) lk | 16 | - | 4 | 40 | -2 | }} | ||
{{SF2HFMoveListRow | Standing Medium Kick | mk | 18 | [[Damage_Scaling_(HF)#0x020|0x020]] | 8 | 60 | +2 | }} | {{SF2HFMoveListRow | Standing Medium Kick | mk | 18 | [[Damage_Scaling_(HF)#0x020|0x020]] | 8 | 60 | +2 | }} | ||
{{SF2HFMoveListRow | Close Medium Kick | | {{SF2HFMoveListRow | Close Medium Kick | (near opponent) mk | 20,20 | [[Damage_Scaling_(HF)#0x020|0x020]] | 8,8 | 60,60 | +9 | }} | ||
{{SF2HFMoveListRow | Standing Hard Kick | hk | 22 | [[Damage_Scaling_(HF)#0x040|0x040]] | 14 | 80 | -8 | }} | {{SF2HFMoveListRow | Standing Hard Kick | hk | 22 | [[Damage_Scaling_(HF)#0x040|0x040]] | 14 | 80 | -8 | }} | ||
{{SF2HFMoveListRow | Crouching Light Punch | d + lp | 14 | - | 4 | 40 | +5 | low }} | |||
{{SF2HFMoveListRow | Crouching Medium Punch | d + mp | 18 | [[Damage_Scaling_(HF)#0x020|0x020]] | 8 | 60 | +0 | }} | |||
{{SF2HFMoveListRow | Crouching Hard Punch | d + hp | 22 | [[Damage_Scaling_(HF)#0x040|0x040]] | 14 | 80 | +0 | }} | |||
{{SF2HFMoveListRow | Crouching Light Kick | d + lk | 14 | - | 4 | 40 | +4 | low }} | |||
{{SF2HFMoveListRow | Crouching Medium Kick | d + mk | 18 | [[Damage_Scaling_(HF)#0x020|0x020]] | 8 | 60 | +9 | low }} | |||
{{SF2HFMoveListRow | Crouching Hard Kick | d + hk | 22 | [[Damage_Scaling_(HF)#0x040|0x040]] | 8 | 130 | +3 | low knockdown }} | |||
{{SF2HFMoveListRow | Jump Light Punch | (air) lp | 16 | [[Damage_Scaling_(HF)#0x020|0x020]] | 4 | 40 | - | high }} | |||
{{SF2HFMoveListRow | Jump Medium Punch | (air) mp | 20 | [[Damage_Scaling_(HF)#0x040|0x040]] | 8 | 50 | - | high }} | |||
{{SF2HFMoveListRow | Neutral Jump Hard Punch | u + hp | 24 | [[Damage_Scaling_(HF)#0x060|0x060]] | 14 | 60 | - | high }} | |||
{{SF2HFMoveListRow | Diagonal Jump Hard Punch | ub / uf + hp | 22 | [[Damage_Scaling_(HF)#0x060|0x060]] | 14 | 60 | - | high }} | |||
{{SF2HFMoveListRow | Neutral Jump Light Kick | u + lk | 16 | [[Damage_Scaling_(HF)#0x020|0x020]] | 4 | 40 | - | high }} | |||
{{SF2HFMoveListRow | Diagonal Jump Light Kick | ub / uf + lk | 14 | [[Damage_Scaling_(HF)#0x020|0x020]] | 4 | 40 | - | high }} | |||
{{SF2HFMoveListRow | Neutral Jump Medium Kick | u + mk | 20 | [[Damage_Scaling_(HF)#0x040|0x040]] | 8 | 50 | - | high }} | |||
{{SF2HFMoveListRow | Diagonal Jump Medium Kick | ub / uf + mk | 18 | [[Damage_Scaling_(HF)#0x040|0x040]] | 8 | 50 | - | high }} | |||
{{SF2HFMoveListRow | Neutral Jump Hard Kick | u + hk | 24 | [[Damage_Scaling_(HF)#0x060|0x060]] | 14 | 60 | - | high }} | |||
{{SF2HFMoveListRow | Diagonal Jump Hard Kick | ub / uf + hk | 22 | [[Damage_Scaling_(HF)#0x060|0x060]] | 14 | 60 | - | high }} | |||
{{MoveListFooter}} | {{MoveListFooter}} | ||
Revision as of 16:11, 24 March 2012


Blanka
One day long ago, a young boy named Jimmy was aboard a plane, along with some government officials, on his way to visit his uncle. Unfortunately these officials were the targets of an assaination attempt by the Shadoloo, and the plane was crashed into the Brazilian Jungle. However Jimmy survived the crash, and began to live amongst the animals in the jungle. One day, he unwittingly hitched a ride on a poacher's car. Curious and excited, Blanka began to venture into the outside world. It was probably during this time that he met Dan as well as Dan's 'student', Sakura, before he went back to the jungle. He later resurfaced again to compete in the World Warrior tounament, where his mother happened to be a spectator. There is a tearful reunion as mother and son were finally reunited. Blanka probably now lives a happy (ab)normal life with his mother.
In a nutshell
Blanka is a powerful character with excellent jumping attacks, useful special moves and some great normals. A very solid character in Hyper Fighting.
Color Options
| Default | Start |
 |

|
Misc Animations
| Walk back | Neutral | Walk Fwd | Crouch |
 |
 |
 |

|
- Standing reel:
 |
 |
 |

|
- Standing gut reel:
 |
 |
 |

|
- Crouching reel:
 |
 |

|
- Dizzy:
 |
 |
 |
 |

|
Moves List
Note: All frame data gathered by using the method described at http://code.google.com/p/macrolua/wiki/FrameDataExamples. Some differs from TAkiba's, and is noted by a *.
Normal Moves
Standing Normals
- Standing Jab (close):
| Damage | 14 |  |
File:Sf2hf-blanka-cllp-s.png | File:Sf2hf-blanka-cllp-a.png | File:Sf2hf-blanka-cllp-r1.png | File:Sf2hf-blanka-cllp-r2.png | File:Sf2hf-blanka-cllp-s.png | 
|
| Random Damage | 0 | |||||||
| Stun | 1~7 | |||||||
| Stun Timer | 40 | |||||||
| Chain Cancel | No | |||||||
| Special Cancel | No | |||||||
| On Hit | +3 | |||||||
| Frame Count | 3 | 2 | 2 | 4 | 2 | 2 | 1 | |
| Simplified | 5 | 2 | 9* | |||||
- Standing Jab (far):
| Damage | 14 |  |
File:Sf2hf-blanka-lp-sup1.png | File:Sf2hf-blanka-lp-a.png | File:Sf2hf-blanka-lp-r1.png | File:Sf2hf-blanka-lp-r2.png | File:Sf2hf-blanka-lp-sup1.png | 
|
| Random Damage | 0 | |||||||
| Stun | 1~7 | |||||||
| Stun Timer | 40 | |||||||
| Chain Cancel | No | |||||||
| Special Cancel | No | |||||||
| On Hit | +0 | |||||||
| Frame Count | 3 | 2 | 3 | 4 | 3 | 3 | 1 | |
| Simplified | 5 | 3 | 11* | |||||
- Standing Strong (close):
| Damage | 16 |  |
File:Sf2hf-blanka-clmp-s.png | File:Sf2hf-blanka-clmp-a.png | File:Sf2hf-blanka-clmp-s.png | 
|
| Rnd dmg table | 0x020 | |||||
| Stun | 5~11 | |||||
| Stun Timer | 60 | |||||
| Chain Cancel | No | |||||
| Special Cancel | Yes | |||||
| On Hit | +12 | |||||
| Frame Count | 1 | 2 | 4 | 2 | 1 | |
| Simplified | 3 | 4 | 3* | |||
- Standing Strong (far):
| Damage | 18 |  |
File:Sf2hf-blanka-mp-s1.png | File:Sf2hf-blanka-mp-a.png | File:Sf2hf-blanka-mp-r1.png | File:Sf2hf-blanka-mp-r2.png | 
|
| Rnd dmg table | 0x020 | ||||||
| Stun | 5~11 | ||||||
| Stun Timer | 60 | ||||||
| Chain Cancel | No | ||||||
| Special Cancel | No | ||||||
| On Hit | +10 | ||||||
| Frame Count | 4 | 2 | 2 | 3 | 3 | 1 | |
| Simplified | 6 | 2 | 7* | ||||
- Standing Fierce:
| Damage | 22 |  |
File:Sf2hf-blanka-hp-s1.png | File:Sf2hf-blanka-hp-a1.png | File:Sf2hf-blanka-hp-a2.png | File:Sf2hf-blanka-hp-r1.png | File:Sf2hf-blanka-hp-s1.png | 
|
| Rnd dmg table | 0x040 | |||||||
| Stun | 11~17 | |||||||
| Stun Timer | 80 | |||||||
| Chain Cancel | No | |||||||
| Special Cancel | No | |||||||
| On Hit | -5 | |||||||
| Frame Count | 3 | 3 | 4 | 6 | 10 | 7 | 1 | |
| Simplified | 6 | 10 | 18* | |||||
- Standing Short (close):
| Damage | 16 |  |
File:Sf2hf-blanka-cllk-s0.png | File:Sf2hf-blanka-cllk-s2.png | File:Sf2hf-blanka-cllk-s3.png | File:Sf2hf-blanka-cllk-s4.png | File:Sf2hf-blanka-cllk-s5.png | File:Sf2hf-blanka-cllk-a.png |
| Random Damage | 0 | |||||||
| Stun | 1~7 | |||||||
| Stun Timer | 40 | |||||||
| Chain Cancel | No | |||||||
| Special Cancel | No | |||||||
| On Hit | -3 | |||||||
| Frame Count | 1 | 3 | 3 | 3 | 2 | 2 | 4 | |
| Simplified | 14 | 4 | ||||||
| File:Sf2hf-blanka-cllk-s5.png | File:Sf2hf-blanka-cllk-s4.png | File:Sf2hf-blanka-cllk-s3.png | File:Sf2hf-blanka-cllk-s1.png | 
| |
| Frame Count | 3 | 3 | 3 | 3 | 1 |
| Simplified | 13* | ||||
- Standing Short (far):
| Damage | 14 |  |
File:Sf2hf-blanka-lk-s1.png | File:Sf2hf-blanka-lk-s2.png | File:Sf2hf-blanka-lk-a.png | File:Sf2hf-blanka-lk-s2.png | File:Sf2hf-blanka-lk-s1.png | 
|
| Random Damage | 0 | |||||||
| Stun | 1~7 | |||||||
| Stun Timer | 40 | |||||||
| Chain Cancel | No | |||||||
| Special Cancel | No | |||||||
| On Hit | +3 | |||||||
| Frame Count | 3 | 2 | 2 | 4 | 3 | 3 | 1 | |
| Simplified | 7 | 4 | 7* | |||||
- Standing Forward (close):
| Damage | 20,20 |  |
File:Sf2hf-blanka-cllk-s0.png | File:Sf2hf-blanka-cllk-s2.png | File:Sf2hf-blanka-cllk-s3.png | File:Sf2hf-blanka-cllk-s4.png | File:Sf2hf-blanka-clmk-a1.png | File:Sf2hf-blanka-clmk-a2.png |
| Random Damage | 0x020 | |||||||
| Stun | 5~11,5~11 | |||||||
| Stun Timer | 60,60 | |||||||
| Chain Cancel | No | |||||||
| Special Cancel | No | |||||||
| On Hit | +8 | |||||||
| Frame Count | 1 | 3 | 3 | 3 | 2 | 2 | 4 | |
| Simplified | 12 | 6 | ||||||
| File:Sf2hf-blanka-cllk-s5.png | File:Sf2hf-blanka-cllk-s4.png | File:Sf2hf-blanka-cllk-s3.png | File:Sf2hf-blanka-cllk-s1.png | 
| |
| Frame Count | 3 | 3 | 3 | 3 | 1 |
| Simplified | 13* | ||||
- Standing Forward (far):
| Damage | 18 |  |
File:Sf2hf-blanka-mk-s1.png | File:Sf2hf-blanka-mk-s2.png | File:Sf2hf-blanka-mk-a.png | File:Sf2hf-blanka-mk-s2.png | File:Sf2hf-blanka-mk-s1.png | 
|
| Rnd dmg table | 0x020 | |||||||
| Stun | 5~11 | |||||||
| Stun Timer | 60 | |||||||
| Chain Cancel | No | |||||||
| Special Cancel | No | |||||||
| On Hit | +1 | |||||||
| Frame Count | 3 | 2 | 2 | 4 | 3 | 3 | 1 | |
| Simplified | 7 | 4 | 7* | |||||
- Standing Roundhouse (far):
| Damage | 22 |  |
File:Sf2hf-blanka-hk-s1.png | File:Sf2hf-blanka-hk-a.png | File:Sf2hf-blanka-hk-a2.png |
| Rnd dmg table | 0x040 | ||||
| Stun | 11~17 | ||||
| Stun Timer | 80 | ||||
| Chain Cancel | No | ||||
| Special Cancel | No | ||||
| On Hit | -9 | ||||
| Frame Count | 4 | 3 | 6 | 5 | |
| Simplified | 7 | 11 | |||
| File:Sf2hf-blanka-hk-r1.png | File:Sf2hf-blanka-hk-r2.png | File:Sf2hf-blanka-hk-r3.png | 
| ||
| Frame Count | 5 | 5 | 5 | 1 | |
| Simplified | 16* | ||||
Crouching Normals
- Crouching Jab:
| Damage | 14 |  |
File:Sf2hf-blanka-crlp-s1.png | File:Sf2hf-blanka-crlp-s2.png | File:Sf2hf-blanka-crlp-a.png |
| Rnd dmg table | 0 | ||||
| Stun | 1~7 | ||||
| Stun Timer | 40 | ||||
| Chain Cancel | No | ||||
| Special Cancel | No | ||||
| On Hit | +4 | ||||
| Frame Count | 3 | 2 | 4 | 3 | |
| Simplified | 9 | 3 | |||
| File:Sf2hf-blanka-crlp-s2.png | File:Sf2hf-blanka-crlp-s1.png | 
| |
| Frame Count | 3 | 3 | 1 |
| Simplified | 7* | ||
Hits low.
- Crouching Strong:
| Damage | 18 |  |
File:Sf2hf-blanka-crmp-s1.png | File:Sf2hf-blanka-crmp-s2.png | File:Sf2hf-blanka-crmp-a.png |
| Random Damage | 0x020 | ||||
| Stun | 5~11 | ||||
| Stun Timer | 60 | ||||
| Chain Cancel | No | ||||
| Special Cancel | No | ||||
| On Hit | -1 | ||||
| Frame Count | 1 | 3 | 3 | 3 | |
| Simplified | 7 | 3 | |||
| File:Sf2hf-blanka-crmp-r1.png | File:Sf2hf-blanka-crmp-r2.png | File:Sf2hf-blanka-crmp-s2.png | File:Sf2hf-blanka-crmp-s1.png | 
| |
| Frame Count | 7 | 3 | 3 | 3 | 1 |
| Simplified | 17* | ||||
- Crouching Fierce:
| Damage | 22 |  |
File:Sf2hf-blanka-crhp-s1.png | File:Sf2hf-blanka-crhp-s2.png | File:Sf2hf-blanka-crhp-a.png | File:Sf2hf-blanka-crhp-s2.png | File:Sf2hf-blanka-crhp-s1.png | 
|
| Rnd dmg table | 0x040 | |||||||
| Stun | 11~17 | |||||||
| Stun Timer | 80 | |||||||
| Chain Cancel | No | |||||||
| Special Cancel | No | |||||||
| On Hit | -1 | |||||||
| Frame Count | 1 | 3 | 4 | 6 | 10 | 7 | 1 | |
| Simplified | 8 | 6 | 18* | |||||
- Crouching Short:
| Damage | 14 |  |
File:Sf2hf-blanka-crlk-s1.png | File:Sf2hf-blanka-crlk-s2.png | File:Sf2hf-blanka-crlk-a.png | File:Sf2hf-blanka-crlk-s2.png | File:Sf2hf-blanka-crlk-s1.png | 
|
| Rnd dmg table | 0 | |||||||
| Stun | 1~7 | |||||||
| Stun Timer | 40 | |||||||
| Chain Cancel | No | |||||||
| Special Cancel | No | |||||||
| On Hit | +3 | |||||||
| Frame Count | 1 | 2 | 2 | 4 | 3 | 3 | 1 | |
| Simplified | 5 | 4 | 7* | |||||
Hits low.
- Crouching Forward:
| Damage | 18 |  |
File:Sf2hf-blanka-crlk-s1.png | File:Sf2hf-blanka-crlk-s2.png | File:Sf2hf-blanka-crmk-a.png | File:Sf2hf-blanka-crlk-s2.png | File:Sf2hf-blanka-crlk-s1.png | 
|
| Rnd dmg table | 0x020 | |||||||
| Stun | 5~11 | |||||||
| Stun Timer | 60 | |||||||
| Chain Cancel | No | |||||||
| Special Cancel | No | |||||||
| On Hit | +8 | |||||||
| Frame Count | 1 | 2 | 2 | 4 | 3 | 3 | 1 | |
| Simplified | 5 | 4 | 7* | |||||
Hits low.
- Crouching Roundhouse:
| Damage | 22 |  |
File:Sf2hf-blanka-crhk-s1.png | File:Sf2hf-blanka-crhk-s2.png | File:Sf2hf-blanka-crhk-a.png | File:Sf2hf-blanka-crhk-s2.png | File:Sf2hf-blanka-crhk-s1.png | 
|
| Rnd dmg table | 0x040 | |||||||
| Stun | 5~11 | |||||||
| Stun Timer | 130 | |||||||
| Chain Cancel | No | |||||||
| Special Cancel | No | |||||||
| On Hit | KD | |||||||
| On Block | +2 | |||||||
| Frame Count | 3 | 2 | 3 | 4 | 10 | 7 | 1 | |
| Simplified | 8 | 4 | 18* | |||||
Hits low, and knocks down.
Aerial Normals
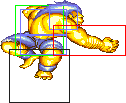
- Neutral/Diagonal Jumping Jab:
| Damage | 16 |  |
 |
 |
 |

|
| Rnd Dmg Table | 0x020 | |||||
| Stun | 1~7 | |||||
| Stun Timer | 40 | |||||
| Frame Count | 2 | 3 | 20 | 3 | ∞ | |
| Simplified | 5 | 20 | ∞ | |||
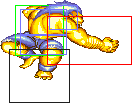
- Neutral/Diagonal Jumping Strong:
| Damage | 20 |  |
 |
 |
 |

|
| Rnd Dmg Table | 0x040 | |||||
| Stun | 5~11 | |||||
| Stun Timer | 50 | |||||
| Frame Count | 2 | 3 | 12 | 3 | ∞ | |
| Simplified | 5 | 12 | ∞ | |||
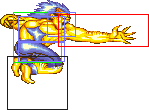
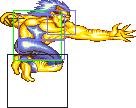
- Neutral Jumping Fierce:
| Damage | 24 | 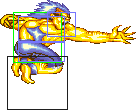 |
 |
 |
 |
 |
 |

|
| Rnd Dmg Table | 0x060 | |||||||
| Stun | 11~17 | |||||||
| Stun Timer | 60 | |||||||
| Frame Count | 1 | 3 | 3 | 6 | 3 | 3 | ∞ | |
| Simplified | 1* | 3* | ∞ | |||||
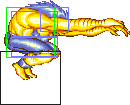
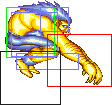
- Diagonal Jumping Fierce:
| Damage | 22 |  |
 |
 |

|
| Rnd Dmg Table | 0x060 | ||||
| Stun | 11~17 | ||||
| Stun Timer | 60 | ||||
| Frame Count | 2 | 3 | 6 | ∞ | |
| Simplified | 5 | 6 | ∞ | ||
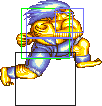
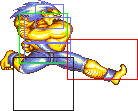
- Neutral Jumping Short:
| Damage | 16 |  |
 |
 |
 |

|
| Rnd Dmg Table | 0x020 | |||||
| Stun | 1~7 | |||||
| Stun Timer | 40 | |||||
| Frame Count | 2 | 3 | 20 | 3 | ∞ | |
| Simplified | 5 | 20 | ∞ | |||
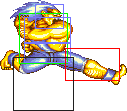
- Diagonal Jumping Short:
| Damage | 14 |  |
 |
 |
 |

|
| Rnd Dmg Table | 0x020 | |||||
| Stun | 1~7 | |||||
| Stun Timer | 40 | |||||
| Frame Count | 2 | 3 | 20 | 3 | ∞ | |
| Simplified | 5 | 20 | ∞ | |||
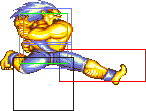
- Neutral Jumping Forward:
| Damage | 20 |  |
 |
 |
 |

|
| Rnd Dmg Table | 0x040 | |||||
| Stun | 5~11 | |||||
| Stun Timer | 50 | |||||
| Frame Count | 2 | 3 | 12 | 3 | ∞ | |
| Simplified | 5 | 12 | ∞ | |||
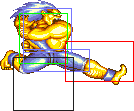
- Diagonal Jumping Forward:
| Damage | 18 |  |
 |
 |
 |

|
| Rnd Dmg Table | 0x040 | |||||
| Stun | 5~11 | |||||
| Stun Timer | 50 | |||||
| Frame Count | 2 | 3 | 12 | 3 | ∞ | |
| Simplified | 5 | 12 | ∞ | |||
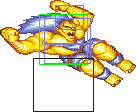
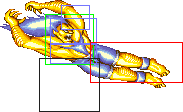
- Neutral Jumping Roundhouse:
| Damage | 24 |  |
 |
 |
 |

|
| Rnd Dmg Table | 0x060 | |||||
| Stun | 11~17 | |||||
| Stun Timer | 60 | |||||
| Frame Count | 2 | 3 | 6 | 3 | ∞ | |
| Simplified | 5 | 6 | ∞ | |||
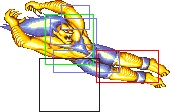
- Diagonal Jumping Roundhouse:
| Damage | 22 |  |
 |
 |
 |

|
| Rnd Dmg Table | 0x060 | |||||
| Stun | 11~17 | |||||
| Stun Timer | 60 | |||||
| Frame Count | 2 | 3 | 6 | 3 | ∞ | |
| Simplified | 5 | 6 | ∞ | |||
Unique Moves
- Rock Crush a.k.a. Headbutt: (On ground and close, ←/→ + Strong)
| Damage | 18,18 |  |
File:Sf2hf-blanka-fmp-s1.png | File:Sf2hf-blanka-fmp-a1.png | File:Sf2hf-blanka-fmp-a2.png | File:Sf2hf-blanka-fmp-a3.png |
| Rnd Dmg Table | 0x020 | |||||
| Stun | 5~11,5~11 | |||||
| Stun Timer | 60,60 | |||||
| Special Cancel | No | |||||
| Super Cancel | No | |||||
| Frame Advantage | +3 | |||||
| Frame Count | 5 | 4 | 4 | 3 | 2 | |
| Simplified | 9 | 7 | 2 | |||
| File:Sf2hf-blanka-fmp-r1.png | File:Sf2hf-blanka-fmp-r2.png | File:Sf2hf-blanka-fmp-s1.png | 
| |
| Frame Count | 5 | 4 | 3 | 1 |
| Simplified | 13 | |||
2nd hit hits low.
Throws
- Wild Fang a.k.a. Bite: (←/→ + Fierce)
| Damage | 20+(4*n) | File:Sf2hf-blanka-throw.png | |
| Duration | 130 | ||
| Stun | 5~11 | ||
| Stun Timer | 60 | ||
| Range (from axis) | 64 | ||
| Range advantage | 35 | ||
Special Moves
Electric Shock: rapidly tap the jab or strong punch buttons.
Horizontal Ball: Hold Back for at least 1 second, then Forward + Punch (Hold at 4 for at least 1 second, then 6 + Punch)
Vertical Ball: Hold Down for at least 1 second, then Up + Kick (Hold at 2 for at least 1 second, then 8 + Kick)
The Basics
Advanced Strategy
Match-ups
Vs. Balrog (boxer):
Vs. Blanka (self):
Vs. Chun-Li:
Vs. Dhalsim:
Vs. E. Honda:
Blanka's crouching hitbox is low enough that Honda's standing lp and mp will whiff over Blanka's head.
Vs. Guile:
Vs. Ken:
Vs. M. Bison (dictator):
Vs. Ryu:
Vs. Sagat:
Vs. Vega (claw):
Vs. Zangief:
Stay grounded and just within reach of a crouching fierce punch.
| General | Game Mechanics | Strategy | Tiers | |
| The Characters | Balrog (Boxer) | Blanka | Chun-Li | Dhalsim | E. Honda | Guile | Ken | M. Bison (Dictator) | Ryu | Sagat | Vega (Claw) | Zangief |
