| Line 451: | Line 451: | ||
| [[File:qcf.gif]], [[File:qcf.gif]] + [[File:snkd.gif]] || '''0''' || '''KD''' || '''-32''' | | [[File:qcf.gif]], [[File:qcf.gif]] + [[File:snkd.gif]] || '''0''' || '''KD''' || '''-32''' | ||
|} | |} | ||
</center> | |||
=Attack Notes= | =Attack Notes= | ||
Revision as of 20:08, 1 October 2011
Introduction
To come.
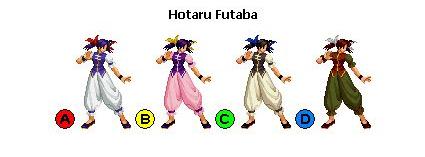
Character Colors
Gameplay Overview
To come.
Move List
Command Normal Moves
Kou-shuu Da (Needle Kick): Down+B in the air
Cross-over: Press CD in the air
Special Command Moves
Attributes
Damage Level: Weak; takes 10% damage from any hit inflicted to her.
Tapping Forward twice will have her Run.
Hit Boxes and Frame Data
Legend:
Hit Box: Area that will hit the opponent
Hurt Box: Area where you can get hit. A move is invincible if the Hurt Box is absent.
Throw Box/Range: Active throw frames and range. Your opponent will be thrown in this field if not in block or hit stun.
Projectile Box: Hit box on a projectile attack
Guard/Counter Box: The Guard Box or Counter Box. This appears when blocking or using a counter move.
Push Box: Has no bearing on hurt/hit boxes. Just allows characters to not pass through each other.
Command = the input for the attack.
Start Up = How many start up frames a move/attack has.
Hit = When the attack hits.
Block = When the attack is blocked.
+ signifies how many advantage frames the attacker has.
- signifies how many disadvantage frames the attacker has.
KD means the attack will knock the opponent down.
Standing, Crouching and Running
Taunt
| Command | Total Frames |
| Normal |
35 |
| Command | Total Frames |
| Close |
9 |
| Command | Total Frames |
| 10 |
| Command | Total Frames |
| 14 |
| Command | Start Up | Hit | Guard |
| Close |
3 | +5 | +5 |
| Command | Start Up | Hit | Guard |
| Close |
4 | +1 | +1 |
| Command | Start Up | Hit | Guard |
| Close |
5 | -5 | -5 |
| Command | Start Up | Hit | Guard |
| Close |
6 | -8 | -8 |
| Command | Start Up | Hit | Guard |
| Far |
5 | +2 | +2 |
| Command | Start Up | Hit | Guard |
| Far |
6 | +2 | +2 |
| Command | Start Up | Hit | Guard |
| Far |
9 | +1 | +1 |
| Command | Start Up | Hit | Guard |
| Far |
11 | -2 | -2 |
| Command | Start Up | Hit | Guard |
| 4 | +2 | +2 |
| Command | Start Up | Hit | Guard |
| 4 | +2 | +2 |
| Command | Start Up | Hit | Guard |
| 5 | -5 | -5 |
| Command | Start Up | Hit | Guard |
| 7 | KD | -14 |
| Command | Start Up | Hit | Guard |
| 23 | -1 | +5 |
| Command | Start Up | Hit | Guard |
| 8 | -3 | +3 |
| Command | Start Up | Hit | Guard |
| Air |
29 | KD | -16 |
| Command | Start Up | Hit | Guard |
| 10 | -5 | -5 |
| Command | Start Up | Hit | Guard |
| air |
10 | KD | ≥-8 |
| Command | Start Up | Hit | Guard |
| air |
13 | KD | ≥-9 |
| Command | Start Up | Hit | Guard |
| 2 | KD | -12 |
| Command | Start Up | Hit | Guard |
| 2 | KD | -31 |
| Command | Start Up | Hit | Guard |
| 10 | KD | -11 |
| Command | Start Up | Hit | Guard |
| 18 | KD | -1 |
| Command | Start Up | Hit | Guard |
| 13 | KD | -19 | |
| 13 | KD | +12 |
| Command | Start Up | Hit | Guard |
| 13 | KD | -19 | |
| 13 | KD | +12 |
| Command | Start Up | Hit | Guard |
| 9 | KD |
| Command | Start Up | Hit | Guard |
| 6 | KD | -51 |
| Command | Start Up | Hit | Guard |
| 6 | KD | -14 |
| Command | Start Up | Hit | Guard |
| 0 | KD | -33 |
| Command | Start Up | Hit | Guard |
| 0 | KD | -32 |
Attack Notes
To come.
Combos
Anywhere:-
1) Jumping C/D-->Crouching C-->QCF+C
2) Jumping C/D-->Standing D-->QCFx2+P
Corner only:-
3) Jumping C/D-->Crouching C-->QCB+C
4) Jumping C/D-->Crouching C-->QCB+B, Break-->F, D, DF+D OR QCFx2+K
5) Down+B in the air, Jumping D (link/chain)xxQCB+B-->QCFx2+K
6) Jumping C/D-->Crouching C-->QCB+B, Break-->QCB+D in the air-->QCFx2+K
TOP+Corner only:-
7) Jumping C/D-->Crouching C-->QCB+B, Break-->TOP Attack
8) Jumping C/D-->Crouching C-->QCB+B, Break-->TOP Attack-->QCFx2+K
Bread'n'Butter Combos
st. b xx qcb b(break w/ab), qcf c (37/31)
cr. a xx qcb b(break w/ab), qcf c (35/29)
st. c/cr. c/st. d xx qcb b(break w/ab), qcf c (40/34)
cr. a(x2) xx qcb a (28/19)
st. c/cr. c xx qcb c (36/28)
st. d xx qcfx2 p (64/45 s, 88/60 p)
Corner stuff(corner only)
st. c xx qcb b(break w/ab), dp d (39/32)
st. c xx qcb b(break w/ab), qcfx2 k (73/55 s, 99/72 p)
j. d xx qcb b(air), qcfx2 k (73/54 s, 99/71 p)
Counter hit stuff
qcb b(counter hit, break w/ab), qcb b(break w/ab), qcf c (46/40)
qcb b(counter hit, break w/ab), qcfx2 k (58/45 s, 84/62 p)
(corner)qcb b(counter hit, break w/ab), qcb b(break w/ab), qcfx2 k (79/61 s, 105/78 p)
(near corner)air qcb d(air counter hit), dp d (31/25)
(near corner)air qcb d(air counter hit), qcfx2 k (65/48 s, 91/65 p)
qcf c(air counter hit), qcf c (32/30)
T.O.P. Notes
She does a flip kick like Marshall Law. Probably one of the worst in the game IMO, but you could use it as an anti air when the opponent is right above you.
Overall Strategy
Hotaru maybe a little weak in the health department, but she can also compete in the right person's hands. She has a lot of tools to place her in situations where the opponent has to guess, and also, if guessing wrong, can lead to a lot of damage.
Useful normals(standing):
st. a(far/close): Well, everyone's standing a's are pretty abusive, her's isn't any different.
st. b(close): It's a really good poke, and it can be used to start combos on a hit.
st. c(close): Also pretty good combo starter. It does some pretty good guard damange as well, so involve it in block strings if you can.
st. d(far/close): Use the far standing d in range, to make it very effective. The close standing D is an easy hit confirm with her punch super.
Useful(crouching):
cr. a: Basic pretty much. You can also combo from it.
cr. b: Pretty ok poke. I think you can combo supers from it.
cr. c: This is yes. This has pretty good range, and is hit confirmable. Just use it well however, and make sure you always cancel it into something.
cr. d: Sweep, it's pretty alright. Use it mostly when you need to knockdown when you can't combo.
Useful(jumping):
j. b: Air to air poke, can link to j. a on a ground it as well.
j. d: Air to ground poke, pretty good, and can cancel it to the air kick.
j. down + b: Very useful in some situations. Use this whenever you are above the opponent, or as a wakeup option on low jump.
Make sure you find ways to apply her normals, so that you don't get punished. Also, make sure you either hit with the air qcb k or whiff it. Make sure you don't get blocked, you will be punished severely. Also, if you need to faint anything, use the f + ac one. It is a lot easier to connect with things with that.
Matchup Notes
To come.
Advanced Tactics
When Hotaru is working properly, she can use her positioning to mixup the opponent in a lot of ways. Here are some ones that you should work on.
Opponent in the air:
j. down + b, then...
--j. d into combo
--land and throw
--land and do a low into combo
--cd and another j. down + b into something else
Off of any air counter hit(note that all the air down + b stuff applies as well):
run up, j. d then...
--cancel into the air kick(can kick super off of this in the corner)
--cancel into the air kick(whiffed), and mixup more
--throw
--throw a low into a combo
--overhead
--dp, reflect kick, or qcb p
run up, s. a then...
--jump, cd, j. d into combo
--low jump down + b into mixup
--run up, hcf + d throw
--low attack into combo
After knocking the opponent down:
low jump down + b then...
--cd, land, sweep
--cd, j. d into combo
--cd, land, throw
Miscellaneous:
Get into a good habit of using her fireballs properly. Most of the time, you want to dash back, and then fire one off. This way the opponent cannot punish you at all. Also, you can use her fireballs as anti airs if timed right and they can catch backdashers a lot. Make sure you do this as well.
Also, remember that Hotaru has an air throw. Whenever an opponent throws an early jumping normal, press up, down + c to do a low jump air throw and snag em out of the air. This puts you in a good position, as to where you can mixup.
Her supers are good outside of combos as well. The kick super is a very good anti air, just watch out, as it is good for long jumps, it will whiff or not hit all the way if the opponent is straight above you. The punch super is good to tick away that last bit of life left. Also rememeber this sequence; qcb p(blocked), dp or punch super. This is Hotaru's frame trap. If the opponent flinches at all, thinking they can punish this move, then they will be punished in retaliation. You can get this off only once per match, so use it wisely.
Template:Garou: Mark of the Wolves

