Cherry K.O. (talk | contribs) No edit summary |
Cherry K.O. (talk | contribs) No edit summary |
||
| Line 9: | Line 9: | ||
|+ | |+ | ||
|- | |- | ||
! Comet Tail !! Input !! Damage !! Start !! Active !! Recovery !! Total Frames | ! Comet Tail !! Input !! Damage !! Start !! Active !! Recovery !! Total Frames !! Notes | ||
|- | |- | ||
| [[file:Comet Tail.jpg | 150px]] || 3 + A || || || || || | | [[file:Comet Tail.jpg | 150px]] || 3 + A || 6 || || || || || Dash and Special Cancellable. Hits low. Does not continue juggles. Can be linked after 5A or 2A. | ||
|} | |} | ||
| Line 17: | Line 17: | ||
|+ | |+ | ||
|- | |- | ||
! Stardust Arrow !! Input !! Damage !! Start !! Active !! Recovery !! Total Frames | ! Stardust Arrow !! Input !! Damage !! Start !! Active !! Recovery !! Total Frames !! Notes | ||
|- | |- | ||
| [[file:Stardust Arrow.jpg | 150px]] || 3 + B || || || || || | | [[file:Stardust Arrow.jpg | 150px]] || 3 + B || 22 || || || || || Dash and Special Cancellable. Hits low. Does not continue juggles. Can be linked after 5A or 2A. | ||
|} | |} | ||
| Line 25: | Line 25: | ||
|+ | |+ | ||
|- | |- | ||
! Metro Launcher !! Input !! Damage !! Start !! Active !! Recovery !! Total Frames | ! Metro Launcher !! Input !! Damage !! Start !! Active !! Recovery !! Total Frames !! Notes | ||
|- | |- | ||
| [[file:Metro Launcher.jpg | 150px]] || 3 + C || || || || || | | [[file:Metro Launcher.jpg|150px]] || 3 + C || 32 || || || || || Does a good amount of stun. Can't juggle opponent when launched. Mostly used as an anti-air. | ||
|} | |} | ||
==Throws== | ==Throws== | ||
Boost Overdrop: 4 | {| class = "wikitable" | ||
|+ | |||
|- | |||
! Boost Overdrop !! Input !! Damage !! Notes | |||
|- | |||
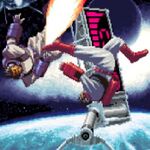
| [[file:Boost Overdrop.jpg|150px]] || 4/6 + B || 32 || Rolf throws the opponent behind him and reverses the side he's on. For the first frame after recovering from Boost Overdrop, the opponent is facing away from Rolf. | |||
The opponent has to block towards Rolf during that frame. You can catch opponents off guard with a Striking Napalm if they are not blocking. | |||
|} | |||
Boost Pressure: 4 | {| class = "wikitable" | ||
|+ | |||
|- | |||
! Boost Pressure !! Input !! Damage | |||
|- | |||
| [[file:Boost Pressure.jpg|150px]] || 4/6 + C || 32 | |||
|} | |||
== Special Moves == | == Special Moves == | ||
| Line 73: | Line 86: | ||
|total frames=- | |total frames=- | ||
|description = | |description = | ||
===== | ===== Notes: ===== | ||
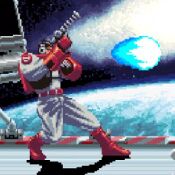
Rolf Shot can knock down the opponent when performed during a dash. | Rolf Shot can knock down the opponent when performed during a dash. | ||
| Line 115: | Line 128: | ||
|total frames=- | |total frames=- | ||
|description = | |description = | ||
===== | ===== Notes: ===== | ||
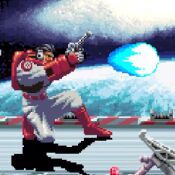
Rolf performs a roll and then fires a projectile. The beginning of the roll has invincibility. This move can also knock down the opponent when performed during a dash. | Rolf performs a roll and then fires a projectile. The beginning of the roll has invincibility. This move can also knock down the opponent when performed during a dash. | ||
| Line 157: | Line 170: | ||
|total frames=- | |total frames=- | ||
|description = | |description = | ||
===== | ===== Notes: ===== | ||
=====Counter Play:===== | =====Counter Play:===== | ||
| Line 200: | Line 213: | ||
|total frames=- | |total frames=- | ||
|description = | |description = | ||
===== | ===== Notes: ===== | ||
}} | }} | ||
| Line 241: | Line 254: | ||
|total frames=- | |total frames=- | ||
|description = | |description = | ||
===== | ===== Notes: ===== | ||
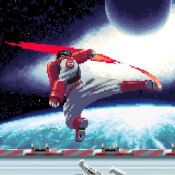
Striking Napalm has long reach and deals massive damage. It's great for catching back dashes and finishing juggles/combos. | Striking Napalm has long reach and deals massive damage. It's great for catching back dashes and finishing juggles/combos. | ||
=====Counter Play:===== | =====Counter Play:===== | ||
Revision as of 15:57, 23 May 2022
Introduction
Move List
Command Normals
| Comet Tail | Input | Damage | Start | Active | Recovery | Total Frames | Notes |
|---|---|---|---|---|---|---|---|
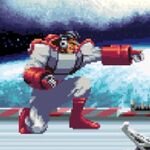 |
3 + A | 6 | Dash and Special Cancellable. Hits low. Does not continue juggles. Can be linked after 5A or 2A. |
| Stardust Arrow | Input | Damage | Start | Active | Recovery | Total Frames | Notes |
|---|---|---|---|---|---|---|---|
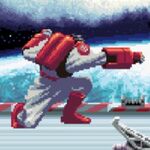 |
3 + B | 22 | Dash and Special Cancellable. Hits low. Does not continue juggles. Can be linked after 5A or 2A. |
| Metro Launcher | Input | Damage | Start | Active | Recovery | Total Frames | Notes |
|---|---|---|---|---|---|---|---|
 |
3 + C | 32 | Does a good amount of stun. Can't juggle opponent when launched. Mostly used as an anti-air. |
Throws
| Boost Pressure | Input | Damage |
|---|---|---|
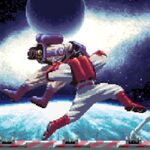 |
4/6 + C | 32 |
Special Moves
| A | Damage | Startup, Active, and Recovery | On Hit | On Block | ||||||||
|---|---|---|---|---|---|---|---|---|---|---|---|---|
| - | - | - | - | |||||||||
| Dash Damage | Dash Startup, Active, and Recovery | On Dash Hit | On Dash Block | |||||||||
| - | - | - | - | |||||||||
| B | Damage | Startup, Active, and Recovery | On Hit | On Block | ||||||||
| - | - | - | - | |||||||||
| Dash Damage | Dash Startup, Active, and Recovery | On Dash Hit | On Dash Block | |||||||||
| - | - | - | - | |||||||||
| C | Damage | Startup, Active, and Recovery | On Hit | On Block | ||||||||
| - | - | - | - | |||||||||
| Dash Damage | Dash Startup, Active, and Recovery | On Dash Hit | On Dash Block | |||||||||
| - | - | - | - | |||||||||
Notes:Rolf Shot can knock down the opponent when performed during a dash. | ||||||||||||
| A | Damage | Startup, Active, and Recovery | On Hit | On Block | ||||||||
|---|---|---|---|---|---|---|---|---|---|---|---|---|
| - | - | - | - | |||||||||
| Dash Damage | Dash Startup, Active, and Recovery | On Dash Hit | On Dash Block | |||||||||
| - | - | - | - | |||||||||
| B | Damage | Startup, Active, and Recovery | On Hit | On Block | ||||||||
| - | - | - | - | |||||||||
| Dash Damage | Dash Startup, Active, and Recovery | On Dash Hit | On Dash Block | |||||||||
| - | - | - | - | |||||||||
| C | Damage | Startup, Active, and Recovery | On Hit | On Block | ||||||||
| - | - | - | - | |||||||||
| Dash Damage | Dash Startup, Active, and Recovery | On Dash Hit | On Dash Block | |||||||||
| - | - | - | - | |||||||||
Notes:Rolf performs a roll and then fires a projectile. The beginning of the roll has invincibility. This move can also knock down the opponent when performed during a dash. | ||||||||||||
| A | Damage | Startup, Active, and Recovery | On Hit | On Block | ||||||||
|---|---|---|---|---|---|---|---|---|---|---|---|---|
| - | - | - | - | |||||||||
| Dash Damage | Dash Startup, Active, and Recovery | On Dash Hit | On Dash Block | |||||||||
| - | - | - | - | |||||||||
| B | Damage | Startup, Active, and Recovery | On Hit | On Block | ||||||||
| - | - | - | - | |||||||||
| Dash Damage | Dash Startup, Active, and Recovery | On Dash Hit | On Dash Block | |||||||||
| - | - | - | - | |||||||||
| C | Damage | Startup, Active, and Recovery | On Hit | On Block | ||||||||
| - | - | - | - | |||||||||
| Dash Damage | Dash Startup, Active, and Recovery | On Dash Hit | On Dash Block | |||||||||
| - | - | - | - | |||||||||
Notes:Counter Play:Each version whiffs the second hit on Juri, Alvan, Kazuma, and Roomi when they're crouching. | ||||||||||||
| A | Damage | Startup, Active, and Recovery | On Hit | On Block | ||||||||
|---|---|---|---|---|---|---|---|---|---|---|---|---|
| - | - | - | - | |||||||||
| Dash Damage | Dash Startup, Active, and Recovery | On Dash Hit | On Dash Block | |||||||||
| - | - | - | - | |||||||||
| B | Damage | Startup, Active, and Recovery | On Hit | On Block | ||||||||
| - | - | - | - | |||||||||
| Dash Damage | Dash Startup, Active, and Recovery | On Dash Hit | On Dash Block | |||||||||
| - | - | - | - | |||||||||
| C | Damage | Startup, Active, and Recovery | On Hit | On Block | ||||||||
| - | - | - | - | |||||||||
| Dash Damage | Dash Startup, Active, and Recovery | On Dash Hit | On Dash Block | |||||||||
| - | - | - | - | |||||||||
Notes: | ||||||||||||
| A | Damage | Startup, Active, and Recovery | On Hit | On Block | ||||||||
|---|---|---|---|---|---|---|---|---|---|---|---|---|
| - | - | - | - | |||||||||
| Dash Damage | Dash Startup, Active, and Recovery | On Dash Hit | On Dash Block | |||||||||
| - | - | - | - | |||||||||
| B | Damage | Startup, Active, and Recovery | On Hit | On Block | ||||||||
| - | - | - | - | |||||||||
| Dash Damage | Dash Startup, Active, and Recovery | On Dash Hit | On Dash Block | |||||||||
| - | - | - | - | |||||||||
| C | Damage | Startup, Active, and Recovery | On Hit | On Block | ||||||||
| - | - | - | - | |||||||||
| Dash Damage | Dash Startup, Active, and Recovery | On Dash Hit | On Dash Block | |||||||||
| - | - | - | - | |||||||||
Notes:Striking Napalm has long reach and deals massive damage. It's great for catching back dashes and finishing juggles/combos. Counter Play:The move only hits twice on block. A consistent counter is to block, guard cancel a forward dash after the second hit, and then punish accordingly. | ||||||||||||
The Basics
Combos
- 66, 214+A, 2B xx 214+A
This combo instantly bubble stuns an opponent when fully connected. Another way of landing the combo is by crossing-up the opponent with the first 214+A.

