GolcarJack (talk | contribs) |
GolcarJack (talk | contribs) |
||
| Line 106: | Line 106: | ||
==The Basics== | ==The Basics== | ||
Not as powerful as Ryu overall, but he still has a lot of good tools. For the most part you will be playing more aggressive, trying to set up ambigious crossup into touch of death, or safejump/tick into srk/throw OS. His slower jab fireball can actually be more useful in some scenarios, and fierce srk goes quite far, making it better for anti air, and punishment in general. Faster walk speed can be ok in matchups where footsies are important, like vs gief for instance. | |||
==Advanced Strategy== | ==Advanced Strategy== | ||
Revision as of 08:12, 16 June 2019


Ken
Shoryuken! A millionaire (by birthright, not effort) playboy with bleached hair (but not eyebrows - representing his 3/4ths Japanese heritage), Ken gets the Money, the Glory, and the Girl. He trained with his rival and friend, Ryu, in a Japanese Dojo under the tutelage of Gouken, a very powerful martial artist who famously went on to simply wake up from being dead. Ken favours a flashy, gung-ho fighting style over the more stoic and traditional Ryu.
In a nutshell
While certainly an overall poorer character than Ryu in SF2HF, Ken is not far behind. In some matchups his slower fireballs and wider arcing Dragon Punch can actually be helpful, and his very doable 'Touch of Death' combos mean one solid hit can always spell an opponent's doom.
Character Specific Information
Color Options
| Default | Start |
 |

|
Moves List
Normal Moves
- Standing Normal Moves (st.)
- Close Standing Normal Moves (cl.)
- Crouching Normal Moves (cr.)
- Jumping Normal Moves (nj.)
- Diagonal Jumping Normal Moves (j.)
Throws
Special Moves
The Basics
Not as powerful as Ryu overall, but he still has a lot of good tools. For the most part you will be playing more aggressive, trying to set up ambigious crossup into touch of death, or safejump/tick into srk/throw OS. His slower jab fireball can actually be more useful in some scenarios, and fierce srk goes quite far, making it better for anti air, and punishment in general. Faster walk speed can be ok in matchups where footsies are important, like vs gief for instance.
Advanced Strategy
Your new advanced stuff is now about the Air version of your Hurricane Kick, isn't comboable outside of Zangief and Sagat but is a pressure tool and also a useful corner escape.
Combos
Bread And Butter
- cr.MK xx QCF+HP
- Crossup j.HK, s.HP xx DP+HP (Touch of Death)
- Cr lkx1/2 > close st hp (cps1 chain)> hp fireball
- Jump hp/hk > close st mp> jab srk (if you can't cross them up this is usually the best for damage)
- Cr mk (meaty)> cr hk
- Jump lp (instant) > hk air tatsu (only works on tall characters if the opponent crouches, decent overhead mixup)
Match-ups
Vs. Balrog (boxer):
Crouching Roundhouse is your best along with Hadoken,but watch out,now he can evade your Hadoken with a quick TAP.
Vs. Blanka:
Punish the Roll with Hadoken or Shoryuken,Vertical Roll can be shoryukened correctly.
Vs. Chun-Li:
Spinning Bird Kick can be countered with crouching Strong,but now can be a fireball match at the correct distance, if she Kikoken's you, its better to use Air TSK instead of jump for crossups.
Vs. Dhalsim:
If he teleports Shoryuken him,at long distance you had a better projectile at speed.
Vs. E. Honda:
Same as Ryu's strategy versus E. Honda: from about halfscreen away, throw slow fireballs, and sweep with cr.HK to hit with the very tip of the toe as Honda lands. You should be a little more careful chucking fireballs than with Ryu however, since Ken's fireball has more recovery time than Ryu's.
Vs. Guile:
Shoryuken vs Flash Kick match,Knee Bazooka can be countered with Shoryuken.
Vs. Ken (self):
Best Ken must use wisely his Shoryuken
Vs. M. Bison (dictator):
Be careful with your Hadoken and wait to punish Head Stomp with Shoryuken
Vs. Ryu:
He had a better Hadoken than you,so Shoryuken him if he jumps
Vs. Sagat:
Crouch to evade High Tiger and then attack him low and cross up him,your air TSK can be comboed with him.
Vs. Vega (claw):
If he jumps or use Barcelona use the Shoryuken to punish him,but watch out with lows.
Vs. Zangief:
Crouching Roundhouse is the key to win because he can evade Hadoken with Double Lariat,Air TSK its well agaisnt him.
Hitboxes
Standing Normals
- Standing LP:
| Damage | 6 |  |
 |
 |

|
| Stun | 1~7 | ||||
| Stun Timer | 40 | ||||
| Chain Cancel | Yes | ||||
| Special Cancel | Yes | ||||
| Frame Advantage | +6 | ||||
| Frame Count | 2 | 4 | 4 | 1 | |
| Simplified | 1+2 | 4 | 5 | ||
- Standing MP:
| Damage | 16 |  |
 |
 |
 |
 |

|
| Stun | 5~11 | ||||||
| Stun Timer | 60 | ||||||
| Chain Cancel | No | ||||||
| Special Cancel | Yes | ||||||
| Frame Advantage | +10 | ||||||
| Frame Count | 1 | 2 | 4 | 3 | 3 | 1 | |
| Simplified | 1+3 | 4 | 7 | ||||
- Standing HP:
| Damage | 26 |  |
 |
 |
 |
 |

|
| Stun | 11~17 | ||||||
| Stun Timer | 80 | ||||||
| Chain Cancel | No | ||||||
| Special Cancel | No | ||||||
| Frame Advantage | -6 | ||||||
| Frame Count | 3 | 2 | 6 | 10 | 12 | 1 | |
| Simplified | 1+5 | 6 | 23 | ||||
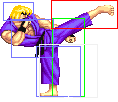
- Standing LK:
| Damage | 8 |  |
 |
 |
 |

|
| Stun | 1~7 | |||||
| Stun Timer | 40 | |||||
| Chain Cancel | Yes | |||||
| Special Cancel | No | |||||
| Frame Advantage | +3 | |||||
| Frame Count | 3 | 3 | 8 | 4 | 1 | |
| Simplified | 1+6 | 8 | 5 | |||
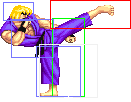
- Standing MK:
| Damage | 16 |  |
 |
 |
 |

|
| Stun | 5~11 | |||||
| Stun Timer | 60 | |||||
| Chain Cancel | No | |||||
| Special Cancel | No | |||||
| Frame Advantage | +1 | |||||
| Frame Count | 5 | 6 | 12 | 6 | 1 | |
| Simplified | 1+11 | 12 | 7 | |||
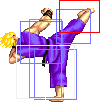
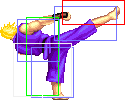
- Standing HK:
| Damage | 22 |  |
 |
 |
 |

|
| Stun | 11~17 | |||||
| Stun Timer | 80 | |||||
| Chain Cancel | No | |||||
| Special Cancel | No | |||||
| Frame Advantage | -2 | |||||
| Frame Count | 2 | 4 | 8 | 10 | 7 | |
| Simplified | 2+1 | 12 | 17 | |||
Close Standing Normals
- Close Standing LP:
| Damage | 6 |  |
 |

|
| Stun | 1~7 | |||
| Stun Timer | 40 | |||
| Chain Cancel | Yes | |||
| Special Cancel | Yes | |||
| Frame Advantage | +6 | |||
| Frame Count | 1+2 | 4 | 5 | |
- Close Standing MP:
| Damage | 16 |  |
 |
 |
 |
 |
 |

|
| Stun | 5~11 | |||||||
| Stun Timer | 60 | |||||||
| Chain Cancel | No | |||||||
| Special Cancel | Yes | |||||||
| Frame Advantage | +2 | |||||||
| Frame Count | 1 | 2 | 2 | 6 | 4 | 3 | 4 | |
| Simplified | 1+3 | 2 | 17 | |||||
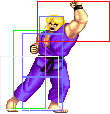
- Close Standing HP:
| Damage | 26 |  |
 |
 |
 |

|
| Stun | 11~17 | |||||
| Stun Timer | 80 | |||||
| Chain Cancel | No | |||||
| Special Cancel | Yes | |||||
| Frame Advantage | -8 | |||||
| Frame Count | 3 | 2 | 6 | 10 | 13 | |
| Simplified | 1+3 | 8 | 23 | |||
- Close Standing LK:
| Damage | 8 |  |
 |
 |
 |
 |

|
| Stun | 1~7 | ||||||
| Stun Timer | 40 | ||||||
| Chain Cancel | Yes | ||||||
| Special Cancel | No | ||||||
| Frame Advantage | +5 | ||||||
| Frame Count | 2 | 3 | 2 | 4 | 3 | 1 | |
| Simplified | 1+5 | 2 | 5 | ||||
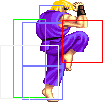
- Close Standing MK:
| Damage | 16 |  |
 |
 |
 |
 |

|
| Stun | 5~11 | ||||||
| Stun Timer | 60 | ||||||
| Chain Cancel | No | ||||||
| Special Cancel | Yes | ||||||
| Frame Advantage | +6 | ||||||
| Frame Count | 2 | 1 | 6 | 4 | 4 | 1 | |
| Simplified | 1+3 | 6 | 9 | ||||
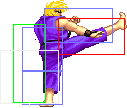
- Close Standing HK:
| Damage | 24,6 |  |
 |
 |
 |
 |

|
| Stun | 11~17 | ||||||
| Stun Timer | 80 | ||||||
| Chain Cancel | No | ||||||
| Special Cancel | Yes/No | ||||||
| Frame Advantage | +8 | ||||||
| Frame Count | 3 | 4 | 8 | 4 | 10 | 1 | |
| Simplified | 1+7 | 12 | 11 | ||||
Crouching Normals
- Crouching LP:
| Damage | 6 |  |
 |
 |

|
| Stun | 1~7 | ||||
| Stun Timer | 40 | ||||
| Chain Cancel | Yes | ||||
| Special Cancel | Yes | ||||
| Frame Advantage | +6 | ||||
| Frame Count | 2 | 4 | 4 | 1 | |
| Simplified | 1+2 | 4 | 5 | ||
- Crouching MP:
| Damage | 14 |  |
 |
 |
 |
 |

|
| Stun | 5~11 | ||||||
| Stun Timer | 60 | ||||||
| Chain Cancel | No | ||||||
| Special Cancel | Yes | ||||||
| Frame Advantage | +10 | ||||||
| Frame Count | 1 | 2 | 4 | 3 | 3 | 1 | |
| Simplified | 1+3 | 4 | 7 | ||||
- Crouching HP:
| Damage | 22 |  |
 |
 |
 |
 |

|
| Stun | 11~17 | ||||||
| Stun Timer | 80 | ||||||
| Chain Cancel | No | ||||||
| Special Cancel | Yes,No | ||||||
| Frame Advantage | -11 | ||||||
| Frame Count | 3 | 3 | 8 | 10 | 12 | 1 | |
| Simplified | 1+3 | 11 | 23 | ||||
- Crouching LK:
| Damage | 6 |  |
 |
 |

|
| Stun | 1~7 | ||||
| Stun Timer | 40 | ||||
| Chain Cancel | Yes | ||||
| Special Cancel | Yes | ||||
| Frame Advantage | +6 | ||||
| Frame Count | 2 | 4 | 4 | 1 | |
| Simplified | 1+2 | 4 | 5 | ||
- Crouching MK:
| Damage | 14 |  |
 |
 |
 |
 |

|
| Stun | 5~11 | ||||||
| Stun Timer | 60 | ||||||
| Chain Cancel | No | ||||||
| Special Cancel | Yes | ||||||
| Frame Advantage | +6 | ||||||
| Frame Count | 1 | 2 | 6 | 4 | 4 | 1 | |
| Simplified | 1+3 | 6 | 9 | ||||
- Crouching HK:
| Damage | 22 |  |
 |
 |
 |

|
| Stun | 11~17 | |||||
| Stun Timer | 80 | |||||
| Chain Cancel | No | |||||
| Special Cancel | Yes | |||||
| Frame Advantage | +2 | |||||
| Frame Count | 3 | 6 | 6 | 8 | 11 | |
| Simplified | 1+3 | 6 | 25 | |||
Aerial Normals
- Neutral Jumping LP:
| Damage | 10 |  |

|
| Stun | 1~7 | ||
| Stun Timer | 40 | ||
| Frame Count | 2 | ∞ | |
- Diagonal Jumping LP:
| Damage | 8 |  |

|
| Stun | 1~7 | ||
| Stun Timer | 40 | ||
| Frame Count | 2 | ∞ | |
- Neutral/Diagonal Jumping MP:
| Damage | 16 |  |
 |
 |
 |
 |
 |

|
| Stun | 5~11 | |||||||
| Stun Timer | 50 | |||||||
| Frame Count | 2 | 2 | 20 | 4 | 4 | 4 | ∞ | |
| Simplified | 4 | 20 | ∞ | |||||
- Neutral Jumping HP:
| Damage | 24 |  |
 |
 |
 |
 |
 |

|
| Stun | 11~17 | |||||||
| Stun Timer | 60 | |||||||
| Frame Count | 2 | 2 | 20 | 4 | 4 | 4 | ∞ | |
| Simplified | 4 | 20 | ∞ | |||||
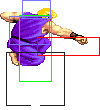
- Diagonal Jumping HP:
| Damage | 22 |  |
 |
 |
 |
 |
 |

|
| Stun | 11~17 | |||||||
| Stun Timer | 60 | |||||||
| Frame Count | 2 | 2 | 8 | 4 | 4 | 4 | ∞ | |
| Simplified | 4 | 8 | ∞ | |||||
- Neutral Jumping LK:
| Damage | 10 |  |
 |

|
| Stun | 1~7 | |||
| Stun Timer | 40 | |||
| Frame Count | 3 | 40 | ∞ | |
- Diagonal Jumping LK:
| Damage | 8 |  |
 |

|
| Stun | 1~7 | |||
| Stun Timer | 40 | |||
| Frame Count | 2 | 3 | ∞ | |
| Simplified | 5 | ∞ | ||
- Neutral Jumping MK:
| Damage | 16 |  |
 |
 |
 |

|
| Stun | 5~11 | |||||
| Stun Timer | 50 | |||||
| Frame Count | 5 | 13 | 6 | 6 | ∞ | |
| Simplified | 5 | 13 | ∞ | |||
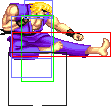
- Diagonal Jumping MK:
| Damage | 16 |  |
 |
 |
 |
 |
 |

|
| Stun | 5~11 | |||||||
| Stun Timer | 50 | |||||||
| Frame Count | 2 | 3 | 13 | 3 | 3 | 3 | ∞ | |
| Simplified | 5 | 13 | ∞ | |||||
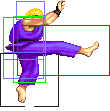
- Neutral Jumping HK:
| Damage | 24 |  |
 |
 |
 |
 |
 |

|
| Stun | 11~17 | |||||||
| Stun Timer | 60 | |||||||
| Frame Count | 2 | 4 | 4 | 3 | 3 | 3 | ∞ | |
| Simplified | 2 | 8 | ∞ | |||||
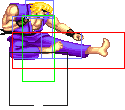
- Diagonal Jumping HK:
| Damage | 22 |  |
 |
 |
 |
 |
 |

|
| Stun | 11~17 | |||||||
| Stun Timer | 60 | |||||||
| Frame Count | 2 | 3 | 7 | 3 | 3 | 3 | ∞ | |
| Simplified | 5 | 7 | ∞ | |||||
Throws
- Normal Throw Boxes (←/→ + HP) and (←/→ + HK)
| Damage | 32 | 
| |
| Duration | 130 | ||
| Stun | 7~13 | ||
| Stun Timer | 100 | ||
| Range (from axis) | 48 | ||
| Range advantage | 19 | ||
Special Moves
- Hadoken: (↓↘→ + P)
Startup:
 |
 |
 |

| |
| Frame Count | 2 | 7 | 2 | 1 |
Active:
LP version:
| Damage | 12 |  |
 |
 |

|
| Stun | 13~19 | ||||
| Stun Timer | 120 | ||||
| Frame Advantage | - | ||||
| Frame Count | 1 | 1 | 2 | 2.. | |
| Simplified | 40 | ||||
MP version:
| Damage | 12 |  |
 |
 |

|
| Stun | 13~19 | ||||
| Stun Timer | 120 | ||||
| Frame Advantage | - | ||||
| Frame Count | 1 | 1 | 2 | 2.. | |
| Simplified | 40 | ||||
HP version:
| Damage | 12 |  |
 |
 |

|
| Stun | 13~19 | ||||
| Stun Timer | 120 | ||||
| Frame Advantage | - | ||||
| Frame Count | 1 | 1 | 2 | 2.. | |
| Simplified | 40 | ||||
- Shoryuken: →↓↘ + Punch
Startup:
| Damage | 32/32,16 |  |
 |
 |
 |
 |

|
| Stun | 13~19 | ||||||
| Stun Timer | 120 | ||||||
| Frame Advantage | -11/-22/-33 | ||||||
| Jab | 4 | 4 | 14 | 6 | 11 | 5 | |
| Strong | 4 | 4 | 22 | 6 | 14 | 5 | |
| Fierce | 4 | 4 | 26 | 6 | 21 | 5 | |
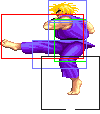
- Tatsumaki Senpuu Kyaku: ↓↙← + Kick
Startup:
| Damage | 10 |  |
 |

|
| Stun | 13~19 | |||
| Stun Timer | 120 | |||
| Frame Advantage | -1 | |||
| Frame Count | 4 | 4 | 3 | |
Active:
 |
 |
 |

| |
| Frame Count | 1 | 1 | 2 | 2 |
Short: 2 Times
Foward: 3 Times
Rounhouse: 4 Times
Recovery:
 |
 |
 |

| |
| Frame Count | 4 | 4 | 4 | 0 |
- Kuchuu Tatsumaki Senpuu Kyaku: During Jump ↓↙← + Kick
Recovery:
 |
 |
 |
 |

| |
| Frame Count | 4 | 4 | 4 | 4 |
Misc Animations
| Walk back | Neutral | Walk Fwd | Crouch |
 |
 |
 |

|
- Standing reel:
 |
 |
 |

|
- Standing gut reel:
 |
 |
 |

|
- Crouching reel:
 |
 |

|
- Dizzy:
 |
 |

|
| General | Game Mechanics | Strategy | Tiers | |
| The Characters | Balrog (Boxer) | Blanka | Chun-Li | Dhalsim | E. Honda | Guile | Ken | M. Bison (Dictator) | Ryu | Sagat | Vega (Claw) | Zangief |
