| Line 79: | Line 79: | ||
{{SFVFrameDataRow|cannon strike|hcf+P > K|15|11|-|-||60|100|||15|HL|-|-|72|120|||}} | {{SFVFrameDataRow|cannon strike|hcf+P > K|15|11|-|-||60|100|||15|HL|-|-|72|120|||}} | ||
{{SFVFrameDataRow|cannon strike EX|hcf+PP > K|13|11|-|-||60|100|||15|HL|-|-|72|120|||}} | {{SFVFrameDataRow|cannon strike EX|hcf+PP > K|13|11|-|-||60|100|||15|HL|-|-|72|120|||}} | ||
{{SFVFrameDataRow|cross stinger assault|qcf,qcf+K| | {{SFVFrameDataRow|cross stinger assault|qcf,qcf+K|3|||KD|-22?|330|0|||50|HL|-|KD|340|0|93|44|}} | ||
{{SFVFrameDataHeader}} | {{SFVFrameDataHeader}} | ||
|- | |- | ||
Revision as of 02:05, 1 March 2016
Cammy
| ||||||||||||||||||||||||||||||||||||||||||||||||||||||||||||||||||||||||||||||
Summary
Bio
TBW
Why Pick Cammy?
(As Street Fighter V is new, this section will be filled out after we learn more about how this character plays most effectively.)
Players To Watch
{{{5}}}
Move List
Unique Attacks
Special Moves
V-System (V-Trigger / V-Skill / V-Reversal)
Critical Art
Cammy Discussions
Discussions regarding Cammy
Cammy Discord Link
Video Guides
Official Capcom Character Breakdown
Sajam's Character Breakdown
Frame Data
- Champion Edition data courtesy of @D4RK_ONION, @HatsonFGC, @Arlieth, @Frostdiener, BananaCyclone and the Frame Assist Tool team. - Huge thanks for their efforts! - See https://fullmeter.com/fatonline/#/home for more information
| Move Name | Command | Startup | Active | Rcvry | Adv Guard |
Adv Hit |
Adv Counter |
Damage | Stun | Hit Level |
Cancel Ability |
KD Adv Normal |
KD Adv Rise |
KD Adv Roll |
Chip Damage |
Counter Damage |
Counter Stun |
|---|---|---|---|---|---|---|---|---|---|---|---|---|---|---|---|---|---|
| stand LP | 4 | 30 | 70 | 2 | 6 | 4 | 2 | {{{21}}} | {{{22}}} | {{{23}}} | {{{24}}} | {{{25}}} | {{{26}}} | ||||
| stand MP | 6 | 60 | 100 | 3 | 9 | 7 | 2 | {{{21}}} | {{{22}}} | {{{23}}} | {{{24}}} | {{{25}}} | {{{26}}} | ||||
| stand HP | 6 | 80 | 150 | 2 | 20 | 1 | -3 | {{{21}}} | {{{22}}} | {{{23}}} | {{{24}}} | {{{25}}} | {{{26}}} | ||||
| stand LK | 4 | 40 | 70 | 2 | 7 | 2 | 1 | {{{21}}} | {{{22}}} | {{{23}}} | {{{24}}} | {{{25}}} | {{{26}}} | ||||
| stand MK | 9 | 60 | 100 | 3 | 13 | 2 | -2 | {{{21}}} | {{{22}}} | {{{23}}} | {{{24}}} | {{{25}}} | {{{26}}} | ||||
| stand HK | 9 | 90 | 150 | 4 | 17 | 2 | -2 | {{{21}}} | {{{22}}} | {{{23}}} | {{{24}}} | {{{25}}} | {{{26}}} | ||||
| crouch LP | 3 | 20 | 70 | 2 | 7 | 4 | 2 | {{{21}}} | {{{22}}} | {{{23}}} | {{{24}}} | {{{25}}} | {{{26}}} | ||||
| crouch MP | 5 | 60 | 100 | 3 | 10 | 5 | 1 | {{{21}}} | {{{22}}} | {{{23}}} | {{{24}}} | {{{25}}} | {{{26}}} | ||||
| crouch HP | 9 | 90 | 150 | 3 | 20 | 0 | -2 | {{{21}}} | {{{22}}} | {{{23}}} | {{{24}}} | {{{25}}} | {{{26}}} | ||||
| crouch LK | 4 | 20 | 70 | 2 | 9 | 1 | -1 | {{{21}}} | {{{22}}} | {{{23}}} | {{{24}}} | {{{25}}} | {{{26}}} | ||||
| crouch MK | 6 | 50 | 100 | 2 | 14 | 0 | -3 | {{{21}}} | {{{22}}} | {{{23}}} | {{{24}}} | {{{25}}} | {{{26}}} | ||||
| crouch HK | 7 | 100 | 150 | 69 | 20 | 25 | 2 | 20 | KD | -12 | {{{21}}} | {{{22}}} | {{{23}}} | {{{24}}} | {{{25}}} | {{{26}}} | |
| jump LP | 3 | 40 | 70 | 5 | - | - | - | {{{21}}} | {{{22}}} | {{{23}}} | {{{24}}} | {{{25}}} | {{{26}}} | ||||
| jump MP | 5 | 70 | 100 | 5 | - | - | - | {{{21}}} | {{{22}}} | {{{23}}} | {{{24}}} | {{{25}}} | {{{26}}} | ||||
| jump HP | 7 | 90 | 150 | 5 | - | - | - | {{{21}}} | {{{22}}} | {{{23}}} | {{{24}}} | {{{25}}} | {{{26}}} | ||||
| jump LK | 3 | 40 | 70 | 5 | - | - | - | {{{21}}} | {{{22}}} | {{{23}}} | {{{24}}} | {{{25}}} | {{{26}}} | ||||
| jump MK | 6 | 70 | 100 | 5 | - | - | - | {{{21}}} | {{{22}}} | {{{23}}} | {{{24}}} | {{{25}}} | {{{26}}} | ||||
| jump HK | 8 | 90 | 150 | 5 | - | - | - | {{{21}}} | {{{22}}} | {{{23}}} | {{{24}}} | {{{25}}} | {{{26}}} | ||||
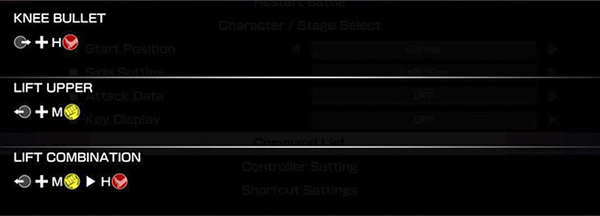
| knee bullet | 12 | 40*40 | 50*50 | 2(5)2 | 17 | 5 | -2 | {{{21}}} | {{{22}}} | {{{23}}} | {{{24}}} | {{{25}}} | {{{26}}} | ||||
| lift upper | 4 | 60 | 100 | 4 | 14 | 0 | -2 | {{{21}}} | {{{22}}} | {{{23}}} | {{{24}}} | {{{25}}} | {{{26}}} | ||||
| lift combination | 9 | 60*72 | 100*90 | 87 | 29 | 33 | 4 | 27 | KD | -12 | {{{21}}} | {{{22}}} | {{{23}}} | {{{24}}} | {{{25}}} | {{{26}}} | |
| gyro clipper | 5 | 65*65 | 100*100 | 58 | 9 | 9 | 2 | 18 | KD | - | {{{21}}} | {{{22}}} | {{{23}}} | {{{24}}} | {{{25}}} | {{{26}}} | |
| delta through | 5 | 140 | 200 | 64 | 15 | 15 | 2 | 18 | KD | - | {{{21}}} | {{{22}}} | {{{23}}} | {{{24}}} | {{{25}}} | {{{26}}} | |
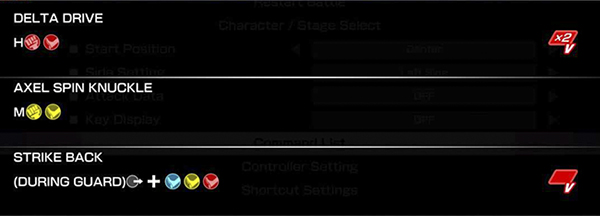
| delta drive | - | {{{21}}} | {{{22}}} | {{{23}}} | {{{24}}} | {{{25}}} | {{{26}}} | ||||||||||
| axel spin knuckle | 36 | 60 | 100 | 2 | 16 | 6 | 2 | {{{21}}} | {{{22}}} | {{{23}}} | {{{24}}} | {{{25}}} | {{{26}}} | ||||
| strike back | 17 | 60 | 0 | 2 | 29 | KD | -8 | {{{21}}} | {{{22}}} | {{{23}}} | {{{24}}} | {{{25}}} | {{{26}}} | ||||
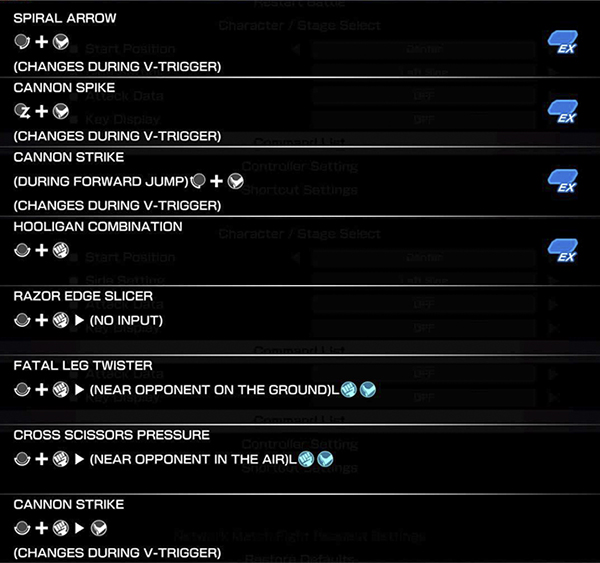
| spiral arrow LK | 7 | 80 | 150 | 85 | 26 | 31 | 11 | 21 | KD | -12 | {{{21}}} | {{{22}}} | {{{23}}} | {{{24}}} | {{{25}}} | {{{26}}} | |
| spiral arrow MK | 7 | 90 | 150 | 78 | 19 | 25 | 13 | 23 | KD | -15 | {{{21}}} | {{{22}}} | {{{23}}} | {{{24}}} | {{{25}}} | {{{26}}} | |
| spiral arrow HK | 7 | 50*50 | 50*100 | 80 | 21 | 26 | 2(1)11 | 26 | KD | -11 | {{{21}}} | {{{22}}} | {{{23}}} | {{{24}}} | {{{25}}} | {{{26}}} | |
| spiral arrow EX | 7 | 50*70 | 50*150 | 81 | 21 | 26 | 2(2)10 | 23 | KD | -11 | {{{21}}} | {{{22}}} | {{{23}}} | {{{24}}} | {{{25}}} | {{{26}}} | |
| cannon spike LK | 4 | 120[80] | 200 | 79 | 20 | 25 | 11 | 39 | KD | -37 | {{{21}}} | {{{22}}} | {{{23}}} | {{{24}}} | {{{25}}} | {{{26}}} | |
| cannon spike MK | 5 | 120[80] | 200 | 79 | 20 | 25 | 11 | 39 | KD | -37 | {{{21}}} | {{{22}}} | {{{23}}} | {{{24}}} | {{{25}}} | {{{26}}} | |
| cannon spike HK | 6 | 120[80] | 200 | 79 | 20 | 25 | 11 | 39 | KD | -37 | {{{21}}} | {{{22}}} | {{{23}}} | {{{24}}} | {{{25}}} | {{{26}}} | |
| cannon spike EX | 3 | 50*50*60 | 50*50*100 | 77 | 18 | 23 | 11 | 38 | KD | -37 | {{{21}}} | {{{22}}} | {{{23}}} | {{{24}}} | {{{25}}} | {{{26}}} | |
| cannon strike LK | 13 | 60 | 100 | - | - | 11 | - | - | - | {{{21}}} | {{{22}}} | {{{23}}} | {{{24}}} | {{{25}}} | {{{26}}} | ||
| cannon strike MK | 13 | 60 | 100 | - | - | 11 | - | - | - | {{{21}}} | {{{22}}} | {{{23}}} | {{{24}}} | {{{25}}} | {{{26}}} | ||
| cannon strike HK | 13 | 60 | 100 | - | - | 11 | - | - | - | {{{21}}} | {{{22}}} | {{{23}}} | {{{24}}} | {{{25}}} | {{{26}}} | ||
| cannon strike EX | 13 | 60 | 100 | - | - | 11 | - | - | - | {{{21}}} | {{{22}}} | {{{23}}} | {{{24}}} | {{{25}}} | {{{26}}} | ||
| hooligan combination LP | - | - | - | 39 | - | - | - | - | {{{21}}} | {{{22}}} | {{{23}}} | {{{24}}} | {{{25}}} | {{{26}}} | |||
| hooligan combination MP | - | - | - | 39 | - | - | - | - | {{{21}}} | {{{22}}} | {{{23}}} | {{{24}}} | {{{25}}} | {{{26}}} | |||
| hooligan combination HP | - | - | - | 39 | - | - | - | - | {{{21}}} | {{{22}}} | {{{23}}} | {{{24}}} | {{{25}}} | {{{26}}} | |||
| hooligan combination EX | - | - | - | 39 | - | - | - | - | {{{21}}} | {{{22}}} | {{{23}}} | {{{24}}} | {{{25}}} | {{{26}}} | |||
| razor edge slicer | 10 | 100 | 150 | 94 | 35 | 40 | KD | -2 | {{{21}}} | {{{22}}} | {{{23}}} | {{{24}}} | {{{25}}} | {{{26}}} | |||
| razor edge slicer EX | 10 | 50*50*50 | 50*50*100 | 97 | 38 | 43 | KD | 3 | {{{21}}} | {{{22}}} | {{{23}}} | {{{24}}} | {{{25}}} | {{{26}}} | |||
| fatal leg twister | {{{21}}} | {{{22}}} | {{{23}}} | {{{24}}} | {{{25}}} | {{{26}}} | |||||||||||
| cross scissors pressure | 4 | 150 | 200 | 55 | 6 | 6 | KD | {{{21}}} | {{{22}}} | {{{23}}} | {{{24}}} | {{{25}}} | {{{26}}} | ||||
| cannon strike | 15 | 60 | 100 | 11 | - | - | {{{21}}} | {{{22}}} | {{{23}}} | {{{24}}} | {{{25}}} | {{{26}}} | |||||
| cannon strike EX | 13 | 60 | 100 | 11 | - | - | {{{21}}} | {{{22}}} | {{{23}}} | {{{24}}} | {{{25}}} | {{{26}}} | |||||
| cross stinger assault | 3 | 330 | 0 | 93 | 44 | KD | -22? | {{{21}}} | {{{22}}} | {{{23}}} | {{{24}}} | {{{25}}} | {{{26}}} | ||||
| Move Name | Command | Startup | Active | Rcvry | Adv Guard |
Adv Hit |
Adv Counter |
Damage | Stun | Hit Level |
Cancel Ability |
KD Adv Normal |
KD Adv Rise |
KD Adv Roll |
Chip Damage |
Counter Damage |
Counter Stun |


