m (→Ground Normals) |
Oldschool BR (talk | contribs) |
||
| Line 32: | Line 32: | ||
| align="center" colspan="2" | Simplified || align="center" | ? || align="center" bgcolor="blue" | ? || align="center" colspan="2" | ? | | align="center" colspan="2" | Simplified || align="center" | ? || align="center" bgcolor="blue" | ? || align="center" colspan="2" | ? | ||
|} | |} | ||
Rapid-fire jab. Guile's arm is fully invincible, but it does not have much reach, just like other such Jabs. It is a good move. | |||
*<b>Crouching Jab:</b> | *<b>Crouching Jab:</b> | ||
| Line 48: | Line 48: | ||
| align="center" colspan="2" | Frame Count || align="center" | ? || align="center" bgcolor="blue" | ? || align="center" | ? | | align="center" colspan="2" | Frame Count || align="center" | ? || align="center" bgcolor="blue" | ? || align="center" | ? | ||
|} | |} | ||
The crouching version also has rapid-fire properties, and similar priority. | |||
*<b>Close Standing Strong:</b> | *<b>Close Standing Strong:</b> | ||
| Line 66: | Line 66: | ||
| align="center" colspan="2" | Simplified || align="center" | ? || align="center" bgcolor="blue" | ? || align="center" colspan="4" | ? | | align="center" colspan="2" | Simplified || align="center" | ? || align="center" bgcolor="blue" | ? || align="center" colspan="4" | ? | ||
|} | |} | ||
This is not very safe if you do not cancel, and not very useful. | |||
*<b>Far Standing Strong:</b> | *<b>Far Standing Strong:</b> | ||
| Line 84: | Line 84: | ||
| align="center" colspan="2" | Simplified || align="center" | ? || align="center" bgcolor="blue" | ? || align="center" colspan="4" | ? | | align="center" colspan="2" | Simplified || align="center" | ? || align="center" bgcolor="blue" | ? || align="center" colspan="4" | ? | ||
|} | |} | ||
Guile performs an upper that has good reach. Unlike N.Guile's, this move does not work as anti-air. | |||
*<b>Crouching Strong:</b> | *<b>Crouching Strong:</b> | ||
| Line 102: | Line 102: | ||
| align="center" colspan="2" | Simplified || align="center" | ? || align="center" bgcolor="blue" | ? || align="center" colspan="2" | ? | | align="center" colspan="2" | Simplified || align="center" | ? || align="center" bgcolor="blue" | ? || align="center" colspan="2" | ? | ||
|} | |} | ||
This has just acceptable range for a crouching Strong move. The priority is poor, so this is mostly used in combos and to punish moves such as whiffed Tatsumakis. | |||
*<b>Close Standing Fierce:</b> | *<b>Close Standing Fierce:</b> | ||
| Line 158: | Line 158: | ||
| align="center" colspan="2" | Simplified || align="center" colspan="2" | ? || align="center" colspan="2" | ? || align="center" colspan="2" | ? | | align="center" colspan="2" | Simplified || align="center" colspan="2" | ? || align="center" colspan="2" | ? || align="center" colspan="2" | ? | ||
|} | |} | ||
The main anti air to use when being jumped on and you aren't charged for a flash kick. This takes training to time: you want it to trade if the enemy attacks the right time. It can also be used | The main anti air to use when being jumped on and you aren't charged for a flash kick. This takes training to time: you want it to trade if the enemy attacks the right time. It can also be used as a feint, tricking the enemy into thinking you stood up and lost charge. | ||
*<b>Close/Far Standing Short:</b> | *<b>Close/Far Standing Short:</b> | ||
| Line 194: | Line 194: | ||
| align="center" colspan="2" | Simplified || align="center" colspan="2" | ? || align="center" bgcolor="blue" | ? || align="center" colspan="2" | ? | | align="center" colspan="2" | Simplified || align="center" colspan="2" | ? || align="center" bgcolor="blue" | ? || align="center" colspan="2" | ? | ||
|} | |} | ||
This move combos into itself. A fast attack to push a close opponent away to ideal c. | This move combos into itself. A fast attack to push a close opponent away to ideal c.Forward range. The priority is horrible, so this is mainly used as a feint or in combos. | ||
*<b>Close Standing Forward:</b> | *<b>Close Standing Forward:</b> | ||
| Line 212: | Line 212: | ||
| align="center" colspan="2" | Simplified || align="center" colspan="2" | ? || align="center" | ? || align="center" colspan="2" | ? | | align="center" colspan="2" | Simplified || align="center" colspan="2" | ? || align="center" | ? || align="center" colspan="2" | ? | ||
|} | |} | ||
Low kick with awesome reach and priority, just poor damage. O.Guile has an advantage over N.Guile related to this move, which is being able to throw it without losing back charge. | |||
*<b>Far Standing Forward:</b> | *<b>Far Standing Forward:</b> | ||
| Line 230: | Line 230: | ||
| align="center" colspan="2" | Simplified || align="center" colspan="4" | ? || align="center" | ? || align="center" colspan="5" | ? | | align="center" colspan="2" | Simplified || align="center" colspan="4" | ? || align="center" | ? || align="center" colspan="5" | ? | ||
|} | |} | ||
Sobat kick. Good priority, may avoid low normals, but cannot be steered like N.Guile's. It is also not cancelable. | |||
*<b>Crouching Forward:</b> | *<b>Crouching Forward:</b> | ||
| Line 248: | Line 248: | ||
| align="center" colspan="2" | Simplified || align="center" colspan="2" | ? || align="center" | ? || align="center" colspan="2" | ? | | align="center" colspan="2" | Simplified || align="center" colspan="2" | ? || align="center" | ? || align="center" colspan="2" | ? | ||
|} | |} | ||
Guile's main poke. It has a very good range, but poor priority. The key to using this attack well is not using it all the time, but positioning yourself so that it will hit or control space when the enemy is not throwing his pokes, which often beat Guile's. | Guile's main poke. It has a very good range, but poor priority. The key to using this attack well is not using it all the time, but positioning yourself so that it will hit or control space when the enemy is not throwing his pokes, which often beat Guile's. It also has an important disadvantage in relation to Chun Li's or Cammy's cr.Fwd, which is that its recovery has projected hitboxes, leaving Guile vulnerable if it does not connect. It also is vulnerable even before going active, which is similar to the shotos' cr.Fwd. | ||
*<b>Close Standing Roundhouse:</b> | *<b>Close Standing Roundhouse:</b> | ||
| Line 266: | Line 266: | ||
| align="center" colspan="2" | Simplified || align="center" colspan="2" | ? || align="center" | ? || align="center" | ? | | align="center" colspan="2" | Simplified || align="center" colspan="2" | ? || align="center" | ? || align="center" | ? | ||
|} | |} | ||
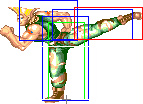
High side kick. It has good recovery, but poor priority. | |||
*<b>Far Standing Roundhouse:</b> | *<b>Far Standing Roundhouse:</b> | ||
| Line 284: | Line 284: | ||
| align="center" colspan="2" | Simplified || align="center" colspan="2" | ? || align="center" | ? || align="center" colspan="4" | ? | | align="center" colspan="2" | Simplified || align="center" colspan="2" | ? || align="center" | ? || align="center" colspan="4" | ? | ||
|} | |} | ||
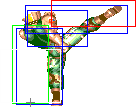
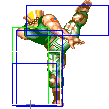
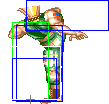
High roundhouse kick that works very well as a trade anti-air. Due to its poor priority, you are not likely to hit cleanly if the enemy sticks out an attack, but it is good enough to have them land on a Sonic Boom, if you maintain a back charge. It can be used if the enemy is not on top of you, when you would need a crouching Fierce instead, assuming no down charge for a Flash Kick. | |||
*<b>Crouching Roundhouse:</b> | *<b>Crouching Roundhouse:</b> | ||
| Line 317: | Line 317: | ||
| align="center" colspan="2" | Simplified || align="center" | ? || align="center" colspan="2" | ? | | align="center" colspan="2" | Simplified || align="center" | ? || align="center" colspan="2" | ? | ||
|} | |} | ||
Used as an anti air at a certain range. The second active part of the move has very good range, which can be used to control space in specific situations, such as on the enemy's wake-up or after forcing him to block a Sonic Boom, with noticeable frame advantage. | Used as an anti air at a certain range. The second active part of the move has very good range, which can be used to control space in specific situations, such as on the enemy's wake-up or after forcing him to block a Sonic Boom, with noticeable frame advantage. However, while it has good priority, there is enough time to react with Shoryukens, Dos Koi headbutts and other moves. | ||
====Aerial Normals==== | ====Aerial Normals==== | ||
Revision as of 06:31, 4 August 2011
Introduction
Color Options
| Normal | Secondary |
 |

|
--Born2SPD
Moves Analysis
Normal Moves
Ground Normals
- Close/Far Standing Jab:
| Damage | ? |  |
 |
 |

|
| Stun | ?-? | ||||
| Stun Timer | ? | ||||
| Chain Cancel | Yes | ||||
| Special Cancel | Yes | ||||
| Frame Count | ? | ? | ? | ? | |
| Simplified | ? | ? | ? | ||
Rapid-fire jab. Guile's arm is fully invincible, but it does not have much reach, just like other such Jabs. It is a good move.
- Crouching Jab:
| Damage | ? |  |
 |

|
| Stun | ?-? | |||
| Stun Timer | ? | |||
| Chain Cancel | Yes | |||
| Special Cancel | Yes | |||
| Frame Count | ? | ? | ? | |
The crouching version also has rapid-fire properties, and similar priority.
- Close Standing Strong:
| Damage | ? |  |
 |
 |
 |
 |

|
| Stun | ?-? | ||||||
| Stun Timer | ? | ||||||
| Chain Cancel | No | ||||||
| Special Cancel | Yes | ||||||
| Frame Count | ? | ? | ? | ? | ? | ? | |
| Simplified | ? | ? | ? | ||||
This is not very safe if you do not cancel, and not very useful.
- Far Standing Strong:
| Damage | ? |  |
 |
 |
 |
 |

|
| Stun | ?-? | ||||||
| Stun Timer | ? | ||||||
| Chain Cancel | No | ||||||
| Special Cancel | Yes | ||||||
| Frame Count | ? | ? | ? | ? | ? | ? | |
| Simplified | ? | ? | ? | ||||
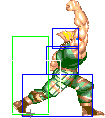
Guile performs an upper that has good reach. Unlike N.Guile's, this move does not work as anti-air.
- Crouching Strong:
| Damage | ? |  |
 |
 |

|
| Stun | ?-? | ||||
| Stun Timer | ? | ||||
| Chain Cancel | No | ||||
| Special Cancel | Yes | ||||
| Frame Count | ? | ? | ? | ? | |
| Simplified | ? | ? | ? | ||
This has just acceptable range for a crouching Strong move. The priority is poor, so this is mostly used in combos and to punish moves such as whiffed Tatsumakis.
- Close Standing Fierce:
| Damage | ? |  |
 |
 |
 |
 |

|
| Stun | ?-? | ||||||
| Stun Timer | ? | ||||||
| Chain Cancel | No | ||||||
| Special Cancel | Yes | ||||||
| Frame Count | ? | ? | ? | ? | ? | ? | |
| Simplified | ? | ? | ? | ||||
- Far Standing Fierce:
| Damage | ? |  |
 |
 |
 |
 |

|
| Stun | ?-? | ||||||
| Stun Timer | ? | ||||||
| Chain Cancel | No | ||||||
| Special Cancel | No | ||||||
| Frame Count | ? | ? | ? | ? | ? | ? | |
| Simplified | ? | ? | ? | ||||
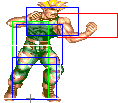
Guile's patented backfist punch. Its awesome range makes this Guile's best punish normal move. It can used at anti air at certain ranges, but mostly to punish projectile recovery after you canceled the projectile itself with a Sonic Boom and the opponent is left open. This move has relatively low priority and can by punished if whiffed.
- Crouching Fierce:
| Damage | ? |  |
 |
 |
 |
 |
|
| Stun | ?-? | ||||||
| Stun Timer | ? | ||||||
| Chain Cancel | No | ||||||
| Special Cancel | No | ||||||
| Frame Count | ? | ? | ? | ? | ? | 1 | |
| Simplified | ? | ? | ? | ||||
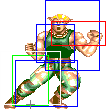
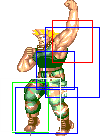
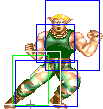
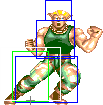
The main anti air to use when being jumped on and you aren't charged for a flash kick. This takes training to time: you want it to trade if the enemy attacks the right time. It can also be used as a feint, tricking the enemy into thinking you stood up and lost charge.
- Close/Far Standing Short:
| Damage | ? |  |
 |
 |
 |

|
| Stun | ?-? | |||||
| Stun Timer | ? | |||||
| Chain Cancel | Yes | |||||
| Special Cancel | Yes | |||||
| Frame Count | ? | ? | ? | ? | ? | |
| Simplified | ? | ? | ? | |||
- Crouching Short:
| Damage | ? |  |
 |
 |
 |

|
| Stun | ?-? | |||||
| Stun Timer | ? | |||||
| Chain Cancel | Yes | |||||
| Special Cancel | No | |||||
| Frame Count | ? | ? | ? | ? | ? | |
| Simplified | ? | ? | ? | |||
This move combos into itself. A fast attack to push a close opponent away to ideal c.Forward range. The priority is horrible, so this is mainly used as a feint or in combos.
- Close Standing Forward:
| Damage | ? |  |
 |
 |
 |

|
| Stun | ?-? | |||||
| Stun Timer | ? | |||||
| Chain Cancel | No | |||||
| Special Cancel | No | |||||
| Frame Count | ? | ? | ? | ? | ? | |
| Simplified | ? | ? | ? | |||
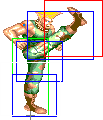
Low kick with awesome reach and priority, just poor damage. O.Guile has an advantage over N.Guile related to this move, which is being able to throw it without losing back charge.
- Far Standing Forward:
| Damage | ? |  |
 |
 |
 |
 |
 |
 |
 |
 |

|
| Stun | ?-? | ||||||||||
| Stun Timer | ? | ||||||||||
| Chain Cancel | No | ||||||||||
| Special Cancel | No | ||||||||||
| Frame Count | ? | ? | ? | ? | ? | ? | ? | ? | ? | ? | |
| Simplified | ? | ? | ? | ||||||||
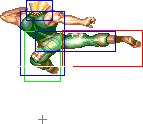
Sobat kick. Good priority, may avoid low normals, but cannot be steered like N.Guile's. It is also not cancelable.
- Crouching Forward:
| Damage | ? |  |
 |
 |
 |

|
| Stun | ?-? | |||||
| Stun Timer | ? | |||||
| Chain Cancel | No | |||||
| Special Cancel | No | |||||
| Frame Count | ? | ? | ? | ? | ? | |
| Simplified | ? | ? | ? | |||
Guile's main poke. It has a very good range, but poor priority. The key to using this attack well is not using it all the time, but positioning yourself so that it will hit or control space when the enemy is not throwing his pokes, which often beat Guile's. It also has an important disadvantage in relation to Chun Li's or Cammy's cr.Fwd, which is that its recovery has projected hitboxes, leaving Guile vulnerable if it does not connect. It also is vulnerable even before going active, which is similar to the shotos' cr.Fwd.
- Close Standing Roundhouse:
| Damage | ? |  |
 |
 |

|
| Stun | ?-? | ||||
| Stun Timer | ? | ||||
| Chain Cancel | No | ||||
| Special Cancel | No | ||||
| Frame Count | ? | ? | ? | ? | |
| Simplified | ? | ? | ? | ||
High side kick. It has good recovery, but poor priority.
- Far Standing Roundhouse:
| Damage | ? |  |
 |
 |
 |
 |
 |

|
| Stun | ?-? | |||||||
| Stun Timer | ? | |||||||
| Chain Cancel | No | |||||||
| Special Cancel | No | |||||||
| Frame Count | ? | ? | ? | ? | ? | ? | 1 | |
| Simplified | ? | ? | ? | |||||
High roundhouse kick that works very well as a trade anti-air. Due to its poor priority, you are not likely to hit cleanly if the enemy sticks out an attack, but it is good enough to have them land on a Sonic Boom, if you maintain a back charge. It can be used if the enemy is not on top of you, when you would need a crouching Fierce instead, assuming no down charge for a Flash Kick.
- Crouching Roundhouse:
| Damage | ? |  |
 |
 |
 |
 |
 |
 |

|
| Stun | ?-? | ||||||||
| Stun Timer | ? | ||||||||
| Chain Cancel | No | ||||||||
| Special Cancel | No | ||||||||
| Frame Count | ? | ? | ? | ? | ? | ? | ? | ? | |
| Simplified | ? | ? | ? | ||||||
| Damage | ? |  |
 |

|
| Stun | ?-? | |||
| Stun Timer | ? | |||
| Chain Cancel | No | |||
| Special Cancel | No | |||
| Frame Count | ? | ? | ? | |
| Simplified | ? | ? | ||
Used as an anti air at a certain range. The second active part of the move has very good range, which can be used to control space in specific situations, such as on the enemy's wake-up or after forcing him to block a Sonic Boom, with noticeable frame advantage. However, while it has good priority, there is enough time to react with Shoryukens, Dos Koi headbutts and other moves.
Aerial Normals
Command Normals
- Knee Bazooka: (On ground, ←/→ + Forward)
| Damage | ? |  |
 |
 |
 |
 |

|
| Stun | ?-? | ||||||
| Stun Timer | ? | ||||||
| Frame Count | ? | ? | ? | ? | ? | ? | |
| Simplified | ? | ? | ? | ||||
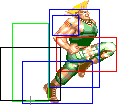
Allows you to advance while charging a Sonic Boom.
- Reverse Spin Kick: (On ground and close, ←/→ + Roundhouse)
| Damage | ? |  |
 |
 |
 |
 |
|
| Stun | ?-? | ||||||
| Stun Timer | ? | ||||||
| Frame Count | ? | ? | ? | ? | ? | ? | |
| Simplified | ? | ? | |||||
| Damage | ? |  |
 |
 |
 |

|
| Stun | ?-? | |||||
| Stun Timer | ? | |||||
| Frame Count | ? | ? | ? | ? | ? | |
| Simplified | ? | |||||
