| Line 875: | Line 875: | ||
=Match-Ups= | =Match-Ups= | ||
==Vs. Ryu== | ==Vs. Ryu== | ||
The best way to fight this opponent is a very consistent ground game. Use | |||
lots of ducking forward sweeps for they are very fast and hard to react to, not | |||
to mention they will knock Ryu out of a spiritball if it hasn't yet left his | |||
hands. Another good technique is to jump over his spiritball and combo him, but | |||
beware due to how high Chun jumps she is easy to uppercut if she jumps to late | |||
so time your jump just as Ryu starts to make the spiritball motion not after | |||
the projectile is visible or you'll be the one getting hit. Another good | |||
attack is to jump in and jab kick then start the lighting kick. This will take | |||
off some energy even if blocked. Another good way to counter his spiritballs | |||
is the roundhouse sweep. Time your attack just as he starts the motion. You will | |||
both get hit but he will be knocked down and probably lose more. Finally if you | |||
jump in just as Ryu starts to stand up you can knock him out of his dragonpunch. | |||
Use a Fierce Punch and time your jump so your fist hits his head just as | |||
he starts to stand, then finish combo #1 leaving out the Jumping Fierce for it | |||
was just used. (If your opponent is going for an uppercut you'll hit him). | |||
**Air Slam- This air attack is a very potent move. It can be used in two | |||
very effective ways. 1- When your opponent jumps in from a distance wait for | |||
them to start to decline then jump toward them and use the strong button right | |||
after you have left the ground. 2- If your opponent jumps over you at close | |||
range wait until they are right above you the jump straight up and come right | |||
up into them, use the strong button for an easy air slam. (to get the timing | |||
for these techniques takes some time but is well worth it. | |||
==Vs. Ken== | ==Vs. Ken== | ||
Fighting him is similar to Ryu,his main differences is that his Hadoken is worst along his Shoryuken that is more dangerous than Ryu's one. | |||
Try to poke him with crouching Foward and Roundhouse and beign more careful about jumping and stomping,Air Throw can punish him strong after you crouch an evaded Shoryuken at recovery | |||
==Vs. E.Honda== | ==Vs. E.Honda== | ||
Your forward foot sweep is your main poke against Honda. | |||
Being an air attacking character Honda's invincible headbutt can create | |||
problems. There is however a simple way around it. Jump in so that you fall | |||
through the back of him. As you fall through execute your jumping combo, this will knock | |||
him out of his super air defense for you are attacking from behind. Also any | |||
time he uses a fierce flying headbutt simply jump straight up and then throw | |||
him. | |||
==Vs. Chun Li== | ==Vs. Chun Li== | ||
==Vs. Blanka== | ==Vs. Blanka== | ||
Use lots of jab punches to keep his ball at bay. When attacking time | |||
your jumps so your foot (jab is best) barely hits him or he will fierce punch | |||
you out of the air. After your jab kick hits (even if he blocks) use the | |||
lighting kick to take off some energy. Your head stomp attack is best against | |||
Blanka for it will hit him out of anything. When you plan on using this move | |||
don't do it to soon our he can jump up and strike you. Finally when you use | |||
lots of head stomps your opponent may start blocking them. Don't worry you can | |||
still head stomp them out of a block. What you do is jump in and wait, you | |||
will start to fall through them, then right before you hit the ground head | |||
stomp, then hit the button again, and again. if you time it right you will | |||
staircase up your opponents body hitting them three or four times. A good way | |||
counter his jump attacks and get an almost guaranteed throw is to walk under | |||
him and as he goes over but before the computer turns you around use the flip | |||
kick (forward kick button), this will flip you backwards and land you right | |||
behind Blanka, then simply throw. Most players will be surprised by this to | |||
say the least. This can also be done to other characters but it works best on | |||
Blanka. | |||
==Vs. Zangief== | ==Vs. Zangief== | ||
Try to stay as ground based as possible when fighting Zan. Your forward | |||
and roundhouse sweeps are you best attacks. When jumping in try to hit him in | |||
the middle top of his head otherwise he may airplane punch you out of whatever | |||
you use. A good attack to use is jump in roundhouse him in the head, whether he | |||
blocks or not keep hitting the roundhouse button until the lightning feet | |||
appear, these will take off a good amount of damage. When going for this move Ôof your foot, if you get closer or hit above the belt he will most likely 360 | |||
you. | |||
==Vs. Guile== | ==Vs. Guile== | ||
Just like Ryu use lots of forward sweeps to keep him on his toes. One | |||
good technique | |||
is when you see a sonic boom start to form roundhouse sweep him, | |||
he will get knocked down while you receive nothing. You can knock him out of his | |||
axe-kick following the same guidelines as knocking Ryu out of his dragonpunch. Or | |||
if you don't have the time you can jump in and if your above him can head stomp | |||
him out of the axe (good in corners). If he uses lots of forward sweeps and axes | |||
you when you jump try going for head stomps. The key to headstomping him out of | |||
the axe is to get within his forward sweep range before jumping. This will get | |||
you above his head and allow you to counter his move. If for some reason his | |||
misses and goes behind you just run in and throw him. Finally a good way to get | |||
out of his sonic boom run in behind it sweep, sweep pattern(or run in throw if | |||
your playing cheepers) is to roundhouse him when he gets in range. You'll both | |||
get hit but he will lose both more damage and his pattern. | |||
==Vs. Dhalsim== | ==Vs. Dhalsim== | ||
Constant non stop attack is best against this yoga master. Your jump | |||
in jab kick is one of your best attacks especially when followed by the | |||
lighting kick. Beware if you use it to much he may start sliding on you and | |||
tripping you as you hit the ground. To get out of this you can either wait | |||
until your very close to the ground before you strike or more reliably head | |||
stomp. Also if you are to close for him to have time to throw a fireball | |||
execute a helicopter kick, he will have no choice but to duck.(if you use | |||
short ones you can lightning kick him after you land) | |||
==Vs. Boxer== | ==Vs. Boxer== | ||
Your roundhouse footsweep will knock him out of almost everything. Be | |||
careful of jumping in to much against a defensive Balrog because he can | |||
charging uppercut you almost all the time. All in all play him as you would | |||
Zangief. Also your neck kick is very hard for him to get out of. | |||
==Vs. Claw== | ==Vs. Claw== | ||
Fight him much as you would another Chun. Watch out for his fake range | |||
and when you jump in try to land on his forward shoulder(anything further and | |||
you'll be stabbed, anything closer an he may walk under and throw you.) Pay | |||
close attention when he starts a wall attack if he tries to go off the wall | |||
behind you jump up and intercept him with an airslam. Don't use the neck kick | |||
to often for he can air throw you out of it. | |||
**Throws- the key to executing Chun's unrivaled ability to throw is timing the | |||
button. Wait until you are just about to land then hit the button and | |||
push the joystick back towards your opponent at the same time, time | |||
your button just as the joystick makes contact with the side of the | |||
joystick hole rarely will you lose. | |||
==Vs. Sagat== | ==Vs. Sagat== | ||
Like Dhalsim a constant attack is best against Sagat. Your head stomp | |||
will knock him out of anything as will most of you other attacks if you time | |||
them right. An experienced and aggressive Chun Li shouldn't have much trouble | |||
with Sagat. | |||
==Vs. Dictador== | ==Vs. Dictador== | ||
Play defensive against him if you can for his air attacks almost | |||
always overpower yours. Not to mention Chun has no real way out of the torpedo | |||
pattern.(She can helicopter kick through a fast on but this doesn't always | |||
work). Use lighting kicks after you attack to take as much extra damage as | |||
possible. And if he torpedoes you into a corner and jumps to avoid being thrownÔ | |||
READ ME | |||
**** Knocking Ryu\Ken out of the DP. | |||
You can only do this if you jump in just as they start to stand up from | |||
being knocked down. You must time your jump so that as you come down | |||
your attack (a fierce punch) strikes them in the top of the head just | |||
as soon as he is graphically half way up. In other words you hit him | |||
in the top of the head just as he starts to STAND back up (make sure | |||
you wait for him to start to stand or your attack may go throw him and | |||
he will throw you). Use the fierce punch to knock him out of the DP and | |||
then follow it with a ducking strong punch, and a ducking forward sweep. | |||
YES this will knock him out of a DP if you get the timing right and he | |||
is going for one..........! | |||
[[Category:Hyper Street Fighter 2]] | [[Category:Hyper Street Fighter 2]] | ||
[[Category:Street Fighter 2: Champion Edition]] | [[Category:Street Fighter 2: Champion Edition]] | ||
{{Champion Edition}} | {{Champion Edition}} | ||
Revision as of 19:31, 8 July 2016


Introduction
Color Options
| Start | Default |
 |

|
Moves List
Normal Moves
Heel Stomp: d + Medium Kick in air
Throw: close, b or f + Medium or Hard Punch
Air Throw: close, b or f + Medium or Hard Punch in air
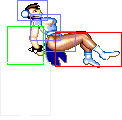
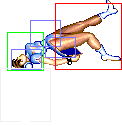
Chest Flip Kick: f + Medium Kick
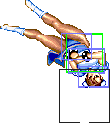
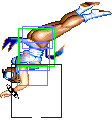
Flipping Neck Breaker: f + Hard Kick
Special Moves
Lightning Kick: Kick button rapidly
Spinning Bird Kick: d~u + Kick
The Basics
Anti Air: standing Medium or Hard Kick
High Pokes: standing Hard Punch
Low Pokes: crounching Medium Kick
Combos
- j.HK,s.MP,s.HP or cr.HK
- j.MK,MK Lightning Kicks
Hitboxes
Standing Normals
- Standing LP:
| Damage | 4 |  |
 |
 |
 |

|
| Stun | 1~7 | |||||
| Stun Timer | 40 | |||||
| Chain Cancel | No | |||||
| Special Cancel | Yes | |||||
| Frame Advantage | +7 | |||||
| Frame Count | 2 | 2 | 4 | 3 | 1 | |
| Simplified | 1+4 | 4 | 4 | |||
- Standing MP:
| Damage | 12 |  |
 |
 |
 |

|
| Stun | 5~11 | |||||
| Stun Timer | 60 | |||||
| Chain Cancel | No | |||||
| Special Cancel | No | |||||
| Frame Advantage | +11 | |||||
| Frame Count | 2 | 2 | 4 | 3 | 1 | |
| Simplified | 1+4 | 4 | 4 | |||
- Standing HP:
| Damage | 16 |  |
 |
 |
 |
 |

|
| Stun | 11~17 | ||||||
| Stun Timer | 80 | ||||||
| Chain Cancel | No | ||||||
| Special Cancel | No | ||||||
| Frame Advantage | -1 | ||||||
| Frame Count | 2 | 3 | 6 | 10 | 7 | 1 | |
| Simplified | 1+5 | 6 | 18 | ||||
- Standing LK:
| Damage | 8 |  |
 |
 |
 |

|
| Stun | 1~7 | |||||
| Stun Timer | 40 | |||||
| Chain Cancel | No | |||||
| Special Cancel | Yes | |||||
| Frame Advantage | +5 | |||||
| Frame Count | 3 | 3 | 5 | 4 | 1 | |
| Simplified | 1+6 | 5 | 5 | |||
- Standing MK:
| Damage | 12 |  |
 |
 |
 |

|
| Stun | 5~11 | |||||
| Stun Timer | 60 | |||||
| Chain Cancel | No | |||||
| Special Cancel | No | |||||
| Frame Advantage | +7 | |||||
| Frame Count | 3 | 3 | 5 | 4 | 4 | |
| Simplified | 1+6 | 5 | 8 | |||
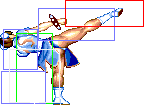
- Standing HK:
| Damage | 16 |  |
 |
 |
 |
 |

|
| Stun | 11~17 | ||||||
| Stun Timer | 80 | ||||||
| Chain Cancel | No | ||||||
| Special Cancel | No | ||||||
| Frame Advantage | +3 | ||||||
| Frame Count | 3 | 3 | 4 | 8 | 7 | 7 | |
| Simplified | 1+10 | 8 | 14 | ||||
Close Standing Normals
- Close Standing LP:
| Damage | 8 |  |
 |
 |
 |

|
| Stun | 1~7 | |||||
| Stun Timer | 40 | |||||
| Chain Cancel | Yes | |||||
| Special Cancel | Yes | |||||
| Frame Advantage | +7 | |||||
| Frame Count | 3 | 2 | 3 | 4 | 3 | |
| Simplified | 1+2 | 3 | 7 | |||
- Close Standing MP:
| Damage | 12 |  |
 |
 |
 |

|
| Stun | 5~11 | |||||
| Stun Timer | 60 | |||||
| Chain Cancel | No | |||||
| Special Cancel | No | |||||
| Frame Advantage | +13 | |||||
| Frame Count | 2 | 2 | 4 | 3 | 1 | |
| Simplified | 1+4 | 4 | 4 | |||
- Close Standing HP:
| Damage | 16 |  |
 |

|
| Stun | 11~17 | |||
| Stun Timer | 80 | |||
| Chain Cancel | No | |||
| Special Cancel | Yes | |||
| Frame Advantage | -8 | |||
| Frame Count | 3 | 20 | 11 | |
- Close Standing LK:
| Damage | 8 |  |
 |
 |
 |

|
| Stun | 1~7 | |||||
| Stun Timer | 40 | |||||
| Chain Cancel | No | |||||
| Special Cancel | No | |||||
| Frame Advantage | +5 | |||||
| Frame Count | 3 | 3 | 5 | 4 | 1 | |
| Simplified | 1+6 | 4 | 5 | |||
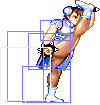
- Close Standing MK:
| Damage | 12 |  |
 |
 |
 |
 |
 |

|
| Stun | 5~11 | |||||||
| Stun Timer | 60 | |||||||
| Chain Cancel | No | |||||||
| Special Cancel | No | |||||||
| Frame Advantage | +6 | |||||||
| Frame Count | 3 | 3 | 3 | 6 | 3 | 4 | 1 | |
| Simplified | 1+6 | 9 | 8 | |||||
- Close Standing HK:
| Damage | 16 |  |
 |
 |
 |

|
| Stun | 11~17 | |||||
| Stun Timer | 80 | |||||
| Chain Cancel | No | |||||
| Special Cancel | No | |||||
| Frame Advantage | -2 | |||||
| Frame Count | 3 | 3 | 6 | 8 | 11 | |
| Simplified | 1+6 | 6 | 19 | |||
Crouching Normals
- Crouching LP:
| Damage | 6 |  |
 |
 |
 |

|
| Stun | 1~7 | |||||
| Stun Timer | 40 | |||||
| Chain Cancel | No | |||||
| Special Cancel | No | |||||
| Frame Advantage | +6 | |||||
| Frame Count | 2 | 2 | 4 | 4 | 1 | |
| Simplified | 1+4 | 4 | 5 | |||
- Crouching MP:
| Damage | 10 |  |
 |
 |
 |

|
| Stun | 5~11 | |||||
| Stun Timer | 60 | |||||
| Chain Cancel | No | |||||
| Special Cancel | No | |||||
| Frame Advantage | +11 | |||||
| Frame Count | 2 | 2 | 4 | 4 | 1 | |
| Simplified | 1+4 | 4 | 5 | |||
- Crouching HP:
| Damage | 16 |  |
 |
 |
 |

|
| Stun | 11~17 | |||||
| Stun Timer | 80 | |||||
| Chain Cancel | No | |||||
| Special Cancel | No | |||||
| Frame Advantage | -2/-1 | |||||
| Frame Count | 3 | 3 | 6 | 8 | 11 | |
| Simplified | 1+6 | 6 | 19 | |||
- Crouching LK:
| Damage | 8 |  |
 |
 |
 |

|
| Stun | 1~7 | |||||
| Stun Timer | 40 | |||||
| Chain Cancel | No | |||||
| Special Cancel | No | |||||
| Frame Advantage | +7 | |||||
| Frame Count | 3 | 3 | 4 | 4 | 1 | |
| Simplified | 6 | 4 | 5 | |||
- Crouching MK:
| Damage | 10 |  |
 |

|
| Stun | 5~11 | |||
| Stun Timer | 60 | |||
| Chain Cancel | No | |||
| Special Cancel | Yes | |||
| Frame Advantage | +12 | |||
| Frame Count | 1+4 | 5 | 4 | |
- Crouching HK:
| Damage | 14 |  |
 |
 |
 |

|
| Stun | 5~11 | |||||
| Stun Timer | 130 | |||||
| Chain Cancel | No | |||||
| Special Cancel | No | |||||
| Frame Advantage | -2 | |||||
| Frame Count | 3 | 3 | 6 | 8 | 11 | |
| Simplified | 1+6 | 6 | 19 | |||
Aerial Normals
- Neutral Jumping LP:
| Damage | 10 |  |
 |
 |

|
| Stun | 1~7 | ||||
| Stun Timer | 40 | ||||
| Frame Count | 3 | 3 | 2 | ∞ | |
| Simplified | 8 | ∞ | |||
- Diagonal Jumping LP:
| Damage | 10 |  |
 |

|
| Stun | 1~7 | |||
| Stun Timer | 40 | |||
| Frame Count | 3 | 3 | ∞ | |
| Simplified | 6 | ∞ | ||
- Neutral Jumping MP:
| Damage | 14 |  |
 |
 |
 |
 |
 |
 |

|
| Stun | 5~11 | ||||||||
| Stun Timer | 50 | ||||||||
| Frame Count | 3 | 3 | 2 | 16 | 2 | 3 | 4 | ∞ | |
| Simplified | 8 | 16 | ∞ | ||||||
- Diagonal Jumping MP:
| Damage | 14 |  |
 |
 |
 |
 |

|
| Stun | 5~11 | ||||||
| Stun Timer | 50 | ||||||
| Frame Count | 3 | 3 | 8 | 3 | 4 | ∞ | |
| Simplified | 6 | 8 | ∞ | ||||
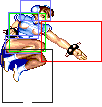
- Neutral Jumping HP:
| Damage | 16 |  |
 |
 |
 |
 |
 |
 |

|
| Stun | 11~17 | ||||||||
| Stun Timer | 60 | ||||||||
| Frame Count | 3 | 3 | 2 | 8 | 2 | 3 | 4 | ∞ | |
| Simplified | 8 | 8 | ∞ | ||||||
- Diagonal Jumping HP:
| Damage | 16 |  |
 |
 |
 |
 |

|
| Stun | 11~17 | ||||||
| Stun Timer | 60 | ||||||
| Frame Count | 3 | 3 | 8 | 3 | 4 | ∞ | |
| Simplified | 6 | 8 | ∞ | ||||
- Neutral Jumping LK:
| Damage | 10 |  |
 |

|
| Stun | 1~7 | |||
| Stun Timer | 40 | |||
| Frame Count | 3 | 3 | ∞ | |
| 5 | 6 | ∞ | ||
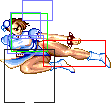
- Diagonal Jumping LK:
| Damage | 10 |  |
 |
|
| Stun | 1~7 | |||
| Stun Timer | 40 | |||
| Frame Count | 3 | 3 | ∞ | |
| 5 | 6 | ∞ | ||
- Neutral Jumping MK:
| Damage | 12 |  |
 |
 |
 |

|
| Stun | 5~11 | |||||
| Stun Timer | 50 | |||||
| Frame Count | 3 | 3 | 16 | 3 | ∞ | |
| Simplified | 6 | 16 | ∞ | |||
- Diagonal Jumping MK:
| Damage | 12 |  |
 |
 |
 |

|
| Stun | 5~11 | |||||
| Stun Timer | 50 | |||||
| Frame Count | 3 | 3 | 16 | 3 | ∞ | |
| Simplified | 6 | 16 | ∞ | |||
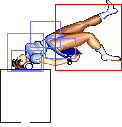
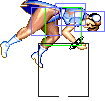
- Neutral Jumping HK:
| Damage | 16 |  |
 |
 |
 |
 |
 |
 |

|
| Stun | 11~17 | ||||||||
| Stun Timer | 60 | ||||||||
| Frame Count | 1 | 2 | 5 | 4 | 4 | 4 | 6 | ∞ | |
| Simplified | 3 | 13 | ∞ | ||||||
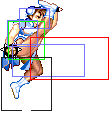
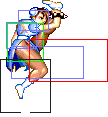
- Diagonal Jumping HK:
| Damage | 16 |  |
 |
 |
 |
 |
 |

|
| Stun | 11~17 | |||||||
| Stun Timer | 60 | |||||||
| Frame Count | 3 | 3 | 6 | 4 | 6 | 6 | ∞ | |
| Simplified | 6 | 6 | 4 | 6 | ∞ | |||
Unique Moves
- Flip Kick: (On ground and close, ←/→ + MK)
| Damage | 14 |  |
 |
 |
 |
 |
 |
 |

|
| Stun | 5~11 | ||||||||
| Stun Timer | 40 | ||||||||
| Chain Cancel | No | ||||||||
| Special Cancel | No | ||||||||
| Frame Advantage | ? | ||||||||
| Frame Count | 2 | 2 | 5 | 4 | 4 | 4 | 6 | 29 | |
| Simplified | 1+4 | 13 | 39 | ||||||
- Neck Breaker: (Close, ←/→ + HK)
| Damage | 14 |  |
 |
 |
 |
 |
 |
 |

|
| Stun | 5~11 | ||||||||
| Stun Timer | 40 | ||||||||
| Chain Cancel | No | ||||||||
| Special Cancel | No | ||||||||
| Frame Advantage | ? | ||||||||
| Frame Count | 4 | 4 | 5 | 6 | 7 | 8 | 2 | 14 | |
| Simplified | 1+36 | 14 | |||||||
- Head Stomp: (On air, ↙/↓/↘ + MK)
| Damage | ? |  |
 |
 |
 |
 |
 |

|
| Stun | 5~11 | |||||||
| Stun Timer | 40 | |||||||
| Chain Cancel | No | |||||||
| Special Cancel | ? | |||||||
| Frame Advantage | ? | |||||||
| Frame Count | 1 | 2 | 16 | 8 | 4 | 5 | ∞ | |
| Simplified | 3 | 16 | ∞ | |||||
Throws
- Koshuu Tou: (←/→ + MP or HP)
| Damage | 20+(4*n) | 
| |
| Duration | 130 | ||
| Stun | 5~11 | ||
| Stun Timer | 100 | ||
| Range (from axis) | 48 | ||
| Range advantage | 23 | ||
- Ryuusei Raku: (On Air ←/→ + MP or HP)
| Damage | 20+(4*n) | 
| |
| Duration | 130 | ||
| Stun | 7~13 | ||
| Stun Timer | 100 | ||
| Range (from axis) | 58 | ||
| Range advantage | 33 | ||
Special Moves
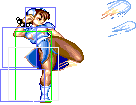
- Hyakurretsu Kyaku: press any single Kick repeatedly
Startup:
 |

| |
| Short | 1 | 3 |
| Foward | 3 | 4 |
| Roundhouse | 4 | 6 |
Cycle:
| Damage | 22/24/26 | 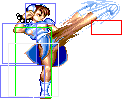 |
 |
 |
 |
 |
 |
 |

|
| Stun | 13~19 | ||||||||
| Stun Timer | 120 | ||||||||
| Frame Advantage | -7/-5/-6 | ||||||||
| Short | 4 | 4 | 4 | 4 | 4 | 4 | 4 | 4 | |
| Foward | 2 | 2 | 2 | 2 | 2 | 2 | 2 | 2 | |
| Roundhouse | 1 | 1 | 1 | 1 | 1 | 1 | 1 | 1 | |
Recovery:
 |

| |
| Short | 2 | 2 |
| Foward | 4 | 4 |
| Roundhouse | 6 | 6 |
+9 on block if is blocked 3 times (point blank). +4 for 2 blocks.
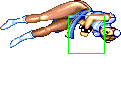
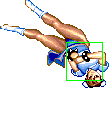
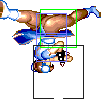
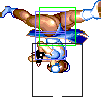
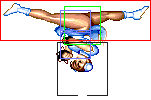
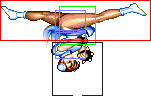
- Spinning Bird Kick: charge ↓, ↑ + Kick (charge 60f)
Startup:
| Damage | 24 |  |
 |
 |
 |
 |

| |
| Stun | 13~19 | |||||||
| Stun Timer | 120 | |||||||
| Frame Advantage | -6/-9/-11 | |||||||
| Frame Count | 1 | 4 | 3 | 2 | 3 | 4 | 6 | |
Active:
LK version :
 |
 |
 |
 |
 |
 |
 |
|
| 4 | 3 | 2 | 1 | 1 | 1 | 1 | 1 |
 |
 |
 |
 |
 |
 |
 |

|
| 2 | 1 | 2 | 2 | 3 | 4 | 4 | 2 |
MK version :
 |
 |
 |
 |
 |
 |
 |

|
| 4 | 4 | 3 | 3 | 2 | 2 | 1 | 1 |
 |
 |
 |
 |
 |
 |
 |

|
| 1 | 1 | 1 | 1 | 1 | 1 | 1 | 1 |
 |
 |
 |
 |
 |
 |
 |

|
| 2 | 1 | 1 | 2 | 2 | 3 | 3 | 4 |

|
| 2 |
HK version :
 |
 |
 |
 |
 |
 |
 |

|
| 5 | 4 | 4 | 3 | 3 | 2 | 2 | 2 |
 |
 |
 |
 |
 |
 |
 |

|
| 1 | 1 | 1 | 1 | 1 | 1 | 1 | 1 |
 |
 |
 |
 |
 |
 |
 |

|
| 1 | 1 | 1 | 1 | 1 | 1 | 1 | 1 |
 |
 |
 |
 |
 |
 |
 |

|
| 1 | 1 | 1 | 1 | 1 | 2 | 1 | 1 |
 |
 |
 |
 |
 |

|
| 2 | 2 | 3 | 3 | 3 | 3 |
Recovery:
Short:
 |
 |
 |
 |
 |
 |
|
| 2 | 3 | 2 | 2 | 3 | 3 | 1 |
Foward:
 |
 |
 |
 |
 |
 |
|
| 2 | 3 | 2 | 2 | 3 | 3 | 1 |
Roundhouse:
 |
 |
 |
 |
 |
 |
|
| 2 | 3 | 2 | 2 | 3 | 3 | 1 |
Misc Animations
| Walk back | Neutral | Walk Fwd | Crouch |
 |
 |
 |

|
- Standing reel:
 |
 |
 |

|
- Standing gut reel:
 |
 |
 |

|
- Crouching reel:
 |
 |
 |

|
- Dizzy:
 |
 |
 |

|
Advanced Strategy
Chun Li's gameplan is about ground poking and air pressure game due that she had to an air throw along with Guile and Claw,and standing and crouching normals are fast with a medium useful range and also had nice damage, her throw is great because is fast and makes good damage too.
Her main weakness its still in long range combat, she commonly can answer with Triangle Jumps attacks, and Spinning Bird Kicks are faster than World Warrior and had invincible frames now and are useful when its far and projectiles are used against her,but at medium range use your crouching Forward,its your main poke because of her fast startup and can defeat startup of projectiles easily and a bit safe if fireball released,her Hyakuretsu Kyaku is buffered and easier to use and can be connected with a jumping attack.
Close combat is the most effective for her because she not only can keep away opponent with her "now easier to use" Multiple Kicks,now she had a Overhead Crossup command move trap for projectile startups and another one that can be used to evade Zangief SPD, and also air-to-air is great due to her main overhead command move and air throw.
Match-Ups
Vs. Ryu
The best way to fight this opponent is a very consistent ground game. Use lots of ducking forward sweeps for they are very fast and hard to react to, not to mention they will knock Ryu out of a spiritball if it hasn't yet left his hands. Another good technique is to jump over his spiritball and combo him, but beware due to how high Chun jumps she is easy to uppercut if she jumps to late so time your jump just as Ryu starts to make the spiritball motion not after the projectile is visible or you'll be the one getting hit. Another good attack is to jump in and jab kick then start the lighting kick. This will take off some energy even if blocked. Another good way to counter his spiritballs is the roundhouse sweep. Time your attack just as he starts the motion. You will both get hit but he will be knocked down and probably lose more. Finally if you jump in just as Ryu starts to stand up you can knock him out of his dragonpunch. Use a Fierce Punch and time your jump so your fist hits his head just as he starts to stand, then finish combo #1 leaving out the Jumping Fierce for it was just used. (If your opponent is going for an uppercut you'll hit him).
- Air Slam- This air attack is a very potent move. It can be used in two
very effective ways. 1- When your opponent jumps in from a distance wait for them to start to decline then jump toward them and use the strong button right after you have left the ground. 2- If your opponent jumps over you at close range wait until they are right above you the jump straight up and come right up into them, use the strong button for an easy air slam. (to get the timing for these techniques takes some time but is well worth it.
Vs. Ken
Fighting him is similar to Ryu,his main differences is that his Hadoken is worst along his Shoryuken that is more dangerous than Ryu's one.
Try to poke him with crouching Foward and Roundhouse and beign more careful about jumping and stomping,Air Throw can punish him strong after you crouch an evaded Shoryuken at recovery
Vs. E.Honda
Your forward foot sweep is your main poke against Honda.
Being an air attacking character Honda's invincible headbutt can create problems. There is however a simple way around it. Jump in so that you fall through the back of him. As you fall through execute your jumping combo, this will knock him out of his super air defense for you are attacking from behind. Also any time he uses a fierce flying headbutt simply jump straight up and then throw him.
Vs. Chun Li
Vs. Blanka
Use lots of jab punches to keep his ball at bay. When attacking time your jumps so your foot (jab is best) barely hits him or he will fierce punch you out of the air. After your jab kick hits (even if he blocks) use the lighting kick to take off some energy. Your head stomp attack is best against Blanka for it will hit him out of anything. When you plan on using this move don't do it to soon our he can jump up and strike you. Finally when you use lots of head stomps your opponent may start blocking them. Don't worry you can still head stomp them out of a block. What you do is jump in and wait, you will start to fall through them, then right before you hit the ground head stomp, then hit the button again, and again. if you time it right you will staircase up your opponents body hitting them three or four times. A good way counter his jump attacks and get an almost guaranteed throw is to walk under him and as he goes over but before the computer turns you around use the flip kick (forward kick button), this will flip you backwards and land you right behind Blanka, then simply throw. Most players will be surprised by this to say the least. This can also be done to other characters but it works best on Blanka.
Vs. Zangief
Try to stay as ground based as possible when fighting Zan. Your forward and roundhouse sweeps are you best attacks. When jumping in try to hit him in the middle top of his head otherwise he may airplane punch you out of whatever you use. A good attack to use is jump in roundhouse him in the head, whether he blocks or not keep hitting the roundhouse button until the lightning feet appear, these will take off a good amount of damage. When going for this move Ôof your foot, if you get closer or hit above the belt he will most likely 360 you.
Vs. Guile
Just like Ryu use lots of forward sweeps to keep him on his toes. One good technique is when you see a sonic boom start to form roundhouse sweep him, he will get knocked down while you receive nothing. You can knock him out of his axe-kick following the same guidelines as knocking Ryu out of his dragonpunch. Or if you don't have the time you can jump in and if your above him can head stomp him out of the axe (good in corners). If he uses lots of forward sweeps and axes you when you jump try going for head stomps. The key to headstomping him out of the axe is to get within his forward sweep range before jumping. This will get you above his head and allow you to counter his move. If for some reason his misses and goes behind you just run in and throw him. Finally a good way to get out of his sonic boom run in behind it sweep, sweep pattern(or run in throw if your playing cheepers) is to roundhouse him when he gets in range. You'll both get hit but he will lose both more damage and his pattern.
Vs. Dhalsim
Constant non stop attack is best against this yoga master. Your jump in jab kick is one of your best attacks especially when followed by the lighting kick. Beware if you use it to much he may start sliding on you and tripping you as you hit the ground. To get out of this you can either wait until your very close to the ground before you strike or more reliably head stomp. Also if you are to close for him to have time to throw a fireball execute a helicopter kick, he will have no choice but to duck.(if you use short ones you can lightning kick him after you land)
Vs. Boxer
Your roundhouse footsweep will knock him out of almost everything. Be
careful of jumping in to much against a defensive Balrog because he can charging uppercut you almost all the time. All in all play him as you would Zangief. Also your neck kick is very hard for him to get out of.
Vs. Claw
Fight him much as you would another Chun. Watch out for his fake range and when you jump in try to land on his forward shoulder(anything further and you'll be stabbed, anything closer an he may walk under and throw you.) Pay close attention when he starts a wall attack if he tries to go off the wall behind you jump up and intercept him with an airslam. Don't use the neck kick to often for he can air throw you out of it.
- Throws- the key to executing Chun's unrivaled ability to throw is timing the
button. Wait until you are just about to land then hit the button and push the joystick back towards your opponent at the same time, time your button just as the joystick makes contact with the side of the joystick hole rarely will you lose.
Vs. Sagat
Like Dhalsim a constant attack is best against Sagat. Your head stomp will knock him out of anything as will most of you other attacks if you time them right. An experienced and aggressive Chun Li shouldn't have much trouble with Sagat.
Vs. Dictador
Play defensive against him if you can for his air attacks almost always overpower yours. Not to mention Chun has no real way out of the torpedo pattern.(She can helicopter kick through a fast on but this doesn't always work). Use lighting kicks after you attack to take as much extra damage as possible. And if he torpedoes you into a corner and jumps to avoid being thrownÔ READ ME
- Knocking Ryu\Ken out of the DP.
You can only do this if you jump in just as they start to stand up from being knocked down. You must time your jump so that as you come down your attack (a fierce punch) strikes them in the top of the head just as soon as he is graphically half way up. In other words you hit him in the top of the head just as he starts to STAND back up (make sure you wait for him to start to stand or your attack may go throw him and he will throw you). Use the fierce punch to knock him out of the DP and then follow it with a ducking strong punch, and a ducking forward sweep. YES this will knock him out of a DP if you get the timing right and he is going for one..........!
| General | Game Mechanics | Strategy | Tiers | |
| The Characters | Balrog (Boxer) | Blanka | Chun-Li | Dhalsim | E. Honda | Guile | Ken | M. Bison (Dictator) | Ryu | Sagat | Vega (Claw) | Zangief |
