No edit summary |
No edit summary |
||
| Line 22: | Line 22: | ||
== Video Guides == | == Video Guides == | ||
====[https://www.youtube.com/user/ | ====[https://www.youtube.com/user/CapcomFightersTV Capcom Fighters'] Official Character Introduction==== | ||
<youtube>oIl8gr-sHDc</youtube><br> | <youtube>oIl8gr-sHDc</youtube><br> | ||
====[https://www.youtube.com/StreetFighter Street Fighter] Official Character Guide==== | |||
<youtube>2ZGTpVwiy4I</youtube><br> | |||
====[https://www.youtube.com/user/SupermanSajam Sajam's] Character Breakdown==== | ====[https://www.youtube.com/user/SupermanSajam Sajam's] Character Breakdown==== | ||
<youtube>mfIfWhEo55g</youtube><br> | <youtube>mfIfWhEo55g</youtube><br> | ||
Revision as of 17:18, 28 March 2016
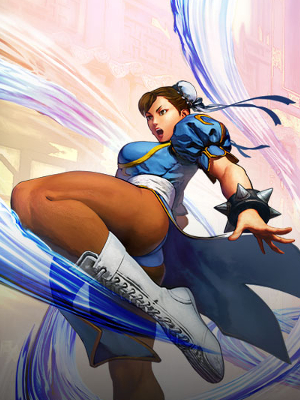
Chun Li
| ||||||||||||||||||||||||||||||||||||||||||||||||||||||||||||||||||||||||||||||
Summary
Bio
TBW
Why Pick Chun Li?
(As Street Fighter V is new, this section will be filled out after we learn more about how this character plays most effectively.)
Players To Watch
{{{5}}}
Move List
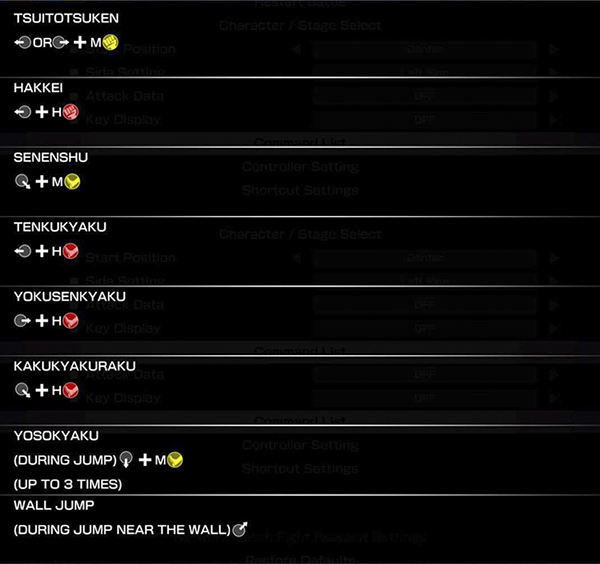
Unique Attacks
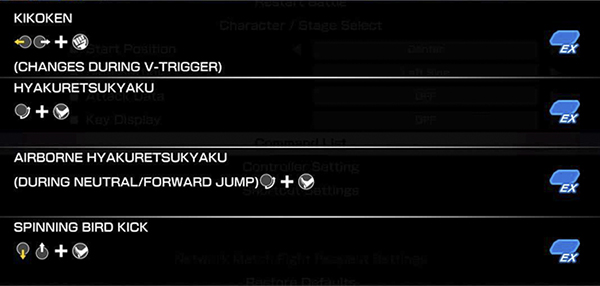
Special Moves
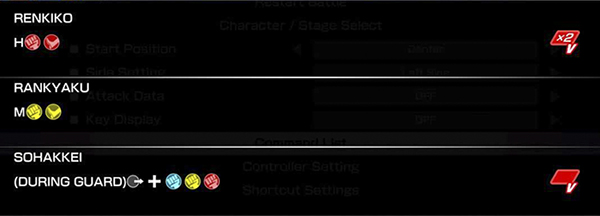
V-System (V-Trigger / V-Skill / V-Reversal)
Critical Art
ChunLi Discussions
Discussions regarding ChunLi
Li-discussion ChunLi Shoryuken Forum
ChunLi Discord Link
Video Guides
Capcom Fighters' Official Character Introduction
Street Fighter Official Character Guide
Sajam's Character Breakdown
Frame Data
- Champion Edition data courtesy of @D4RK_ONION, @HatsonFGC, @Arlieth, @Frostdiener, BananaCyclone and the Frame Assist Tool team. - Huge thanks for their efforts! - See https://fullmeter.com/fatonline/#/home for more information
| Move Name | Command | Startup | Active | Rcvry | Adv Guard |
Adv Hit |
Adv Counter |
Damage | Stun | Hit Level |
Cancel Ability |
KD Adv Normal |
KD Adv Rise |
KD Adv Roll |
Chip Damage |
Counter Damage |
Counter Stun |
|---|---|---|---|---|---|---|---|---|---|---|---|---|---|---|---|---|---|
| stand LP | 4 | 30 | 70 | 2 | 8 | 5 | 2 | {{{22}}} | {{{23}}} | {{{24}}} | {{{25}}} | {{{26}}} | |||||
| stand MP | 5 | 60 | 100 | 2 | 10 | 6 | 3 | {{{22}}} | {{{23}}} | {{{24}}} | {{{25}}} | {{{26}}} | |||||
| stand HP | 11 | 80 | 100 | 2 | 16 | 0 | -3 | {{{22}}} | {{{23}}} | {{{24}}} | {{{25}}} | {{{26}}} | |||||
| stand LK | 4 | 40 | 70 | 3 | 7 | 1 | -3 | {{{22}}} | {{{23}}} | {{{24}}} | {{{25}}} | {{{26}}} | |||||
| stand MK | 8 | 60 | 100 | 3 | 15 | 2 | -2 | {{{22}}} | {{{23}}} | {{{24}}} | {{{25}}} | {{{26}}} | |||||
| stand HK | 12 | 90 | 150 | 3 | 16 | 1 | -2 | {{{22}}} | {{{23}}} | {{{24}}} | {{{25}}} | {{{26}}} | |||||
| crouch LP | 3 | 20 | 70 | 2 | 6 | 5 | 2 | {{{22}}} | {{{23}}} | {{{24}}} | {{{25}}} | {{{26}}} | |||||
| crouch MP | 10 | 60 | 100 | 9 | 18 | -3 | -8 | {{{22}}} | {{{23}}} | {{{24}}} | {{{25}}} | {{{26}}} | |||||
| crouch HP | 7 | 60*40 | 100*50 | 2(10)2 | 14 | 2 | -5 | {{{22}}} | {{{23}}} | {{{24}}} | {{{25}}} | {{{26}}} | |||||
| crouch LK | 3 | 20 | 70 | 2 | 8 | 1 | -1 | {{{22}}} | {{{23}}} | {{{24}}} | {{{25}}} | {{{26}}} | |||||
| crouch MK | 6 | 50 | 100 | 2 | 15 | 0 | -2 | {{{22}}} | {{{23}}} | {{{24}}} | {{{25}}} | {{{26}}} | |||||
| crouch HK | 7 | 100 | 150 | 65 | 16 | 21 | 3 | 24 | KD | -12 | {{{22}}} | {{{23}}} | {{{24}}} | {{{25}}} | {{{26}}} | ||
| jump LP | 3 | 40 | 70 | 5 | - | - | - | {{{22}}} | {{{23}}} | {{{24}}} | {{{25}}} | {{{26}}} | |||||
| jump MP | 6 | 60 | 100 | 4 | - | - | - | {{{22}}} | {{{23}}} | {{{24}}} | {{{25}}} | {{{26}}} | |||||
| jump HP | 6 | 50*50 | 100*50 | 4(2)4 | - | - | - | {{{22}}} | {{{23}}} | {{{24}}} | {{{25}}} | {{{26}}} | |||||
| jump LK | 4 | 40 | 70 | 7 | - | - | - | {{{22}}} | {{{23}}} | {{{24}}} | {{{25}}} | {{{26}}} | |||||
| jump MK | 6 | 60 | 100 | 5 | - | - | - | {{{22}}} | {{{23}}} | {{{24}}} | {{{25}}} | {{{26}}} | |||||
| jump HK | 5 | 90 | 150 | 6 | - | - | - | {{{22}}} | {{{23}}} | {{{24}}} | {{{25}}} | {{{26}}} | |||||
| tsuitotsuken | 7 | 60 | 100 | 2 | 12 | 3 | 0 | {{{22}}} | {{{23}}} | {{{24}}} | {{{25}}} | {{{26}}} | |||||
| hakkei | 7 | 90 | 150 | 5 | 13 | 3 | 2 | {{{22}}} | {{{23}}} | {{{24}}} | {{{25}}} | {{{26}}} | |||||
| senenshu | 26 | 70 | 100 | 2 | 16 | 0 | -2 | {{{22}}} | {{{23}}} | {{{24}}} | {{{25}}} | {{{26}}} | |||||
| tenkukyaku | 8 | 70 | 150 | 5 | 13 | 2 | 0 | {{{22}}} | {{{23}}} | {{{24}}} | {{{25}}} | {{{26}}} | |||||
| yokusenkyaku | 18 | 70 | 150 | 5 | 13 | 2 | -2 | {{{22}}} | {{{23}}} | {{{24}}} | {{{25}}} | {{{26}}} | |||||
| kakurakukyaku | 34 | 80 | 150 | 6 | 6 | 4 | -2 | {{{22}}} | {{{23}}} | {{{24}}} | {{{25}}} | {{{26}}} | |||||
| yosokyaku | 5 | 40 | 60 | 4 | - | - | {{{22}}} | {{{23}}} | {{{24}}} | {{{25}}} | {{{26}}} | ||||||
| wall jump | - | - | - | - | - | - | - | - | - | {{{22}}} | {{{23}}} | {{{24}}} | {{{25}}} | {{{26}}} | |||
| koshuto | 5 | 120 | 170 | 64 | 15 | 15 | 2 | 18 | KD | {{{22}}} | {{{23}}} | {{{24}}} | {{{25}}} | {{{26}}} | |||
| tenshin shushu | 5 | 140 | 200 | 72 | 23 | 23 | 2 | 18 | KD | {{{22}}} | {{{23}}} | {{{24}}} | {{{25}}} | {{{26}}} | |||
| ryuseiraku | 5 | 130 | 200 | 70 | 21 | 21 | 2 | - | KD | {{{22}}} | {{{23}}} | {{{24}}} | {{{25}}} | {{{26}}} | |||
| renkiko | 54 | {{{22}}} | {{{23}}} | {{{24}}} | {{{25}}} | {{{26}}} | |||||||||||
| rankyaku | 11 | 40 | 50 | 71 | 12 | 17 | 4 | 44 | KD | -24 | {{{22}}} | {{{23}}} | {{{24}}} | {{{25}}} | {{{26}}} | ||
| sohakkei | 10 | 40 | 0 | 2 | 20 | 1 | 0 | {{{22}}} | {{{23}}} | {{{24}}} | {{{25}}} | {{{26}}} | |||||
| kikoken LP | 13 | 60 | 100 | - | 32 | 0 | -6 | {{{22}}} | {{{23}}} | {{{24}}} | {{{25}}} | {{{26}}} | |||||
| kikoken MP | 11 | 60 | 100 | - | 32 | -1 | -5 | {{{22}}} | {{{23}}} | {{{24}}} | {{{25}}} | {{{26}}} | |||||
| kikoken HP | 9 | 60 | 100 | - | 32 | -2 | -4 | {{{22}}} | {{{23}}} | {{{24}}} | {{{25}}} | {{{26}}} | |||||
| kikoken EX | 11 | 40*60 | 0*100 | - | 27 | 4 | 1 | {{{22}}} | {{{23}}} | {{{24}}} | {{{25}}} | {{{26}}} | |||||
| hyakuretsukyaku LK | 5 | 20x4 | 20x4 | 2x4 | 20 | 3 | -8 | {{{22}}} | {{{23}}} | {{{24}}} | {{{25}}} | {{{26}}} | |||||
| hyakuretsukyaku MK | 10 | 20x5 | 20x5 | 2x5 | 20 | 2 | -9 | {{{22}}} | {{{23}}} | {{{24}}} | {{{25}}} | {{{26}}} | |||||
| hyakuretsukyaku HK | 14 | 20x6 | 20x6 | 2x6 | 20 | 1 | -10 | {{{22}}} | {{{23}}} | {{{24}}} | {{{25}}} | {{{26}}} | |||||
| hyakuretsukyaku EX | 5 | 10x9*50 | 10x9*150 | 90 | 31 | 36 | 2x10 | 19 | KD | -2 | video says she's -3, but ryu can't DP | {{{22}}} | {{{23}}} | {{{24}}} | {{{25}}} | {{{26}}} | |
| air hyakuretsukyaku LK | 7 | 20x4 | 20x4 | 2x4 | - | - | {{{22}}} | {{{23}}} | {{{24}}} | {{{25}}} | {{{26}}} | ||||||
| air hyakuretsukyaku MK | 8 | 20x5 | 20x5 | 2x5 | - | - | {{{22}}} | {{{23}}} | {{{24}}} | {{{25}}} | {{{26}}} | ||||||
| air hyakuretsukyaku HK | 8 | 20x6 | 20x6 | 2x6 | - | - | {{{22}}} | {{{23}}} | {{{24}}} | {{{25}}} | {{{26}}} | ||||||
| air hyakuretsukyaku EX | 6 | 25x7 | 30x7 | 2x7 | - | - | {{{22}}} | {{{23}}} | {{{24}}} | {{{25}}} | {{{26}}} | ||||||
| spinning bird kick LK | 9 | 20x4*40 | 20*25x3*105 | 91 | 32 | 37 | 2x5 | 24 | KD | -6 | {{{22}}} | {{{23}}} | {{{24}}} | {{{25}}} | {{{26}}} | ||
| spinning bird kick MK | 15 | 25*15x5*40 | 30*20x5*70 | 91 | 32 | 37 | 2x7 | 24 | KD | -8 | {{{22}}} | {{{23}}} | {{{24}}} | {{{25}}} | {{{26}}} | ||
| spinning bird kick HK | 22 | 10*15x7*45 | 20x8*40 | 89 | 30 | 35 | 2x9 | 26 | KD | -10 | {{{22}}} | {{{23}}} | {{{24}}} | {{{25}}} | {{{26}}} | ||
| spinning bird kick EX | 5 | 30x4*50 | 30x4*80 | 80 | 21 | 26 | 2x5 | 27 | KD | -12 | {{{22}}} | {{{23}}} | {{{24}}} | {{{25}}} | {{{26}}} | ||
| hoyokusen | 5 | 340 | 0 | 99 | 40 | 40 | 2 | 35 | KD | -20 | {{{22}}} | {{{23}}} | {{{24}}} | {{{25}}} | {{{26}}} | ||
| Move Name | Command | Startup | Active | Rcvry | Adv Guard |
Adv Hit |
Adv Counter |
Damage | Stun | Hit Level |
Cancel Ability |
KD Adv Normal |
KD Adv Rise |
KD Adv Roll |
Chip Damage |
Counter Damage |
Counter Stun |


