No edit summary |
No edit summary |
||
| Line 22: | Line 22: | ||
== Video Guides == | == Video Guides == | ||
====[https://www.youtube.com/user/ | ====[https://www.youtube.com/user/CapcomFightersTV Capcom Fighters'] Official Character Introduction==== | ||
<youtube>uhqFlBifaHA</youtube><br> | <youtube>uhqFlBifaHA</youtube><br> | ||
====[https://www.youtube.com/StreetFighter Street Fighter] Official Character Guide==== | |||
<youtube>bD_VQxxS7Nk</youtube><br> | |||
====[https://www.youtube.com/user/SupermanSajam Sajam's] Character Breakdown==== | ====[https://www.youtube.com/user/SupermanSajam Sajam's] Character Breakdown==== | ||
<youtube>_KjFXrKh824</youtube><br> | <youtube>_KjFXrKh824</youtube><br> | ||
Revision as of 17:14, 28 March 2016
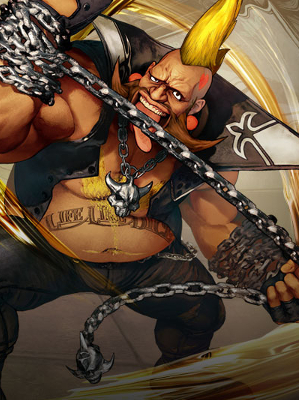
Birdie
| ||||||||||||||||||||||||||||||||||||||||||||||||||||||||||||||||||||||||||||||
Summary
Bio
TBW
Why Pick Birdie?
(As Street Fighter V is new, this section will be filled out after we learn more about how this character plays most effectively.)
Players To Watch
{{{5}}}
Move List
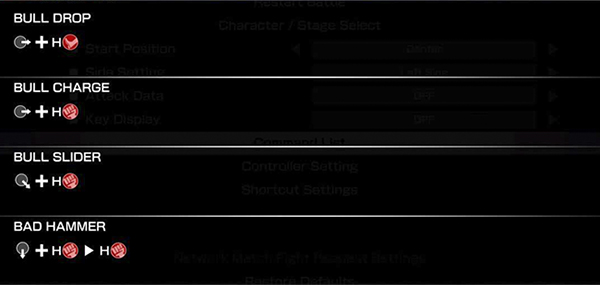
Unique Attacks
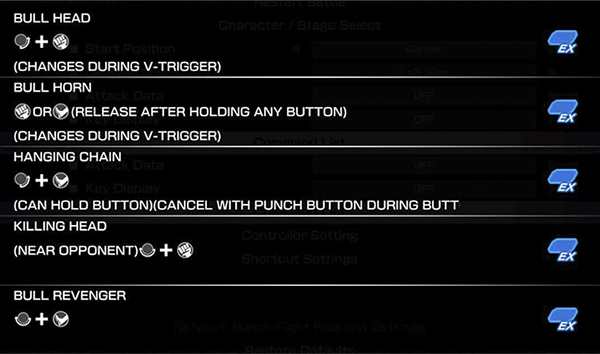
Special Moves
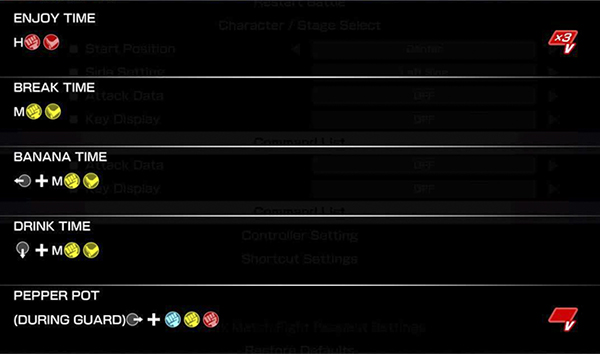
V-System (V-Trigger / V-Skill / V-Reversal)
Critical Art
Birdie Discussions
Discussions regarding Birdie
Birdie Discord Link
Video Guides
Capcom Fighters' Official Character Introduction
Street Fighter Official Character Guide
Sajam's Character Breakdown
Frame Data
- Champion Edition data courtesy of @D4RK_ONION, @HatsonFGC, @Arlieth, @Frostdiener, BananaCyclone and the Frame Assist Tool team. - Huge thanks for their efforts! - See https://fullmeter.com/fatonline/#/home for more information
| Move Name | Command | Startup | Active | Rcvry | Adv Guard |
Adv Hit |
Adv Counter |
Damage | Stun | Hit Level |
Cancel Ability |
KD Adv Normal |
KD Adv Rise |
KD Adv Roll |
Chip Damage |
Counter Damage |
Counter Stun |
|---|---|---|---|---|---|---|---|---|---|---|---|---|---|---|---|---|---|
| stand LP | 5 | 40 | 90 | 2 | 10 | 4 | 3 | {{{21}}} | {{{22}}} | {{{23}}} | {{{24}}} | {{{25}}} | {{{26}}} | ||||
| stand MP | 7 | 60 | 120 | 2 | 16 | 4 | -1 | {{{21}}} | {{{22}}} | {{{23}}} | {{{24}}} | {{{25}}} | {{{26}}} | ||||
| stand HP | 14 | 90 | 150 | 2 | 22 | -2 | -6 | {{{21}}} | {{{22}}} | {{{23}}} | {{{24}}} | {{{25}}} | {{{26}}} | ||||
| stand LK | 4 | 30 | 90 | 2 | 7 | 6 | 3 | {{{21}}} | {{{22}}} | {{{23}}} | {{{24}}} | {{{25}}} | {{{26}}} | ||||
| stand MK | 8 | 70 | 120 | 3 | 16 | 2 | -2 | {{{21}}} | {{{22}}} | {{{23}}} | {{{24}}} | {{{25}}} | {{{26}}} | ||||
| stand HK | 12 | 100 | 150 | 3 | 20 | 6 | 0 | {{{21}}} | {{{22}}} | {{{23}}} | {{{24}}} | {{{25}}} | {{{26}}} | ||||
| crouch LP | 5 | 40 | 90 | 2 | 11 | 4 | 2 | {{{21}}} | {{{22}}} | {{{23}}} | {{{24}}} | {{{25}}} | {{{26}}} | ||||
| crouch MP | 6 | 70 | 120 | 6 | 15 | 0 | -5 | {{{21}}} | {{{22}}} | {{{23}}} | {{{24}}} | {{{25}}} | {{{26}}} | ||||
| crouch HP | 10 | 90 | 150 | 93 | 32 | 37 | 4 | 26 | KD | -9 | {{{21}}} | {{{22}}} | {{{23}}} | {{{24}}} | {{{25}}} | {{{26}}} | |
| crouch LK | 4 | 30 | 90 | 2 | 11 | 4 | 2 | {{{21}}} | {{{22}}} | {{{23}}} | {{{24}}} | {{{25}}} | {{{26}}} | ||||
| crouch MK | 10 | 60 | 120 | 2 | 18 | -1 | -4 | {{{21}}} | {{{22}}} | {{{23}}} | {{{24}}} | {{{25}}} | {{{26}}} | ||||
| crouch HK | 12 | 100 | 150 | 69 | 20 | 25 | 3 | 25 | KD | -11 | {{{21}}} | {{{22}}} | {{{23}}} | {{{24}}} | {{{25}}} | {{{26}}} | |
| jump LP | 4 | 50 | 90 | 5 | - | - | - | {{{21}}} | {{{22}}} | {{{23}}} | {{{24}}} | {{{25}}} | {{{26}}} | ||||
| jump MP | 7 | 70 | 120 | 6 | - | - | - | {{{21}}} | {{{22}}} | {{{23}}} | {{{24}}} | {{{25}}} | {{{26}}} | ||||
| jump HP | 7 | 100 | 150 | 5 | - | - | - | {{{21}}} | {{{22}}} | {{{23}}} | {{{24}}} | {{{25}}} | {{{26}}} | ||||
| jump LK | 5 | 50 | 90 | 5 | - | - | - | {{{21}}} | {{{22}}} | {{{23}}} | {{{24}}} | {{{25}}} | {{{26}}} | ||||
| jump MK | 7 | 70 | 120 | 4 | - | - | - | {{{21}}} | {{{22}}} | {{{23}}} | {{{24}}} | {{{25}}} | {{{26}}} | ||||
| jump HK | 9 | 100 | 150 | 5 | - | - | - | {{{21}}} | {{{22}}} | {{{23}}} | {{{24}}} | {{{25}}} | {{{26}}} | ||||
| bull charge | 25 | 100 | 150 | 4 | 18 | 3 | -7 | {{{21}}} | {{{22}}} | {{{23}}} | {{{24}}} | {{{25}}} | {{{26}}} | ||||
| bull slider | 19 | 100 | 150 | 5 | 22 | -1 | -5 | {{{21}}} | {{{22}}} | {{{23}}} | {{{24}}} | {{{25}}} | {{{26}}} | ||||
| bull drop | 7 | 40*80 | 50*100 | 3(12)4 | 18 | 2 | -4 | {{{21}}} | {{{22}}} | {{{23}}} | {{{24}}} | {{{25}}} | {{{26}}} | ||||
| bad hammer | 7 | 90*54 | 150*135 | 62 | 1 | 6 | 5 | 31 | KD | - | {{{21}}} | {{{22}}} | {{{23}}} | {{{24}}} | {{{25}}} | {{{26}}} | |
| bad skull | 5 | 150 | 200 | 71 | 12 | 12 | 2 | 18 | KD | - | {{{21}}} | {{{22}}} | {{{23}}} | {{{24}}} | {{{25}}} | {{{26}}} | |
| bad chain | 5 | 75*75 | 100*100 | 74 | 15 | 15 | 2 | 18 | KD | - | {{{21}}} | {{{22}}} | {{{23}}} | {{{24}}} | {{{25}}} | {{{26}}} | |
| break time | 52 | - | - | - | {{{21}}} | {{{22}}} | {{{23}}} | {{{24}}} | {{{25}}} | {{{26}}} | |||||||
| banana time | 50 | 10 | 0 | - | 9 | 29 | 2 | {{{21}}} | {{{22}}} | {{{23}}} | {{{24}}} | {{{25}}} | {{{26}}} | ||||
| drink time | 50 | 10 | 0 | - | 11 | 28 | 10 | {{{21}}} | {{{22}}} | {{{23}}} | {{{24}}} | {{{25}}} | {{{26}}} | ||||
| enjoy time | 16 | - | {{{21}}} | {{{22}}} | {{{23}}} | {{{24}}} | {{{25}}} | {{{26}}} | |||||||||
| pepper pot | 16 | 60 | 0 | 2 | 19 | KD | -2 | {{{21}}} | {{{22}}} | {{{23}}} | {{{24}}} | {{{25}}} | {{{26}}} | ||||
| bull head LP | 14 | 120 | 200 | 85 | 26 | 31 | 3 | 29 | KD | -10 | {{{21}}} | {{{22}}} | {{{23}}} | {{{24}}} | {{{25}}} | {{{26}}} | |
| bull head MP | 18 | 130 | 200 | 85 | 25 | 30 | 3 | 30 | KD | -10 | {{{21}}} | {{{22}}} | {{{23}}} | {{{24}}} | {{{25}}} | {{{26}}} | |
| bull head HP | 27 | 140 | 200 | 90 | 31 | 36 | 3 | 24 | KD | -5 | {{{21}}} | {{{22}}} | {{{23}}} | {{{24}}} | {{{25}}} | {{{26}}} | |
| bull head EX | 14 | 80*80 | 100*150 | 85 | 26 | 30 | 4(26)4 | 28 | KD | -10 | {{{21}}} | {{{22}}} | {{{23}}} | {{{24}}} | {{{25}}} | {{{26}}} | |
| bull horn | 15 | 130 | 200 | 89 | 30 | 35 | 6 | 29 | KD | -18 | {{{21}}} | {{{22}}} | {{{23}}} | {{{24}}} | {{{25}}} | {{{26}}} | |
| bull horn EX | 15 | 75*75 | 50*200 | 88 | 29 | 34 | 9(11)4 | 32 | KD | -19 | {{{21}}} | {{{22}}} | {{{23}}} | {{{24}}} | {{{25}}} | {{{26}}} | |
| killing head LP | 5 | 20*160 | 40*160 | 82 | 23 | 23 | 2 | 52 | KD | - | {{{21}}} | {{{22}}} | {{{23}}} | {{{24}}} | {{{25}}} | {{{26}}} | |
| killing head MP | 5 | 20*20*150 | 40*40*140 | 82 | 23 | 23 | 2 | 52 | KD | - | {{{21}}} | {{{22}}} | {{{23}}} | {{{24}}} | {{{25}}} | {{{26}}} | |
| killing head HP | 5 | 20x3*140 | 40x3*120 | 82 | 23 | 23 | 2 | 52 | KD | - | {{{21}}} | {{{22}}} | {{{23}}} | {{{24}}} | {{{25}}} | {{{26}}} | |
| killing head EX | 5 | 10x6*160 | 30x6*90 | 82 | 23 | 23 | 2 | 52 | KD | - | {{{21}}} | {{{22}}} | {{{23}}} | {{{24}}} | {{{25}}} | {{{26}}} | |
| hanging chain LK | 25 | 140 | 200 | 79 | 20 | 20 | 16 | 24 | KD | -23 | {{{21}}} | {{{22}}} | {{{23}}} | {{{24}}} | {{{25}}} | {{{26}}} | |
| hanging chain MK | 25 | 150 | 200 | 68 | 19 | 19 | 16 | 24 | KD | -23 | {{{21}}} | {{{22}}} | {{{23}}} | {{{24}}} | {{{25}}} | {{{26}}} | |
| hanging chain HK | 25 | 160 | 200 | 81 | 22 | 22 | 16 | 31 | KD | - | {{{21}}} | {{{22}}} | {{{23}}} | {{{24}}} | {{{25}}} | {{{26}}} | |
| hanging chain EX | 15 | 70*100 | 100*100 | 78 | 29 | 29 | 17 | 21 | KD | -21 | {{{21}}} | {{{22}}} | {{{23}}} | {{{24}}} | {{{25}}} | {{{26}}} | |
| hanging chain cancel | - | - | - | - | - | 17 | - | - | {{{21}}} | {{{22}}} | {{{23}}} | {{{24}}} | {{{25}}} | {{{26}}} | |||
| bull revenger LK | 35 | 70*70*30 | 100*100*30 | 69 | 20 | 20 | 2 | 28 | KD | - | {{{21}}} | {{{22}}} | {{{23}}} | {{{24}}} | {{{25}}} | {{{26}}} | |
| bull revenger MK | 40 | 70*70*40 | 100*100*30 | 69 | 20 | 20 | 2 | 28 | KD | - | {{{21}}} | {{{22}}} | {{{23}}} | {{{24}}} | {{{25}}} | {{{26}}} | |
| bull revenger HK | 43 | 70*70*50 | 100*100*30 | 69 | 20 | 20 | 2 | 28 | KD | - | {{{21}}} | {{{22}}} | {{{23}}} | {{{24}}} | {{{25}}} | {{{26}}} | |
| bull revenger EX | 25 | 50*50*100 | 50*50*130 | 69 | 20 | 20 | 11 | 47 | KD | - | {{{21}}} | {{{22}}} | {{{23}}} | {{{24}}} | {{{25}}} | {{{26}}} | |
| skip to my chain | 6 | 50x3*200 | 0*0*0*0 | 36 | 36 | 36 | 5 | 60 | KD | -30 | {{{21}}} | {{{22}}} | {{{23}}} | {{{24}}} | {{{25}}} | {{{26}}} | |
| Move Name | Command | Startup | Active | Rcvry | Adv Guard |
Adv Hit |
Adv Counter |
Damage | Stun | Hit Level |
Cancel Ability |
KD Adv Normal |
KD Adv Rise |
KD Adv Roll |
Chip Damage |
Counter Damage |
Counter Stun |


