(1f of added to description of startup) |
No edit summary |
||
| (48 intermediate revisions by 2 users not shown) | |||
| Line 1: | Line 1: | ||
<includeonly>|- style="font-size:80%; line-height:1em" | <includeonly>|- style="font-size:80%; line-height:1em;" | ||
{{#if: {{{version|}}} | ! style="font-size:125%; min-width:70px;" rowspan= | {{#if: {{{version|}}} | ! style="font-size:125%; min-width:70px;" rowspan=2 {{!}} {{{version}}}{{#if: {{{subtitle|}}} | <br><small>{{{subtitle}}}</small> }} }} | ||
! style="width: | {{#if: {{{noheader|}}} | | | ||
! style="width: | ! style="width:10%" {{!}} {{Tooltip| text=Startup | hovertext=Amount of frames before the move becomes active +1, including the 1st active frame.}} | ||
! style="width: | ! style="width:10%" {{!}} {{Tooltip| text=Active | hovertext=Amount of frames the move is active for.}} | ||
! style="width: | ! style="width:10%" {{!}} {{Tooltip| text=Recovery | hovertext=Amount of frames the move takes to recover after it's last active hitbox.}} | ||
! style="width: | ! style="width:10%" {{!}} {{Tooltip| text=Base Damage | hovertext=The move's base damage before any modifiers like defense or scaling are applied.}} | ||
! style="width:10%" {{!}} {{Tooltip| text=Stand Damage | hovertext=How much damage the move does to the Stand gauge.}} | |||
! style="width:10%" {{!}} {{Tooltip| text=Guard | hovertext=Whether the move needs to be blocked high, low or mid.}} | |||
! style="width:10%" {{!}} {{Tooltip| text=Hit Adv. | hovertext=How many frames you can move before the opponent after hitting the opponent.}} | |||
! style="width:10%" {{!}} {{Tooltip| text=Block Adv. | hovertext=Same as hit advantage, except for when the move is blocked.}} | |||
! style="width:10%" {{!}} {{Tooltip| text=Pushblock Adv. | hovertext=Like the other advantages, except when the attack is pushblocked.
Pushblock advantage calculated as if pushblocked on the same frame a move is blocked.}} | |||
}} | |||
|- | |- | ||
| {{#if: {{{startup|}}} | {{{startup}}} |-}} | | {{#if: {{{startup|}}} | {{{startup}}} |-}} | ||
| Line 11: | Line 17: | ||
| {{#if: {{{recovery|}}} | {{{recovery}}} |-}} | | {{#if: {{{recovery|}}} | {{{recovery}}} |-}} | ||
| {{#if: {{{damage|}}} | {{{damage}}} |-}} | | {{#if: {{{damage|}}} | {{{damage}}} |-}} | ||
| {{#if: {{{standdamage|}}} | {{{standdamage}}} |-}} | |||
| {{#if: {{{guard|}}} | {{{guard}}} |-}} | | {{#if: {{{guard|}}} | {{{guard}}} |-}} | ||
| {{#if: {{{hit|}}} | {{{hit}}} |-}} | | {{#if: {{{hit|}}} | {{{hit}}} |-}} | ||
| {{#if: {{{block}}} | {{{block}}} |-}} | | {{#if: {{{block}}} | {{{block}}} |-}} | ||
| {{#if: {{{pushblock|}}} | {{{pushblock}}} |-}} | | {{#if: {{{pushblock|}}} | {{{pushblock}}} |-}} | ||
|- | |- | ||
{{#if: {{{description|}}} | {{!}} class="mw-collapsible" style=" | {{#if: {{{description|}}} | {{!}} style="width:100%; text-align:left" colspan={{#if: {{{version|}}} | 10 | 9 }} {{!}} | ||
{{{ | {{{description}}} | ||
{{{!}} class="mw-collapsible mw-collapsed wikitable" style="white-space:nowrap; margin-left: 4px; margin-right: auto; max-width: 10%; text-align: center" | |||
{{!}}+ Additional Info | |||
! style="width:16%" {{!}} {{Tooltip | text=Invulnerability | hovertext=The period in which you can't be hit.}} | |||
! style="width:16%" {{!}} {{Tooltip | text=Cancel | hovertext=What this move can be cancelled into.}} | |||
! style="width:16%" {{!}} {{Tooltip | text=Triggers IPS | hovertext=Whether this move triggers IPS.}} | |||
! style="width:16%" {{!}} {{Tooltip | text=Triggers scaling | hovertext=Whether this move triggers combo scaling.}} | |||
! style="width:16%" {{!}} {{Tooltip | text=Meter on whiff | hovertext=How much meter you gain when this move is used.}} | |||
! style="width:16%" {{!}} {{Tooltip | text=Meter on hit | hovertext=How much meter you gain when this move hits.}} | |||
{{!}}- | |||
{{!}} {{#if: {{{invuln|}}} | {{{invuln}}} | None }} | |||
{{!}} {{#if: {{{cancel|}}} | {{{cancel}}} | - }} | |||
{{!}} {{#if: {{{ips|}}} | {{{ips}}} | - }} | |||
{{!}} {{#if: {{{scaling|}}} | {{{scaling}}} | - }} | |||
{{!}} {{#if: {{{meterwhiff|}}} | {{{meterwhiff}}} | - }} | |||
{{!}} {{#if: {{{meterhit|}}} | {{{meterhit}}} | - }} | |||
{{!}}- | |||
{{#if: {{{additionalinfo|}}} | {{!}} style="text-align:left;max-width: 10%" colspan = 6 {{!}} | |||
{{{additionalinfo}}} }} | |||
{{!}}} | |||
}} | |||
</includeonly> | |||
<noinclude> | |||
Placeholder examples. | Placeholder examples. | ||
{{MoveData | |||
|image=Jotaro214abc.png|frameless | |||
|name=Blazing Strike<br>214A/B/C | |||
|data= | |||
{{AttackData-HFTF | |||
|version=214A | |||
|startup=14-18 | |||
|active=2 | |||
|recovery=15 Total [0] | |||
|hit=+30-34 | |||
|block=+18-22 | |||
|pushblock=+17-21 | |||
|guard=Mid | |||
|damage=10 | |||
}} | |||
{{AttackData-HFTF | |||
|version=214B | |||
|startup=14-18 | |||
|active=2 | |||
|recovery=15 Total [0] | |||
|hit=+30-34 | |||
|block=+18-22 | |||
|pushblock=+17-21 | |||
|guard=Mid | |||
|damage=10 | |||
|noheader=y | |||
}} | |||
{{AttackData-HFTF | |||
|noheader=y | |||
|version=214C | |||
|startup=14-18 | |||
|active=2 | |||
|recovery=15 Total [0] | |||
|hit=+30-34 | |||
|block=+18-22 | |||
|pushblock=+17-21 | |||
|guard=Mid | |||
|damage=10 | |||
|description=Star Platinum rushes forward before delivering a punch. A very useful special both in combos and pressure, as well as a rare neutral tool when used as a makeshift fireball. 214B will be the version you'll use the most and is the basis of your Stand OFF combos. | |||
}} | |||
}} | |||
{{MoveData | {{MoveData | ||
| Line 43: | Line 105: | ||
|guard=Mid | |guard=Mid | ||
|damage=4 | |damage=4 | ||
|cancel= | |standdamage=1 | ||
| | |cancel = SP, SU, TA | ||
|invuln = none | |||
|ips = No | |||
|scaling = Yes | |||
|meterwhiff = 2 | |||
|meterhit = 6 | |||
|description= | |description= | ||
Quick jab that can combo into most of your other normals. Can combo into s+j.B on airborne opponents. Somewhat alright as a close anti-air. | |||
*Links into the majority of your other normals. Whiffs on some crouching characters. | *Links into the majority of your other normals. | ||
*Whiffs on some crouching characters. | |||
}} | }} | ||
}} | }} | ||
| Line 53: | Line 121: | ||
{{MoveData | {{MoveData | ||
|image= | |image=Jotaro6B.png|frameless | ||
| | |caption=Stanky Leg. | ||
| | |name=6B | ||
|name= | |||
|data= | |data= | ||
{{AttackData-HFTF | {{AttackData-HFTF | ||
|startup=5 | |||
|startup= | |active=5 | ||
|active= | |recovery=13 | ||
|recovery= | |hit=-1 | ||
|hit=- | |block=-2 | ||
|block=- | |pushblock=-10 | ||
|pushblock=- | |guard=Low | ||
|guard= | |damage=9 | ||
|damage= | |standdamage=4 | ||
|cancel=SP, SU, TA | |cancel=SP, SU, TA | ||
|description= | |description= | ||
* | Your main Stand Off hitconfirm. Excellent counterpoke. | ||
*Incredibly good poke, can combo into 214AA, 236S, 214B, even 214C. | |||
*One of Jotaro's best buttons. | |||
|ips=Yes | |||
|scaling=Yes | |||
|meterwhiff=4 | |||
|meterhit=5 | |||
|additionalinfo= | |||
Jotaro's outstretched foot lacks an extended hurtbox. Jotaro's outstretched foot lacks an extended hurtbox. Jotaro's outstretched foot lacks an extended hurtbox. Jotaro's outstretched foot lacks an extended hurtbox. Jotaro's outstretched foot lacks an extended hurtbox. Jotaro's outstretched foot lacks an extended hurtbox. Jotaro's outstretched foot lacks an extended hurtbox. | |||
}} | |||
}} | |||
<br> | <br> | ||
{{MoveData | |||
|image=HFTF-boingo-623X.png | |||
|name=Glass Shower | |||
|input=623A/B/C | |||
|data= | |||
{{AttackData-HFTF | {{AttackData-HFTF | ||
|version= | |version=623A | ||
|startup= | |startup=10 | ||
|active= | |active= Until ground [Until Ceil.] | ||
|recovery= | |recovery=32 Total | ||
|hit= | |hit= varies | ||
|block= | |block= varies | ||
|pushblock= | |pushblock= varies | ||
|guard= | |guard=High [Mid] | ||
|damage= | |damage= 3×N [12] | ||
| | |standdamage= 6×N [0] | ||
| | |cancel= | ||
}} | }} | ||
{{AttackData-HFTF | {{AttackData-HFTF | ||
|version= | |version=623B/C | ||
|startup= | |startup=12 | ||
|active= | |active= Until ground [Until Ceil.] | ||
|recovery= | |recovery=33 Total | ||
|hit= | |hit= varies | ||
|block= | |block= varies | ||
|pushblock= | |pushblock= varies | ||
|guard= | |guard=High [Mid] | ||
|damage= | |damage= 3×N [12] | ||
|cancel= | |standdamage= 6×N [0] | ||
| | |cancel= | ||
|description= | |noheader=y | ||
|description=Fires an upwards shot, which creates a shower of falling glass upon hitting the ceiling. <br> | |||
A version fires straight up, B fires just in front of Boingo, C fires around half a screen away.<br> | |||
* | Core setup tool. Finds occasional use as an antiair or techchase option. Strong when combined with your other projectiles, as Boingo recovers shortly after the glass spawns. The glass hits overhead, making it a key part of your best setups and okizeme.<br> | ||
'''623B''' is the easiest to use in setups. '''623C''' is a good way to cover a large part of the screen, and the glass falls at the perfect spot to setup unblockables by combining it with '''236C''' / '''236AC'''. <br> | |||
*The glass shards do a lot of chip and Stand Gauge damage, build lots of meter, and have a notoriously weird preblock activation range, causing opponents to get stuck while trying to walk while the glass is out. | |||
*Data in [] indicate values for the bullet. | |||
|ips=Yes [No] | |||
|scaling=Yes [No] | |||
|meterwhiff = 0 | |||
|meterhit=4×N [0] | |||
}} | }} | ||
}} | }} | ||
</noinclude> | </noinclude> | ||
[[Category:JoJo's Bizarre Adventure]] | [[Category:JoJo's Bizarre Adventure]] | ||
Latest revision as of 17:01, 21 January 2025
Placeholder examples.
| 214A | Startup | Active | Recovery | Base Damage | Stand Damage | Guard | Hit Adv. | Block Adv. | Pushblock Adv. | ||||||||||||
|---|---|---|---|---|---|---|---|---|---|---|---|---|---|---|---|---|---|---|---|---|---|
| 14-18 | 2 | 15 Total [0] | 10 | - | Mid | +30-34 | +18-22 | +17-21 | |||||||||||||
| 214B | |||||||||||||||||||||
| 14-18 | 2 | 15 Total [0] | 10 | - | Mid | +30-34 | +18-22 | +17-21 | |||||||||||||
| 214C | |||||||||||||||||||||
| 14-18 | 2 | 15 Total [0] | 10 | - | Mid | +30-34 | +18-22 | +17-21 | |||||||||||||
|
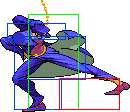
Star Platinum rushes forward before delivering a punch. A very useful special both in combos and pressure, as well as a rare neutral tool when used as a makeshift fireball. 214B will be the version you'll use the most and is the basis of your Stand OFF combos.
| |||||||||||||||||||||
| Startup | Active | Recovery | Base Damage | Stand Damage | Guard | Hit Adv. | Block Adv. | Pushblock Adv. | ||||||||||||
|---|---|---|---|---|---|---|---|---|---|---|---|---|---|---|---|---|---|---|---|---|
| 3 | 2 | 2 | 4 | 1 | Mid | +5 | +7 | +4 | ||||||||||||
|
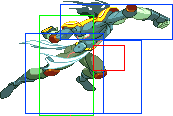
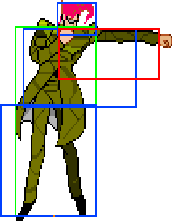
Quick jab that can combo into most of your other normals. Can combo into s+j.B on airborne opponents. Somewhat alright as a close anti-air.
| ||||||||||||||||||||
| Startup | Active | Recovery | Base Damage | Stand Damage | Guard | Hit Adv. | Block Adv. | Pushblock Adv. | ||||||||||||||||||
|---|---|---|---|---|---|---|---|---|---|---|---|---|---|---|---|---|---|---|---|---|---|---|---|---|---|---|
| 5 | 5 | 13 | 9 | 4 | Low | -1 | -2 | -10 | ||||||||||||||||||
|
Your main Stand Off hitconfirm. Excellent counterpoke.
| ||||||||||||||||||||||||||
| 623A | Startup | Active | Recovery | Base Damage | Stand Damage | Guard | Hit Adv. | Block Adv. | Pushblock Adv. | ||||||||||||
|---|---|---|---|---|---|---|---|---|---|---|---|---|---|---|---|---|---|---|---|---|---|
| 10 | Until ground [Until Ceil.] | 32 Total | 3×N [12] | 6×N [0] | High [Mid] | varies | varies | varies | |||||||||||||
| 623B/C | |||||||||||||||||||||
| 12 | Until ground [Until Ceil.] | 33 Total | 3×N [12] | 6×N [0] | High [Mid] | varies | varies | varies | |||||||||||||
|
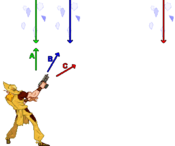
Fires an upwards shot, which creates a shower of falling glass upon hitting the ceiling.
| |||||||||||||||||||||


