Lichmassacre (talk | contribs) m (→Data: Unnecessary.) |
Mr. yagami91 (talk | contribs) No edit summary |
||
| Line 27: | Line 27: | ||
===Colors=== | ===Colors=== | ||
{| | |||
! [[image:snka.gif]] | |||
! [[image:snkb.gif]] | |||
! [[image:snkc.gif]] | |||
! [[image:snkd.gif]] | |||
|- | |||
|[[File:KOF2003 Shen colour A.png]] | |||
|[[File:KOF2003 Shen colour B.png]] | |||
|[[File:KOF2003 Shen colour C.png]] | |||
|[[File:KOF2003 Shen colour D.png]] | |||
|} | |||
==Movelist== | ==Movelist== | ||
| Line 54: | Line 64: | ||
|invul=- | |invul=- | ||
|description= | |description= | ||
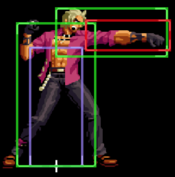
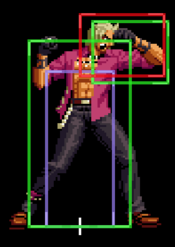
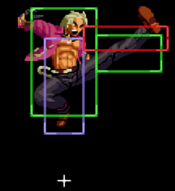
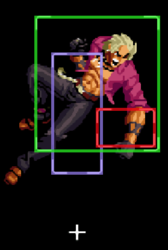
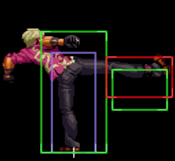
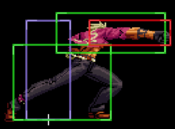
standard jab with quick and good range, useful for stopping hops | |||
}} | }} | ||
}} | }} | ||
| Line 82: | Line 91: | ||
|description= | |description= | ||
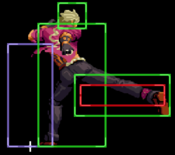
*despite appearances, this is not a low | *despite appearances, this is not a low | ||
* | *alot of active frames | ||
*if timmed as a meaty, you can link MSA/another st.B/Kouhyou Rengeki after | |||
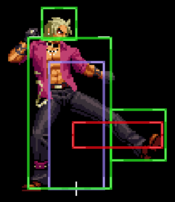
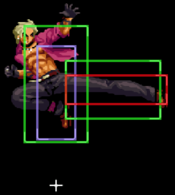
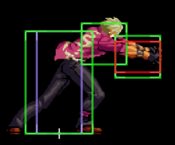
a very good poke due to the ton of active frame it has, use this at close range poke. | |||
}} | }} | ||
}} | }} | ||
| Line 110: | Line 121: | ||
*whiffs on a crouching malin | *whiffs on a crouching malin | ||
*doesn't have armor on it compared to later iterations | *doesn't have armor on it compared to later iterations | ||
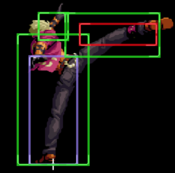
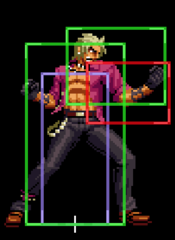
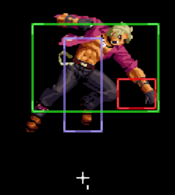
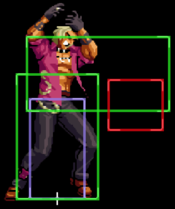
can be a decent anti-air, it's alittle on the slow side in terms of start-up and recovery | |||
}} | }} | ||
}} | }} | ||
| Line 135: | Line 147: | ||
|invul=- | |invul=- | ||
|description= | |description= | ||
*whiffs on all crouchers | *whiffs on all crouchers | ||
*moves shen forward alittle bit | *moves shen forward alittle bit | ||
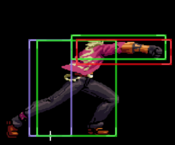
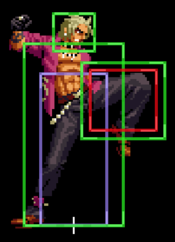
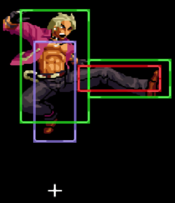
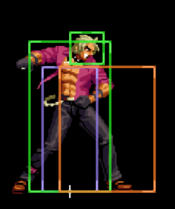
optimal anti-air, useful for hitting people hopping at him from a distance. just be careful whiffing this due to horrible recovery. | |||
}} | }} | ||
}} | }} | ||
| Line 190: | Line 202: | ||
|description= | |description= | ||
*much like st.B, this hits mid | *much like st.B, this hits mid | ||
*doesn't have much use. | |||
}} | }} | ||
}} | }} | ||
| Line 269: | Line 282: | ||
|invul=- | |invul=- | ||
|description= | |description= | ||
st.A but crouching, slightly less range but still useful | |||
}} | }} | ||
}} | }} | ||
| Line 294: | Line 308: | ||
|invul=- | |invul=- | ||
|description= | |description= | ||
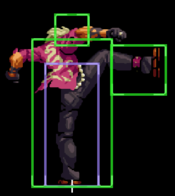
a cr.B that links into itself and cr.A, doesn't have the best reach. still important for shen. | |||
}} | }} | ||
}} | }} | ||
| Line 320: | Line 335: | ||
|invul=- | |invul=- | ||
|description= | |description= | ||
*only the 1st hit is cancelable | *only the 1st hit is cancelable | ||
optiomal anti-air, be careful if this whiffs as you recover slowly. | |||
}} | }} | ||
}} | }} | ||
| Line 373: | Line 388: | ||
|invul=- | |invul=- | ||
|description= | |description= | ||
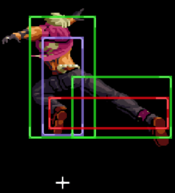
*same as jp.A but with a lowered hitbox | |||
}} | }} | ||
}} | }} | ||
| Line 398: | Line 414: | ||
|invul=- | |invul=- | ||
|description= | |description= | ||
*good for hitting people above shen, but other than that, it's | *good for hitting people above shen, but other than that, it's doesn't really alot of use | ||
}} | |||
}} | }} | ||
| Line 424: | Line 440: | ||
|invul=- | |invul=- | ||
|description= | |description= | ||
*same as jp.C but with a lowered hitbox and slightly smaller hurtbox | |||
}} | }} | ||
}} | }} | ||
| Line 475: | Line 492: | ||
|advBlock= | |advBlock= | ||
|invul=- | |invul=- | ||
|description= | |description= | ||
*can be a decent instant overhead | |||
*overshadowed by other normals | |||
}} | |||
}} | }} | ||
| Line 527: | Line 546: | ||
|invul=- | |invul=- | ||
|description= | |description= | ||
*good as a jump-in, terrible as a air-to-air | |||
}} | |||
}} | }} | ||
| Line 552: | Line 572: | ||
|invul=- | |invul=- | ||
|description= | |description= | ||
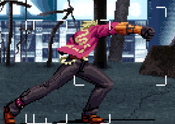
*shen's most commonly used jump-in, hits at a good angle and has a pretty decent hitbox, use it for zoning and as a jump-in | |||
}} | }} | ||
}} | }} | ||
| Line 578: | Line 599: | ||
*hardknockdown | *hardknockdown | ||
*leaves the opponent next to shen | *leaves the opponent next to shen | ||
*it's possible to create an ambigous roll mix-up | |||
}} | }} | ||
}} | }} | ||
| Line 604: | Line 626: | ||
|invul=Strike/Projectile | |invul=Strike/Projectile | ||
|description= | |description= | ||
*shen's MSA is his cl.C, this MSA has decent range and can also be used as an anti-air like most MSA's | |||
}} | }} | ||
}} | }} | ||
| Line 656: | Line 679: | ||
|invul=- | |invul=- | ||
|description= | |description= | ||
* | *overhead | ||
*pretty slow to come out | *pretty slow to come out | ||
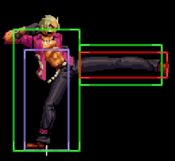
despite the appearance, this is actually his overhead. can catch some people off guard but it's fairly reactable due to the slow start-up. it also doesn't have great range which can be problem when used in combos. | |||
}} | |||
}} | }} | ||
| Line 685: | Line 707: | ||
|invul=- | |invul=- | ||
|description= | |description= | ||
*shen does a slow spin around before doing a fast kick horizontal | *shen does a slow spin around before doing a fast kick horizontal that knocksdown on hit. | ||
*Is cancelable from his normals but is too slow to combo from anything | |||
*cancelable from his normals but is too slow to combo from anything | |||
*i don't recommend using this | *i don't recommend using this | ||
}} | }} | ||
| Line 745: | Line 766: | ||
|invul=- | |invul=- | ||
|description=* Can be cancelled with K. | |description=* Can be cancelled with K. | ||
*unsafe no matter the distance | |||
}} | }} | ||
{{AttackData-KoF03 | {{AttackData-KoF03 | ||
| Line 762: | Line 784: | ||
|description=* Can be cancelled with K. | |description=* Can be cancelled with K. | ||
*if fully charged it will become unblockable | *if fully charged it will become unblockable | ||
*unsafe no matter the distance | |||
}} | }} | ||
}} | }} | ||
| Line 806: | Line 829: | ||
|invul=- | |invul=- | ||
|description= | |description= | ||
*mainly used as a combo ender | *1st hit has much more range than the animation implies | ||
*does alot of stun dmg | |||
mainly for show. used as a combo ender | |||
}} | }} | ||
}} | }} | ||
| Line 833: | Line 858: | ||
|invul=- | |invul=- | ||
|description= | |description= | ||
* | *prioximity unblockable | ||
*can | *re-stand's the opponent | ||
*can reflect projectiles that's not a super | |||
this is shen's command grab; however, it's not treated like one, rather it's a proximity unblockable that allows you to combo after it. If you K.O with your command grab, shen will be in the perfect position to cross-up the opponent. just be aware that it has short range, not invinicbile and has very few active frames. | |||
}} | }} | ||
}} | }} | ||
| Line 865: | Line 890: | ||
*heavy version has upper body invinicibility | *heavy version has upper body invinicibility | ||
*will cause a counter-wire on counter hit | *will cause a counter-wire on counter hit | ||
an enhanced version of his geki ken, mainly used in combos where kohyou rengeki will whiff. you can also use it to beat projeciles, but whichever version you use depends on the projectile. | |||
}} | }} | ||
}} | }} | ||
| Line 892: | Line 917: | ||
|invul=- | |invul=- | ||
|description= | |description= | ||
*invinicbile on start-up | *invinicbile on start-up | ||
*this | *when used in combo's only the inital hit adds up to the combo counter, this causes the move to be almost unscaled in any combo. | ||
}} | |||
}} | }} | ||
| Line 917: | Line 942: | ||
|advBlock= | |advBlock= | ||
|invul=- | |invul=- | ||
|description= shen's install super | |description= | ||
*shen's install super, this LDM power up shen's damage output, allowing easy 50-60% combos. | |||
*the | *the buff will last 7 in-game seconds | ||
*if canceled into, shen will skip the start-up of the move | *if canceled into, shen will skip the start-up of the move | ||
despite what's been mention, there alot of drawbacks to using this: | despite what's been mention, there alot of drawbacks to using this: | ||
*a unique drawback of this move is that shen's | *a unique drawback of this move is that shen's will take much more stun dmg (this is noticeable when hitting his head) | ||
*when done raw, it starts up extremly slow, leaving you wide open to be punished | *when done raw, it starts up extremly slow, leaving you wide open to be punished | ||
*it has | *it has extremely small hitbox upon activation | ||
*you can not build meter while in the buffed state | *you can not build meter while in the buffed state | ||
overall,shen as a leader is not recommended, as he gains major drawbacks using his LDM | overall,shen as a leader is not recommended, as he gains major drawbacks using his LDM | ||
all for the price of more dmg | all for the price of more dmg. | ||
}} | }} | ||
}} | }} | ||
| Line 939: | Line 963: | ||
==Combos== | ==Combos== | ||
''' | *st.C/st.D/cr.C | ||
**f.B,qcf P | |||
***qcfqcf P | |||
*st.B (must be done meaty) | |||
**st.B | |||
**qcfqcfK | |||
*jp.C/jp.D | |||
**st.C/st.D/cr.C (don't implement a f.B, it will whiff) | |||
***qcb A~qcf A (does alot of stun) | |||
***qcf P | |||
****qcfqcf P (2 bars) | |||
****qcfqcf K (2 bars,does 50% health) | |||
*hcb,F,C,run-up st.C/st.D | |||
**anything you want | |||
'''MSA set-ups(1 bar):''' | |||
*hcb,F,C,run-up st.C,MSA (main MSA starter) | |||
*meaty st.B,MSA (hard) | |||
*f.B,MSA (corner only, useless) | |||
'''MSA ender:''' | |||
standing: | |||
*anything you want | |||
in air: | |||
*any jumping normal | |||
*qcfqcf K | |||
==Strategy== | ==Strategy== | ||
Revision as of 00:42, 23 July 2022
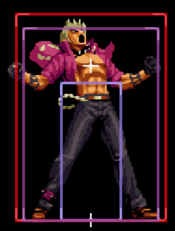
Introduction
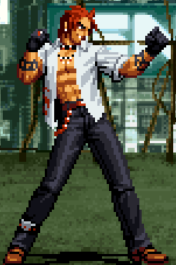
「 Shen Woo 」
Shen is a character that excels on melee, he usually has problems with characters that can stay away and safe from his Zetsu geki ken (qcfx2 + P) using low projectiles. (Iori for example)
In general, he is a fairly solid mid-tier character and with a few interesting options that we will list throughout this page:
| Strengths | Weaknesses |
|---|---|
|
|
Colors
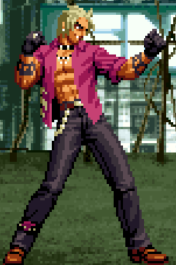
|
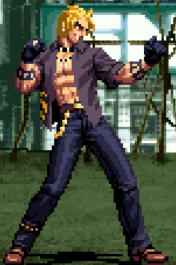
|
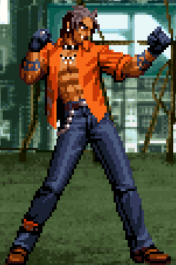
|
|
Movelist
Normals
Far Normals
| Damage | Counter Dmg | Guard | Guard Damage | Damage Scaling | Stun | CH Stun | Meter | Cancel Properties | Startup | Active | Recovery | Total | Hit Advantage | Block Advantage | Invulnerability |
|---|---|---|---|---|---|---|---|---|---|---|---|---|---|---|---|
| - | - | Mid | - | - | - | - | - | Special/Super | - | - | - | - | - | - | - |
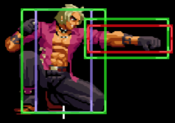
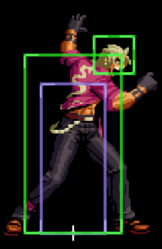
standard jab with quick and good range, useful for stopping hops | |||||||||||||||
| Damage | Counter Dmg | Guard | Guard Damage | Damage Scaling | Stun | CH Stun | Meter | Cancel Properties | Startup | Active | Recovery | Total | Hit Advantage | Block Advantage | Invulnerability |
|---|---|---|---|---|---|---|---|---|---|---|---|---|---|---|---|
| - | - | Mid | - | - | - | - | - | none | - | - | - | - | - | - | - |
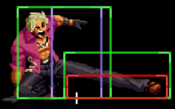
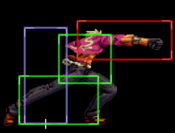
a very good poke due to the ton of active frame it has, use this at close range poke. | |||||||||||||||
| Damage | Counter Dmg | Guard | Guard Damage | Damage Scaling | Stun | CH Stun | Meter | Cancel Properties | Startup | Active | Recovery | Total | Hit Advantage | Block Advantage | Invulnerability |
|---|---|---|---|---|---|---|---|---|---|---|---|---|---|---|---|
| - | - | Mid | - | - | - | - | - | none | - | - | - | - | - | - | - |
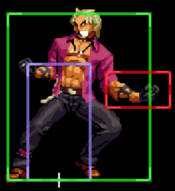
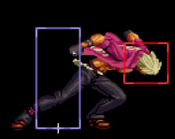
can be a decent anti-air, it's alittle on the slow side in terms of start-up and recovery | |||||||||||||||
| Damage | Counter Dmg | Guard | Guard Damage | Damage Scaling | Stun | CH Stun | Meter | Cancel Properties | Startup | Active | Recovery | Total | Hit Advantage | Block Advantage | Invulnerability |
|---|---|---|---|---|---|---|---|---|---|---|---|---|---|---|---|
| - | - | Mid | - | - | - | - | - | none | - | - | - | - | - | - | - |
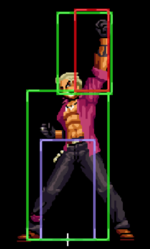
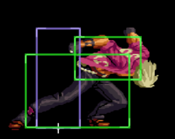
optimal anti-air, useful for hitting people hopping at him from a distance. just be careful whiffing this due to horrible recovery. | |||||||||||||||
Close Range Normals
| Damage | Counter Dmg | Guard | Guard Damage | Damage Scaling | Stun | CH Stun | Meter | Cancel Properties | Startup | Active | Recovery | Total | Hit Advantage | Block Advantage | Invulnerability |
|---|---|---|---|---|---|---|---|---|---|---|---|---|---|---|---|
| - | - | Mid | - | - | - | - | - | CMD/Special/Super | - | - | - | - | - | - | - |
| Damage | Counter Dmg | Guard | Guard Damage | Damage Scaling | Stun | CH Stun | Meter | Cancel Properties | Startup | Active | Recovery | Total | Hit Advantage | Block Advantage | Invulnerability |
|---|---|---|---|---|---|---|---|---|---|---|---|---|---|---|---|
| - | - | Mid | - | - | - | - | - | none | - | - | - | - | - | - | - |
| |||||||||||||||
| Damage | Counter Dmg | Guard | Guard Damage | Damage Scaling | Stun | CH Stun | Meter | Cancel Properties | Startup | Active | Recovery | Total | Hit Advantage | Block Advantage | Invulnerability |
|---|---|---|---|---|---|---|---|---|---|---|---|---|---|---|---|
| - | - | Mid | - | - | - | - | - | CMD/Special/Super | - | - | - | - | - | - | - |
| |||||||||||||||
Crouching Normals
| Damage | Counter Dmg | Guard | Guard Damage | Damage Scaling | Stun | CH Stun | Meter | Cancel Properties | Startup | Active | Recovery | Total | Hit Advantage | Block Advantage | Invulnerability |
|---|---|---|---|---|---|---|---|---|---|---|---|---|---|---|---|
| - | - | Mid | - | - | - | - | - | CMD/Special/Super | - | - | - | - | - | - | - |
st.A but crouching, slightly less range but still useful | |||||||||||||||
| Damage | Counter Dmg | Guard | Guard Damage | Damage Scaling | Stun | CH Stun | Meter | Cancel Properties | Startup | Active | Recovery | Total | Hit Advantage | Block Advantage | Invulnerability |
|---|---|---|---|---|---|---|---|---|---|---|---|---|---|---|---|
| - | - | Low | - | - | - | - | - | none | - | - | - | - | - | - | - |
a cr.B that links into itself and cr.A, doesn't have the best reach. still important for shen. | |||||||||||||||
| Damage | Counter Dmg | Guard | Guard Damage | Damage Scaling | Stun | CH Stun | Meter | Cancel Properties | Startup | Active | Recovery | Total | Hit Advantage | Block Advantage | Invulnerability |
|---|---|---|---|---|---|---|---|---|---|---|---|---|---|---|---|
| - | - | Mid | - | - | - | - | - | CMD/Special/Super | - | - | - | - | - | - | - |
optiomal anti-air, be careful if this whiffs as you recover slowly. | |||||||||||||||
| Damage | Counter Dmg | Guard | Guard Damage | Damage Scaling | Stun | CH Stun | Meter | Cancel Properties | Startup | Active | Recovery | Total | Hit Advantage | Block Advantage | Invulnerability |
|---|---|---|---|---|---|---|---|---|---|---|---|---|---|---|---|
| - | - | Low | - | - | - | - | - | none | - | - | - | - | KD | - | - |
Neutral Jumping Normals
| Damage | Counter Dmg | Guard | Guard Damage | Damage Scaling | Stun | CH Stun | Meter | Cancel Properties | Startup | Active | Recovery | Total | Hit Advantage | Block Advantage | Invulnerability |
|---|---|---|---|---|---|---|---|---|---|---|---|---|---|---|---|
| - | - | Overhead | - | - | - | - | - | - | - | - | - | - | - | - | - |
| |||||||||||||||
Diagonal Jump Normals
| Damage | Counter Dmg | Guard | Guard Damage | Damage Scaling | Stun | CH Stun | Meter | Cancel Properties | Startup | Active | Recovery | Total | Hit Advantage | Block Advantage | Invulnerability |
|---|---|---|---|---|---|---|---|---|---|---|---|---|---|---|---|
| - | - | Overhead | - | - | - | - | - | - | - | - | - | - | - | - | - |
| |||||||||||||||
Throws
| Damage | Counter Dmg | Guard | Guard Damage | Damage Scaling | Stun | CH Stun | Meter | Cancel Properties | Startup | Active | Recovery | Total | Hit Advantage | Block Advantage | Invulnerability |
|---|---|---|---|---|---|---|---|---|---|---|---|---|---|---|---|
| - | - | Throw | - | - | - | - | - | - | - | - | - | - | - | - | - |
| |||||||||||||||
MSA
| Damage | Counter Dmg | Guard | Guard Damage | Damage Scaling | Stun | CH Stun | Meter | Cancel Properties | Startup | Active | Recovery | Total | Hit Advantage | Block Advantage | Invulnerability |
|---|---|---|---|---|---|---|---|---|---|---|---|---|---|---|---|
| - | - | Mid | - | - | - | - | - | - | - | - | - | - | - | - | Strike/Projectile |
| |||||||||||||||
| Damage | Counter Dmg | Guard | Guard Damage | Damage Scaling | Stun | CH Stun | Meter | Cancel Properties | Startup | Active | Recovery | Total | Hit Advantage | Block Advantage | Invulnerability |
|---|---|---|---|---|---|---|---|---|---|---|---|---|---|---|---|
| - | - | Mid | - | - | - | - | - | - | - | - | - | - | - | - | - |
Command Normals
| Damage | Counter Dmg | Guard | Guard Damage | Damage Scaling | Stun | CH Stun | Meter | Cancel Properties | Startup | Active | Recovery | Total | Hit Advantage | Block Advantage | Invulnerability |
|---|---|---|---|---|---|---|---|---|---|---|---|---|---|---|---|
| - | - | Mid | - | - | - | - | - | none | - | - | - | - | - | - | - |
despite the appearance, this is actually his overhead. can catch some people off guard but it's fairly reactable due to the slow start-up. it also doesn't have great range which can be problem when used in combos. | |||||||||||||||
| Damage | Counter Dmg | Guard | Guard Damage | Damage Scaling | Stun | CH Stun | Meter | Cancel Properties | Startup | Active | Recovery | Total | Hit Advantage | Block Advantage | Invulnerability |
|---|---|---|---|---|---|---|---|---|---|---|---|---|---|---|---|
| - | - | Mid | - | - | - | - | - | none | - | - | - | - | - | - | - |
| |||||||||||||||
| Damage | Counter Dmg | Guard | Guard Damage | Damage Scaling | Stun | CH Stun | Meter | Cancel Properties | Startup | Active | Recovery | Total | Hit Advantage | Block Advantage | Invulnerability |
|---|---|---|---|---|---|---|---|---|---|---|---|---|---|---|---|
| - | - | Mid | - | - | - | - | - | - | - | - | - | - | - | - | - |
| |||||||||||||||
Special Moves
| Damage | Counter Dmg | Guard | Guard Damage | Damage Scaling | Stun | CH Stun | Meter | Cancel Properties | Startup | Active | Recovery | Total | Hit Advantage | Block Advantage | Invulnerability |
|---|---|---|---|---|---|---|---|---|---|---|---|---|---|---|---|
| - | - | - | - | - | - | - | - | - | - | - | - | - | - | - | - |
this is shen's command grab; however, it's not treated like one, rather it's a proximity unblockable that allows you to combo after it. If you K.O with your command grab, shen will be in the perfect position to cross-up the opponent. just be aware that it has short range, not invinicbile and has very few active frames. | |||||||||||||||
Super Moves
| Damage | Counter Dmg | Guard | Guard Damage | Damage Scaling | Stun | CH Stun | Meter | Cancel Properties | Startup | Active | Recovery | Total | Hit Advantage | Block Advantage | Invulnerability |
|---|---|---|---|---|---|---|---|---|---|---|---|---|---|---|---|
| - | - | - | - | - | - | - | - | - | - | - | - | - | - | - | - |
an enhanced version of his geki ken, mainly used in combos where kohyou rengeki will whiff. you can also use it to beat projeciles, but whichever version you use depends on the projectile. | |||||||||||||||
| Damage | Counter Dmg | Guard | Guard Damage | Damage Scaling | Stun | CH Stun | Meter | Cancel Properties | Startup | Active | Recovery | Total | Hit Advantage | Block Advantage | Invulnerability |
|---|---|---|---|---|---|---|---|---|---|---|---|---|---|---|---|
| - | - | - | - | - | - | - | - | - | - | - | - | - | - | - | - |
| |||||||||||||||
LDM
| Damage | Counter Dmg | Guard | Guard Damage | Damage Scaling | Stun | CH Stun | Meter | Cancel Properties | Startup | Active | Recovery | Total | Hit Advantage | Block Advantage | Invulnerability |
|---|---|---|---|---|---|---|---|---|---|---|---|---|---|---|---|
| - | - | - | - | - | - | - | - | - | - | - | - | - | - | - | - |
despite what's been mention, there alot of drawbacks to using this:
overall,shen as a leader is not recommended, as he gains major drawbacks using his LDM all for the price of more dmg. | |||||||||||||||
Battle
UNDER CONSTRUCTION
Attack Strings
UNDER CONSTRUCTION
Combos
- st.C/st.D/cr.C
- f.B,qcf P
- qcfqcf P
- f.B,qcf P
- st.B (must be done meaty)
- st.B
- qcfqcfK
- jp.C/jp.D
- st.C/st.D/cr.C (don't implement a f.B, it will whiff)
- qcb A~qcf A (does alot of stun)
- qcf P
- qcfqcf P (2 bars)
- qcfqcf K (2 bars,does 50% health)
- st.C/st.D/cr.C (don't implement a f.B, it will whiff)
- hcb,F,C,run-up st.C/st.D
- anything you want
MSA set-ups(1 bar):
- hcb,F,C,run-up st.C,MSA (main MSA starter)
- meaty st.B,MSA (hard)
- f.B,MSA (corner only, useless)
MSA ender:
standing:
- anything you want
in air:
- any jumping normal
- qcfqcf K
Strategy
UNDER CONSTRUCTION
Match Up
UNDER CONSTRUCTION
| - Ash:
| - Duo Lon:
| - Shen:
| - Terry:
| - Joe:
| - Tizoc:
| - Ryo:
| - Robert:
| - Yuri:
| - Kim:
| - Chang:
| - Jhun:
| - Leona:
| - Ralf:
| - Clark:
| - Gato:
| - Billy:
| - Yamazaki:
| - King:
| - Mai:
| - Mary:
| - Benimaru:
| - Shingo:
| - Daimon:
| - Athena:
| - Hinako:
| - Malin:
| - K':
| - Maxima:
| - Whip:
| - Kyo:
| - Chizuru:
| - KUSANAGI:
| - Maki:
| - Adelheid:
| - Mukai:
