No edit summary |
No edit summary |
||
| Line 23: | Line 23: | ||
== Video Guides == | == Video Guides == | ||
====[https://www.youtube.com/user/SupermanSajam Sajam's] Character Breakdown==== | ====[https://www.youtube.com/user/SupermanSajam Sajam's] Character Breakdown==== | ||
<youtube>cjhkrafLpVM</youtube><br> | <youtube>cjhkrafLpVM</youtube><br> | ||
Revision as of 22:02, 23 February 2016
Zangief
| ||||||||||||||||||||||||||||||||||||||||||||||||||||||||||||||||||||||||||||||
Summary
Bio
TBW
Why Pick Zangief?
(As Street Fighter V is new, this section will be filled out after we learn more about how this character plays most effectively.)
Players To Watch
{{{5}}}
Move List
Unique Attacks
Special Moves
V-System (V-Trigger / V-Skill / V-Reversal)
Critical Art
Zangief Discussions
Discussions regarding Zangief
Zangief Discord Link
Video Guides
Sajam's Character Breakdown
UltraChenTV's Character Breakdown
Frame Data
- Champion Edition data courtesy of @D4RK_ONION, @HatsonFGC, @Arlieth, @Frostdiener, BananaCyclone and the Frame Assist Tool team. - Huge thanks for their efforts! - See https://fullmeter.com/fatonline/#/home for more information
| Move Name | Command | Startup | Active | Rcvry | Adv Guard |
Adv Hit |
Adv Counter |
Damage | Stun | Hit Level |
Cancel Ability |
KD Adv Normal |
KD Adv Rise |
KD Adv Roll |
Chip Damage |
Counter Damage |
Counter Stun |
|---|---|---|---|---|---|---|---|---|---|---|---|---|---|---|---|---|---|
| stand LP | 7 | 40 | 70 | 4 | 7 | 5 | 3 | 5f s.lp as anti-air | {{{22}}} | {{{23}}} | {{{24}}} | {{{25}}} | {{{26}}} | ||||
| stand MP | 6 | 70 | 100 | 2 | 12 | 3 | 1 | {{{22}}} | {{{23}}} | {{{24}}} | {{{25}}} | {{{26}}} | |||||
| stand HP (hold) | 16(37) | 100(130) | 150 | 94 | 4 | 23 | 1 (KD) | -3 (1) | {{{22}}} | {{{23}}} | {{{24}}} | {{{25}}} | {{{26}}} | ||||
| stand LK | 5 | 30 | 70 | 2 | 12 | 2 | 0 | {{{22}}} | {{{23}}} | {{{24}}} | {{{25}}} | {{{26}}} | |||||
| stand MK | 9 | 70 | 100 | 3 | 17 | 0 | -3 | {{{22}}} | {{{23}}} | {{{24}}} | {{{25}}} | {{{26}}} | |||||
| stand HK | 11 | 90 | 150 | 4 | 22 | 1 | -2 | {{{22}}} | {{{23}}} | {{{24}}} | {{{25}}} | {{{26}}} | |||||
| crouch LP | 4 | 30 | 70 | 3 | 6 | 5 | 3 | {{{22}}} | {{{23}}} | {{{24}}} | {{{25}}} | {{{26}}} | |||||
| crouch MP | 7 | 60 | 100 | 3 | 12 | 5 | 3 | {{{22}}} | {{{23}}} | {{{24}}} | {{{25}}} | {{{26}}} | |||||
| crouch HP | 9 | 100 | 150 | 6 | 20 | 1 | -4 | {{{22}}} | {{{23}}} | {{{24}}} | {{{25}}} | {{{26}}} | |||||
| crouch LK | 4 | 30 | 70 | 2 | 8 | 4 | 1 | {{{22}}} | {{{23}}} | {{{24}}} | {{{25}}} | {{{26}}} | |||||
| crouch MK | 8 | 60 | 100 | 2 | 16 | 0 | -4 | {{{22}}} | {{{23}}} | {{{24}}} | {{{25}}} | {{{26}}} | |||||
| crouch HK | 10 | 100 | 150 | 68 | 3 | 26 | KD | -10 | {{{22}}} | {{{23}}} | {{{24}}} | {{{25}}} | {{{26}}} | ||||
| jump LP | 5 | 50 | 70 | 5 | - | - | - | {{{22}}} | {{{23}}} | {{{24}}} | {{{25}}} | {{{26}}} | |||||
| jump MP | 6 | 80 | 100 | 4 | - | - | - | {{{22}}} | {{{23}}} | {{{24}}} | {{{25}}} | {{{26}}} | |||||
| jump HP | 7 | 100 | 150 | 6 | - | - | - | {{{22}}} | {{{23}}} | {{{24}}} | {{{25}}} | {{{26}}} | |||||
| jump LK | 6 | 50 | 70 | 5 | - | - | - | {{{22}}} | {{{23}}} | {{{24}}} | {{{25}}} | {{{26}}} | |||||
| jump MK | 7 | 70 | 100 | 3 | - | - | - | {{{22}}} | {{{23}}} | {{{24}}} | {{{25}}} | {{{26}}} | |||||
| jump HK | 9 | 100 | 150 | 5 | - | - | - | {{{22}}} | {{{23}}} | {{{24}}} | {{{25}}} | {{{26}}} | |||||
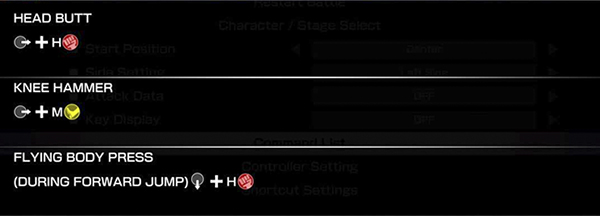
| head butt | 12 | 100 | 200 | 4 | 14 | 7 | 2 | {{{22}}} | {{{23}}} | {{{24}}} | {{{25}}} | {{{26}}} | |||||
| knee hammer | 12 | 70 | 100 | 4 | 12 | 3 | -3 | {{{22}}} | {{{23}}} | {{{24}}} | {{{25}}} | {{{26}}} | |||||
| flying body press | 7 | 100 | 150 | 7 | - | - | {{{22}}} | {{{23}}} | {{{24}}} | {{{25}}} | {{{26}}} | ||||||
| atomic drop | 5 | 130 | 170 | 64 | 2 | 18 | KD | - | {{{22}}} | {{{23}}} | {{{24}}} | {{{25}}} | {{{26}}} | ||||
| captured | 5 | 130 | 170 | 74 | 2 | 18 | KD | - | {{{22}}} | {{{23}}} | {{{24}}} | {{{25}}} | {{{26}}} | ||||
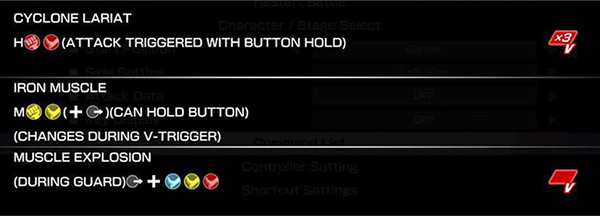
| cyclone lariat | 27 | 20x9 | 20x8*90 | 131 | KD | {{{22}}} | {{{23}}} | {{{24}}} | {{{25}}} | {{{26}}} | |||||||
| iron muscle | 50 | 100 | 25 | 2 | -2 | {{{22}}} | {{{23}}} | {{{24}}} | {{{25}}} | {{{26}}} | |||||||
| muscle explosion | 10 | 60 | 0 | 2 | 17 | 3 | -2 | {{{22}}} | {{{23}}} | {{{24}}} | {{{25}}} | {{{26}}} | |||||
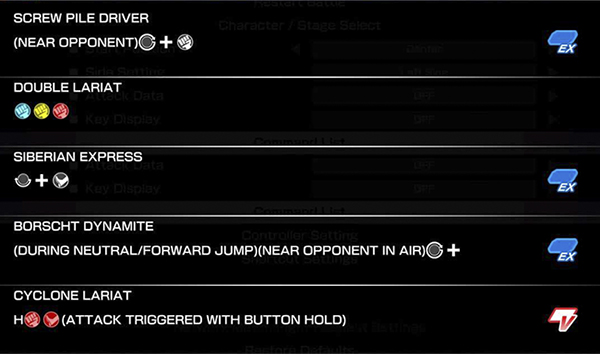
| screw pile driver LP | 5 | 180 | 250 | 71 | 2 | 52 | KD | - | {{{22}}} | {{{23}}} | {{{24}}} | {{{25}}} | {{{26}}} | ||||
| screw pile driver MP | 5 | 200 | 250 | 76 | 2 | 52 | KD | - | {{{22}}} | {{{23}}} | {{{24}}} | {{{25}}} | {{{26}}} | ||||
| screw pile driver HP | 5 | 240 | 250 | 76 | 2 | 52 | KD | - | {{{22}}} | {{{23}}} | {{{24}}} | {{{25}}} | {{{26}}} | ||||
| screw pile driver EX | 5 | 240 | 300 | 76 | 2 | 52 | KD | - | {{{22}}} | {{{23}}} | {{{24}}} | {{{25}}} | {{{26}}} | ||||
| double lariat | 9 | 100 | 200 | 75 | 6(5)4(8)3 | 31 | KD | -35 | {{{22}}} | {{{23}}} | {{{24}}} | {{{25}}} | {{{26}}} | ||||
| siberian express LK | 17 | 170 | 200 | 73 | 2 | 52 | KD | - | {{{22}}} | {{{23}}} | {{{24}}} | {{{25}}} | {{{26}}} | ||||
| siberian express MK | 23 | 200 | 200 | 73 | 2 | 52 | KD | - | {{{22}}} | {{{23}}} | {{{24}}} | {{{25}}} | {{{26}}} | ||||
| siberian express HK | 30 | 220 | 200 | 73 | 2 | 52 | KD | - | {{{22}}} | {{{23}}} | {{{24}}} | {{{25}}} | {{{26}}} | ||||
| siberian express EX | 15 | 200 | 200 | 68 | 2 | 52 | KD | - | {{{22}}} | {{{23}}} | {{{24}}} | {{{25}}} | {{{26}}} | ||||
| borscht dynamite LP | 3 | 50*130 | 100*150 | 72 | 4 | 37 | KD | - | {{{22}}} | {{{23}}} | {{{24}}} | {{{25}}} | {{{26}}} | ||||
| borscht dynamite MP | 3 | 50*150 | 100*150 | 72 | 4 | 37 | KD | - | {{{22}}} | {{{23}}} | {{{24}}} | {{{25}}} | {{{26}}} | ||||
| borscht dynamite HP | 3 | 50*170 | 100*150 | 72 | 4 | 37 | KD | - | {{{22}}} | {{{23}}} | {{{24}}} | {{{25}}} | {{{26}}} | ||||
| borscht dynamite EX | 4 | 50*150 | 100*150 | 76 | 4 | 37 | KD | - | {{{22}}} | {{{23}}} | {{{24}}} | {{{25}}} | {{{26}}} | ||||
| bolshoi russian suplex | 1 | 50*50*300 | 0 | 60 | 2 | 65 | KD | - | {{{22}}} | {{{23}}} | {{{24}}} | {{{25}}} | {{{26}}} | ||||
| Move Name | Command | Startup | Active | Rcvry | Adv Guard |
Adv Hit |
Adv Counter |
Damage | Stun | Hit Level |
Cancel Ability |
KD Adv Normal |
KD Adv Rise |
KD Adv Roll |
Chip Damage |
Counter Damage |
Counter Stun |


