| Line 16: | Line 16: | ||
=== Normal Moves === | === Normal Moves === | ||
*<b>Standing Normal Moves (st.)</b> | |||
{{SF2HFMoveListHeader}} | |||
{{SF2HFMoveListRow | Standing Light Punch or Kick | lp or lk | 4+0 | - | 4 | 40 | 5 | 4 | 5 | +5/+6 | specialcancel }} | |||
{{SF2HFMoveListRow | Standing Medium Punch or Kick | mp or mk | 10+2 | - | 8 | 60 | 6 | 4 | 7 | +8/+9 | }} | |||
{{SF2HFMoveListRow | Standing Hard Punch or Kick | hp or hk | 14+4 | - | 14 | 80 | 8 | 6 | 19 | -2/-1 | }} | |||
{{MoveListFooter}} | |||
*<b>Crouching Normal Moves (cr.)</b> | |||
{{SF2HFMoveListHeader}} | |||
{{SF2HFMoveListRow | Crouching Light Punch | d + lp | 4+0 | - | 4 | 40 | 5 | 4 | 4 | +6/+7 | specialcancel }} | |||
{{SF2HFMoveListRow | Crouching Medium Punch | d + mp | 10+2 | - | 8 | 60 | 6 | 4 | 7* | +8/+9 | }} | |||
{{SF2HFMoveListRow | Crouching Hard Punch | d + hp | 14+4 | - | 14 | 80 | 8 | 6 | 19* | -2/-1 | }} | |||
{{SF2HFMoveListRow | Crouching Light Kick | d + lk | 7 | - | 4 | 40 | 6 | 4 | 5 | +5/+6 | low}} | |||
{{SF2HFMoveListRow | Crouching Medium Kick | d + mk | 10 | - | 8 | 60 | 6 | 4 | 7 | +8/+9 | low }} | |||
{{SF2HFMoveListRow | Crouching Hard Kick | d + hk | 14 | - | 8 | 130 | 8 | 21 | 14 | KD/-11 | low knockdown }} | |||
{{MoveListFooter}} | |||
*<b>Jumping Normal Moves (nj.)</b> | |||
{{SF2HFMoveListHeader}} | |||
{{SF2HFMoveListRow | Neutral Jump Light Punch or Kick | u + lp or lk | 8 | - | 4 | ? | 3 | 20 | ∞ | - | high }} | |||
{{SF2HFMoveListRow | Neutral Jump Medium Punch or Kick | u + mp or mk | 12 | - | 8 | ? | 3 | 10 | ∞ | - | high }} | |||
{{SF2HFMoveListRow | Neutral Jump Hard Punch or Kick | u + hp or hk | 16 | - | 14 | ? | 4 | 5 | ∞ | - | high }} | |||
{{MoveListFooter}} | |||
*<b>Diagonal Jumping Normal Moves (j.)</b> | |||
{{SF2HFMoveListHeader}} | |||
{{SF2HFMoveListRow | Diagonal Jump Light Punch or Kick | ub / uf + lp or lk | 7 | - | 4 | ? | 3 | 20 | ∞ | - | high }} | |||
{{SF2HFMoveListRow | Diagonal Jump Medium Punch or Kick | ub / uf + mp or mk | 10 | - | 8 | ? | 4 | 10 | ∞ | - | high }} | |||
{{SF2HFMoveListRow | Diagonal Jump Hard Punch or Kick | ub / uf + hp or hk | 14 | - | 14 | ? | 5 | 5 | ∞ | - | high }} | |||
{{MoveListFooter}} | |||
===Unique Moves=== | ===Unique Moves=== | ||
Revision as of 06:07, 10 August 2015


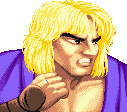
Ken
Shoryuken! A millionaire (by birthright, not effort) playboy with bleached hair (but not eyebrows - representing his 3/4ths Japanese heritage), Ken gets the Money, the Glory, and the Girl. He trained with his rival and friend, Ryu, in a Japanese Dojo under the tutelage of Gouken, a very powerful martial artist who famously went on to simply wake up from being dead. Ken favours a flashy, gung-ho fighting style over the more stoic and traditional Ryu.
In a nutshell
While certainly an overall poorer character than Ryu in SF2HF, Ken is not far behind. In some matchups his slower fireballs and wider arcing Dragon Punch can actually be helpful, and his very doable 'Touch of Death' combos mean one solid hit can always spell an opponent's doom.
Character Specific Information
Color Options
Moves List
Normal Moves
- Standing Normal Moves (st.)
- Crouching Normal Moves (cr.)
- Jumping Normal Moves (nj.)
- Diagonal Jumping Normal Moves (j.)
Unique Moves
Throws
Special Moves
The Basics
Advanced Strategy
Combos
Bread And Butter
- cr.MK xx QCF+HP
- j.HK, s.HP xx DP+HP (Touch of Death)
Match-ups
- Vs. Balrog (boxer):
- Vs. Blanka:
- Vs. Chun-Li:
- Vs. Dhalsim:
- Vs. E. Honda:
Same as Ryu's strategy versus E. Honda: from about halfscreen away, throw slow fireballs, and sweep with cr.HK to hit with the very tip of the toe as Honda lands. You should be a little more careful chucking fireballs than with Ryu however, since Ken's fireball has more recovery time than Ryu's.
- Vs. Guile:
- Vs. Ken (self):
- Vs. M. Bison (dictator):
- Vs. Ryu:
- Vs. Sagat:
- Vs. Vega (claw):
- Vs. Zangief:
Hitboxes
| General | Game Mechanics | Strategy | Tiers | |
| The Characters | Balrog (Boxer) | Blanka | Chun-Li | Dhalsim | E. Honda | Guile | Ken | M. Bison (Dictator) | Ryu | Sagat | Vega (Claw) | Zangief |
