Introduction
Editor's Notes: For ANY Inquiries, Questions, Corrections etc. About The Page; Contact Me On Twitter (@EXDSPRTS) or Discord (exodusprotoss
Urien is not the monster he is in 3rd Strike, but he's damn close enough. His pokes are great and his damage/stun is nothing to scoff at. Aegis reflector is one of the best supers in the game and makes one touch from him extremely deadly.
A high tier character, he requires a lot of work in this game due to lacking in defensive options (No Red Parry) and certain things being weaker, changed or downright gone in this game compared to 3rd Strike. If you're willing to put in that work however, he can be an extremely devastating character who only needs one touch to win.
Moves List
Normal Moves
KEY NOTE: BOLDED NORMALS ARE NECESSARY TO USE WITH THIS CHARACTER
Standing Normals
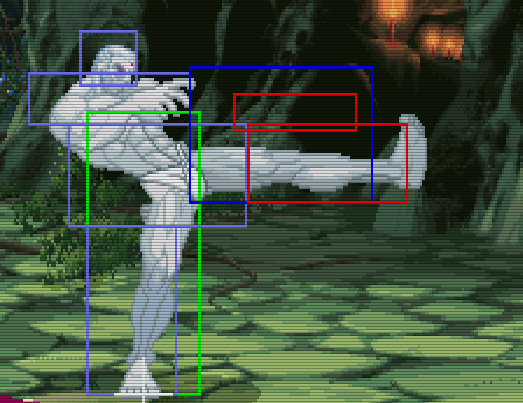
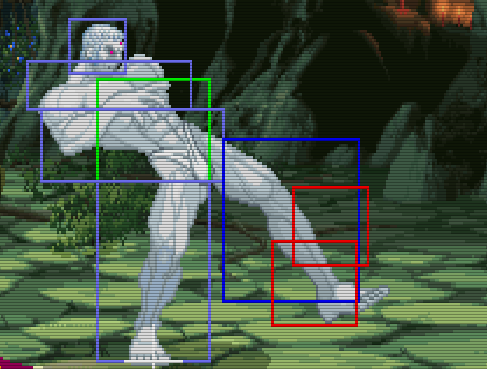
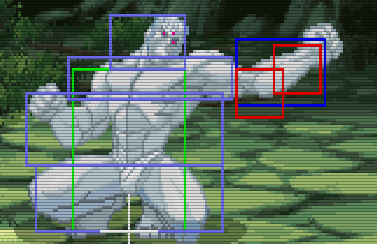
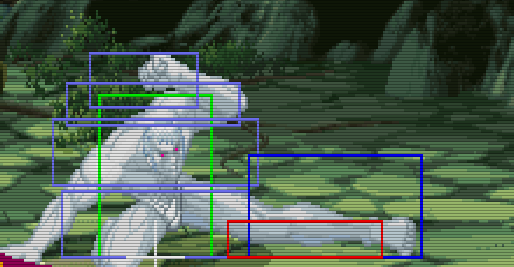
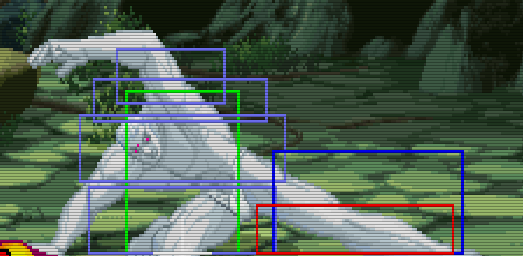
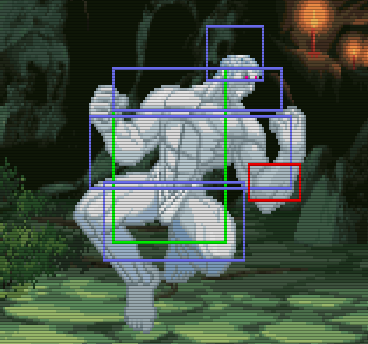
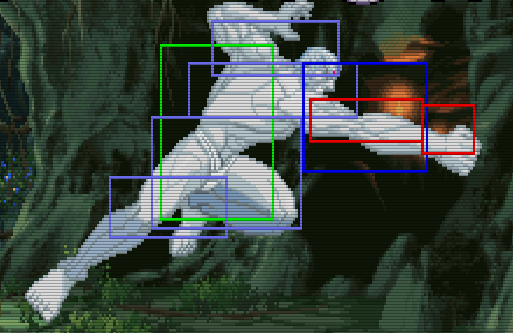
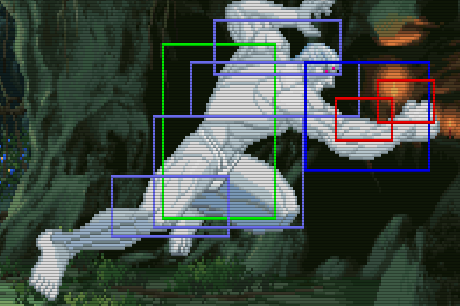
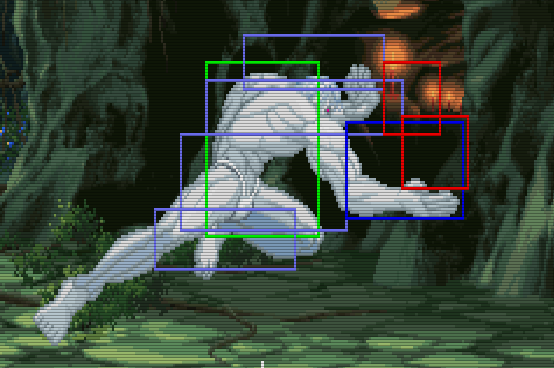
stLP - Fast jab, has a target combo into stMP, cancellable
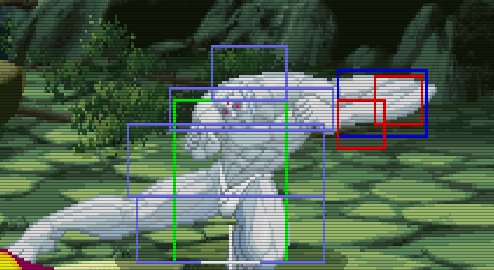
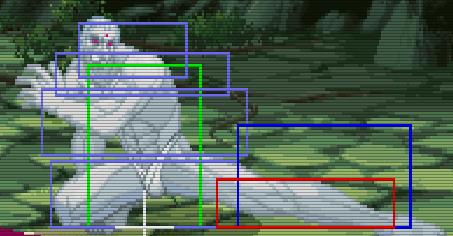
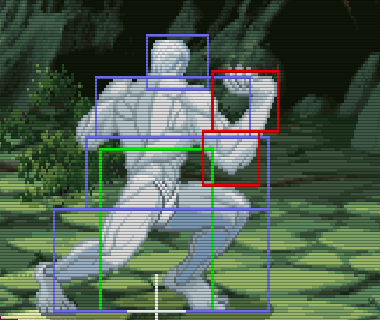
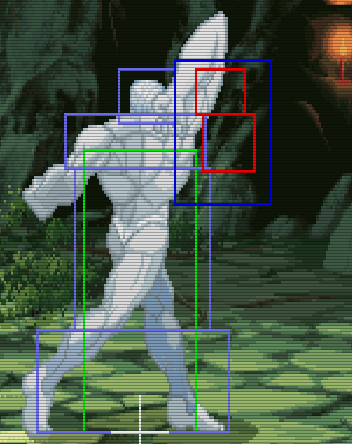
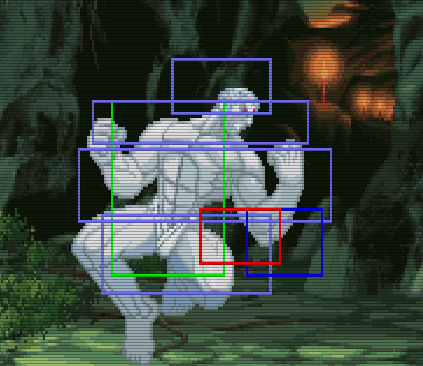
Click To View Hitbox
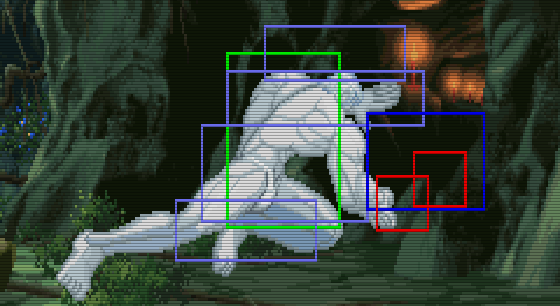
stLK - Fast but doesn't reach very far, cancellable.
Click To View Hitbox
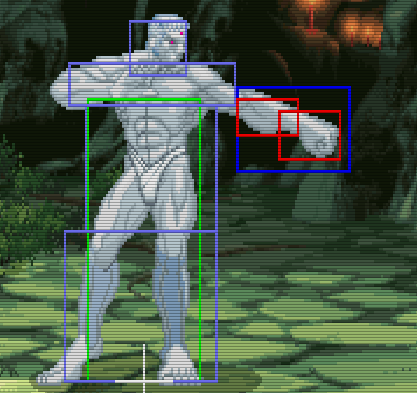
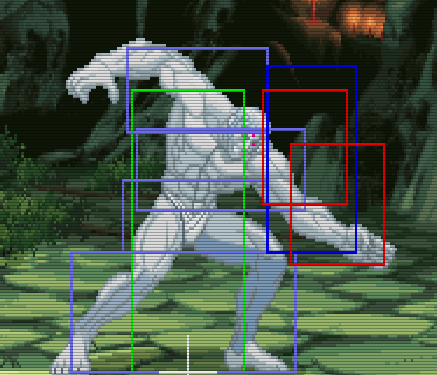
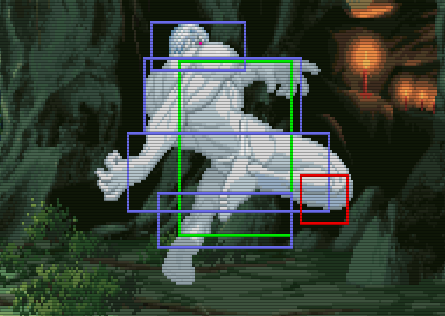
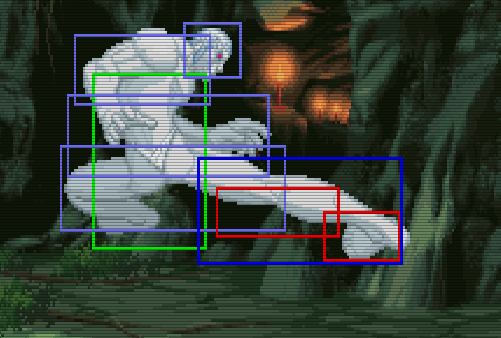
stMP - Godlike poke, whiffs on crouchers however, cancellable. Will also stop grounded approaches and even air approaches, use in tandem with stHP.
Click To View Hitbox
Important Aspects of stMP as you'll be pressing this a lot:
- Recovers Quickly, It's difficult to whiff punish.
- Good Priority, This can beat a lot of buttons in the game, INCLUDING Gouki Divekick clean at the right spacing. This is because it has an extended hitbox.
- Doesn't move his hurtbox forward all too much, He can control horizontal space while not being too vulnerable to lows.
- He can stand still and retain the threat of tackle, or if you're partitioning, headbutt.
- Good Meter Build Normal.
- It's safe, this is massive.
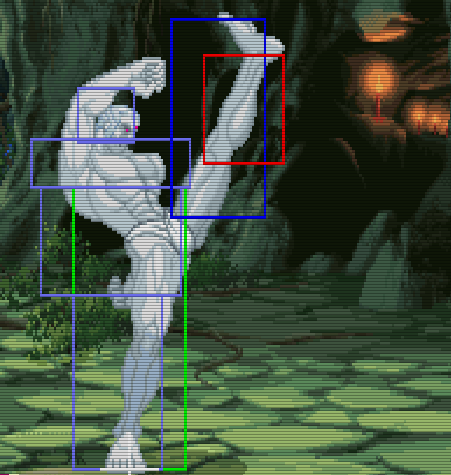
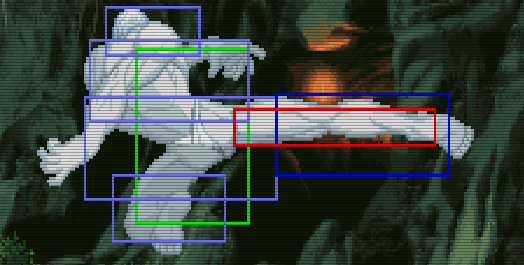
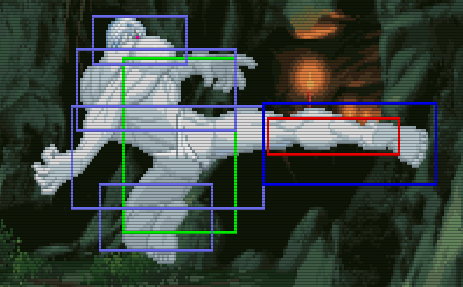
stMK - LONG normal, fair enough poke to use in neutral, Unfortunately punishable, though. It's outclassed by his other normals.
Click To View Hitbox
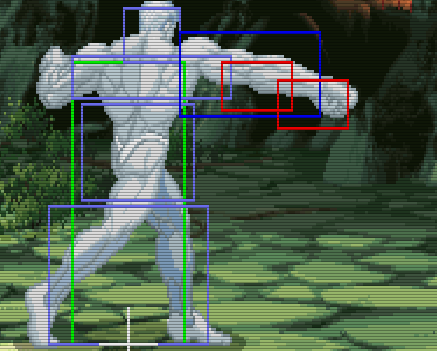
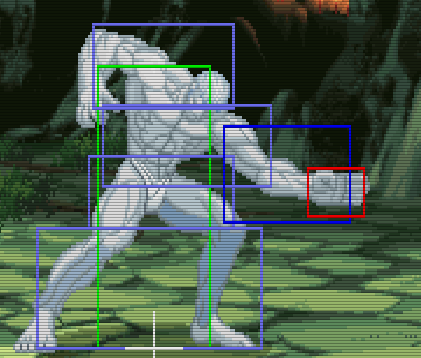
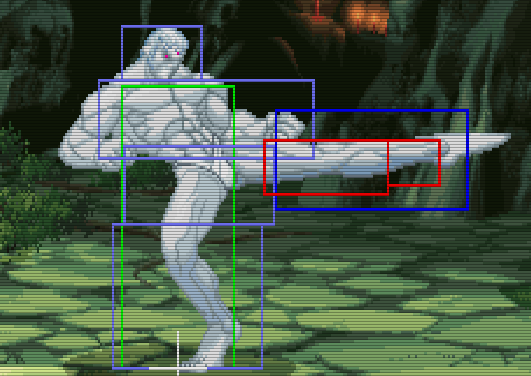
stHP - Fast chop, knocks down airborne opponents (Hard Knockdown too) amazing poke as it can also stop grounded approaches as well as beat out pokes it has no business beating. Punishable by 0f supers on block even if spaced. Use if you wanna dissuade parrying, mashing etc. You can frame trap into this normal to really hurt the opponent. (e.g, crLP stHP)
Click To View Hitbox
Important Aspects As You'll Be Using stHP A Lot:
- Combo Ender, Knockdowns. Preferable to headbutt whenever possible though in those situations.
- Damn Good Hitbox. It can beat a whole lot of grounded normals
- Hurts, A LOT! Stun and damage will rack up quickly the more this lands, you can efficiently destroy momentum with this.
- Dissuades Guess Parries And Bad Throw Teching (*whispers* Mashing). Frame trapping into this normal (crLP into stHP) or delaying your usage of this normal, however you want to use it can easily dissuade bad guesses.
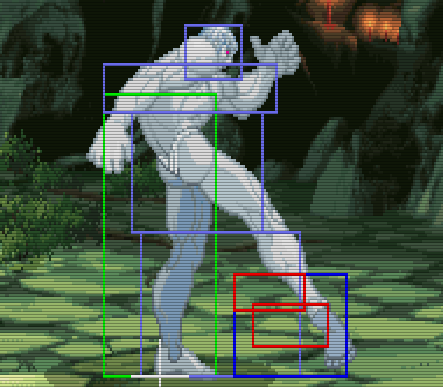
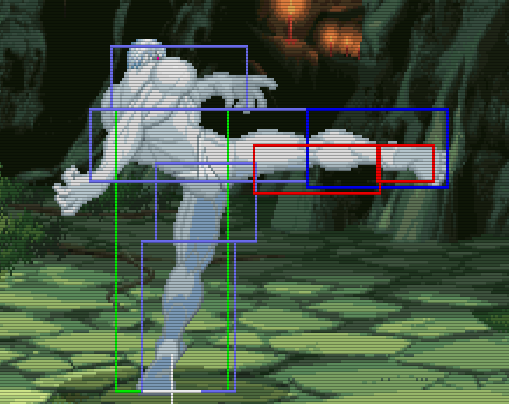
stHK - Very long startup pushes you back very far on block but punishable on hit by supers. Has the unique trait of being able to crush throws because of his hurtbox and throwbox being reeled back during the startup of the animation. Otherwise refrain from using this normal.
Click To View Hitbox
Crouching Normals
crLP - Another fast jab, cancellable. Use to frame trap, combo after Tackle xx EX Aegis, check pressure, etc. Key normal.
Click To View Hitbox
crLK - Fast Low, cancellable
Click To View Hitbox
crMP - It doesn't do anything that any of his other normals can do but there is niche use to it? Can make certain air moves whiff and is good for stun combo filler but it's ultimately not much of a good normal.
Click To View Hitbox
crMK - Good far reaching low poke, can be difficult for some characters to beat from max range and can check dashes and approach options reliably, however, you're probably better off using stMP for that anyways. Ridiculously good at footsies though due to reaching a bit further than stMP, don't be surprised if your whiff punishes with this normal are nasty.
Click To View Hitbox
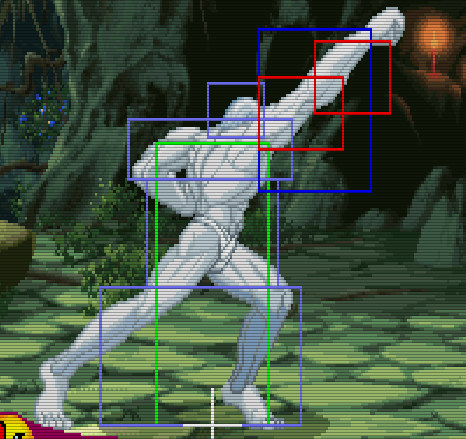
crHP - Very essential launcher in this game, unlike 3rd strike the second hit will whiff on crouchers however, but this move is super duper important for starting big plays as Urien.
Click To View Hitbox
Things To Note Before You Begin Using This:
- Minus, VERY MINUS. You better cancel into something.
- Doesn't Work On Crouchers. Cancel into tackle on hit.
crHK - Awesome sweep, hits you from a backdash away. Similar to stHP, you can frame trap into this to dissuade parries and mashing.
Click To View Hitbox
Things To Note:
- Minus On Block. This doesn't matter until the opponent has a super they can use to blow you up.
Jumping Normals
jLP - Active all the way throughout, it's fine as an air to air but you get this because you accidentally fucked up your headbutt partition
Click To View Hitbox
jMP - Another fine air to air, covers horizontal air space a bit better than jHP and jHK does
Click To View Hitbox
jHP - Good air to air, doesn't have the horizontal/downwards range jHK does but covers more upwards vertical air space than jHK does
Click To View Hitbox
jLK - Not really useful, I think jLP fills whatever niche using a light jumping normal would have better.
Click To View Hitbox
jMK - Not really a normal you'll press, controls air space horizontally though.
Click To View Hitbox
jHK - Main jumping normal, extremely long, good at stopping approaches, great jump-in and air to air. Really hard to beat out as well all things considered. It's good.
Click To View Hitbox
Command Normals
f+MK - Moves you forward by a lot, not a bad meaty and helps in unblockables. Not the best in neutral though, you probably got this for fucking up your tackle charge.
Click To View Hitbox
f+MP - Don't use this. You have better anti-air options and it doesn't serve the same purpose as his 3S f+MP. Better off using something else
Click To View Hitbox
UOH - EXTREMELY GOOD UOH, Meatying with this puts you in throw range and serves as a tick on hit/block, the reward you get off of throw is fucking ridiculous too. This is otherwise extremely good for setups as its a fast and airborne universal overhead. It is however reactable.
Click To View Hitbox
Throws
f/b+MP/HP - Spartan Bomb: One of Urien's really good throws, no difference between the strength used, puts you very close to the opponent after a throw, gives you oki and pressure opportunities. If you throw the opponent into aegis they bounce up, the followups you get aren't consistent but they're damaging.
f/b+MK/HK - Destroy Claw: Urien's Hold, racks up a shitton of stun and like Spartan Bomb, puts you very close to the opponent. Allows for more consistent juggles into aegis off of throw but at the expense of less stun.
Special Moves
Metallic Sphere (Fireball): QCB + Punch
Urien's Fireball, The 3 Different Strengths Cover 3 Different Angles. EX Throws Out Two Horizontally Moving But Oscillating Spheres.
Always Use light if you have to, the anti-air versions that medium and heavy present aren't very useful and the reward you get off it is really bad. There's a lot of recovery as far as the move is concerned too so whiffing this is a death sentence as well. Heavy sphere can lead into multiple tackles if it hits them high enough but that has to come from a read.
Medium And Heavy also have extended hurtboxes as their legs are put forward more than light is. If you whiff those two in particular and your opponent doesn't outright kill you for it consider yourself lucky. You have better anti-air options anyways.
You can cancel into sphere after a parried anti-air stMP to blow up unprepared opponents (if you don't have charge as an example)
Tackle: Charge Back (43f), Forward + Kick
Urien Charges At The Opponent Horizontally, The Strengths Determine Distance. Light Travels The Shortest Distance, Heavy Travels The Longest. EX Goes Full Screen And Hits Twice.
Usually best to use Light or Medium Tackle, but if you land a crHP it's not a bad idea to cancel into heavy.
Good anti-air, amazing corner carry after crHP, The backbone of a lot of your aegis setups, corner combos etc.
Tackling in neutral is probably something you wanna do cautiously, more cautiously than in 3S, the move has a lot of recovery in this game so you'll get punished harder, try to combo into this instead, the reward you get is amazing. EX Tackle has enough frame advantage to link stMP, this leads into a loop so I wouldn't fault you for fishing for it. Backbone of your corner combos as well.
Knee Drop: Charge Down (43f), Up + Kick
Urien flies up into the air, before knee dropping onto the opponent, strength determines distance and tracking. EX has a second hit and goes the furthest.
You have infinitely better ways to punish fireballs, and is a last resort corner escape option. This move is garbage, you can be punished on hit sometimes so I really don't recommend it. It's extremely slow and easy to react to, people in The Current Year Of Our Lord shouldn't be letting you get away with this move either, especially not EX. The most valuable usage of this move is that it is the backbone of your corner unblockables.
Headbutt: Charge Down (43f), Up + Punch
Urien jumps and headbutts the opponent. Strength determines startup and height of the jump, Light being the fastest but shortest; Heavy being the slowest but highest. EX hits twice, is amazingly fast, has a lot of horizontal distance, easily one of the best specials in the game.
The Headbutts are usually punishable or unsafe, except for EX Headbutt which is +3 on block.
They all whiff on crouchers in this game but you can use this to your advantage by setting up blockstrings that jail them into the standing animation. This is relevant because all headbutts are overhead in 2nd Impact.
Godlike special as far as Urien's toolkit is concerned. EX Headbutt is an amazing special that mines the fuck out of the opponent's stun bar and leads into hilariously high stun combos that are as easy as just repeatedly doing EX headbutt.
It's otherwise a gimmicky throw setup and in the case of the EX version, a strong pressure tool; especially since the EX version plus on block.
It's airborne as well so you can use EX headbutt to bait out throw attempts and button presses in a post-reset situation, reward is extremely high in the corner especially.
Don't whiff your normal headbutts though unless you want to lose.
Super Moves
All Of His Supers Are Done with QCFx2 + Punch
SA1 (Tyrant Slaughter): You can, in fact, use this super in this game. SA1 is a more immediately useful super as far as Urien's supers go. It is his only reversal and combo routes you can go for into SA1 and even out of SA1 aren't limited. The longer bar + two stocks allows for more EX Tackle Loops/EX Headbutts. This is probably more versatile due to launching the opponent being harder in this game.
It's weird, this super is on paper more useful as this game values being able to whiff punish moves (or punish moves) with a 0f super, which is a niche this super fills. However, the reward, control, etc. off of Aegis is just so much stronger, at the expense of a higher execution / game knowledge demand.
There is a place for both in this game, but Urien is truly unlocked with Aegis.
SA2 (Temporal Thunder): Easily his worst super, its a 0f projectile super that does bare damage and basically no stun. Full combos into it do as much as combos you'd spend EX on in the first place. It's at the very least plus on block, but you don't get any follow-ups after temporal thunder hits unless your opponent is a dumbass who forgets to block after getting reset into it.
The utility barely exists as fireballs in this game aren't used like in ST, you won't be in fireball wars to burst through a fireball with this. Everything you can do with this another move does better.
It lacks the damage that would make Tyrant Slaughter a threatening super, the utility that makes Aegis a threatening super... and the Both that also makes Aegis a threatening super.
I was gonna leave this section empty with nothing but "this super sucks" but honestly You should just know why it sucks. It's just a very useless super that serves no purpose.
Anyways, This super sucks don't use it.
SA3 (Aegis Reflector): Aegis Reflector is slightly worse in this game than in 3S, but it doesn't mean it's a bad super; quite the opposite, it's his best super. The distance aegis travels depends on the strength you use, with light being the nearest and heavy being the farthest. EX aegis will place the mirror above.
You can set things up with aegis and the reward you get off it is extremely high. There are a lot of resets into aegis as well as a fairly universal hard knockdown setup and the reward you can get off those are typically combos that lead into stun/another reset or death. There are also setups similar to the 3rd Strike unblockables, so I can recommend using Aegis in 2nd Impact.
A big aspect is the control this super allows for, the moment you drop aegis, the opponent is FORCED to hold something and the risk/reward is so heavily in your favour. Every character, even Akuma with his teleport, has to respect the mixup you've put them in the moment they are face to face with Aegis. One of the very few instances in this game where the risk reward is JUST THAT SKEWED in someone's favour.
A majority of this wiki's advanced tech section is with the assumption that you have chosen THIS super.
USE: SA3 (Easily his best super)
TRY: SA1 (If you really can't do aegis stuff and just want to be more aggressive, SA1 might be your super but I'd honestly just suggest learning SA3)
DON'T USE: SA2 (It Sucks Don't Use It)
The Basics
Urien's one of the harder/more complex characters in 2nd Impact, but he is a character with a basic gameplan.
The main gist of it is that you wanna be poking around with stMP, stHP and crMK and try not to get yourself cornered. Sometimes you'll land a combo here and there and do some damage. You have solid anti-airs with crHP, stMP as previously mentioned, stHP is great too. (it's also a combo ender). You'll have trouble anti-airing some characters though (like Akuma and Sean) but learning how to space your anti-air normals like stMP comes a long way. You can also buffer air parry or crouch to make jump-ins whiff, which allows you to punish landing recovery. Air parry is obviously an option as well.
You can stop rushdown with the grounded normals but also with your airborne normals, jHK is amazing for covering grounded space and beating throws as well.
For air to airs, jHP, jMP, jHK and one of his infinitely active normals (jLK/jLP) tend to serve you well here. Use jHK to cover grounded approaches and air to air attempts. jHP or jMP to stop jump-ins as an anti-air. jLK and jLP tend to beat out some anti-air normals as well, for whatever reason.
His throws are amazing and gives you oki, as well as having a hold that gives you a lot of stun as well as oki, you're going to love his throws in this game, especially since this is a game with extremely good throws (and a really plus UoH to tick from on meaty).
Once you get your meter, however, is when you maybe wanna ramp up the aggression just a tiny bit and try to win the corner or score a launcher and go for your aegis setups.
Building meter is not exclusively reliant on whiffing your normals as you build so much meter from interacting with your opponent, it can sometimes waste more time than valuably use it.
It's very important you don't get cornered yourself because unless you're running SA1, you don't have a reversal and you're just gonna have to hold so much shit in this game because of the lack of red parrying. Make sure your defense is good and that you're not trying to guess parry too much, there's only enough crack for 2i players to do and you can't be wasting it on Urien of all characters. Good defense is key to surviving as Urien
Guardjump is strong against command grab characters, less so against traditional strike/throw. Holding upback on wakeup beats throw, blocks meaty mids/highs, jumps over lows. Loses to delayed attacks. You can do upback then immediately go back to downback to cover multi-hits and possible delayed blockstrings.
You wanna try to get your setups and/or corner resets on deck and try to win the game off a really good opening, you can do that with Aegis in this game, doubly so since you have unblockables in this game as well.
If you're running SA2, don't.
Combos
Meterless
stLP~MP: Target Combo
stLP xx L.Headbutt
stLP/stLPx2~MP xx Tackle / Headbutt: hitconfirm off of the target combo, headbutt requires a partition
crLK xx L.Headbutt
crLK xx L.Tackle
stMP xx M.Tackle
stMP xx M.Headbutt
crHP, M.Tackle: Respectable midscreen combo off crHP launcher, don't waste whatever chance you get being able to launch the opponent by doing crHP into Non-EX headbutt, you want to win corner as Urien.
crHP[1] xx H.Tackle: If the opponent is crouching, this is probably your best way to get something on them.
Meterless (Corner)
crHP, M.Tackle, stHP: Universal corner combo, sometimes you just gotta chop a motherfucker.
crHP, M.Tackle, L/M.Headbutt: Tackle Headbutt, requires a charge partition that you do by briefly holding upback during the crHP launcher before returning to downback.
crHP, crHP, M.Tackle, L/M.Tackle, L/M.Headbutt: Tackle Tackle Headbutt, we talk more about this in the section below, very useful combo to know in the corner.
Metered
crLK xx EX Tackle
stMP xx EX Headbutt is an awesome launcher to have, here's routes you can go for, so
stMP xx EX Headbutt...
Tackle: Corner Carry
EX Headbutt, M.Tackle: Corner Carry and you're not spending much extra bar, stun is insane.
EX Headbutt, EX Headbutt: This is how you tell your opponent you're a dumbass, the meter usage is not worth the amount of stun you basically end up doing, save that shit.
TTH (corner): Solid ender, allows for sweet spot.
TTTH (corner): Three Medium Tackles, Light Headbutt (or chop if you can't partition). Works on Alex and Urien, practical on both.
M.Tackle, EX headbutt, H.Headbutt (corner): Touch of Stun on Akuma if you do jHK beforehand.
---
crHP, EX headbutt, TTH: Extremely good reward for landing launcher in the corner and you dont want to spend bar on super.
crHP, crHP, TTH: Meterless TTH, requires a microwalk on Dudley and Twins, works on everyone.
crHP, M.Tackle, M.Tackle, EX Tackle, Headbutt: Bootleg TTTH, Feel free to mix the ordering of this depending on the character and what you want to do.
--
EX Tackle Loops are explained in the advanced section.
Supers
SA1
Any cancelable normal into SA1, yes, it's 0f
Any cancelable normal into tackle, canceled into SA1: special canceling your tackle into SA1
EX Tackle, stMP xx SA1
EX Tackle Loop, end with stMP xx M.Tackle into SA1
crHP[1] xx EX Fireball xx SA1: this is funky near the corner, gives you a full juggle depending on the character, on ibuki you get TTH, on shotos you might just get EX headbutt into headbutt, feel free to fuck around with this.
SA2
crHP, crHP, Tackle, Tackle xx SA2
Any cancelable normal into tackle, canceling into SA2
Losing The Game And Then Picking A Real Super: The Easiest Urien Combo
SA3
Throw, (Bounces Off Of Aegis), crHP, EX Headbutt, Headbutt / Tackle.
(Corner) jHK crHP[1] xx H.Tackle xx Jab Aegis, H.Tackle...
If you want to dump all your meter, do crHP[1] xx H.Tackle xx Jab Aegis, H.Tackle, crHP[1] xx H.Tackle xx Jab Aegis, H.Tackle and then do corner combo of choice
If you don't want to dump all your meter, do crHP after H.Tackle, and then do your corner combo of choice, preferably a reset into aegis, fuck them up.
(Corner) jHK crHP, M.Tackle, M.Tackle xx Fierce Aegis, M.Tackle, M.Tackle, M.Headbutt
Four Tackles in one combo, requires you to go back to downback after "Fierce Aegis, M.Tackle"
The Styles Of Urien
Urien is a character who has a lot of variety in how he's played, there's always a basic gameplan you could go for, you can go one step beyond.
Neutral Focused: Cheap and boring, but really fucking effecient. You build meter, play footsies, hit a combo sometimes. None of that flashy shit, all business. Everything you do once you have meter pushes corner or a situation. REALLY BASIC BUT VERY EFFECTIVE. They aren’t the most flashy, but what they do works and they always keep things simple.
Flashy: Really hard, requires you to have your execution and game knowledge to be totally on point. This probably isn't what you should do if you aren’t good, or are inconsistent in your level of play. Almost definitely what you want to do regardless because we’re all suckers. If you aren’t constantly on point this is going to suck, if you overcomplicate everything, this is also going to suck. Likely to get you killed before the opponent. This requires a LOT of experience and knowledge, and you have to make sure you’re constantly hitting your shit.
Balanced: Mix of both, really hard to pull off well. Your gamesense has to be on point here for you to know when to go for flashy shit, and when to stay solid. IMO the best way to play but unless you’re just in tune with your character this is going to be too hard to pull off.
The Urien Diary (Advanced Tech)
Charge Partitioning:
Much like in 3rd Strike, Charge Partitioning does exist in this game. Charge partitioning is the ability to break up your change into multiple parts/sections by performing a different action before going back to charge. To understand how this works, you need to understand how charge moves work in SF3.
Each charge move has two meters attached to them, a 'charge' bar and an 'uncharge' bar.
The charge bar is filled up naturally when you charge a move, if you fill it up long enough you will be able to execute the move (or not execute the move). The filled up charge bar resets when you let go of your charge, so you cannot partition a complete charge. You can fill up that charge bar in pieces though, and that's handled by the 'uncharge bar'.
So at the same time the charge bar is running, an uncharge bar is too and this is continuously running as it's tied to the internal game time. There are setups and techniques to reset this timer which we will get into later. It starts at 100% and ends at 0%, then resets. When that uncharge bar reaches 0%, the game dumps your charge automatically. When you are charging this meter freezes though, which is why you're able to break your charge up into multiple pieces.
So you charge for a little bit, pause and before the uncharge bar reaches 0% and dumps your charge, pick the charge back up and execute the move properly.
So what resets the partition timer?
- Super Flash (Resets Tackle/Headbutt)
- Parry (Resets Tackle/Headbutt)
- Pressing Up (Resets Tackle)
- Overcharging Headbutt (Resets Headbutt)
Here are some situations where you can practice partition timing but also apply charge partitions:
- Dash Tackle (Off Throw): During the throw, press up, once they hit the ground, hold back for a little bit, dash, hold back for a split second then release the tackle
- Dash Headbutt (Off Throw): During the throw animation, hold down, once they hit the ground, let go, tap down, dash, and complete the partition
I like counting to 2 before dashing to help with my timing
Headbutt and tackle partitions are going to help you take rounds you definitely don't deserve to win, you spend your time learning the timing for all of this stuff though.
Tackle Tackle Headbutt:
You can do Tackle Tackle Headbutt in 2i as well! This is typically off of crHP. Here's a handy guide to what tackles to use when doing TTH. I always recommend ending with light headbutt here.
Thankfully, it's universal!
Medium Tackle Twice: Shotos, Urien, Hugo, Necro
Medium Tackle, Light Tackle: Alex
crHP, Medium Tackle, Medium Tackle: Dudley, Twins, Oro, Elena, Ibuki (This works on everyone though, probably best you go for this unless you just don't want to I suppose)
crHP, Medium Tackle, Medium Tackle, Medium Tackle: Urien/Gill, Alex, Hugo
On Urien/Gill, Hugo and Alex, You are able to do TTTH (Triple Tackle Headbutt) off of a stMP EX Headbutt starter, use 3 mediums, end with headbutt, during your EX Headbutt, rock your stick from up, to upback, then go back to downback so you maintain charge for the first tackle while partitioning the headbutt.
EX Tackle Loops:
In this game, if you land EX Tackle, you are able to link stMP afterwards, this allows you to repeatedly loop that. It's not an infinite as you will eventually run out of bar. I recommend ending your loop with stMP EX headbutt into TTH or whatever corner ender you feel like would work afterwards once you reach the corner....or SA1 if you're running SA1
Combo: (Whatever) xx EX Tackle, [stMP xx EX Tackle]xN
Reverse Tackle
You can do reverse tackle in multiple ways, here are some of them
Off Headbutt: In a combo where you headbutt as your opponent is crossing over you, you have to do downback, upback+punch and then forward+kick, the game autocorrects.
Off Throw/Sweep: If you throw/sweep the opponent and they bounce over you with aegis, you go from downback to back. You can also do downback to forward then back to back.
In Neutral: You can punish stuff like air tatsu or someone jumping over you by going from downback to back.
USING AEGIS:
Getting To The Other Side:
The most basic setup as Urien is to throw your opponent and drop light aegis on top of them being doing medium headbutt across their corpse and going for a high/low mixup. This can be quickrised but is the most basic setup in the game and will get you fairly far against people who don't quick rise your throws
You can drop higher aegis strengths to chase them in case they do quick rise, feel free to partition a headbutt as well so you can chase them and do crLK xx headbutt or something.
Standard Aegis Midscreen Setup:
There is a universal hard knockdown setup that Urien has midscreen that works on the entire cast, with alterations you can do for Hugo/Elena to make it more consistent and/or get rid of the precision element of the setup on them.
The setup is as follows:
crHP, EX Headbutt, Jab Fireball xx Jab Aegis, Medium Tackle to switch sides
Elena falls too weirdly for the regular setup to work consistently, so you can do this on her instead:
On Elena: crHP, EX Headbutt, Jab Aegis, Medium Tackle to switch sides
Hugo is too big for the regular setup to work consistently, you can do this on him instead:
On Hugo: crHP, EX Headbutt, Jab Aegis, wait until hugo BOUNCES on top of aegis before doing M.Tackle under him.
Jab fireball into Jab Aegis is a very consistent way to assure that they bounce on top of aegis and gives you time to tackle under them, characters like twins might be a bit more precise to land this on so there is an alternate setup you can go for:
Alternative Twins Setup: crHP, EX headbutt, Jab Aegis, neutral jump to body block them, dash up medium headbutt to switch sides.
The idea is you want to get to the other side, after that you can implement a mix-up of your choice. UOH, crMK, jHK. All you need to do is have them get hit by a high/low and get your reward once their dumbasses get opened up. The reward varies per character but try to find a way to relaunch them.
If you time your high/low (sometimes even a mid) at a specific timing, you actually cause an unblockable (its really a hard to blockable, the difference between left/right is a frame) to occur, what you open them up will vary between characters, here's the list
Shotos: crLK/MK, UOH, jHK
Alex: crLK/MK, jHK
Twins: F+MK, more possibilities off the alternate twins setup.
Necro: Don't Bother.
Hugo: crMK, jHK, F+MK
Ibuki: F+MK, crLK/MK, jHK
Urien: jHK, crMK, F+MK
Elena: f+MK, crMK
Oro: f+MK, crMK
Dudley: F+MK, stHP
You can't loop this setup but if you want to put them in another aegis setup your only option is a soft knockdown Aegis setup they might be able to quick rise.
You can 100% stun the Shotos with a single setup if you use two EX headbutts, the setup is as follows:
jHK stMP xx EX Headbutt, EX Headbutt
OR
jHK crHP, EX Headbutt, EX Headbutt
Jab Sphere xx Jab Aegis, [M.Tackle Under], jHK stMP crHP, EX Headbutt, H.Headbutt
One Bar Setup
On Shotos and Urien, you can perform a one bar aegis setup, this requires a partition, is somewhat finicky but it works.
crHP, H.Tackle xx H.Aegis, H.Tackle, Dash, M.Headbutt to get to other side, Dash, Dash and then press a normal of choice.
Fucking finally.
Flying Anago Special (or F.A.S):
Anago was the first ever 2i Aegis Urien, who invented this setup 25 years ago in 2nd Impact. it's powerful in this game if not a bit of a gimmick, there's no partitioning required and it works on the entire cast.
crHP, EX Headbutt, Walk Forward, crHP xx Strong Aegis, Dash Under, jHK, freestyle from there.
They will get air reset into an aegis setup, and you just get to rock that motherfucker to hell and back, the meter gain is better and it's a very versatile setup, it's definitely more valuable on some characters than others but there is little reason why you shouldn't learn this setup. Definitely go fuck people up.
Widescreen Anomalies:
So if for some reason you're deciding to actually look into playing widescreen (I've tried this unfortunately it kind of blows) then you'll probably experience REALLY weird drops on some of the setups above (the midscreen ones definitely). I have seen aegis fail to hit meaty despite Sean actually being right on top of it and not deviating from the standard setup whatsoever so I legitimately think widescreen might be more buggy than initially thought. Consider this section completed for now, I don't know if I'm particularly interested in labbing widescreen setups enough considering how rarely widescreen is even played in the first place. If I decide to do so, then I'll list specific anomalies here.
Ping Pong:
The Ping Pong is an important midscreen aegis setup that's not as expensive as the hard knockdown setup but can be quickrised, so you want to vary your aegis release timings to fuck with the opponent's timing. The setup is very simple, do any combo into light headbutt, drop medium aegis. You want to charge partition a headbutt during the super flash, if they don't quick rise you get to do dash up headbutt over their body. You want to be a fair bit away from them, crowding them won't give you the bounce you want. As soon as Aegis hits you can go for your ping pong combo.
The universal one is: crLK crMK crLP crLP crHP
I go for an alternate version on shotos: crMK stMP stMP stMP crHP, this one's called "Pong 2" (thanks TTTTTsd)
That version gives me more meter and allows me to go into the unblockable setup if I did the ping pong setup with just enough bar to do the unblockable setup in the first place.
Corner Aegis:
There's a lot you can do with Aegis in the corner, unblockables and resets galore. Corner setups are some of the cheapest shit you can do in this game so let's get right into it:
Resetting
I have an extremely simple one: Any corner combo into: stMP xx Aegis. I do crHP, crHP, M.Tackle, M.Tackle, stMP xx Aegis. Light aegis will give you time for a throw mixup, Medium Aegis forces an immediate high/low.
After that you can try to open them up with UOH, crMK, or throw, and at that point just go for a corner combo, you can even try resetting them again and putting them in the same guessing situations. Go fuck people up.
On shotos, if you do stMP air reset into aegis, if they throw you they often get punished on hit so quick rise their throw, get your punish and keep corner. If they eat throw or just guess wrong in general they usually eat the round for it.
Generally, an air reset combo into throw, EX Headbutt, H.Headbutt will stun a shoto.
Alternatively, you can do launcher, Tackle xx Aegis, and reset with jHP, while this removes the throw aspect of the mixup and does unfortunately sour spot, this has more of an overhead presence, using uoh.
These resets will give you a lot of meter, keep that in mind when going for them.
Corner Unblockables
So the setup is simple, but requires some execution depending on the character, but the basic one is: Launcher, M.Tackle, EX Tackle, M.Tackle xx Light Aegis, WAIT for the bounce then delay MK knee drop so you body block them, but NOT hit them. You don't exhaust the juggle counter after aegis so you have to time your knee press. Microwalk forward slightly (some characters dont require this) and do a medium/roundhouse knee drop.
You want the opponent to be near aegis/the corner without being cornered for this to work, the knee drop will guard break and it can guard break either side just in case your opponent thinks blocking the other way will save them.
You will either end up in front of them or behind them, followups will vary depending on what you do.
Shotos: medium kneedrop body block, microwalk forward medium kneedrop guard break
Twins: heavy kneedrop body block, heavy kneedrop guard break
Alex: medium kneedrop body block, medium kneedrop guard break
Elena: light kneedrop body block, dash medium kneedrop guard break
Ibuki: heavy kneedrop body block, heavy kneedrop guard break
Hugo: heavy kneedrop body block, heavy kneedrop guard break
Oro: forward jump body block, dash up heavy kneedrop guard break
Dudley: heavy kneedrop body block, heavy kneedrop guard break
Necro: Impossible
This isn't that useful, but once in a while it's rewarding but you don't really go for it, applying corner pressure with sweet spot/sour spot etc. is more valuable.
Sweet Spot Aegis:
Sweet Spot Aegis is when you drop Aegis right in front of the opponent, but not on top of them, in a way where aegis isn't making contact with the opponent. This is incredibly strong in the corner as it allows you to have multiple opportunities to open your opponent up. Think of it like having a giant wall keeping your opponent in the corner. Extremely useful shit, learn how to implement this into your gameplan.
The easiest setup for Sweet Spot is TTH in the corner, the headbutt gives you the correct amount of time to backdash jab fireball into jab aegis for the sweet spot.
Reverse Sweet Spot is a thing, and it's when you put the aegis directly BEHIND your opponent in a way where it's not hitting them, provides the same situations as regular sweet spot.
Sour Spot Aegis:
Sour Spot Aegis is when you drop aegis right on top of the opponent, this is a good way to immediately force an aegis mixup and sometimes you just have to go for it, you will have less opportunities to open someone up but hey, no one guesses right all the time anyways amarite ;^)
Low Parry Tackle
If you charge for tackle, then do forward for the tackle, then down+ for the parry, you'll be able to get tackle out of of a low parry, despite the move ending on forward. It is a bit janky but it allows you to make low parry punishes absolutely hurt for Urien.
Urien F-Shikis:
So in 2i, Urien Headbutt is an overhead, you can create extremely fucked up 50/50 involving getting them to stand block a move and then true stringing into headbutt. While this is risky because of headbutt being punishable, this creates extremely rewarding 50/50s off of stand blocking jHK or other methods of getting them to stand-block. Best coupled with EX Headbutt as that + an aegis reset or setup can grant you the one touch you need to win the game.
Urien Diary
The Urien Diary is a Youtube Playlist consisting of a lot of Urien tech specific to 2nd Impact, This will also provide visual references to most of the concepts talked about here. I highlight suggest looking into it if you want to learn this character.
Matchups
Urien Matchup Chart (2023 by A.D.H.D)
Highly Disadvantaged:
Akuma, Yun
Disadvantaged:
Yang, Ryu, Sean, Ibuki
Even:
Dudley, Ken
Advantaged:
Elena, Necro, Oro
Highly Advantaged:
Hugo, Alex
