
Controlling Space
One initial difference from Street Fighter is that in KOF it becomes possible to attack from more unique angles due to hops. Knowing which grounded and aerial normals can cover specific angles or areas is required knowledge to best deal with the opponent's approach or to judge which approach you should attempt.
Note: the hitboxes in this section are approximations and may not be exact. They primarily demonstrate their simplified 'feel' rather.
Ground Control
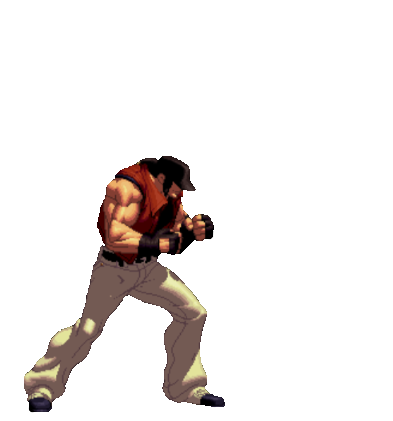
Here we see Terry standing at neutral which doesn't offer any spacing insight in and of itself, especially without context. By visualizing the spaces and angles readily controllable the player can gain greater insight into a stronger spacing game. Specific spacing strategies will vary depending on the distance between both players, so the following sections discuss defending against the common angles of approach from an oncoming hop or jump. Through understanding the general strengths and weaknesses associated with defending each zone, the player should therefore gain insight to each area's benefits and flaws when going on the offense.
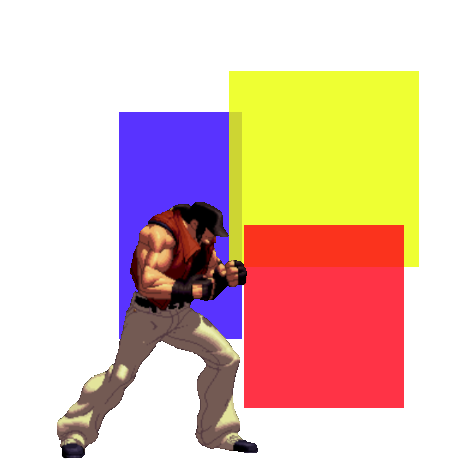
These three colored areas represent common zones of approach and thus angles that the player should want to be able to recognize and act accordingly, whether on offense when deciding which jumping attack to use or on defense when determining to anti-air from the ground, air-to-air, run-under, or escape with a backdash or similar special movement. Notice how the boxes overlap as some approaches and attacks can occupy an intermediate place.
Let's analyze each individually:
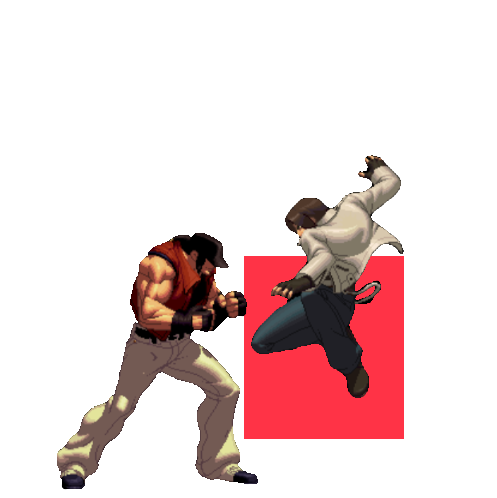
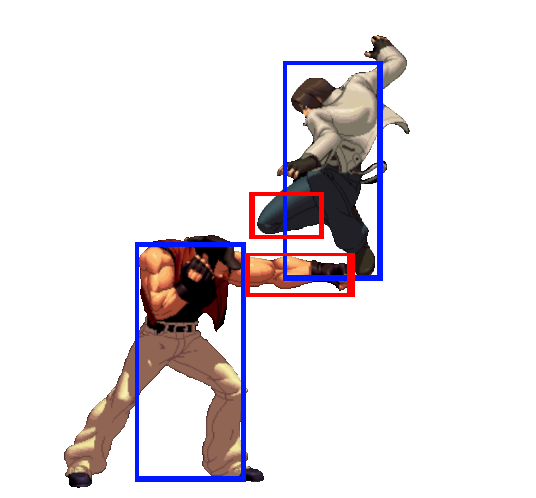
Here we have the low 'hop space' designated in red. This low area can commonly be accessed from a short or hyper hop, although it's possible to space a jump to land and attack in this low space. Having quick access to this intimate, low-to-ground zone is part of what allows KOF to have a faster offensive game.
It's also a simple area to anti-air with a Standing ![]() as demonstrated by Terry and Kyo. A standing jab is quick and places a hitbox out in front of the hopping opponent's short trajectory, effectively hitting the opponent before they stick out their attack. Other attacks can dominate this area (such as a typical Far/Crouching
as demonstrated by Terry and Kyo. A standing jab is quick and places a hitbox out in front of the hopping opponent's short trajectory, effectively hitting the opponent before they stick out their attack. Other attacks can dominate this area (such as a typical Far/Crouching ![]() , other heavy normals, or specials like Yuri's Saifa (
, other heavy normals, or specials like Yuri's Saifa ( ![]() +
+ ![]() ) ) but a Standing Light Punch is the quickest and safest universal solution to a hop. Be aware, that not every single hop will be anti-aired and some setups can cleanly beat anti-air attempts.
) ) but a Standing Light Punch is the quickest and safest universal solution to a hop. Be aware, that not every single hop will be anti-aired and some setups can cleanly beat anti-air attempts.
In short, anti-airing this close space often follows the same principles of anti-airing a typical dive kick in any fighting game.
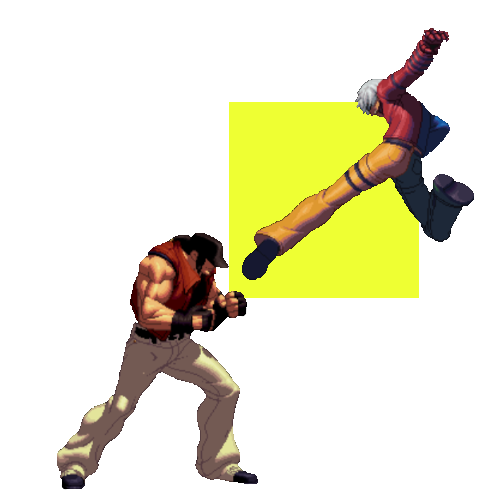
This angle is often difficult to defend against or anti-air. This makes it a hotly contested bit of space to approach from. Defending against an aerial attack with both strong vertical and horizontal reach is difficult. Terry lacks an appropriate attack that can attack diagonally forward from his current spacing and so a solution (besides blocking) revolves around changing the player's positioning.
- The player has a few options against similarly-angled attacks as K's Jumping
 but most require space to work with or a risk to deal with.
- One possibility is to hop backwards before the attack comes into range and then countering the downward attack with a horizontal air-to-air. This doesn't work if the player is cornered or if the opponent is at a large frame advantage from a previous action.
- A gutsy answer is to run forward underneath the oncoming attack and anti-airing with an upward vertical attack.
- Likewise the player can run underneath the oncoming attack and time a Crouching
 attack to meaty the opponent while dodging the attack from behind. This can lead into a combo on success but can be countered if the opponent uses a deep vertical jumping attack or spaces the jumping attack from further out.
- All of these techniques are demonstrated further below on this page.
- All of these techniques are demonstrated further below on this page.
- The grounded player could use an invulnerable move or 'DP' through these tough jump-ins but reacting to a hop with a special is tough and requires the player to be buffering before the opponent hops. Terry is out of luck as his Rising Tackle requires a downward charge which limits the special's use outside of his wakeup.
- Finally, the grounded player can respect the opponent's spacing and block the jumping attack. This is always the safest and easiest option.
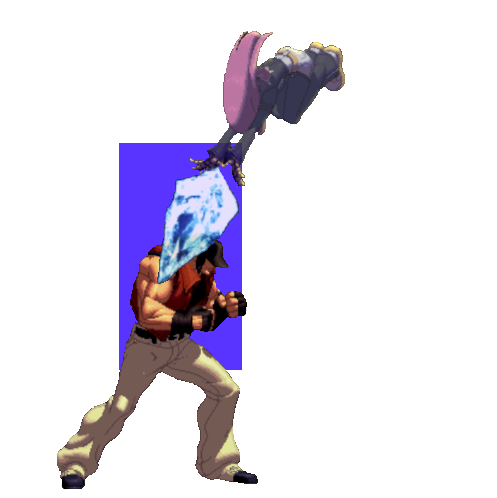
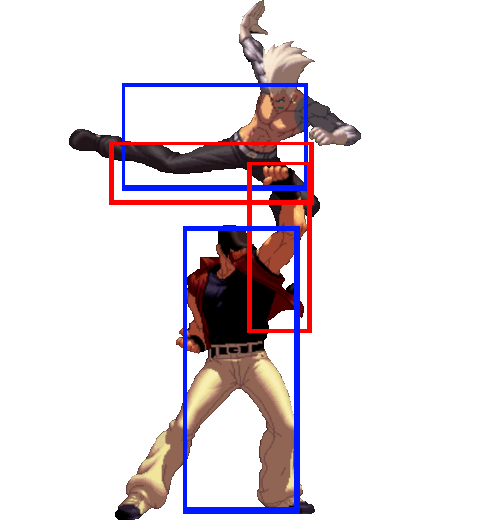
This blue area is the 'deep' or vertical angle where crossups can occur if the aerial attack registers deep enough behind the grounded player.
Vertical attacks offer one solution to these approaches. Terry's df.![]() can anti-air Benimaru's more horizontal Jumping
can anti-air Benimaru's more horizontal Jumping ![]() from underneath its active hitbox, but the more downward vertical jump-ins like Kula's Jumping
from underneath its active hitbox, but the more downward vertical jump-ins like Kula's Jumping ![]() are more difficult to deal with.
are more difficult to deal with.
- Anti-airing attacks similar to Kula's J.
 as fast as possible will lead to a higher success rate. If the opponent starts to attack preemptively to beat out a standard anti-air, the grounded player can adjust by crouching under the early attack and punishing the whiffed jump-in with a tripguard meatying crouching
  . There's also the option of running under the opponent as a more extreme method of preemptively beating an air approach.
Some DPs (Terry's Rising Tackle is one example) or Crouching ![]() type uppercuts can whiff against an aerial player that travels deep into the crossup area (think of the space toward Terry's back). This positioning is easy to establish against a cornered player, especially after a knockdown. Landing this setup can effectively shut down all methods of escape for the player waking up.
type uppercuts can whiff against an aerial player that travels deep into the crossup area (think of the space toward Terry's back). This positioning is easy to establish against a cornered player, especially after a knockdown. Landing this setup can effectively shut down all methods of escape for the player waking up.
- The grounded player can sometimes walk or run forward in this situation and attempt to anti-air the opponent from behind that jumping attack's line of fire. This is a risky method to escape from the opponent since the window of opportunity is limited to times when an air-to-ground isn't a meaty, such as if the opponent rehops. Know that this can backfire if mistimed or if the opponent attacks with a move that can easily cross up.
Another weakness to deep vertical jumping attacks is that they are cleanly beaten by air-to-air attacks.
- As usual, this requires one to have enough spacial and frame advantage to get into the air to intercept the opponent.
Be on the lookout if the opponent's spacing is off; if a vertical air-to-ground attack was spaced too short and whiffs, the a grounded player may be able to safely anti-air with a normal, sweep, or special poke.
Let's review and take a look at all three areas again and then at all of Terry's stationary attack options:

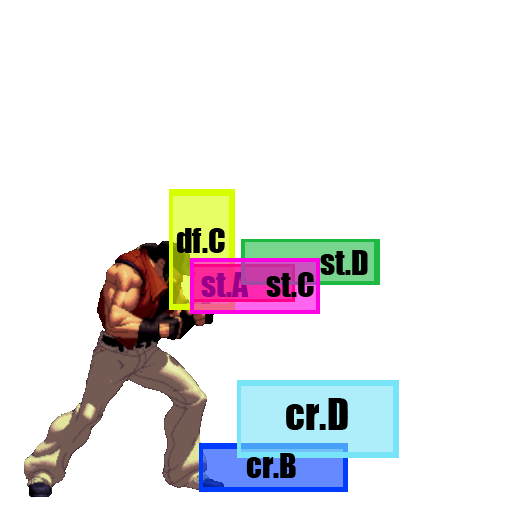
With all of Terry's main grounded attack hitboxes listed at once you can see that he lacks an attack that reaches both vertically and horizontally to control the space between the deep vertical and low hop spaces. Thankfully characters have other techniques to anti-air from the ground, which are listed below.
Tripguard Anti-airs
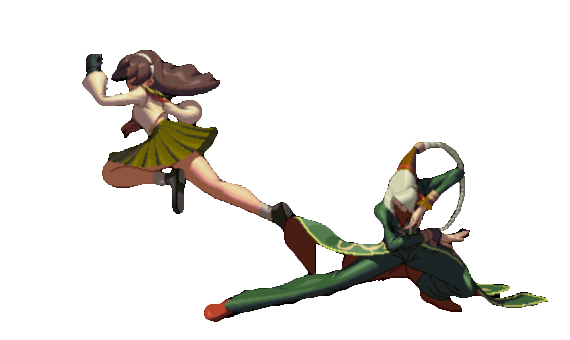
When a player commits to a jump or hop there's a recovery period when landing on the ground where the player cannot block low attacks. The grounded player can take advantage of this and attack with a low-hitting move such as a Crouching ![]() or
or ![]() attack to punish the opponent.
attack to punish the opponent.
In the above picture Duo Lon is meatying Athena's early-timed Jumping ![]() attack. A downward attack like hers is a strong air-to-ground attack when spaced close in toward the grounded opponent, but notice in this situation Athena's attack ran out of active frames and is coming down on the outstretched active hitbox of Duo Lon's Crouching
attack. A downward attack like hers is a strong air-to-ground attack when spaced close in toward the grounded opponent, but notice in this situation Athena's attack ran out of active frames and is coming down on the outstretched active hitbox of Duo Lon's Crouching ![]() . Had Athena been closer or used a more vertically downward-hitting jumping attack then Duo Lon's anti-air could have been heavily punished.
. Had Athena been closer or used a more vertically downward-hitting jumping attack then Duo Lon's anti-air could have been heavily punished.
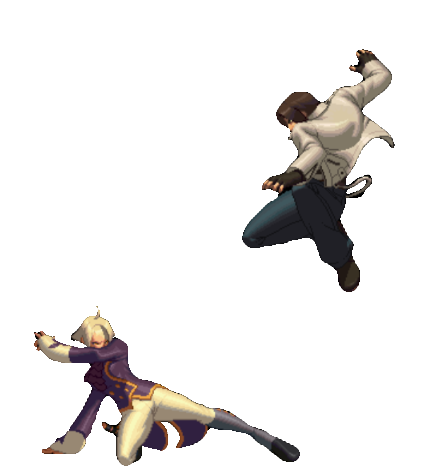
Tripguard meaties are great punishes against whiffed or crouchable jumping attacks but will outright lose to a proper 'deep' downward jumping attack.
In the above setting Kyo's vertical Jumping ![]() would hit Elizabeth out of her Crouching
would hit Elizabeth out of her Crouching ![]() long before Kyo would land on the ground. Like most deep vertical air-to-ground attacks, Kyo's Jumping
long before Kyo would land on the ground. Like most deep vertical air-to-ground attacks, Kyo's Jumping ![]() can hit most low attacks before touching down on the ground and becoming vulnerable. Despite this, it's still possible for a vertical jump-in to be performed too early in a hop or whiff due to spacing, which then leaves the landing player open to a tripguard punish.
can hit most low attacks before touching down on the ground and becoming vulnerable. Despite this, it's still possible for a vertical jump-in to be performed too early in a hop or whiff due to spacing, which then leaves the landing player open to a tripguard punish.
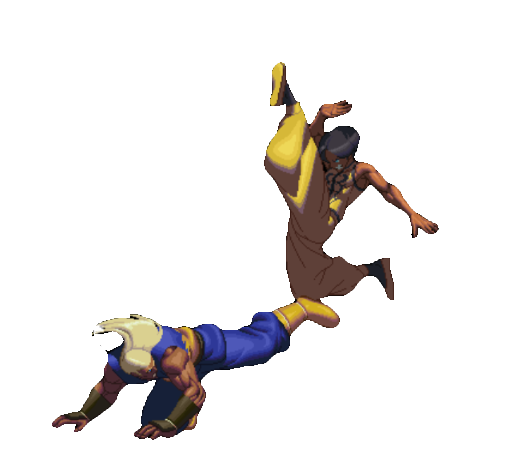
This spacing demonstrates two extremes: Andy's amazing Crouching ![]() that is possibly the best (tripguard) anti-air in the game, and Kensou's Jumping
that is possibly the best (tripguard) anti-air in the game, and Kensou's Jumping ![]() which is an extremely upward and horizontal air-to-air attack, but a horribly unsafe jump-in.
which is an extremely upward and horizontal air-to-air attack, but a horribly unsafe jump-in.
Run-Unders
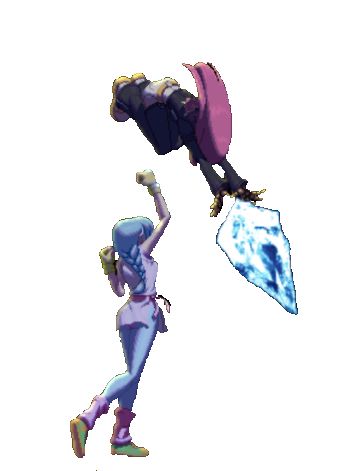
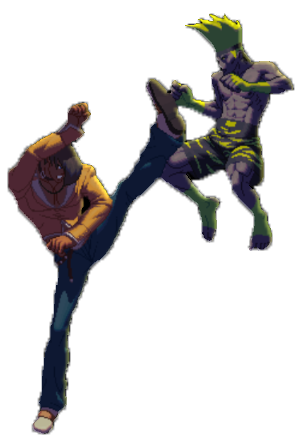
Most air-to-ground attacks have a blind spot directly underneath the character that can be exploited with attacks that reach vertically upward like Yuri's Close ![]() . If the player runs forward and can get either under or behind the opponent then the anti-air should be successful. Even a steep downward jumping attacks can be countered if the running player can get to the opponent before their attack can become active.
. If the player runs forward and can get either under or behind the opponent then the anti-air should be successful. Even a steep downward jumping attacks can be countered if the running player can get to the opponent before their attack can become active.
This technique can be applied not just to full jumps, but also to hops. Iori's Close ![]() is quick and has a great hitbox for anti-airing, though the player often has to run toward to opponent to quickly get inside the range where his Standing
is quick and has a great hitbox for anti-airing, though the player often has to run toward to opponent to quickly get inside the range where his Standing ![]() registers as a Close normal. Running underneath a hop requires the grounded player to be closer up to the opponent, and when running very deep this can lead into a tripguard anti-air:
registers as a Close normal. Running underneath a hop requires the grounded player to be closer up to the opponent, and when running very deep this can lead into a tripguard anti-air:
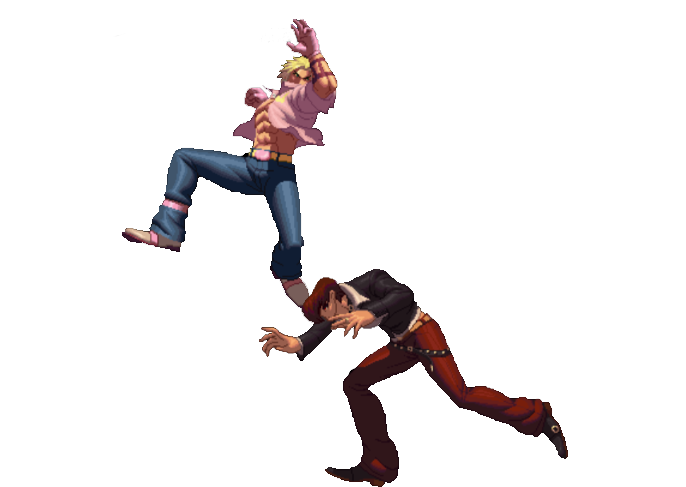
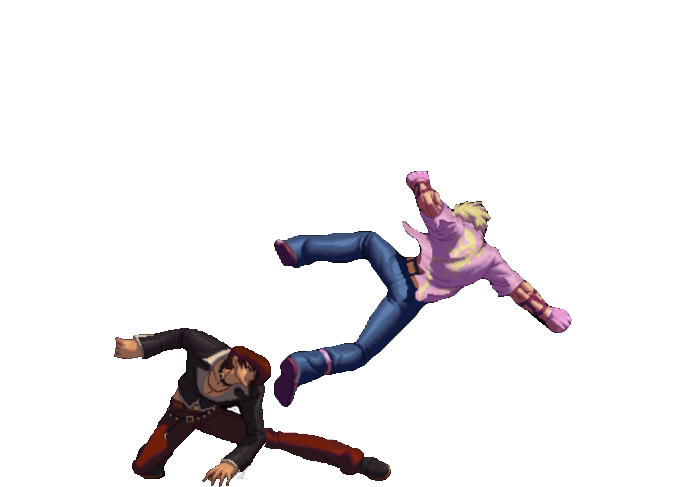
Run-unders can be combined with tripguard anti-airs. With a proper read, the grounded player can run all the way behind the opponent's active jumping hitbox and meaty from behind to start a combo. In the above scene, the Iori player counters Shen's buff Jumping Blowback Attack by moving underneath it. This technique can be very rewarding when landed but arranging for a setup requires spacial awareness and knowledge of the opponent's aerial options in order to make an educated guess about which jump-in the opponent will use. Overall, a very high risk, high reward anti-air method.
Air Control
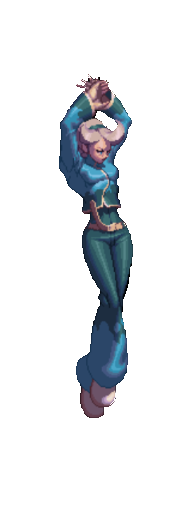
Aerial attack angles can also be categorized as on the ground. This time we'll look at Ash and a few others.
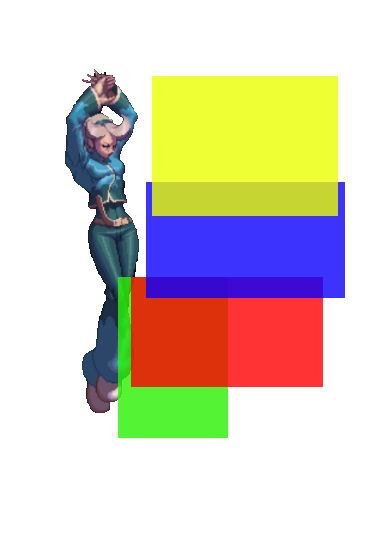
Aerial attacks primarily fall somewhere between these general outlines.
- On top is the yellow box representing the high vertical angle.
- Below is the more pure horizontal space in blue.
- The red zone enters the vertical, downward zone but still maintains extra horizontal range.
- At the bottom is the green more vertical attack zone.
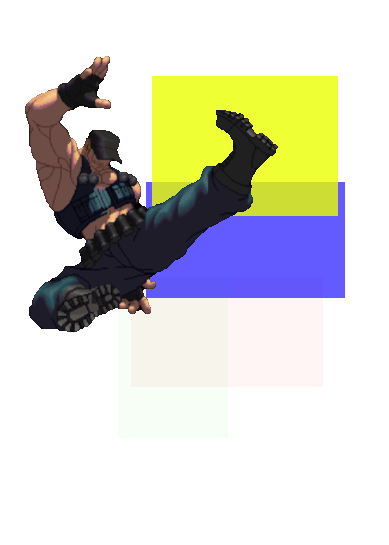
Clark's Jumping ![]() really reaches upward into that high vertical space that can air-to-air opponents above him excellently. His foot's also intermingling with the blue horizontal zone and so the attack can also air-to-air straight in front of him. Just like with Kensou's Jumping
really reaches upward into that high vertical space that can air-to-air opponents above him excellently. His foot's also intermingling with the blue horizontal zone and so the attack can also air-to-air straight in front of him. Just like with Kensou's Jumping ![]() pictured above, attacks with high vertical dominance are easily beaten by tripguard anti-airs.
pictured above, attacks with high vertical dominance are easily beaten by tripguard anti-airs.
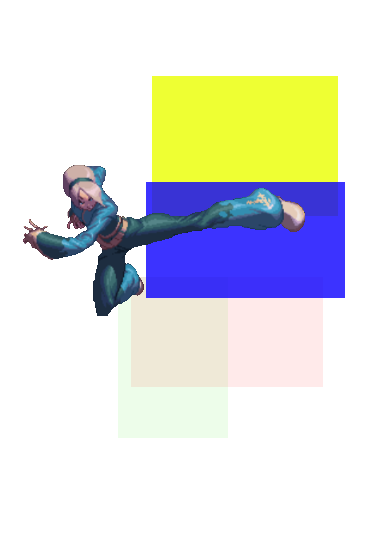
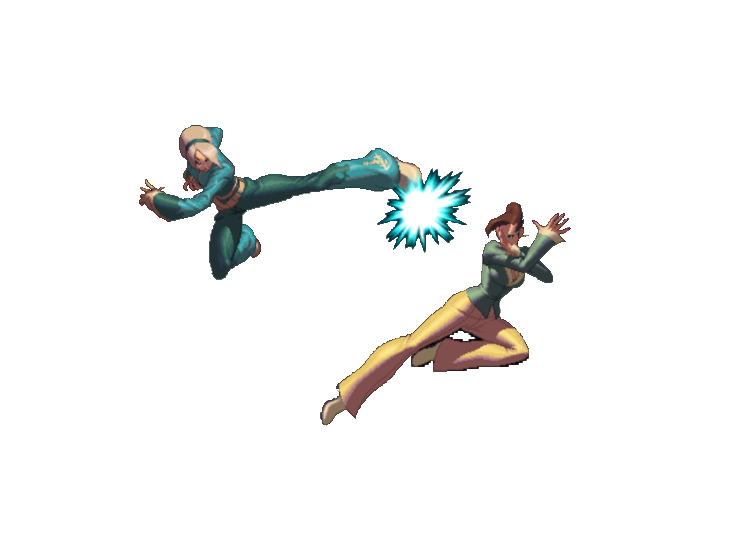
Ash's Jumping ![]() reaches primarily horizontally but slightly overlaps with the higher upward space. Attacks with this angle function best as air-to-air attacks against opponents in front of the player or slightly above or below. Downward, vertical jumping attacks will lose to these attacks unless the horizontal attack is stuffed during the startup or attacked from directly above.
reaches primarily horizontally but slightly overlaps with the higher upward space. Attacks with this angle function best as air-to-air attacks against opponents in front of the player or slightly above or below. Downward, vertical jumping attacks will lose to these attacks unless the horizontal attack is stuffed during the startup or attacked from directly above.
The effectiveness of horizontal air-to-airs should speak for itself from the image of Vice and Ash.
- While strong air-to-airs, the vertical reach is weak. These attacks are incredibly vulnerable to tripguard anti-airs if the opponent crouches.
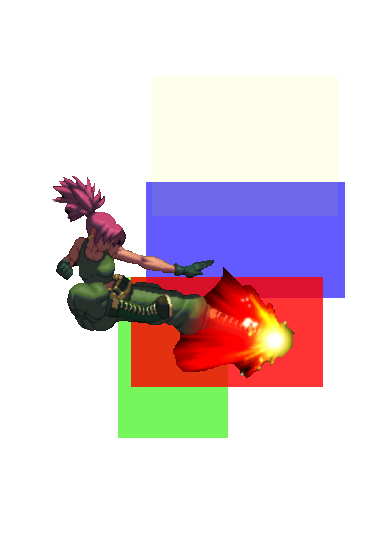
Jumping attacks that fall into the red-colored area are a strong intermediate between the horizontal and the vertical. When spaced to tip the grounded player these attacks hit deep enough to force crouchers to standblock while having the extended width that places the character's vulnerable hitbox far out of reach. Other moves like Benimaru's Jumping ![]() can additionally cross up the opponent when deep.
can additionally cross up the opponent when deep.
- One weakness of these jumping attacks is that they can be vulnerable to tripguard anti-airs if timed early. Timing the attack later creates a longer window for the grounded player to anti-air with a normal attack.
Jumping attacks that fall into the red and blue zones (or in other words, attacks with strong horizontal hitboxes) also function defensively. Hopping into a horizontally-angled attack can create a barrier that will both air-to-air and hit standing or approaching opponents. This is a great tactic against an aggressive opponent since it can hit a running or hopping player. Take a look at what options Hwa Jai defends against in the below setup:
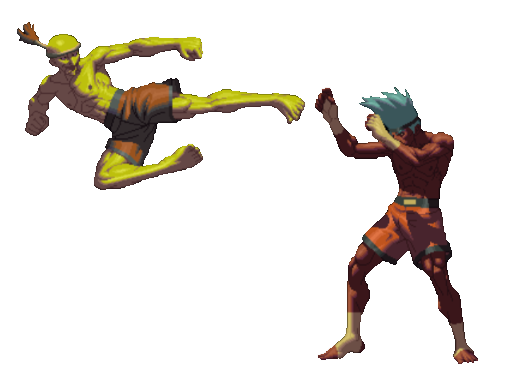
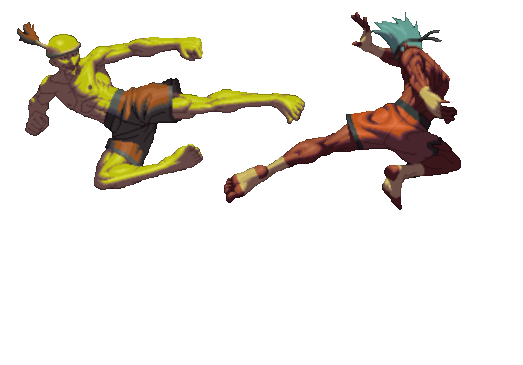
Hwa Jai's Jumping Blowback Attack has been timed late from a neutral hop so that it prevents Joe from walking or running forward and if Joe tries his usual short hop Jumping Heavy Kick to get in, Hwa Jai's attack would cleanly air-to-air it with its stronger horizontal hitbox.
This option limits the other player's methods of approaching, but as with any tactic these setups have risks of their own.
- Activating a jumping attack earlier in a jump arc so that it may air-to-air better, or hopping forward with a horizontal attack leaves the aerial player vulnerable to a tripguard punish from below. A player that performs patiently on the ground can wait and punish these setups by crouching and reacting with a low attack.
- Additionally, a player could challenge this technique with a quick or powerful horizontal air-to-air. Hwa Jai's Jumping Blowback Attack has a big hitbox, but the Joe player in our demonstration could stuff the attack before before it becomes active with a jumping attack of his own. Just be aware that hopping with a preemptive horizontal attack can leave one vulnerable to a tripguard punish just as mentioned above.
- Although the running player may can get hit by the jumping attack from this setup, the hopping player needs some space to work with in so that their jumping attack comes out at the descent of their hop. A close grounded player can simply run and get underneath the hopping player and anti-air with an upward attack before the jumping attack is low enough to hit. Spacial awareness is key for both the grounded and airborne player.
- Reacting to a hop is difficult, but the grounded player has the option of anti-airing with a special poke that commands the short hop space. For instance, a projectile may automatically anti-air the hopping player.
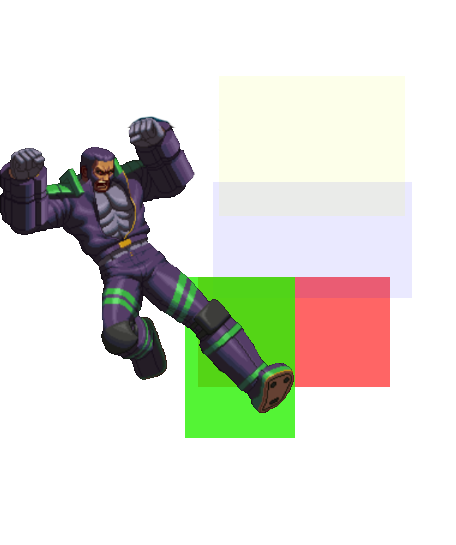
The last aerial angle to cover is the deep vertical space. These are attacks that hit deeply downward but lack that extra horizontal range; this leaves the aerial player more vulnerable to anti-air attacks while moving into position to connect against the player. One of the best ways to minimize the vulnerability when using one of these attacks is to simply save them for hops since they're the hardest aerial approaches to react to.
- Attacks with vertical angles are usually the primary air-to-ground choice for up-close hop pressure. Their additional downward range allows them to connect earlier on in a hop arc if need be, which complexifies the player's offensive options.
- Some vertical attacks can also cross up such as Kim's Jumping
 and Kyo's Jumping
  .
. - Some command normals that lower a character's vulnerable hitbox (King's df.
 slide) can only be jumped on with a direct, downward attack.
Projectiles
The projectile has proven itself time and again to be a dominating weapon in 2D fighters. This is because projectiles act as pokes that travel fully across the screen while lacking a vulnerable hitbox. From longer distances its easy to observe how projectiles heavily limit the opponent's moveable space but a lesser obvious strength is found when using fireballs as extended pokes just outside of the opponent's maximum normal range.
There are two main projectile classes in KOF which vary in which ways they limit the opponent's aerial approaches. The opponent may have numerous methods to get around projectiles in KOF XIII, though most are baitable and then punishable when read, and so the key is to become as gutsy or minimalist as necessary against the opponent, and then further pressing the advantage off a knockdown or anti-air.
Non-grounded Projectiles
This is the more common projectile type that mimics standard Hadouken's properties. Takuma's Ko'ouken ( ![]() +
+ ![]() ) is one just fireball, so let's discuss how these are unique.
) is one just fireball, so let's discuss how these are unique.
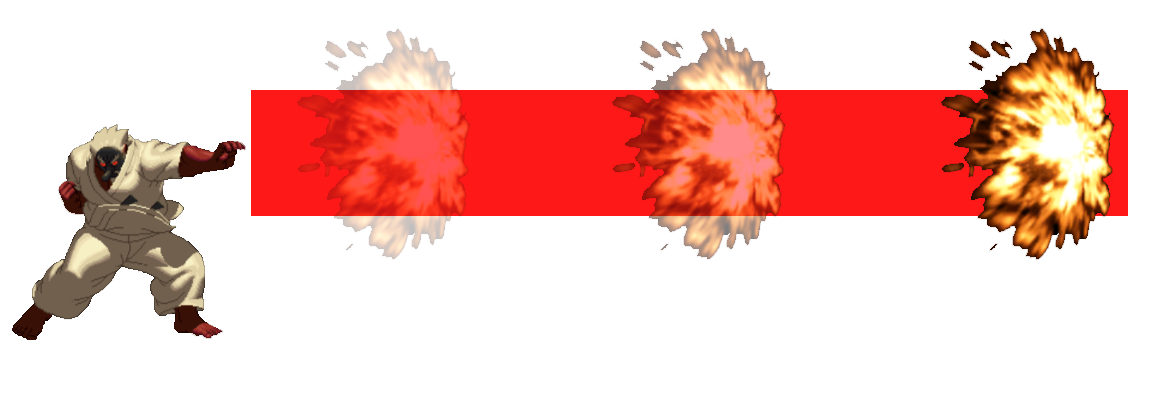
Non-grounded projectiles travel higher in the air than their grounded siblings. Look at how these projectile dominate the Short Hop space discussed above; Takuma's Ko'ouken is big enough to hit crouching opponents and its additional height allows it to anti-air and otherwise reign over this region across the entire screen! This encourages the opponent to commit to a full jump to quickly get in, as reacting to an oncoming projectile's speed and correctly timing a hop is difficult.
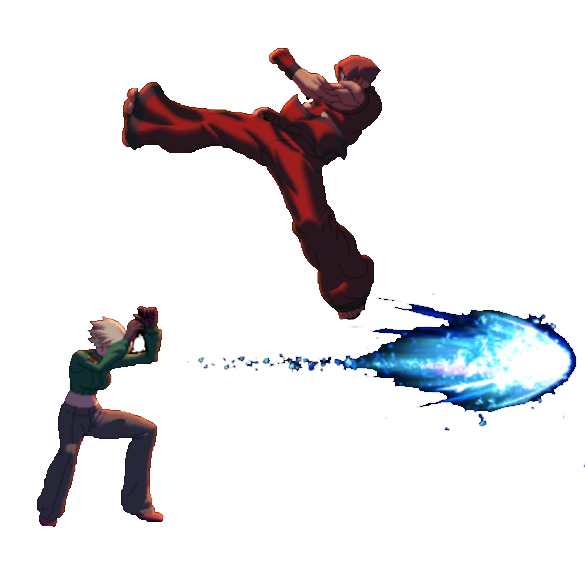
Most projectiles can be baited and punished with a jump or super jump as with any fighting game. After using a few projectiles and discouraging the opponent from hopping, the zoning player should keen up and look out for a new method of approach from the opponent. Many of these desperate attempts to get in are punishable--but only when taking a break from flinging fire. Full jumps can be reacted to and anti-aired from the ground or be met with an appropriate horizontal or upward air-to-air. More directly damaging anti-airs include invulnerable uppercuts, EX specials, and DMs, all of which are more likely to connect against a jump vs a hop.
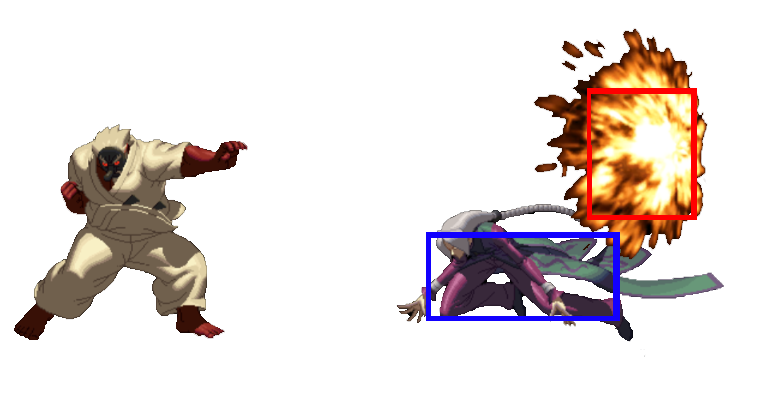
One weakness of non-grounded projectiles is that certain characters can shrink their hitboxes to maneuver underneath an oncoming volley. Duo Lon's Hiden: Genmubakkoshikon ( ![]()
![]()
![]() +
+ ![]() ) DM is a great anti-air and projectile punish as his vulnerable hitbox is significantly lowered while he moves forward, despite the fact he isn't even invulnerable when performing this. Always be aware of the opponent's options that allow them to get underneath these projectiles. Recognizing this flaw moves us on to grounded projectiles:
) DM is a great anti-air and projectile punish as his vulnerable hitbox is significantly lowered while he moves forward, despite the fact he isn't even invulnerable when performing this. Always be aware of the opponent's options that allow them to get underneath these projectiles. Recognizing this flaw moves us on to grounded projectiles:
Grounded Projectiles
The lesser common projectile type, but a more unique staple to SNK fighters. We'll look at Kyo's 108 Shiki: Yamibarai ( ![]() +
+ ![]() ) as our example:
) as our example:
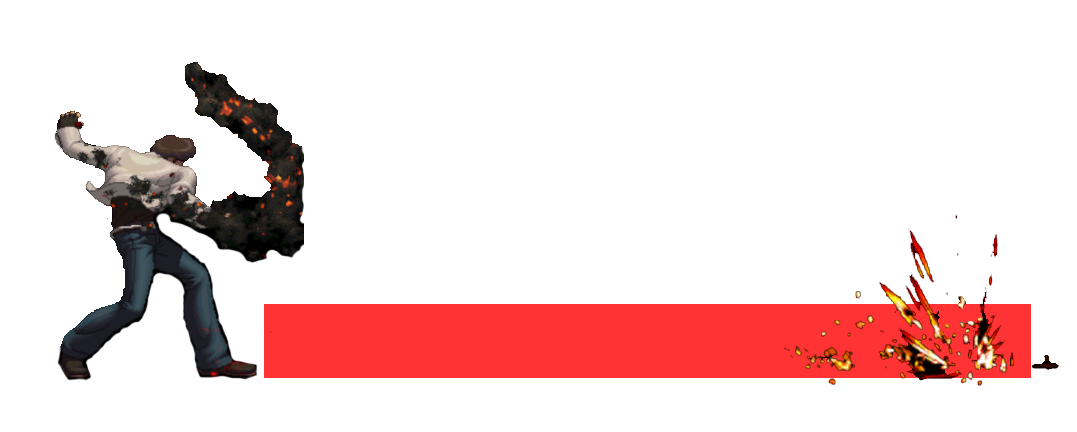
Grounded projectiles travel fullscreen and may initially appear identical in utility to any other fireball. But compare the areas controlled by each projectile archetype and the difference becomes clear: grounded projectiles don't control the short hop space. Either projectile can work wonders against a grounded enemy, but their similarities end at that. So what does this mean?
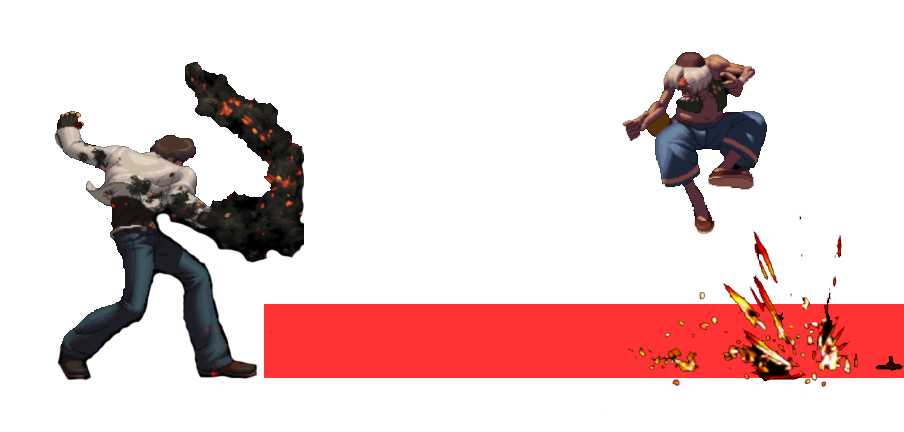
The simplest method to deal with a grounded projectile would then be to hop over it. Grounded projectiles carry a much lighter threat of anti-airing a short hop attempt, and recall that a full jump unnecessarily increases one's vulnerability. So if suspended projectiles encourage jumping, their bottom-bound brothers promote hopping. The next step in countering the adversary is to bait a hop in order to intercept the opponent with a grounded anti-air (one that reaches into the hop space) or a horizontal air-to-air (which gives varying frame advantage, spacing setups, and possibly set up for cross-unders).
Another built-in bonus is that the enemy can't manipulate their hitbox to shrink underneath these projectiles, so the opponent will need to hop, block, roll, or use a different method to approach attacking player.
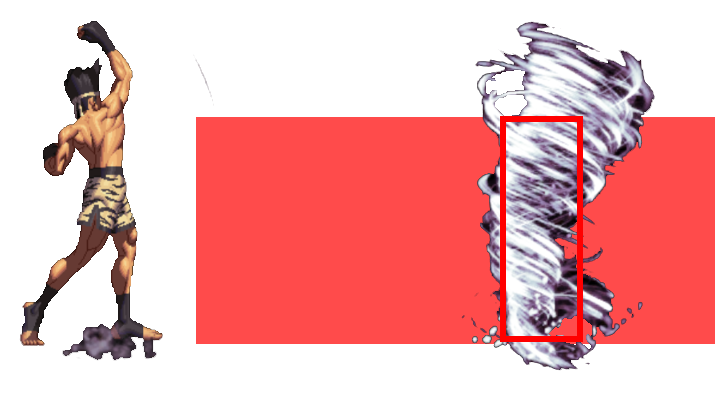
Joe's Hurricane Upper ( ![]() +
+ ![]() ) is unique in that its hitbox stretches from the bottom of the ground up into the low hop space. He has the benefits of both types in one.
) is unique in that its hitbox stretches from the bottom of the ground up into the low hop space. He has the benefits of both types in one.
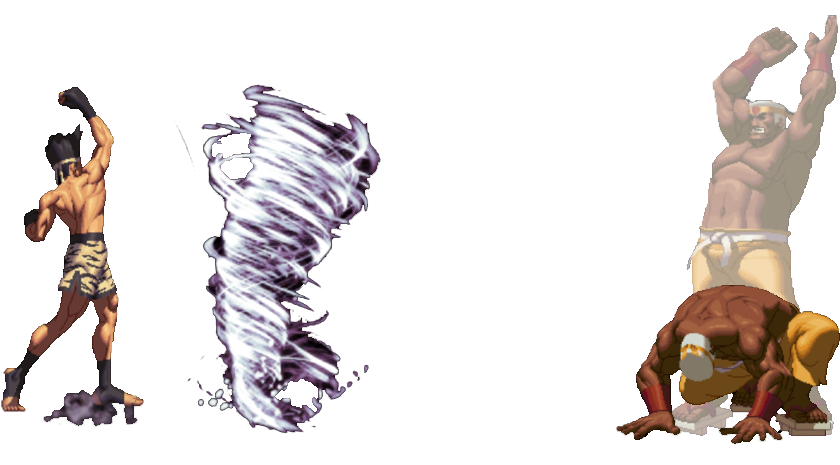
Joe players must still take caution to avoid having his projectile hopped or jumped, rolled through, or countered with reflectors or anti-projectile attacks such as Daimon's Jiraishin ( ![]() +
+ ![]() ) fullscreen pound. In fact, many EX specials and DMs can be used to move through projectiles regardless of their hitbox. Fortunately for the projectile player most of these invulnerable moves are unsafe on block and deplete the opponent's meter, and so baiting very is important. Never be predictable.
) fullscreen pound. In fact, many EX specials and DMs can be used to move through projectiles regardless of their hitbox. Fortunately for the projectile player most of these invulnerable moves are unsafe on block and deplete the opponent's meter, and so baiting very is important. Never be predictable.
Projectile Strength
Ignoring EX moves and specific one-speed projectiles like K's Second Shot ( ![]() +
+ ![]() then
then ![]() +
+ ![]() ), most characters only have two fireball speeds; fast and slow. This difference goes further than just allowing for the player to mix up speeds to keep the opponent out as in a Street Fighter projectile-trap sense.
), most characters only have two fireball speeds; fast and slow. This difference goes further than just allowing for the player to mix up speeds to keep the opponent out as in a Street Fighter projectile-trap sense.
Weak Projectiles
The slower projectiles have two large advantages: they stay on the active playing field for a longer duration and their recovery speed is much greater. This is important as these factors combined will often allow the projectile player to send out a fireball and then trail behind it. In Street Fighter IV, Rose is barely able to trail behind her weak Soul Spark when the opponent is from mid to far-screen, though by spending meter for an FADC-canceled projectile just about any character can walk behind their canceled fireball and force the opponent to block and deal with close-ranged mixups. Guile is historically known for always having this same option from his weak Sonic Boom, though his close offensive options are limited.
In KOF, most light projectiles recover around when the attack travels halfway across the screen. When this happens, a projectile character can simultaneously control the ground while being free to move on their own, much like when FADCing a projectile. Unlike in Street Fighter, KOF enables more mobility options as the player can run or hop or jump to quickly move forward to get in on the opponent. If the opponent decides to block a weak projectile, the other player can capitalize on their blockstun and move forward to launch an offense. Joe's weak Hurricane Upper allows him to recover with enough time to run forward, confirm if the opponent tries to jump or roll through, and punish escape attempts on reaction; and if the opponent blocks then Joe gets a free mixup from the blockstun.
This technique also works on the defensive by using the time bought from a blocked projectile to backdash or bait a projectile-invulnerable counterattack. Athena and Kyo ould follow a projectile by using their aerial command normals off their backdashes to fly backwards at a faster speed than the opponent can match while running. This can be a very frustrating tactic to get in against, and so the zoning player can easily capitalize off the opponent's frustration by baiting an unsafe action from the opponent.
The effectiveness of these followups varies based on how fast a character recovers from their projectile animation, and how slow their projectile travels across the screen. Duo Lon's Juon Shikon ( ![]() +
+ ![]() ) travels very slowly and recovers quickly which guarantees him two attack fronts once it comes out (though his projectile has a short range and is easily hopped over). Lesser extreme projectiles will recover more slowly, though all it takes is a solid distance between the opponent or their willingness to block in order to open them up from across the screen.
) travels very slowly and recovers quickly which guarantees him two attack fronts once it comes out (though his projectile has a short range and is easily hopped over). Lesser extreme projectiles will recover more slowly, though all it takes is a solid distance between the opponent or their willingness to block in order to open them up from across the screen.
Strong Projectiles
With all the advantages of slower projectiles, the appeal of their faster variety may initially seem diminished. However, slower projectiles are much easier to react to and counter with a hop, jump, or any efficient anti-fireball attack, and repeatedly using the same speed fireball makes one predictable. Enter the strong projectile. Their accelerated speed can blow up the opponent's reactions and timing, such as when looking to use a projectile counter or when timing a jump when predicting more sloth speed. And although it may seem obvious, they get across the screen faster and form tighter blockstrings and leave a tighter window for the opponent to attempt a jump or other escape method.
Their faster speed comes with the downside of controlling the active play area for a shorter amount of time. Also, since the opponent will block or avoid the faster projectile much earlier, this means the recovery on these fast projectiles is much worse. Because of this, nearly all fast projectiles can be safely rolled, efficiently shortening the distance between the two players. After the opponent rolls a fast projectile, the threat of hops, running, and long-reaching normals applies a heavy pressure that only increases the risk of further projectile usage.
In short, the opponent knows just how good/annoying a slow projectile can be and will try to avoid blocking or being hit by one. In fact they're so much safer, who'd even expect a fast one since they have such poor recovery and can so easily sacrifice spacial advantage? And with that thought in mind, the enemy walks forward in preparation to counter the next projectile... and end up walking straight into the fast version before reacting with their super. And that's what we call yomi layer 3.
