
Amaterasu
Amaterasu, the sun goddess, lost her physical form year ago defeating the True Orochi. 100 years later she was resurrected in the form of a wolf who now uses her powers to restore beauty to islands of Japan.
In a nutshell
Amaterasu is a very unique and versatile character due to her extensive weapons and swift defense. She is well equiped to force the opponent into a corner through the use of her Thunder Edge and airdash creating situations to increase preasure and extend combos, also with the use of airdash. A new change to the game system in Ultimate prevents blocking while airdashing which leaves her vulnerable to counter attacks. Lastly, Ammy is shorter than many standing attacks leaving the opponent vulnerable to retaliation.
Character Vitals
Move List
Assist Types
Normal Moves : Solar Flare Weapon Stance
softknockdown
San
Shi
Solar Flare Attack
H
H
h
60,000
60,000
60,000
can chain into itself to 3 hits
softknockdown vs airborne opponent
Normal Moves : Thunder Edge Weapon Stance
softknockdown
(Charged version)
San
Thunder Edge Slash
H
h
80,000
80,000
can be charged
forced groundbounce can be charged
San
Thunder Edge Slash
(charged versions)
H charge
h charge
100,000
100,000
stagger
stagger
can be charged
(Charged Version)
forcedgroundbounce
softknockdown vs airborne opponent
otg
groundbounce vs airborne opponent
(Charged Version)
otg
groundbounce vs airborne opponent
Normal Moves : Devout Beads Weapon Stance
(79,500)
(79,500)
softknockdown
(79,500)
San
Shi
Devout Beads Whip
H
H
h
25,000 X 4
25,000 X 4
25,000 X 4
(153,900)
(163,900 for full rosary combo)
softknockdown
(79,500)
softknockdown vs airborne opponent
Throws
Universal Special Moves
(Paper)
M changes to Thunder Edge
H changes to Devout Beads
Solar Flare Stance Special Moves
Counter vs high and mid
cptr
hardknockdown
Counter vs low
cptr
hardknockdown
proj reflector
if proj cant be reflected:
projnull instead
Thunder Edge Stance Special Moves
L stabs f
m stabs uf
h stabs u
(Charged Version)
slightly by height and angle
Devout Beads Stance Special Moves
(20,000 ~ 113,600)
mashable
freezes opponent
atk used determines angle:
l shoots f
m shoots uf
h jumps and shoots df
Hyper Moves
+ 10,000 per ice hit
+ 7,000 per lightning hit
+ 80,000 for final bolt
(295,800)
Damage varies by screen location
soft knockdown for first hit
otg hardknockdown
for all other hits.
Doesn't scale normally with combo.
More research required.
slow state that affects only
opponent's team.
lasts 5 seconds.
Level 3 Hyper.
Frame Data
| Move Name | Startup | Active | Recovery | Adv. On Guard | Adv. On Hit | Notes |
|---|---|---|---|---|---|---|
| 3 | 2 | 11 | -1 | -1 | ||
| 6 | 6 | 12 | -1 | -1 | ||
| Solar Flare |
8 | 4 | 16 | +2 | +2 | |
| Thunder Edge |
13 | 4 | 17 | +1 | +1 | |
| Devout Beads |
15 | 4 | 30 | -9 | +0 | |
| Crouch |
4 | 2 | 12 | -2 | -2 | |
| Crouch |
7 | 6 | 12 | -1 | -1 | |
| Solar Flare Crouch |
9 | 4 | 16 | +2 | - | |
| Thunder Edge Crouch |
13 | 4 | 19 | -1 | - | |
| Devout Beads Crouch |
13 | 4 | 26 | -5 | - | |
| 7 | 6 | 18 | -2 | - | ||
| Jump |
4 | 4 | 14 | +8 | +8 | |
| Jump |
7 | 3 | 20 | +13 | +13 | |
| Solar Flare Jump |
9 | 5 | 20 | +17 | +17 | |
| Thunder Edge Jump |
17 | 4 | 17 | +17 | +17 | |
| Thunder Edge Jump Hold |
36 | 4 | 17 | +17 | - | |
| Devout Beads Jump |
18 | 5 | 18 | +17 | +17 | |
| Jump |
11 | 3 | 22 | +14 | +14 | |
| Jump |
13 | - | Until Ground | - | - | |
| Jump |
13 | - | Until Ground | - | - | |
| Jump File:D.gif + |
13 | - | Until Ground | - | - | |
| Forward Throw | 1 | 1 | - | - | - | |
| Back Throw | 1 | 1 | - | - | - | |
| Forward Air Throw | 1 | 1 | - | - | - | |
| Back Air Throw | 1 | 1 | - | - | - | |
| 38 | - | 141 | ||||
| 32 | 17(6)6 | 110 | ||||
| 59 | 11 | 93 | ||||
| Snap Back | 2 | 4 | 18 | +1 | - | |
| Gohadoken L | 14 | - | 28 | -6 | -4 | |
| Gohadoken M | 14 | - | 31 | -9 | -7 | |
| Gohadoken H | 14 | - | 34 | -12 | -10 | |
| Zanku Hadoken L | 10 | - | 35 | +10 | +11 | |
| Zanku Hadoken M | 10 | - | 40 | +10 | +11 | |
| Zanku Hadoken H | 10 | - | 45 | +10 | +11 | |
| Goshoryuken L | 6 | 14 | 24 | -15 | -2 | |
| Goshoryuken M | 4 | 5(1)10 | 30 | -23 | -4 | |
| Goshoryuken H | 3 | 6(1)10 | 44 | -36 | -18 | |
| Tatsumaki Zankyaku L | 8 | 7 | 18 | -1 | - | |
| Tatsumaki Zankyaku M | 8 | 17(6)6 | 14 | +3 | +11 | |
| Tatsumaki Zankyaku H | 8 | 41(6)6 | 16 | +1 | +9 | |
| Air Tatsumaki Zankyaku L | 5 | 28 | Until Grounded, 6 frames grounded recovery | +12 | +13 | |
| Air Tatsumaki Zankyaku M | 5 | 18(4)6 | Until Grounded, 6 frames grounded recovery | +12 | +13 | |
| Air Tatsumaki Zankyaku H | 5 | 42(4)6 | Until Grounded, 6 frames grounded recovery | +12 | +13 | |
| Hyakkishu L | 37/ Until Grounded | |||||
| Hyakkishu M | 42/ Until Grounded | |||||
| Hyakkishu H | 53/ Until Grounded | |||||
| Hyakki Gosho | 9 | 4 | 15 | +12 | ||
| Hyakki Gojin | 14 | Until Grounded | 8 | +11 | +13 | |
| Hyakki Goho | 10 | - | Until Grounded | |||
| Ashura Senku | 14 | 20 | ||||
| Messatsu-Gohado Agyo | 7+1 | 76 | 50 | -20 | -18 | |
| Messatsu-Gohado Ungyo | 7+1 | 80 | 46 | -34 | ||
| Tenma-Gozanku Agyo | 7+2 | 76 | 16 | +3 | -5 | |
| Tenma-Gozanku Ungyo | 7+2 | 80 | 13 | -1 | ||
| Messatsu-Goshoryu | 13+3 | 14(6)14(6)14 | 40 | -22 | -4 | |
| Raging Demon | 5+0 | 40 | 4 |
Mission Mode
Strategy
Tips and Tricks
- While learning Amaterasu, do not be afraid to lose. Take your time learning each weapon separately before trying to combine all of her techniques into one gameplan. Remember to experiment and find out what you can crouch under as one of the shortest characters in the game. The knowledge will add up to a much deadlier character in the future.
- Play the matchup when using Amaterasu. If your opponent's character is weak to rush down, then rush him down. If he is weak to keep away, keep him out!
- Be ready for a quick, nearly full screen punish using the Okami Shuffle super.
- Don't be afraid to slow your opponent's down with the Vale of Mist. Meter gain stops during this, but the damage you get or the escape you make can be invaluable. Try DHCing into this super for a safe switch.
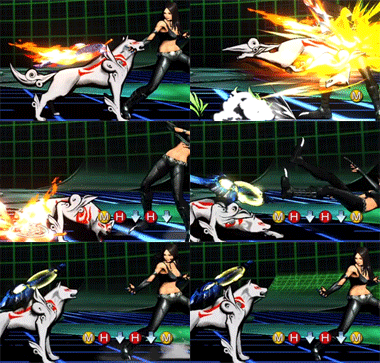
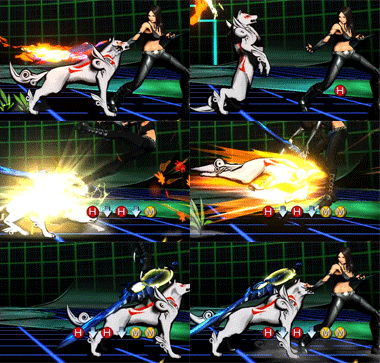
- The ideal way to switch weapons midcombo is to connect a Down+Heavy then quickly Down+(weapon change button), as opposed to Down+Heavy then Down+Down+(Weapon Change Button). Doing this allows you to continue the combo easier as you are performing one less command input, using the Down+Heavy as one of the Down commands for the weapon change. Here are animated GIFs to visually describe to perform this.
1- Quick Weapon change done at the end of a 3-hit combo at this link here
2- Quick Weapon change in the middle of a 3-hit combo here


