|
|
| Line 4: |
Line 4: |
| |content1= | | |content1= |
| {{Content Box|header=Introduction|content= | | {{Content Box|header=Introduction|content= |
| | | (Lore info here) |
| Placeholder
| | <br> |
| | <br> |
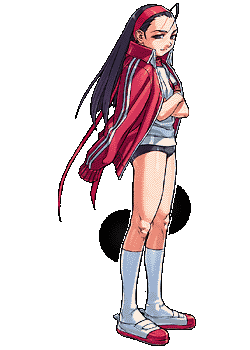
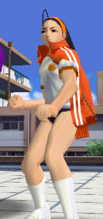
| | Much like how [[Project Justice/Roy | Roy]] is '''''"The"''''' character to pick, '''Chairperson''' is also '''''"The"''''' character in '''''Project Justice'''''...in her own way. Having studied (long distance) under the illustrious Saikyo Style, here's what she brings to the table: |
| | <br><br> |
| | Abysmally lacking in damage, poor reaching normals, specials that are occasionally unsafe '''''on hit''''', and to top it off, lacking a Rival Launcher '''''entirely'''''. '''Chairperson''' has a few mountains to climb to be successful on the front lines. Thankfully, '''Chairperson''' does have one extremely redeeming quality: her Team-Up, '''''Chairpersons One-Point Advice'''''. Debatably one of the best Team-Ups in '''''Project Justice''''', '''Chairperson''' hops into the fray and restores not only 4 bars of Guts (super) meter, but also restores a portion of Health! While she may struggle heavily to be successful on point, her assist can make her a potentially invaluable asset to a full teams composition. '''Chairperson''' is the most useful and versatile benchwarmer you could ever hope to find, and while not a great character in her own right, is a fantastic 2nd or 3rd pick for players just starting out, or specialists who would never need any other characters anyways. |
|
| |
|
| }} | | }} |
| Line 41: |
Line 45: |
| }} | | }} |
| }} | | }} |
| ----
| |
| <br>
| |
| <center><span style="font-size: 1.3em;"><u>'''''Old page below the fold until new page converts all information to new format!'''''</u><span></center>
| |
| <br>
| |
| <div class="mw-collapsible-content srkbox" style="image-align: left; text-align: left; padding: 30px;">
| |
| <div class="toccolours mw-collapsible mw-collapsed">
| |
|
| |
| [[File:Project_Justice_Chairperson.gif|right]]
| |
|
| |
| ==Introduction==
| |
| Most people who play Project Justice will agree that every character is viable, not matter where they are on the tier list. This is the exception.
| |
|
| |
| Chairperson has one of the best Team-ups in the game, which makes her a viable partner. And that's where she should be, because she is absolutely horrible on point.
| |
|
| |
| Her frame data is bad across the board, her normals outside of jabs are so bad that the opponent can easily punish her with Tardy Cancel and her Tardy Cancel options are not great either. Almost all of her specials are unsafe and some are unsafe ON HIT, but the worst part is that she has poor damage output. Which means you won't leave a dent unless you do a super.
| |
|
| |
| Only a few souls has dared to play her on point. Some by mistake, and some who are simply just insane.
| |
|
| |
| ==Normal Moves==
| |
| {{PJMoveListHeader}}
| |
| {{PJMoveListRow | | {{n}} {{lp}} | 9 | 20 | +1 | +4 | 3 | All | }}
| |
| {{PJMoveListRow | | {{n}} {{hp}} | 13 | 32 | +2 | -8 | 7 | All | }}
| |
| {{PJMoveListRow | | {{d}} {{lp}} | 11 | 17 | +9 | +5 | 3 | Crouching | }}
| |
| {{PJMoveListRow | | {{d}} {{hp}} | 18 | 39 | +2 | -17 | 8 | Crouching | }}
| |
| {{PJMoveListRow | | {{n}} {{lk}} | 9 | 26 | -4 | -2 | 4 | All | }}
| |
| {{PJMoveListRow | | {{n}} {{hk}} | 14 | 25 | +2 | -1 | 8 | All | }}
| |
| {{PJMoveListRow | | {{d}} {{lk}} | 12 | 32 | -1 | -10 | 3 | Crouching | }}
| |
| {{PJMoveListRow | | {{d}} {{hk}} | 16 | 27 | +4 | -5 | 7 | Crouching | }}
| |
| {{PJMoveListRow | | {{u}} {{lp}} | 9 | On landing, 1 | - | - | 3 | Standing | }}
| |
| {{PJMoveListRow | | {{u}} {{hp}} | 17 | On landing, 13 | - | - | 7 | Standing | }}
| |
| {{PJMoveListRow | | {{u}} {{lk}} | 8 | On landing, 1 | - | - | 3 | Standing | }}
| |
| {{PJMoveListRow | | {{u}} {{hk}} | 19 | On landing, 1 | - | - | 10 | Standing | }}
| |
| {{MoveListFooter}}
| |
|
| |
| ==Command Normals==
| |
| {{PJMoveListHeader}}
| |
| {{PJMoveListRow | | {{lp}} {{lp}} {{lp}} | 16 | 46 | -3 | -22 | 5 | All | }}
| |
| {{PJMoveListRow | | {{hp}} {{hp}} | 13 | 38 | +2 | -14 | 11 | All | }}
| |
| {{PJMoveListRow | | {{f}} {{hp}} | 15 | 45 | -2 | -21 | 10 | All | }}
| |
| {{PJMoveListRow | | {{f}} {{hk}} | 15 | 39 | - | -15 | 11 | All | Blowback }}
| |
| {{PJMoveListRow | | {{b}} {{hp}} | 20 | 46 | - | -22 | 7 | Standing | Overhead, Knockdown }}
| |
| {{PJMoveListRow | | {{b}} {{hk}} | 20 | 35 | - | -11 | 10 | All | Blowback }}
| |
| {{PJMoveListRow | | {{df}} {{hp}} | 12 | 37 | - | -8 | 8 | All | Mini Launcher }}
| |
| {{PJMoveListRow | | {{df}} {{hk}} | 19 | 32 | - | -8 | 8 | All | Mini Launcher }}
| |
| {{PJMoveListRow | | (Air) {{f}} {{hp}} | 14 | On landing, 1 | - | - | 11 | Standing | Slamming }}
| |
| {{MoveListFooter}}
| |
|
| |
| ==Universals/Generics==
| |
| {{PJMoveListHeader}}
| |
| {{PJMoveListRow | | {{p}} while facing away from opponent | 10 | 16 | 2 | 8 | 3 | All | }}
| |
| {{PJMoveListRow | | {{k}} while facing away from opponent | 9 | 37 | - | -13 | 4 | All | Blowback }}
| |
| {{PJMoveListRow | | {{p}} while running | 12 | 31 | - | -7 | 8 | Standing | Overhead, Blowback }}
| |
| {{PJMoveListRow | | {{lk}} while running | 12 | 28 | - | -6 | 5 | Crouching | Blowback }}
| |
| {{PJMoveListRow | | {{hk}} while running | 12 | 32 | - | -8 | 7 | Standing | Overhead, Blowback }}
| |
| {{MoveListFooter}}
| |
|
| |
| ==Throws==
| |
| {{PJMoveListHeader}}
| |
| {{PJMoveListRow | | {{lp}} + {{hp}}, near opponent | 10 | 37 | - | - | 27 | - | Standing Throw }}
| |
| {{PJMoveListRow | | {{d}} + {{lp}} + {{hp}}, near opponent | 10 | 47 | - | - | 32 | - | Crouching Throw }}
| |
| {{PJMoveListRow | | {{lp}} + {{hp}}, when behind opponent | 8 | 51 | - | - | 35 | - | Back Throw }}
| |
| {{PJMoveListRow | | (Air) {{lp}} + {{hp}}, near opponent | 1 | - | - | - | 39 | - | Air Throw }}
| |
| {{MoveListFooter}}
| |
|
| |
| ==Special Moves==
| |
| {{PJMoveListHeader}}
| |
| {{PJMoveListRow | Hurricane Stance / Wind Stance (weak) | {{qcf}} {{lp}} | 24 | 46 | - | -24 | 7 | Crouching | Blowback }}
| |
| {{PJMoveListRow | Hurricane Stance (strong) / Wind Stance (weak) | {{qcf}} {{hp}} | 30 | 30 | - | -6 | 7 | All | Blowback }}
| |
| {{PJMoveListRow | Rising Dragon Stance / Dragon Stance | {{dp}} {{p}} (Hold to charge) | 23 | 47 | -26 | -23 | 13~67 | All | Blowback when charged }}
| |
| {{PJMoveListRow | Swordflash Stance / Lightning Stance | {{qcf}} {{k}} (Hold to charge) | 26 | 24 | -18 | 0 | 8~43 | All | Blowback when charged }}
| |
| {{PJMoveListRow | Rock Breaker Stance | {{qcb}} {{p}} | 39 | 47 | - | -23 | 4 | All | Knockdown }}
| |
| {{PJMoveListRow | Frontal Turnover Stance / Front Stance | {{qcb}} {{k}} | - | 61 | - | - | - | - | Special Roll }}
| |
| {{MoveListFooter}}
| |
|
| |
| ==Burning Vigor Attacks==
| |
| {{PJMoveListHeader}}
| |
| {{PJMoveListRow | Performance Demonstration / Demonstration | {{qcf}} {{qcf}} {{p}} | 36 | 94 | - | -71 | 30 | All | Blowback }}
| |
| {{PJMoveListRow | Lecture Attack | {{qcf}} {{qcf}} {{k}} | 19 | 29 | - | -4 | 45 | All | Blowback, Fixed damage }}
| |
| {{MoveListFooter}}
| |
|
| |
| ==Team Up Techniques==
| |
| {{PJMoveListHeader}}
| |
| {{PJMoveListRow | Chairperson's One-Point Advice | {{lp}} + {{lk}} (or {{hp}} + {{hk}}) | 25 | 49 | - | -23 | 30 | All | Team Up Technique, Guts Up + Heal Type }}
| |
| {{PJMoveListRow | Horse Ride Smash | {{p}} + {{p}} + {{k}} (or {{k}} + {{k}} + {{p}}) | 20 | 44 | - | -20 | 100 | All | Party Up Technique }}
| |
| {{MoveListFooter}}
| |
|
| |
|
| |
| </div></div>
| |
| ---- | | ---- |
| __NOTOC__ | | __NOTOC__ |
