Bonus Lizard (talk | contribs) mNo edit summary |
Bonus Lizard (talk | contribs) |
||
| (8 intermediate revisions by the same user not shown) | |||
| Line 1: | Line 1: | ||
'''MiSTer FPGA guide for Tournament Organizers | == '''MiSTer FPGA guide for Tournament Organizers''' == | ||
[[File:MiSTer1.png|frame|center]] | [[File:MiSTer1.png|frame|center]] | ||
'''Introduction''' | ==== '''Introduction''' ==== | ||
For many people, the MiSTer FPGA system is the best option for playing old games in the 21st century. It is significantly cheaper, less fragile, and more portable than original hardware, while also being more accurate than software emulation. Further, the MiSTer can output both SD and HD video signals simultaneously allowing you to play games in 240P on a CRT while passing a 1080P signal to a capture card without need for an external scaler. | For many people, the MiSTer FPGA system is the best option for playing old games in the 21st century. It is significantly cheaper, less fragile, and more portable than original hardware, while also being more accurate than software emulation. Further, the MiSTer can output both SD and HD video signals simultaneously allowing you to play games in 240P on a CRT while passing a 1080P signal to a capture card without need for an external scaler. | ||
| Line 14: | Line 14: | ||
'''MiSTer Hardware | ==== '''MiSTer Hardware''' ==== | ||
In addition to the DE-10 Nano and [https://misteraddons.com/collections/parts/products/sdram-xsd-2-9-128mb 128MB RAM module], you will need a few other things to ensure that a MiSTer can handle the stress of being used in a tournament setting. These are divided into Required and Strongly Recommended sections. | In addition to the DE-10 Nano and [https://misteraddons.com/collections/parts/products/sdram-xsd-2-9-128mb 128MB RAM module], you will need a few other things to ensure that a MiSTer can handle the stress of being used in a tournament setting. These are divided into Required and Strongly Recommended sections. | ||
'''Required | ==== '''Required''' ==== | ||
Do not run MiSTer’s in a tournament setting without the following: | Do not run MiSTer’s in a tournament setting without the following: | ||
| Line 30: | Line 30: | ||
'''Strongly Recommended | ==== '''Strongly Recommended''' ==== | ||
While technically optional, the following will make running a tournament much easier: | While technically optional, the following will make running a tournament much easier: | ||
● One [https://misteraddons.com/products/mini-wireless-keyboard?_pos=1&_sid=838aad42b&_ss=r Mini Wireless Keyboard] per MiSTer setup. | ● One [https://misteraddons.com/products/mini-wireless-keyboard?_pos=1&_sid=838aad42b&_ss=r Mini Wireless Keyboard] per MiSTer setup. These are 2.4GHz models so they only work with the included dongle. | ||
○ TO’s can easily access the MiSTer UI from a distance. | ○ TO’s can easily access the MiSTer UI from a distance. | ||
○ Can lock out menu shortcuts from controllers so they can’t be hit mid-match. | ○ Can lock out menu shortcuts from controllers so they can’t be hit mid-match. | ||
| Line 40: | Line 40: | ||
★ Sharing keyboards between setups will create a huge bottleneck, and is highly discouraged. | ★ Sharing keyboards between setups will create a huge bottleneck, and is highly discouraged. | ||
★ Label each keyboard and corresponding USB dongle to keep them from getting mixed up. | ★ Label each keyboard and corresponding USB dongle to keep them from getting mixed up. | ||
★ Turn off keyboards when not in use to ensure they don't interfere with matches. | |||
| Line 58: | Line 59: | ||
'''Dual RAM''' | [[File:Tournament SD Cards.jpg|frame|center]] | ||
==== '''Dual RAM''' ==== | |||
There is a lot of confusion about the need for dual RAM MiSTer builds. | There is a lot of confusion about the need for dual RAM MiSTer builds. | ||
| Line 69: | Line 73: | ||
● Lets you play the arcade versions of Smash T.V. and Total Carnage. | ● Lets you play the arcade versions of Smash T.V. and Total Carnage. | ||
● Gives you imperceptibly better audio for the PSX Core. | ● Gives you imperceptibly better audio for the PSX Core. | ||
For any of the platforms not listed above, dual RAM does nothing. No arcade fighters have been announced that require dual RAM. There was an effort to bring over other Midway games such as Mortal Kombat, | For any of the platforms not listed above, dual RAM does nothing. No arcade fighters have been announced that require dual RAM. There was an effort to bring over other Midway games such as Mortal Kombat, but this has been shelved. | ||
'''The Sega Saturn | ==== '''The Sega Saturn''' ==== | ||
While the Saturn core has officially been released, it is still in active development and has some minor compatibility issues. Notably, some games might have issues with SD RAM revisions earlier than 2.9. When it comes to the system BIOS, HiSaturn 1.03 is recommended and should work with most if not all games. If you have doubts regarding your setup, check with the given game's community to see what they require. | |||
==== '''MiSTer UI''' ==== | |||
'''MiSTer UI | |||
The following is an overview of the MiSTer interface that TO’s should be familiar with. | The following is an overview of the MiSTer interface that TO’s should be familiar with. | ||
'''Running Scripts | ==== '''Running Scripts''' ==== | ||
While many things can be set from menus, some require scripts to access from the MiSter itself. To find the Scripts menu: | While many things can be set from menus, some require scripts to access from the MiSter itself. To find the Scripts menu: | ||
| Line 105: | Line 98: | ||
'''Update All | ==== '''Update All''' ==== | ||
The [https://github.com/theypsilon/Update_All_MiSTer update_all] script automatically downloads the latest version of each Core. It’s not included with the MiSTer distro, so you’ll need to download it separately. | The [https://github.com/theypsilon/Update_All_MiSTer update_all] script automatically downloads the latest version of each Core. It’s not included with the MiSTer distro, so you’ll need to download it separately. | ||
| Line 160: | Line 153: | ||
6) Extra Content | 6) Extra Content | ||
○ BIOS Database: Automatically downloads BIOS files for the platforms that require them like the Neo Geo, PSX, and Saturn. | ○ BIOS Database: Automatically downloads BIOS files for the platforms that require them like the Neo Geo, PSX, and Saturn. | ||
■ Various Saturn games might require a different BIOS to run, and these will need to be added manually. For example, Asuka 120% requires | ■ Various Saturn games might require a different BIOS to run, and these will need to be added manually. For example, Asuka 120% requires HiSaturn 1.03. | ||
○ Arcade ROMs Database: Automatically downloads ROM's for any supported arcade games. This should be enabled. | ○ Arcade ROMs Database: Automatically downloads ROM's for any supported arcade games. This should be enabled. | ||
■ The MiSTer staff classifies the Neo Geo as a console, so these ROM's will need to be added manually. | ■ The MiSTer staff classifies the Neo Geo as a console, so these ROM's will need to be added manually. | ||
| Line 169: | Line 162: | ||
'''MiSTer Config File | ==== '''MiSTer Config File''' ==== | ||
The ini_settings script included with the MiSTer distro allows you to make changes to the MiSTer.ini file, though this can make the formatting harder to read. As such, it's better to edit the ini files on a PC using a text editor like Notepad++ if possible. While this ini file contains many different settings, TO’s will mainly be concerned with configuring video output and disabling autofire. | The ini_settings script included with the MiSTer distro allows you to make changes to the MiSTer.ini file, though this can make the formatting harder to read. As such, it's better to edit the ini files on a PC using a text editor like Notepad++ if possible. While this ini file contains many different settings, TO’s will mainly be concerned with configuring video output and disabling autofire. | ||
| Line 177: | Line 170: | ||
'''Video Output | ==== '''Video Output''' ==== | ||
This is probably the biggest pain point TO’s will run into outside of controllers, especially if they don’t know what type of monitors they’ll be using ahead of time. | This is probably the biggest pain point TO’s will run into outside of controllers, especially if they don’t know what type of monitors they’ll be using ahead of time. | ||
| Line 224: | Line 217: | ||
'''Autofire | ==== '''Autofire''' ==== | ||
Make sure the following is set: | Make sure the following is set: | ||
| Line 233: | Line 226: | ||
'''Games | ==== '''Games''' ==== | ||
While you can load games using the default file structure, it’s better to have every tournament game available from a designated folder that’s universal on every micro SD card. | While you can load games using the default file structure, it’s better to have every tournament game available from a designated folder that’s universal on every micro SD card. | ||
| Line 268: | Line 261: | ||
'''Keyboard Shortcuts | ==== '''Keyboard Shortcuts''' ==== | ||
By default, all of the Jotego Arcade (i.e. CPS1 and 2) Cores use MAME keyboard shortcuts. Here are some that may be helpful. | By default, all of the Jotego Arcade (i.e. CPS1 and 2) Cores use MAME keyboard shortcuts. Here are some that may be helpful. | ||
| Line 277: | Line 270: | ||
'''Controller Troubleshooting | ==== '''Button Macros''' ==== | ||
While the MiSTer does not have a normal way to implement button macros, it is possible to assign multiple button inputs to a single button. For example, you can set the Neo Geo buttons A and B to R1 on your controller so that you can perform rolls in KoF '98 with a single button. To do this... | |||
● Go through the Define Buttons prompts as per normal. | |||
● When prompted to setup Alternate Buttons, select Yes. | |||
● Skip each input until reaching the first one needed for the macro (in this case A) and press the desired button (R1). | |||
● Proceed until reaching the next input need for the macro (in this case B) and press the desired button (R1). | |||
● Continue defining or skipping inputs as desired, and then save your settings. | |||
The downside to this approach is that you can only have one set of alternative buttons for each input, so if you want macros for A + B and A + C, you have to choose one or the other. | |||
==== '''USB Extension Cables''' ==== | |||
Between the atypical form factor, 7-different USB ports, and the fake USB port used for SNAC adapters, it is common for players unfamiliar with the MiSTer to need help connecting their controllers. To make this process easier, you can use [https://www.amazon.com/USB-3-0-Extension-Cable-Black-Left/dp/B079GV7FXT angled USB extension cables] and label them "P1" and "P2" respectively. | |||
If you want something fancier, I have made a [https://www.printables.com/model/909045-usb-extension-hub-for-the-mister-fpga 3D printed enclosure to house these specific cables]. | |||
[[File:MiSTer USB Hub - Small.png|frame|center]] | |||
==== '''Controller Troubleshooting''' ==== | |||
When defining player controls on a given controller, a common issue is that some buttons will not register at all (Start, Select, and Home are the most problematic). If this happens, there’s two things you can try. | When defining player controls on a given controller, a common issue is that some buttons will not register at all (Start, Select, and Home are the most problematic). If this happens, there’s two things you can try. | ||
| Line 301: | Line 317: | ||
'''Problematic Controller PCB's | ====== '''Problematic Controller PCB's''' ====== | ||
Qanba Sticks tend to be the most consistent at having issues. | Qanba Sticks tend to be the most consistent at having issues. | ||
'''Player Sides are Incorrect:''' | ====== '''Player Sides are Incorrect:''' ====== | ||
If the left and right players are swapped or only player 2 is getting inputs, the Core probably has the TO’s keyboard set as player 1. To fix this: | If the left and right players are swapped or only player 2 is getting inputs, the Core probably has the TO’s keyboard set as player 1. To fix this: | ||
| Line 316: | Line 332: | ||
● Have player 2 press a button. | ● Have player 2 press a button. | ||
'''General Best Practices:''' | ==== '''General Best Practices:''' ==== | ||
● Update, sync, and test all micro SD cards a week prior to use. | ● Update, sync, and test all micro SD cards a week prior to use. | ||
| Line 324: | Line 340: | ||
● Lock out menu access for controllers. | ● Lock out menu access for controllers. | ||
● Have participants check controllers on each setup before matches start. | ● Have participants check controllers on each setup before matches start. | ||
● Have at least one person who knows how to set up button configs, reset player assignments, and | ● Have at least one person who knows how to set up button configs, reset player assignments, and load games per every two MiSTer setups. | ||
Latest revision as of 13:01, 24 June 2024
MiSTer FPGA guide for Tournament Organizers
Introduction
For many people, the MiSTer FPGA system is the best option for playing old games in the 21st century. It is significantly cheaper, less fragile, and more portable than original hardware, while also being more accurate than software emulation. Further, the MiSTer can output both SD and HD video signals simultaneously allowing you to play games in 240P on a CRT while passing a 1080P signal to a capture card without need for an external scaler.
That said, they are not quite turnkey devices and require some existing knowledge to make the most out of. This is particularly true for Tournament Organizers (TO's) who might struggle a bit when using them in a tournament for the first time: seeing everything work fine at home only for players' controllers to not register when trying to start a bracket sucks.
Max'DOut and myself have been running tournaments on MiSTer's for years at this point, and have compiled this guide to help streamline and unify the process of using them across the FGC. If you are new to the platform, the following advice should help you avoid any major pitfalls. Even if you have MiSTer experience, you should still read this as it could help you run tournaments more smoothly. We are not the sole arbiters of how to use this hardware though and welcome any feedback/suggestions.
MiSTer Hardware
In addition to the DE-10 Nano and 128MB RAM module, you will need a few other things to ensure that a MiSTer can handle the stress of being used in a tournament setting. These are divided into Required and Strongly Recommended sections.
Required
Do not run MiSTer’s in a tournament setting without the following:
Though the external USB HUB and stock AC Adapter are good enough in most cases, they can struggle with some power-hungry devices. These upgrades should give you enough headroom to deal with whatever controllers participants can and will inevitably bring.
Strongly Recommended
While technically optional, the following will make running a tournament much easier:
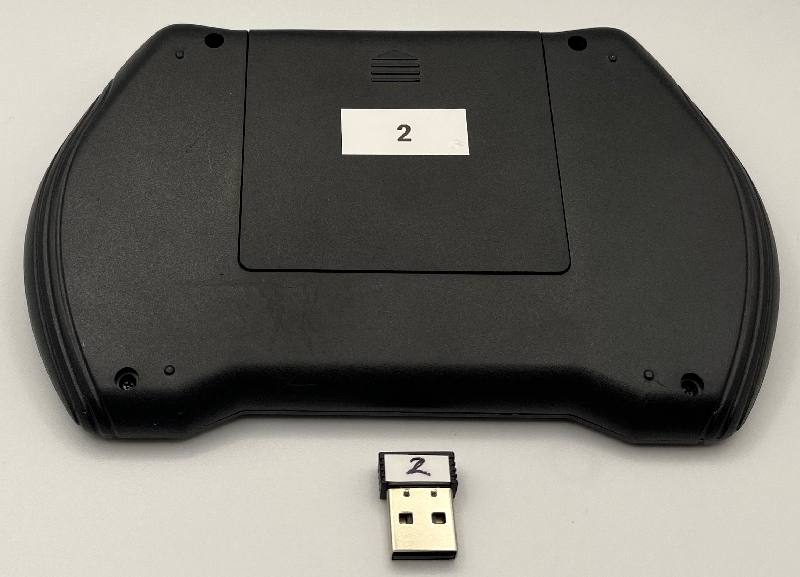
● One Mini Wireless Keyboard per MiSTer setup. These are 2.4GHz models so they only work with the included dongle.
○ TO’s can easily access the MiSTer UI from a distance.
○ Can lock out menu shortcuts from controllers so they can’t be hit mid-match.
★ Sharing keyboards between setups will create a huge bottleneck, and is highly discouraged.
★ Label each keyboard and corresponding USB dongle to keep them from getting mixed up.
★ Turn off keyboards when not in use to ensure they don't interfere with matches.
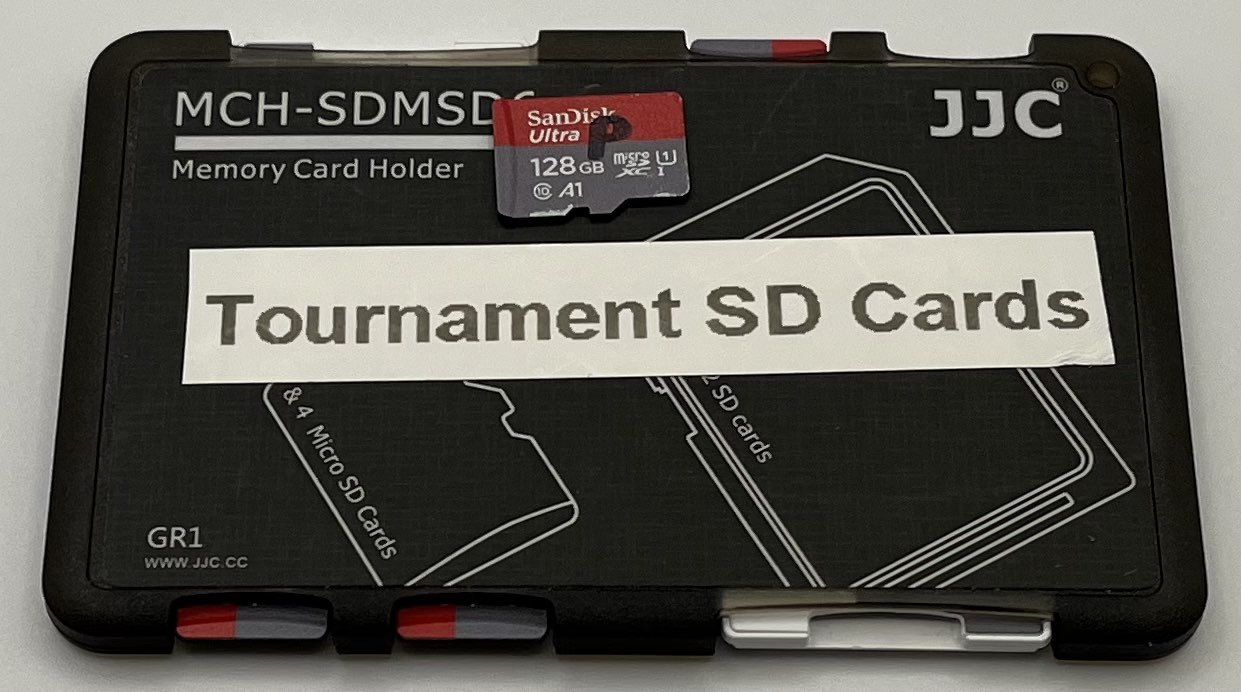
● One ‘Tournament’ micro SD card per MiSTer setup.
○ Ensures all MiSTer’s are using the same firmware and ROM’s.
○ Config files can be preset for tournament use (monitors, player ports, etc).
○ Normalizes the file structure, so navigating each setup is the same.
○ Lets you set tournament specific wallpapers and music if you care.
○ Prevents players from messing up your home config.
★ Packs of low capacity SanDisk micro SD cards are relatively cheap online.
★ 32GB should be more than enough unless you need access to every CD-based versus game.
★ Copy data between cards to keep them in sync.
★ Cards should be stored together, and the primary/master micro SD card should be labeled.
Dual RAM
There is a lot of confusion about the need for dual RAM MiSTer builds.
The DE-10 Nano has two 2x20 GPIO headers for expansion boards. RAM modules will use one of these, but due to hardware limitations neither can exceed 128MB nor surpass a very limited bandwidth cap. The only way to increase these stats is to add a second RAM module. To further complicate things, the current analogue IO board also uses a GPIO header, so users have to choose between either dual RAM or simultaneous digital and analogue video out.
Currently, dual RAM does the following:
● Lets you play the arcade versions of Smash T.V. and Total Carnage.
● Gives you imperceptibly better audio for the PSX Core.
For any of the platforms not listed above, dual RAM does nothing. No arcade fighters have been announced that require dual RAM. There was an effort to bring over other Midway games such as Mortal Kombat, but this has been shelved.
The Sega Saturn
While the Saturn core has officially been released, it is still in active development and has some minor compatibility issues. Notably, some games might have issues with SD RAM revisions earlier than 2.9. When it comes to the system BIOS, HiSaturn 1.03 is recommended and should work with most if not all games. If you have doubts regarding your setup, check with the given game's community to see what they require.
MiSTer UI
The following is an overview of the MiSTer interface that TO’s should be familiar with.
Running Scripts
While many things can be set from menus, some require scripts to access from the MiSter itself. To find the Scripts menu:
● Open the MiSTer menu.
● Press right to go to the System menu.
● Select Scripts.
These are stored within the Scripts folder, and any additional scripts like update_all should be placed here as well.
Update All
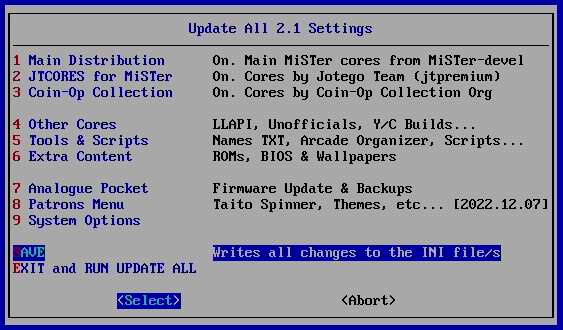
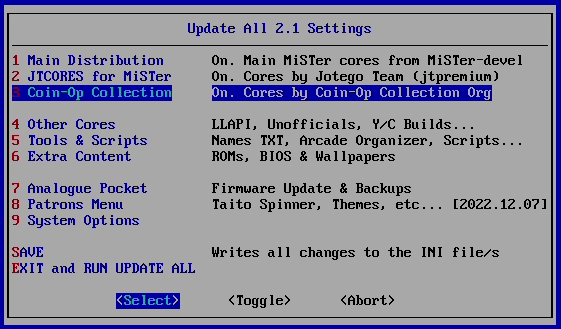
The update_all script automatically downloads the latest version of each Core. It’s not included with the MiSTer distro, so you’ll need to download it separately.
To access the Update All menu:
● Run the update_all script.
● When prompted, press Up.
There's a lot of options here, so I will focus on what TO's need to be concerned with:
1) Main Distribution: Automatically downloads Cores developed by the MiSTer team.
○ Distribution Enabled: Automatically downloads the official MiSTer Cores. This should be enabled.
○ Cores versions: Changes the type of Cores downloaded. Leave this set to Official Cores from MiSTer-devel.
2) JTCORES for MiSTer: Automatically downloads Cores developed by the Jotego Team.
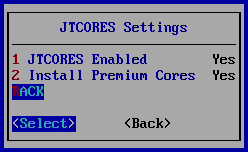
○ JTCORES Enabled: Downloads the publicly released Jotego Cores. This should be enabled.
○ Install Premium Cores: Downloads the beta Jotego Cores. These are only available to Patreon backers.
3) Coin-Op Collection: Automatically downloads Cores by the Coin-Op Collection Org. There's no sub-menu for this option, and this should be enabled.
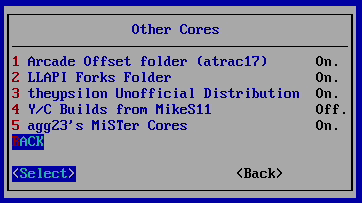
4) Other Cores: Automatically downloads a variety of Cores.
○ Arcade Offset folder (atrac17): These are out of date, and should be disabled.
○ LLAPI Forks Folder: Alternate Cores developed for the BlisSTer, the predecessor to the SNAC adapter. This should be disabled unless you have a BlisSter.
○ theypsilon Unofficial Distribution: Unofficial Cores developed by theypsilon. This should be enabled.
○ Y/C Builds from MikeS11: MiSTer Cores that support S-Video and composite video out. Only enable this if you plan on using these video signals for tournaments.
○ agg23's MiSTer Cores: Gives you Cores developed by agg23. This should be enabled.
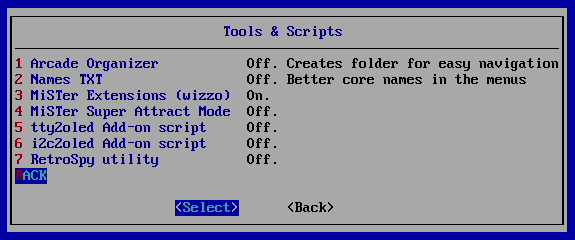
5) Tools & Scripts:
○ MiSTer Extensions (wizzo): Gives you the gamesmenu script among other things. This should be enabled.
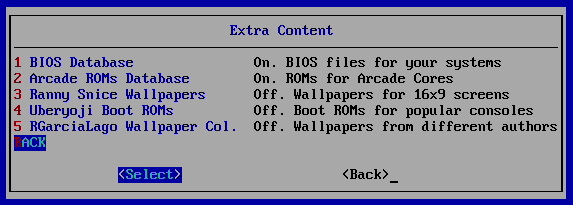
6) Extra Content
○ BIOS Database: Automatically downloads BIOS files for the platforms that require them like the Neo Geo, PSX, and Saturn.
  ■ Various Saturn games might require a different BIOS to run, and these will need to be added manually. For example, Asuka 120% requires HiSaturn 1.03.
○ Arcade ROMs Database: Automatically downloads ROM's for any supported arcade games. This should be enabled.
  ■ The MiSTer staff classifies the Neo Geo as a console, so these ROM's will need to be added manually.
This should be run at least 1-week out from the tournament for each SD card being used to ensure each Core is current.
MiSTer Config File
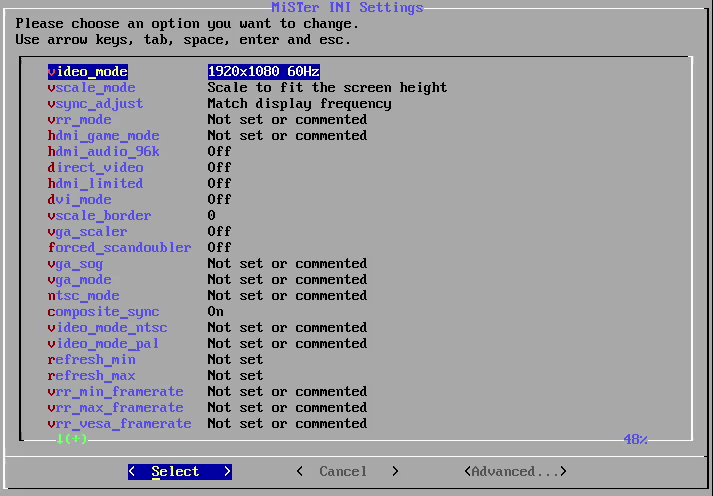
The ini_settings script included with the MiSTer distro allows you to make changes to the MiSTer.ini file, though this can make the formatting harder to read. As such, it's better to edit the ini files on a PC using a text editor like Notepad++ if possible. While this ini file contains many different settings, TO’s will mainly be concerned with configuring video output and disabling autofire.
Video Output
This is probably the biggest pain point TO’s will run into outside of controllers, especially if they don’t know what type of monitors they’ll be using ahead of time.
The MiSTer supports a wide variety of resolutions for both digital and analogue video output, and settings for these are handled separately within the MiSTer.ini file.
● Digital Displays (LCD, OLED):
○ For standard LCD/OLED monitors, set the following:
  ■ video_mode to “8” (1920x1080@60)
○ For Laser Bear iPad 3 monitors, set the following:
  ■ video_mode to “13” (2048x1536@60)
  ■ vscale_mode to "4".
● Analogue Displays (CRT):
○ For RGB monitors (PVM's and BVM's), set the following:
  ■ ypbpr=0
  ■ composite_sync=1
  ■ vga_scaler=0
○ For Component (YpBpR) consumer TV's, set the following:
  ■ ypbpr=1
  ■ composite_sync=1
  ■ vga_scaler=0
○ For PC CRT monitors, set the following:
  ■ ypbpr=0
  ■ composite_sync=0
  ■ vga_scaler=1
  ■ video_mode=6
Only one digital and one analogue config can be set at a time. This is generally fine for digital signals since the vast majority of people are only going to use 1080P, but you are much more likely to need to change analogue configs when switching between RGB, Component, and VGA monitors.
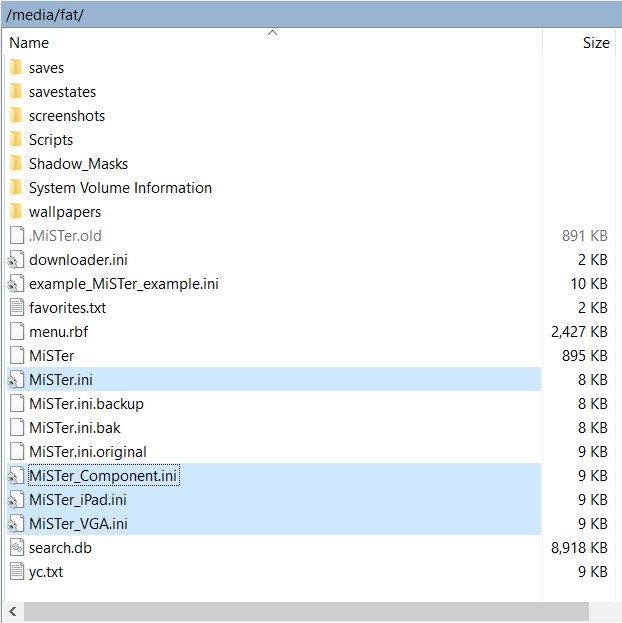
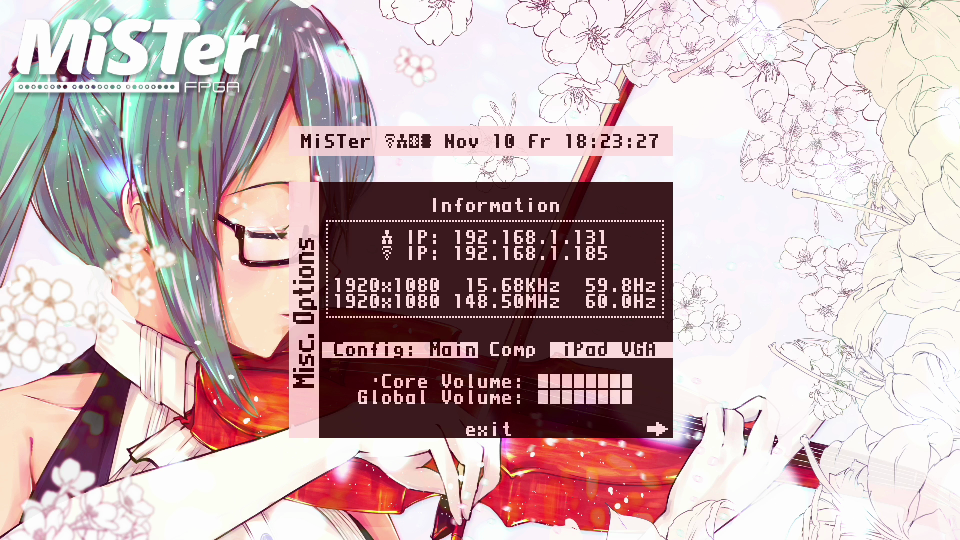
While you can edit the MiSTer.ini file each time you need to change monitors, it is possible to create alternate ini files and switch between them from the MiSTer UI. To do this, make a copy of the MiSTer.ini file and add “_AtlernateName” to the end. Note, the UI will truncate names to 4-characters, so “MiSTer_Component.ini” will just be displayed as “Comp”.
These configs can be selected from the Information page on the main MiSTer menu.
Presets for each of the configs listed above can be found here. The Main config covers both HDMI at 1920x1080@60 and RGB video out, while the rest are named after their intended output type.
Autofire
Make sure the following is set:
● disable_autofire=1
If this line isn’t present, add it by editing the ini file using a PC.
True to the name, this disables turbo for controllers. Do not run matches without it, unless you think E. Honda should be able to do instant hands.
Games
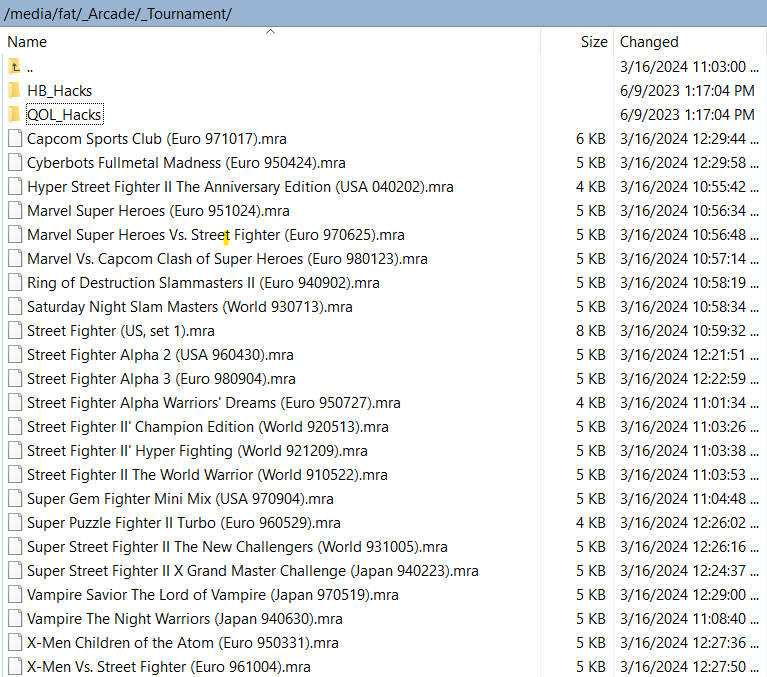
While you can load games using the default file structure, it’s better to have every tournament game available from a designated folder that’s universal on every micro SD card.
The process for this is a bit different depending on the type of game you want to load:
● For Arcade game cores developed by Jotego's team:
 ○ Create a copy of the MRA file for each Tournament Game that removes the Core Credits button.
 ○ Navigate to the "_Arcade" folder.
 ○ Create a folder called "_Tournament". Any folder with a leading "_" in this directory will be displayed from the MiSTer menu.
 ○ Place copies of all the Tournament MRA's here.
Preconfigured Tournament MRA's for popular CPS 0, 1, and 2 games can be found here.
If you want to remove the Core Credits button manually, open the given MRA file in a text editor (Notepad++), delete ", Core Credits" under the ROM section, and save. This will prevent players from being able to pause the game during a match.
● For Console games:
 ○ Navigate to Scripts and run the gamesmenu script.
 ○ Set any platform you plan on running to "Yes", and select Generate Menu. This will create MGL's for the selected platforms and add them to a "_Games" folder to media/fat.
 ○ Create a folder in media/fat called "_@Favorites".
 ○ Copy the MGL files for the games you plan on supporting to the "_@Favorites" folder.
MGL files are essentially a shortcut that tells the MiSTer to load a game and its respective Core from a single input. They do not take up much space, so there is not much of a downside to using them.
Keyboard Shortcuts
By default, all of the Jotego Arcade (i.e. CPS1 and 2) Cores use MAME keyboard shortcuts. Here are some that may be helpful.
● 5: inserts credits
● F2: opens the service menu
● F3: resets the game
● F12: opens the MiSTer OSD menu
Button Macros
While the MiSTer does not have a normal way to implement button macros, it is possible to assign multiple button inputs to a single button. For example, you can set the Neo Geo buttons A and B to R1 on your controller so that you can perform rolls in KoF '98 with a single button. To do this...
● Go through the Define Buttons prompts as per normal.
● When prompted to setup Alternate Buttons, select Yes.
● Skip each input until reaching the first one needed for the macro (in this case A) and press the desired button (R1).
● Proceed until reaching the next input need for the macro (in this case B) and press the desired button (R1).
● Continue defining or skipping inputs as desired, and then save your settings.
The downside to this approach is that you can only have one set of alternative buttons for each input, so if you want macros for A + B and A + C, you have to choose one or the other.
USB Extension Cables
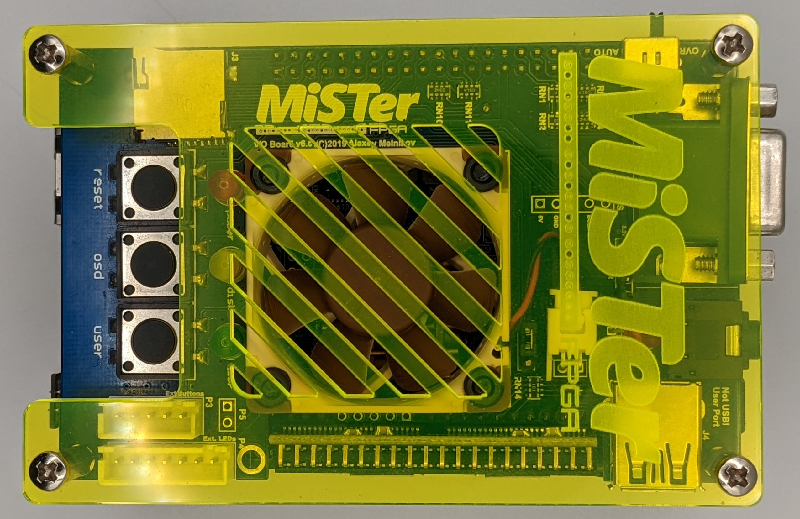
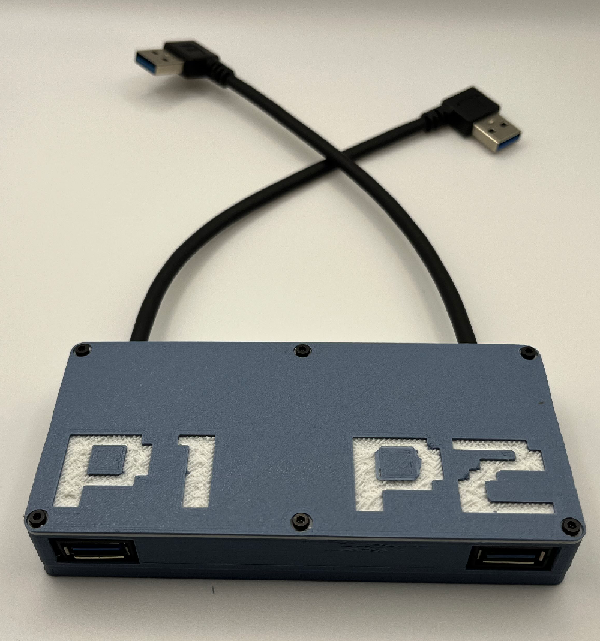
Between the atypical form factor, 7-different USB ports, and the fake USB port used for SNAC adapters, it is common for players unfamiliar with the MiSTer to need help connecting their controllers. To make this process easier, you can use angled USB extension cables and label them "P1" and "P2" respectively. If you want something fancier, I have made a 3D printed enclosure to house these specific cables.
Controller Troubleshooting
When defining player controls on a given controller, a common issue is that some buttons will not register at all (Start, Select, and Home are the most problematic). If this happens, there’s two things you can try.
1) If the controller has switches for other modes (XInput, PS4, etc…):
● Cancel out of the Define [Game] Buttons prompt.
● Select a different mode on the controller.
● Try setting the inputs again.
2) If none of the other modes work:
● Return to the main MiSTer menu.
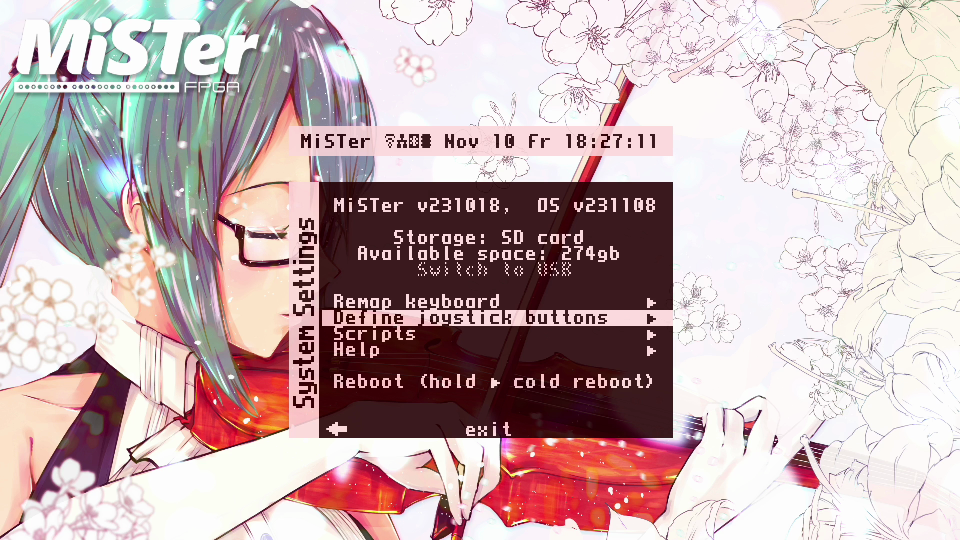
● Press the Cancel button to go to the System Settings menu.
● Select Define Joystick Buttons.
● Set the basic inputs for the problematic controller.
● Set the Confirm and Cancel buttons, but skip the MiSTer menu shortcut and any unused inputs.
● Reload the Core and try setting the inputs again.
Once this is done, reload the Core and you should be able to set all of the buttons for the given controller. Be sure to save afterwards, or these changes will be lost if the system is rebooted.
Problematic Controller PCB's
Qanba Sticks tend to be the most consistent at having issues.
Player Sides are Incorrect:
If the left and right players are swapped or only player 2 is getting inputs, the Core probably has the TO’s keyboard set as player 1. To fix this:
● Ask both players to stop hitting buttons/directions.
● Open the MiSTer menu.
● Press right to go to the System menu.
● Select Reset Player Assignment.
● Have player 1 press a button.
● Have player 2 press a button.
General Best Practices:
● Update, sync, and test all micro SD cards a week prior to use.
● One keyboard per MiSTer setup.
● USB extension cables labeled P1 and P2.
● Cover other USB ports (especially the serial port that looks like a USB Port).
● Lock out menu access for controllers.
● Have participants check controllers on each setup before matches start.
● Have at least one person who knows how to set up button configs, reset player assignments, and load games per every two MiSTer setups.
