|
|
| (7 intermediate revisions by the same user not shown) |
| Line 1: |
Line 1: |
| | |
| [[Image:PTDX_Logo.png |link=Pokken_Tournament_DX |Pokken Tournament DX]] | | [[Image:PTDX_Logo.png |link=Pokken_Tournament_DX |Pokken Tournament DX]] |
| <br> | | <br> |
| Line 4: |
Line 5: |
| ==Introduction== | | ==Introduction== |
|
| |
|
| Arguably the core element of Pokken’s gameplay is Synergy Power. Characters can collect Synergy Power throughout the match in order to fill up their Synergy Gauge. Once this gauge fills up, a powerful Synergy Burst mode can be activated for a duration of time. In addition to various character-specific enhancements, a devastating Burst Attack, or "BA" can be unleashed when in Burst. Each BA has different properties, but they can completely change the course of a match if utilized well. It would be easy to think of Synergy Burst simply as a comeback mechanic, and while the health recovery, increased damage, increased defense, and high-damage super allow it to function well as that, it is as much a way to maintain pressure or steal momentum.
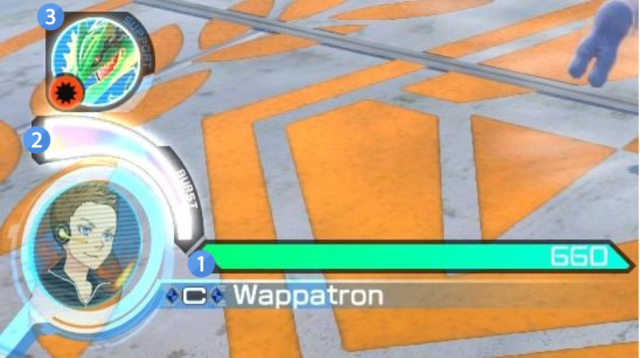
| | One core element of Pokken's gameplay is the management of its various resources. There are three resources the player must keep track of during a match: Health, Synergy, and Support Gauge. The Synergy and Support Gauges each have one use, only accessible when the meter is full, so the single relevant decision is when to spend that use. However, wisely choosing the right time to activate Burst Mode or call your Support Pokemon can be the difference between victory and defeat. Health, by contrast, is managed much more like a fluctuating pool. Beyond living and dying by one's HP, many characters have ways of either healing themselves or spending HP. In the latter case, players of these self-destructive characters must carefully consider exactly how much they want to cash out. Pokken's various gauges are positioned as follows. |
| | |
| ==Synergy Gauge==
| |
| | |
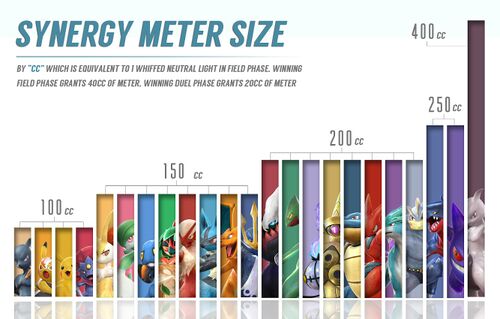
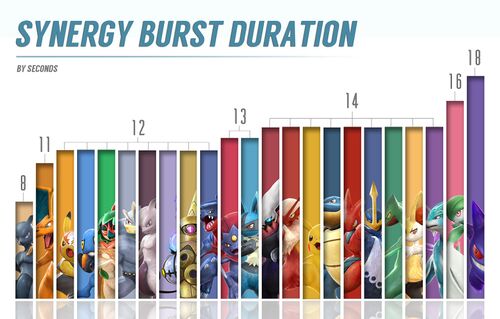
| Bordering each player icon is a gauge that fills up periodically throughout the match - this is the Synergy Gauge. As you collect Synergy Power, this gauge will periodically fill up. Each character’s gauge has a different size, meaning that a variable amount of Synergy Power is required to reach max capacity depending on the character. Synergy Power can be measured in “CC”, a measurement system that Pokken players have adopted in order to accurately measure Synergy Power. Furthermore, once activated, each character's Synergy Burst mode lasts for a different period of time. The values given here are a vacuum measurement in seconds, as certain factors can extend or shorten the time you spend in Burst.
| |
| {| class="wikitable sortable"
| |
| |-
| |
| ! Character !! CC !! Duration (Seconds)
| |
| |-
| |
| | Darkrai || 200 || 14
| |
| |-
| |
| | Blaziken || 150 || 14
| |
| |-
| |
| | Pikachu || 100 || 14
| |
| |-
| |
| | Lucario || 150 || 13
| |
| |-
| |
| | Gardevoir || 150 || 16
| |
| |-
| |
| | Pikachu Libre || 100 || 12
| |
| |-
| |
| | Scizor || 200 || 14
| |
| |-
| |
| | Aegislash || 200 || 12
| |
| |-
| |
| | Croagunk || 150 || 12
| |
| |-
| |
| | Sceptile || 200 || 14
| |
| |-
| |
| | Gengar || 250 || 18
| |
| |-
| |
| | Decidueye || 150 || 12
| |
| |-
| |
| | Machamp || 200 || 12
| |
| |-
| |
| | Braixen || 150 || 14
| |
| |-
| |
| | Empoleon || 150 || 14
| |
| |-
| |
| | Blastoise || 200 || 14
| |
| |-
| |
| | Mewtwo || 400 || 12
| |
| |-
| |
| | Chandelure || 200 || 12
| |
| |-
| |
| | Suicune || 200 || 14
| |
| |-
| |
| | Weavile || 100 || 13
| |
| |-
| |
| | Charizard || 150 || 11
| |
| |-
| |
| | Garchomp || 250 || 12
| |
| |-
| |
| | Shadow Mewtwo || 100 || 8
| |
| |}
| |
| | |
| ==Synergy Burst==
| |
| <br> | | <br> |
| Once the Synergy Gauge has been filled, Synergy Burst can be activated. By pressing L+R, the screen briefly flashes, and the character is powered up. Being in Synergy Burst will slowly consume the gauge until all its Synergy Power has been depleted, at which point it will end. The rate at which the gauge depletes is also character specific. Being in Burst increases damage by 10% as a modifier that is not affected by damage scaling. Defense is also enhanced in a similar fashion. Its most notable benefit, however, is Burst Armor.
| |
| <br> | | <br> |
| | [[File:Pokken HUD.png|640x358px|border]] |
| <br> | | <br> |
| ===Burst Armor===
| |
| <br> | | <br> |
| Unless enhanced with an Attack Up buff, Weak Attacks will not inflict any hitstun on an opponent in Burst. This means that options with which to pressure or defend against an opponent in Burst are limited, making it all the more formidable.
| | ==1. Health Gauge== |
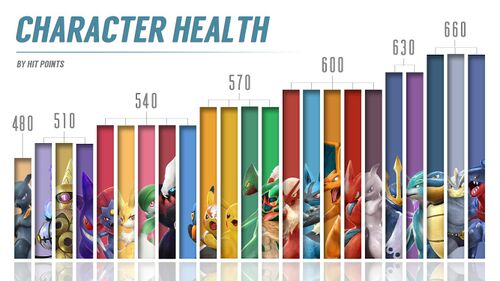
| | Of all Pokken's resources, HP is probably the most important. As in other fighting games, the primary way to lose a round is to have your HP reduced to 0. Each character has different amounts of HP, as pictured below. |
| <br> | | <br> |
| <br> | | <br> |
| Burst Armor has some rules to it:
| | [[File:Pokken Character Health Burnside Graph.jpg|500px|border]] |
| <br> | | <br> |
| <br> | | <br> |
| *Weak Attacks can still go through Burst Armor if it was a critical hit.
| | Whenever you take damage in Pokken, a portion of that damage can be recovered via Recoverable HP. Many supports and a few characters can regenerate Recoverable HP, but universally, 50% of Recoverable HP is regenerated when shifting from Field Phase into Duel Phase, and Recoverable HP regenerates slowly while in Burst Mode. |
| <br> | | <br> |
| *Weak Attacks that do not go through Burst Armor can still be used in a combo as long as the move that started the combo goes through Burst Armor.
| | ====Rage==== |
| <br>
| |
| *Hitting the opponent with nine attacks that don't deal hitstun to Burst Armor causes them to lose their Burst Armor for the next hit.
| |
| <br>
| |
| *This nine hit mechanic resets at the end of a combo, when the opponent is knocked down, does an air-tech, or if the Phase Shifts.
| |
| <br>
| |
| <br>
| |
| | |
| ===Burst Declare Wave=== | |
| <br> | | <br> |
| | [[File:Pokken_Rage.png]] |
| <br> | | <br> |
| [[File:Pokken_Burst_Declare_Wave.png|border]]
| |
| <div>
| |
| {|border="4" cellpadding="4" cellspacing="4"
| |
| |'''Burst Declare Wave'''
| |
| |-
| |
| | Attack
| |
| | Damage
| |
| | PSP
| |
| | Height
| |
| | Impact
| |
| | Hit Adv
| |
| | Block
| |
| |-
| |
| | N/A
| |
| | 0
| |
| | -12
| |
| | Mid
| |
| | i19
| |
| | +8
| |
| | 0
| |
| |}</div>
| |
| <br> | | <br> |
| | "Rage" is the state a player enters when their HP is '''1/4''' or below. Recovering HP to an amount higher than this brings the player out of Rage. |
| <br> | | <br> |
| Upon activating Synergy Burst, a wave of energy expands outwards around the character. Commonly known as the Burst Declare Wave, this wave knocks back the opponent. If the wave wasn't blocked, both player's PSP is reset to zero, and the one who activated Synergy Burst is left +8 against the opponent (0 if blocked).
| |
| <br>
| |
| <br>
| |
| Although it doesn't deal damage, the wave can counter pierce the opponent. The wave is also considered a projectile. It has the potential to erase any incoming projectiles, but also interacts with moves such as Gardevoir's Energy Ball and Chandelure's Smog.
| |
| <br> | | <br> |
| | Rage increases the amount of damage dealt by '''20%''', while decreasing the amount of damage received by '''30%'''. |
| <br> | | <br> |
| <br> | | <br> |
| | If both players are in Rage, the increased damage is effectively canceled out and the amount of damage received is decreased by '''10%'''. |
| | ==2. Synergy Gauge== |
|
| |
|
| ===Synergy Burst Enhancements===
| | Bordering each player icon is a gauge that fills up periodically throughout the match - this is the Synergy Gauge. As you collect Synergy Power, this gauge will periodically fill up. Each character’s gauge has a different size, meaning that a variable amount of Synergy Power is required to reach max capacity depending on the character. Synergy Power can be measured in “CC”, a measurement system that Pokken players have adopted in order to accurately measure Synergy Power. Furthermore, once activated, each character's Synergy Burst mode lasts for a different period of time. The values given here are a vacuum measurement in seconds, as certain factors can extend or shorten the time you spend in Burst. |
| <br> | | <br> |
| <br> | | <br> |
| | [[File:Pokken Synergy Meter Size Burnside Graph.jpg|500px|border]] |
| | [[File:Pokken Synergy Burst Duration Burnside Graph.jpg|500px|border]] |
| <br> | | <br> |
| <div>
| |
| {|border="2"
| |
| |'''General Enhancements'''
| |
| |-
| |
| | <p>• Damage dealt increased by 10%.</p>
| |
| <p>• Damage received decreased by 10%.</p>
| |
| <p>• Increased walking speed.</p>
| |
| <p>• Heals recoverable HP.</p>
| |
| <p>• Burst Armor is granted.</p>
| |
| |}</div>
| |
| <br> | | <br> |
| | ===Synergy Burst=== |
| <br> | | <br> |
| | Once the Synergy Gauge has been filled, Synergy Burst can be activated. By pressing L+R, the screen briefly flashes, and the character is powered up. The activation of Burst Mode generates a wave which pushes opponents back and Destroys Projectiles. Burst Mode will slowly consume the gauge until all its Synergy Power has been depleted, at which point it will end. Universally, Burst Mode grants the following benefits while active. |
| | * Damage dealt is increased by 10%. |
| | * Damage received is decreased by 10%. |
| | * Increased walking speed. |
| | * 4F of recovery is reduced from all Dashes. |
| | * Heals recoverable HP. |
| | * Burst Armor. |
| <br> | | <br> |
| [[File:Pokken_Darkrai_Burst_Mode.png|left|border]]
| |
| <div>
| |
| {|border="2"
| |
| |'''Darkrai (200 CC / 14 Second Duration)'''
| |
| |-
| |
| | <p>• Any move that Phase Shifts from Field to Duel activates Bad Dreams Rising.</p>
| |
| |}</div>
| |
| <br> | | <br> |
| | ===Burst Armor=== |
| <br> | | <br> |
| | Unless enhanced with an Attack Up buff, Weak Attacks will not inflict any hitstun on an opponent in Burst. This means that options with which to pressure or defend against an opponent in Burst are limited, making it all the more formidable. |
| <br> | | <br> |
| <br> | | <br> |
| | Burst Armor has some rules to it: |
| <br> | | <br> |
| <br> | | <br> |
| | *Weak Attacks can still go through Burst Armor if it was a critical hit. |
| | *Weak Attacks that do not go through Burst Armor can still be used in a combo as long as the move that started the combo goes through Burst Armor. |
| | *Hitting the opponent with nine attacks that don't deal hitstun to Burst Armor causes them to lose their Burst Armor for the next hit. |
| | *This nine hit mechanic resets at the end of a combo, when the opponent is knocked down, does an air-tech, or if the Phase Shifts. |
| <br> | | <br> |
| <br> | | <br> |
| <br>
| | The full list of every attack subject to burst armor can be found [https://wiki.supercombo.gg/w/Pokken_Tournament_DX/Burst_Armor here]. |
| [[File:Pokken_Blaziken_Burst_Mode.png|left|border]]
| | |
| <div>
| | ===Burst Attack=== |
| {|border="2"
| | |
| |'''Blaziken (150 CC / 14 Second Duration)'''
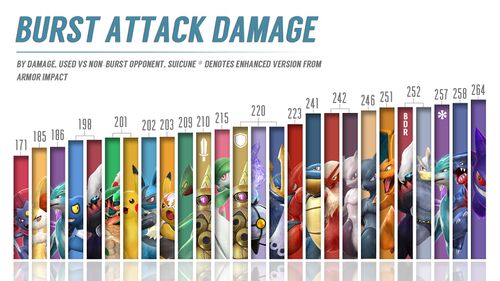
| | While still in Synergy Burst, pressing L+R again will result in another screen flash, followed up by a special attack known as a Burst Attack (BA). These attacks are treated like Pokemon Moves, meaning that they can be canceled into from certain normal attacks. Most BA's become invincible a few frames after activation. However, some BA's are completely invincible, and some have armor. These attacks do a lot of damage on their own. They can also counter pierce, making them powerful tools for hit confirms or neutral. |
| |-
| |
| | <p>• Moves that have HP recoil are reduced by half.</p>
| |
| <p>• Counter Attack height changes from a High to a Mid.</p>
| |
| <p>• 2Y gains an additional hit, increased hitstun, range, and cancels into specials faster.</p>
| |
| <p>• 5Y gains an additional hit that is a Mid.</p>
| |
| <p>• 5YY gains an additional hit that is a Mid.</p>
| |
| |}</div>
| |
| <br>
| |
| <br>
| |
| <br>
| |
| [[File:Pokken_Pikachu_Burst_Mode.png|left|border]]
| |
| <div>
| |
| {|border="2"
| |
| |'''Pikachu (100 CC / 14 Second Duration)'''
| |
| |-
| |
| | <p>• 2Y range increases.</p>
| |
| <p>• 5YX always does the Just Frame variant.</p>
| |
| <p>• 6Y always does the Just Frame variant.</p>
| |
| <p>• Volt Tackle receives a followup attack.</p>
| |
| <p>• Thunder receives a followup attack.</p>
| |
| |}</div>
| |
| <br> | | <br> |
| <br> | | <br> |
| | [[File:Pokken Burst Attack Damage Burnside Graph.jpg|500px|border]] |
| <br> | | <br> |
| [[File:Pokken_Lucario_Burst_Mode.png|left|border]]
| |
| <div>
| |
| {|border="2"
| |
| |'''Lucario (150 CC / 13 Second Duration)'''
| |
| |-
| |
| | <p>• Can Midair Dash with j.R.</p>
| |
| <p>• Duel Phase Grab deals additional damage.</p>
| |
| <p>• Homing Attack 2 is replaced with a flurry of punches.</p>
| |
| <p>• 5YY is replaced with a flurry of punches.</p>
| |
| <p>• 5X's PSP goes from 2 on each hit, to 1 on each hit.</p>
| |
| <p>• 5X crumples the opponent instead of launching.</p>
| |
| <p>• 5XX is available.</p>
| |
| <p>• 6X / 6[X] is replaced with a pair of aura swords.</p>
| |
| <p>• Force Palm receives a followup attack.</p>
| |
| <p>• Aura Sphere becomes enhanced (each level).</p>
| |
| <p>• Extreme Speed receives a followup attack.</p>
| |
| <p>• Aura Sphere: Midair can cancel into Midair Dash.</p>
| |
| |}</div>
| |
| <br> | | <br> |
| | ==3. Support Gauge== |
| <br> | | <br> |
| [[File:Pokken_Gardevoir_Burst_Mode.png|left|border]]
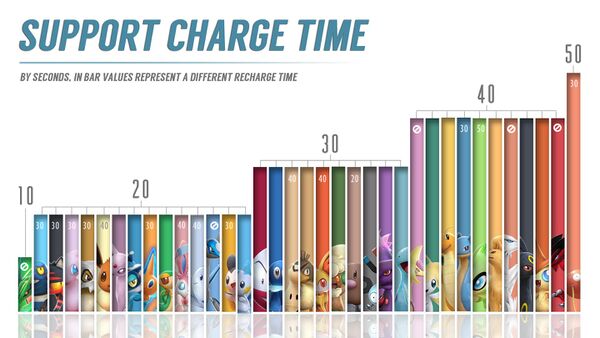
| | Each Support Pokemon requires time to charge before they can be called. These charge times vary for each Support Pokemon and range from 20 to 50 seconds. Charge times for certain Support Pokemon change after the first use. For example, Litten requires 20 seconds to fully charge for Its first call. Afterwards, it now requires 30 seconds to charge any further calls. |
| <div>
| |
| {|border="2"
| |
| |'''Gardevoir (150 CC / 16 Second Duration)'''
| |
| |-
| |
| | <p>• Midair Counter Attack becomes safer on block.</p>
| |
| <p>• An additional orb is thrown out when using nY.</p>
| |
| <p>• j.Y (Duel Phase) fires an additional arrow.</p>
| |
| <p>• 6X becomes safer on block.</p>
| |
| <p>• Moonblast fires a wave of horizontal arrows in Field Phase.</p>
| |
| <p>• Moonblast fires a wave of vertical arrows in Duel Phase.</p>
| |
| <p>• Calm Mind grants two charges instead of one.</p>
| |
| <p>• Future Sight's hitbox is increased (both High and Low versions).</p>
| |
| |}</div>
| |
| <br> | | <br> |
| [[File:Pokken_Pikachu_Libre_Burst_Mode.png|left|border]]
| |
| <div>
| |
| {|border="2"
| |
| |'''Pikachu Libre (100 CC / 12 Second Duration)'''
| |
| |-
| |
| | <p>• Grants an enhanced state for the entire duration.</p>
| |
| |}</div>
| |
| <br> | | <br> |
| <br>
| | [[File:Pokken_Support_Charge_Time_Burnside_Graph.jpg|600px|border]] |
| <br>
| |
| <br>
| |
| <br>
| |
| <br>
| |
| <br>
| |
| <br>
| |
| <br>
| |
| [[File:Pokken_Scizor_Burst_Mode.png|left|border]] | |
| <div>
| |
| {|border="2"
| |
| |'''Scizor (200 CC / 14 Second Duration)'''
| |
| |-
| |
| | <p>• Hover Dash Y gains two additional hits.</p>
| |
| <p>• Sets down even more staples when using nY.</p>
| |
| <p>• 2Y becomes plus on hit, safer on block, and gains two additional hits.</p>
| |
| <p>• 5Y becomes plus on hit, safer on block, and gains two additional hits.</p>
| |
| <p>• 8Y gains two additional hits.</p>
| |
| <p>• All Bullet Punch variants launch the opponent.</p>
| |
| <p>• Bug Bite deals additional damage.</p>
| |
| <p>• Scizor gains two stocks from doing Swords Dance.</p>
| |
| <p>• The first hit of Aerial Ace receives hitstun.</p>
| |
| |}</div>
| |
| <br>
| |
| [[File:Pokken_Aegislash_Burst_Mode.png|left|border]]
| |
| <div>
| |
| {|border="2"
| |
| |'''Aegislash (200 CC / 12 Second Duration)'''
| |
| |-
| |
| | <p>• Grants an enhanced state for the entire duration.</p>
| |
| |}</div>
| |
| <br>
| |
| <br>
| |
| <br>
| |
| <br>
| |
| <br>
| |
| <br>
| |
| <br>
| |
| <br>
| |
| <br>
| |
| [[File:Pokken_Croagunk_Burst_Mode.png|left|border]]
| |
| <div>
| |
| {|border="2"
| |
| |'''Croagunk (150 CC / 12 Second Duration)'''
| |
| |-
| |
| | <p>• More likely to receive good results from random effects.</p>
| |
| <p>• The first hit of Poison Sting receives hitstun.</p>
| |
| |}</div>
| |
| <br>
| |
| <br>
| |
| <br>
| |
| <br>
| |
| <br>
| |
| <br>
| |
| <br>
| |
| [[File:Pokken_Sceptile_Burst_Mode.png|left|border]]
| |
| <div>
| |
| {|border="2"
| |
| |'''Sceptile (200 CC / 14 Second Duration)'''
| |
| |-
| |
| | <p>• Field and Duel Phase Grab deals additional damage.</p>
| |
| <p>• Bullet Seed grows into the vines faster.</p>
| |
| <p>• Leaf Blade receives a followup attack.</p>
| |
| <p>• Leech Seed grows into the plants faster.</p>
| |
| |}</div>
| |
| <br>
| |
| <br>
| |
| <br>
| |
| <br>
| |
| <br>
| |
| <br>
| |
| [[File:Pokken_Gengar_Burst_Mode.png|left|border]]
| |
| <div>
| |
| {|border="2"
| |
| |'''Gengar (250 CC / 18 Second Duration)'''
| |
| |-
| |
| | <p>• High Stance grants counter armor against Highs on frame 5.</p>
| |
| <p>• Low Stance grants counter armor against Lows on frame 5.</p>
| |
| <p>• Forward, Back, and Side Dashes have increased invincibility frames.</p>
| |
| <p>• Counter Attack is altered.</p>
| |
| <p>• nY fires three projectiles in each direction.</p>
| |
| <p>• sY is altered.</p>
| |
| <p>• fY is altered.</p>
| |
| <p>• j.X is altered.</p>
| |
| <p>• Homing Attack 1 is altered.</p>
| |
| <p>• Homing Attack 2 is altered.</p>
| |
| <p>• 2Y is altered.</p>
| |
| <p>• 5Y is altered.</p>
| |
| <p>• 5YY is altered.</p>
| |
| <p>• 8Y is altered.</p>
| |
| <p>• 2X is altered.</p>
| |
| <p>• 5X / 5[X] is altered.</p>
| |
| <p>• 8X is altered.</p>
| |
| <p>• Sludge Bomb's puddles increase in size.</p>
| |
| <p>• Curse receives hitstun on all hits.</p>
| |
| <p>• Shadow Ball becomes enhanced.</p>
| |
| |}</div>
| |
| <br>
| |
| <br>
| |
| [[File:Pokken_Decidueye_Burst_Mode.png|left|border]]
| |
| <div>
| |
| {|border="2"
| |
| |'''Decidueye ( 150 CC / 12 Second Duration)'''
| |
| |-
| |
| | <p>• Acrobatics deals the full damage.</p>
| |
| <p>• Spirit Shackle deals additional damage.</p>
| |
| <p>• Spirit Shackle fires three arrows in Field Phase.</p>
| |
| <p>• Charged Spirit Shackle deals additional damage.</p>
| |
| <p>• Charged Spirit Shackle fires five arrows in Field Phase.</p>
| |
| <p>• Spirit Shackle's traps deal additional damage.</p>
| |
| <p>• Leaf Blade receives a followup attack.</p>
| |
| <p>• Three Magnemites fall from above when using Smack Down.</p>
| |
| |}</div>
| |
| <br>
| |
| <br>
| |
| [[File:Pokken_Machamp_Burst_Mode.png|left|border]]
| |
| <div>
| |
| {|border="2"
| |
| |'''Machamp (200 CC / 12 Second Duration)'''
| |
| |-
| |
| | <p>• Pokemon moves are always enhanced.</p>
| |
| |}</div>
| |
| <br>
| |
| <br>
| |
| <br>
| |
| <br>
| |
| <br>
| |
| <br>
| |
| <br>
| |
| <br>
| |
| <br>
| |
| [[File:Pokken_Braixen_Burst_Mode.png|left|border]]
| |
| <div>
| |
| {|border="2"
| |
| |'''Braixen (150 CC / 14 Second Duration)'''
| |
| |-
| |
| | <p>• Pokemon moves are always enhanced.</p>
| |
| <p>• j.Y is now Special / j.R cancelable (only after the fourth fireball).</p>
| |
| |}</div>
| |
| <br>
| |
| <br>
| |
| <br>
| |
| <br>
| |
| <br>
| |
| <br>
| |
| <br>
| |
| [[File:Pokken_Empoleon_Burst_Mode.png|left|border]]
| |
| <div>
| |
| {|border="2"
| |
| |'''Empoleon (150 CC / 14 Second Duration)'''
| |
| |-
| |
| | <p>• Aqua Jet will always be level three.</p>
| |
| <p>• Defog becomes more advantageous on hit.</p>
| |
| <p>• Defog becomes safer on block.</p>
| |
| |}</div>
| |
| <br>
| |
| <br>
| |
| <br>
| |
| <br>
| |
| <br>
| |
| <br>
| |
| <br>
| |
| [[File:Pokken_Blastoise_Burst_Mode.png|left|border]]
| |
| <div>
| |
| {|border="2"
| |
| |'''Blastoise (200 CC / 14 Second Duration)'''
| |
| |-
| |
| | <p>• Shell Fortress Stance Y becomes a large water ball projectile.</p>
| |
| <p>• fY becomes more advantageous on hit.</p>
| |
| <p>• fY becomes safer on block.</p>
| |
| <p>• bY gains an additional bubble trap.</p>
| |
| <p>• j.Y (Duel Phase) becomes a large water ball projectile.</p>
| |
| <p>• Water Pulse deals additional damage.</p>
| |
| <p>• Water Spout's damage is unaffected by Blastoise's HP.</p>
| |
| <p>• Dark Pulse becomes a laser.</p>
| |
| <p>• Dragon Pulse deals additional damage.</p>
| |
| <p>• Aura Sphere deals additional damage.</p>
| |
| <p>• Water Gun receives a followup attack.</p>
| |
| <p>• Hydro Pump deals additional damage.</p>
| |
| |}</div>
| |
| <br>
| |
| <br>
| |
| [[File:Pokken_Mewtwo_Burst_Mode.png|left|border]]
| |
| <div>
| |
| {|border="2"
| |
| |'''Mewtwo (400 CC / 12 Second Duration)'''
| |
| |-
| |
| | <p>• Field Phase Grab deals additional damage.</p>
| |
| <p>• Homing Attack 2 is replaced with a flurry of kicks.</p>
| |
| <p>• j.Y (Duel Phase) is altered.</p>
| |
| <p>• 8X is altered.</p>
| |
| <p>• Fire Punch gives the opponent an Attack debuff.</p>
| |
| <p>• Fire Punch automatically combos into Ice Punch.</p>
| |
| <p>• Thunder Punch gives the opponent a Speed debuff.</p>
| |
| <p>• Confusion stuns if Its a critical hit.</p>
| |
| <p>• Psystrike receives hitstun on all hits.</p>
| |
| |}</div>
| |
| <br>
| |
| [[File:Pokken_Chandelure_Burst_Mode.png|left|border]]
| |
| <div>
| |
| {|border="2"
| |
| |'''Chandelure (200 CC / 12 Second Duration)'''
| |
| |-
| |
| | <p>• 6XX turns into a fullscreen laser that stuns the opponent.</p>
| |
| <p>• Will-O-Wisp gains an additional hit and stuns the opponent.</p>
| |
| |}</div>
| |
| <br>
| |
| <br>
| |
| <br>
| |
| <br>
| |
| <br>
| |
| <br>
| |
| <br>
| |
| <br>
| |
| [[File:Pokken_Suicune_Burst_Mode.png|left|border]]
| |
| <div>
| |
| {|border="2"
| |
| |'''Suicune (200 CC / 14 Second Duration)'''
| |
| |-
| |
| | <p>• j.Y (Duel Phase) fires an additional projectile.</p>
| |
| <p>• Icy Wind will always be level three.</p>
| |
| <p>• An additional wave of Hail falls.</p>
| |
| <p>• Blizzard freezes the opponent on hit.</p>
| |
| |}</div>
| |
| <br>
| |
| <br>
| |
| <br>
| |
| <br>
| |
| <br>
| |
| [[File:Pokken_Weavile_Burst_Mode.png|left|border]]
| |
| <div>
| |
| {|border="2"
| |
| |'''Weavile (100 CC / 13 Second Duration)'''
| |
| |-
| |
| | <p>• sY throws out five icicle traps.</p>
| |
| <p>• j.Y (Field Phase) throws out three snowball projectiles.</p>
| |
| <p>• Icicle Crash can be used twice.</p>
| |
| |}</div>
| |
| <br>
| |
| <br>
| |
| <br>
| |
| <br>
| |
| <br>
| |
| <br>
| |
| [[File:Pokken_Charizard_Burst_Mode.png|left|border]]
| |
| <div>
| |
| {|border="2"
| |
| |'''Charizard (150 CC / 11 Second Duration)'''
| |
| |-
| |
| | <p>• Can perform a double jump in any direction.</p>
| |
| <p>• Moves that have HP recoil are reduced by half.</p>
| |
| <p>• Homing Attack 1 becomes safer on block if canceled into Flying Stance.</p>
| |
| <p>• 6X becomes safer on block if canceled into Flying Stance.</p>
| |
| <p>• A flame pillar is created at the end of Flamethrower that launches.</p>
| |
| <p>• Fire Punch becomes more advantageous on hit.</p>
| |
| <p>• Fire Punch becomes safer on block.</p>
| |
| <p>• Fire Punch becomes more advantageous on hit if canceled into Flying Stance.</p>
| |
| <p>• Fire Punch becomes safer on block if canceled into Flying Stance.</p>
| |
| |}</div>
| |
| <br>
| |
| <br>
| |
| [[File:Pokken_Garchomp_Burst_Mode.png|left|border]]
| |
| <div>
| |
| {|border="2"
| |
| |'''Garchomp (250 CC / 12 Second Duration)'''
| |
| |-
| |
| | <p>• Pokemon moves are always enhanced.</p>
| |
| |}</div>
| |
| <br>
| |
| <br>
| |
| <br>
| |
| <br>
| |
| <br>
| |
| <br>
| |
| <br>
| |
| <br>
| |
| <br>
| |
| [[File:Pokken_Shadow_Mewtwo_Burst_Mode.png|left|border]]
| |
| <div>
| |
| {|border="2"
| |
| |'''Shadow Mewtwo (100 CC / 8 Second Duration)'''
| |
| |-
| |
| | <p>• Pokemon moves no longer consume HP on use.</p>
| |
| <p>• Field and Duel Phase Grab deals additional damage.</p>
| |
| <p>• The amount of nY orbs increases to five.</p>
| |
| <p>• sY mirrors have increased duration and travel forward.</p>
| |
| <p>• j.Y (Field Phase) throws out five orbs.</p>
| |
| <p>• j.X spawns a pillar upon landing.</p>
| |
| <p>• Homing Attack 2 is replaced with a flurry of kicks.</p>
| |
| <p>• 5Y is altered.</p>
| |
| <p>• 5YY is altered.</p>
| |
| <p>• 6Y pillar receives hitstun.</p>
| |
| <p>• j.Y (Duel Phase) is altered.</p>
| |
| <p>• 2X gains additional hits and becomes safer on block.</p>
| |
| <p>• 8X is altered.</p>
| |
| |}</div>
| |
| <br>
| |
| <br>
| |
| <br>
| |
| | |
| ==Burst Attack==
| |
| | |
| While still in Synergy Burst, pressing L+R again will result in another screen flash, followed up by a special attack known as a Burst Attack (BA). These attacks are treated like Pokemon Moves, meaning that they can be canceled into from certain normal attacks. Most BA's become invincible a few frames after activation. However, some BA's are completely invincible, and some have armor. These attacks do a lot of damage on their own. They can also counter pierce, making them powerful tools for hit confirms or neutral.
| |
| {| class="wikitable sortable"
| |
| |-
| |
| ! Character !! Attack !! Damage !! Chip !! Invincible on !! Armor
| |
| |-
| |
| | Darkrai || Normal || 180 || 60 || Frame 9 || N/A
| |
| |-
| |
| | Darkrai (BDR) || Normal || 240 || 60 || Frame 1 || N/A
| |
| |-
| |
| | Blaziken || Normal || 216 || 49 || Frame 5 || N/A
| |
| |-
| |
| | Pikachu || Normal || 180 || 60 || Frame 5 || N/A
| |
| |-
| |
| | Lucario || Normal || 182 || 20 || Frame 5 || N/A
| |
| |-
| |
| | Gardevoir || Normal || 192 || 60 || Frame 5 || N/A
| |
| |-
| |
| | Pikachu Libre || Normal || 184 || 15 || Frame 5 || N/A
| |
| |-
| |
| | Scizor || Normal || 201 || 24 || Frame 5 || N/A
| |
| |-
| |
| | Aegislash || Normal || 210 || 35 || Frame 5 || N/A
| |
| |-
| |
| | Aegislash (SF) || Counter || 220 || 41 || Frame 9 || Counter Armor
| |
| |-
| |
| | Croagunk || Normal || 180 || 30 || Frame 13 || N/A
| |
| |-
| |
| | Croagunk (Aerial) || Normal || 180 || 30 || Frame 1 || N/A
| |
| |-
| |
| | Sceptile || Counter || 190 || 50 || Frame 20 || Counter Armor
| |
| |-
| |
| | Gengar || Grab || 240 || N/A || Frame 1 || N/A
| |
| |-
| |
| | Decidueye || Normal || 181 || 50 || Frame 13 || N/A
| |
| |-
| |
| | Machamp || Normal || 240 || 58 || Frame 5 || N/A
| |
| |-
| |
| | Braixen || Normal || 167 || 25 || Frame 9 || N/A
| |
| |-
| |
| | Empoleon || Grab || 200 || N/A || Frame 26 || N/A
| |
| |-
| |
| | Blastoise || Normal || 219 || 20 || Frame 5 || N/A
| |
| |-
| |
| | Mewtwo || Grab || 220 || N/A || Frame 1 || N/A
| |
| |-
| |
| | Chandelure || Counter || 200 || 35 || Frame 13 || Counter Armor
| |
| |-
| |
| | Suicune || Counter || 170 || 60 || Frame 20 || Counter Armor
| |
| |-
| |
| | Weavile || Counter || 155 || 20 || Frame 9 || Counter Armor
| |
| |-
| |
| | Charizard || Normal || 235 || 60 || Frame 5 || N/A
| |
| |-
| |
| | Garchomp || Normal || 245 || 75 || Frame 9 || Red Armor
| |
| |-
| |
| | Shadow Mewtwo || Normal || 226 || 80 || Frame 13 || N/A
| |
| |}
| |
| [[Category:Pokken Tournament DX]] | | [[Category:Pokken Tournament DX]] |
![]()
