| Line 71: | Line 71: | ||
==Burning Vigor Attacks== | ==Burning Vigor Attacks== | ||
{{PJMoveListHeader}} | {{PJMoveListHeader}} | ||
{{PJMoveListRow | Kikou Kai / Energy Focus Cluster | {{qcf}} {{qcf}} {{p}} | 35 | 53 | - | -37 | 42 | All | 5 | {{PJMoveListRow | Kikou Kai / Energy Focus Cluster | {{qcf}} {{qcf}} {{p}} | 35 | 53 | - | -37 | 42 | All | 5 hits, Blowback on 5th hit }} | ||
{{PJMoveListRow | Air Kikou Kai / Energy Focus Cluster | (Air) {{qcf}} {{qcf}} {{p}} | 20 | 13 | - | +3 | 46 | All | 5 | {{PJMoveListRow | Air Kikou Kai / Energy Focus Cluster | (Air) {{qcf}} {{qcf}} {{p}} | 20 | 13 | - | +3 | 46 | All | 5 hits, Blowback on 5th hit }} | ||
{{PJMoveListRow | Ha no Renbu / Reflex Barrage | {{qcb}} {{qcb}} {{p}} | 19 | 43 | - | -19 | 45 | All | 7 | {{PJMoveListRow | Ha no Renbu / Reflex Barrage | {{qcb}} {{qcb}} {{p}} | 19 | 43 | - | -19 | 45 | All | 7 hits, Blowback on 7th hit }} | ||
{{PJMoveListRow | Ten no Renbu / Aerial Barrage | {{qcb}} {{qcb}} {{k}} | 35 | 54 | - | -30 | 38 | All | 6 | {{PJMoveListRow | Ten no Renbu / Aerial Barrage | {{qcb}} {{qcb}} {{k}} | 35 | 54 | - | -30 | 38 | All | 6 hits, Blowback on 6th hit, Slamming }} | ||
{{PJMoveListRow | Haten Mueishu / Destructive Heaven's Stealth Kick | {{qcf}} {{qcf}} {{k}} | 35 | 41 | - | -24 | 55 | All | 10 | {{PJMoveListRow | Haten Mueishu / Destructive Heaven's Stealth Kick | {{qcf}} {{qcf}} {{k}} | 35 | 41 | - | -24 | 55 | All | 10 hits, Blowback on 10th hit }} | ||
{{MoveListFooter}} | {{MoveListFooter}} | ||
Revision as of 19:43, 7 May 2021
Introduction
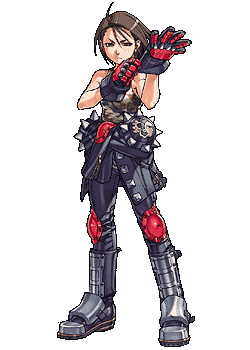
Akira is definitely my favourite character in the game. She is beautiful and strong and she hasn't been given huge bosoms or anything to make her more appealing to shallow people.
-Falsehead from Gamefaqs, CEO of Tiffany slander
Everyone's main since Third Strike, Akira is a character that struggles at long/mid range, but once she's in, can run a train on you. Your objective with her is to land the first hit of her rekka series (![]()
![]() ) into air launcher follow up, or
) into air launcher follow up, or ![]()
![]() to start her Textbook Combos. Some of her go-to Tardy Counters include side stepping and hit-grab Specials, which make her a good pick for players who favor a defensive play style. Her main shortcomings are her short range, and having to work for her damage more than other characters in the game. As a partner, her Team Up Techniques are rather standard, but her Party Up Technique is hella cool, so there's that.
to start her Textbook Combos. Some of her go-to Tardy Counters include side stepping and hit-grab Specials, which make her a good pick for players who favor a defensive play style. Her main shortcomings are her short range, and having to work for her damage more than other characters in the game. As a partner, her Team Up Techniques are rather standard, but her Party Up Technique is hella cool, so there's that.
Normal Moves
Command Normals
Universals/Generics
Throws
Special Moves
Burning Vigor Attacks
Team Up Techniques
Combos


 (Air)
(Air) 


 (Air)
(Air) 


 (Air)
(Air) 


 (Air)
(Air) 


 (Air)
(Air) 


 (Air)
(Air) 


- When Air Kikou Kai hits a non-airborne opponent with any hit except the last, hitstun is great enough for Akira to land, dash in, and follow-up with any combo.
