mNo edit summary |
|||
| Line 34: | Line 34: | ||
{{PJMoveListHeader}} | {{PJMoveListHeader}} | ||
{{PJMoveListRow | Turn Around Punch | {{p}} While facing away from opponent | 10 | 16 | +2 | +8 | 8 | All | }} | {{PJMoveListRow | Turn Around Punch | {{p}} While facing away from opponent | 10 | 16 | +2 | +8 | 8 | All | }} | ||
{{PJMoveListRow | Turn Around Kick | {{k}} While facing away from opponent | 9 | 37 | - | -13 | 5 | All | Blowback}} | {{PJMoveListRow | Turn Around Kick | {{k}} While facing away from opponent | 9 | 37 | - | -13 | 5 | All | Blowback }} | ||
{{PJMoveListRow | Running Shoulder Tackle | {{p}} while running | 12 | 31 | - | -7 | 11 | Standing | Overhead, Blowback}} | {{PJMoveListRow | Running Shoulder Tackle | {{p}} while running | 12 | 31 | - | -7 | 11 | Standing | Overhead, Blowback }} | ||
{{PJMoveListRow | Low Slide Kick | {{lk}} while running | 12 | 28 | - | -6 | 8 | Crouching | Blowback}} | {{PJMoveListRow | Low Slide Kick | {{lk}} while running | 12 | 28 | - | -6 | 8 | Crouching | Blowback }} | ||
{{PJMoveListRow | Flying Jump Kick | {{hk}} while running | 12 | 32 | - | -8 | 8 | Standing | Overhead, Blowback}} | {{PJMoveListRow | Flying Jump Kick | {{hk}} while running | 12 | 32 | - | -8 | 8 | Standing | Overhead, Blowback }} | ||
{{MoveListFooter}} | {{MoveListFooter}} | ||
==Throws== | ==Throws== | ||
{{PJMoveListHeader}} | {{PJMoveListHeader}} | ||
{{PJMoveListRow | Slap of Love | {{lp}} + {{hp}}, Near Opponent | 7 | 47 | - | - | 32 | - | Standing Throw | {{PJMoveListRow | Slap of Love | {{lp}} + {{hp}}, Near Opponent | 7 | 47 | - | - | 32 | - | Standing Throw }} | ||
{{PJMoveListRow | Jumping Piledriver | {{d}} + {{lp}} + {{hp}}, Near Opponent | 7 | 38 | - | - | 34 | - | Crouching Throw | {{PJMoveListRow | Jumping Piledriver | {{d}} + {{lp}} + {{hp}}, Near Opponent | 7 | 38 | - | - | 34 | - | Crouching Throw }} | ||
{{PJMoveListRow | Face Crusher | {{lp}} + {{hp}}, When Behind Opponent | 8 | 51 | - | - | 42 | - | Back Throw | {{PJMoveListRow | Face Crusher | {{lp}} + {{hp}}, When Behind Opponent | 8 | 51 | - | - | 42 | - | Back Throw }} | ||
{{PJMoveListRow | Jigoku Guruma | (Air) {{lp}} + {{hp}}, Near Opponent | 1 | - | - | - | 40 | - | Air Throw | {{PJMoveListRow | Jigoku Guruma | (Air) {{lp}} + {{hp}}, Near Opponent | 1 | - | - | - | 40 | - | Air Throw }} | ||
{{MoveListFooter}} | {{MoveListFooter}} | ||
| Line 51: | Line 51: | ||
{{PJMoveListHeader}} | {{PJMoveListHeader}} | ||
{{PJMoveListRow | Serve Spike (weak) | {{qcf}} {{lp}} | 18 | 44 | - | -15 | 14 | All | Blowback | }} | {{PJMoveListRow | Serve Spike (weak) | {{qcf}} {{lp}} | 18 | 44 | - | -15 | 14 | All | Blowback | }} | ||
{{PJMoveListRow | Serve Spike (strong) | {{qcf}} {{hp}} | 18 | 44 | - | -16 | 14 | All | Blowback, different angle to weak version | {{PJMoveListRow | Serve Spike (strong) | {{qcf}} {{hp}} | 18 | 44 | - | -16 | 14 | All | Blowback, different angle to weak version }} | ||
{{PJMoveListRow | Aerial Spike Serve | (Air) {{qcf}} {{p}} | 13 | 1 | - | +7 | 13 | All | Blowback, button changes angle | {{PJMoveListRow | Aerial Spike Serve | (Air) {{qcf}} {{p}} | 13 | 1 | - | +7 | 13 | All | Blowback, button changes angle }} | ||
{{PJMoveListRow | Sliding Receive | {{dp}} {{p}} | 21 | 38 | - | -16 | 14 | Crouching | Mini Launcher | {{PJMoveListRow | Sliding Receive | {{dp}} {{p}} | 21 | 38 | - | -16 | 14 | Crouching | Mini Launcher }} | ||
{{PJMoveListRow | Rolling Receive (weak) | {{qcb}} {{lp}} | 27 | 38 | - | -14 | 17 | All | Rival Launcher | {{PJMoveListRow | Rolling Receive (weak) | {{qcb}} {{lp}} | 27 | 38 | - | -14 | 17 | All | Rival Launcher }} | ||
{{PJMoveListRow | Rolling Receive (strong) | {{qcb}} {{hp}} | 32 | 38 | - | -14 | 17 | All | Rival Launcher | {{PJMoveListRow | Rolling Receive (strong) | {{qcb}} {{hp}} | 32 | 38 | - | -14 | 17 | All | Rival Launcher }} | ||
{{PJMoveListRow | Top Block | (Air) {{dp}} {{p}} | 3 | 12 | - | - | 33 | All | Catch counter | {{PJMoveListRow | Top Block | (Air) {{dp}} {{p}} | 3 | 12 | - | - | 33 | All | Catch counter }} | ||
{{PJMoveListRow | Tokkun Spike | (Air) {{qcb}} {{p}} | 7 | 1 | - | - | 29 | All | Blowback | {{PJMoveListRow | Tokkun Spike | (Air) {{qcb}} {{p}} | 7 | 1 | - | - | 29 | All | Blowback }} | ||
{{MoveListFooter}} | {{MoveListFooter}} | ||
==Burning Vigor Attacks== | ==Burning Vigor Attacks== | ||
{{PJMoveListHeader}} | {{PJMoveListHeader}} | ||
{{PJMoveListRow | Blazing Serve | {{qcf}} {{qcf}} {{p}} | 13 | 30 | - | -23 | 29 | All | Blowback on final hit, button changes angle | {{PJMoveListRow | Blazing Serve | {{qcf}} {{qcf}} {{p}} | 13 | 30 | - | -23 | 29 | All | Blowback on final hit, button changes angle }} | ||
{{PJMoveListRow | Aerial Blazing Serve | (Air) {{qcf}} {{qcf}} {{p}} | 17 | 1 | - | -17 | 31 | All | Blowback on final hit, button changes angle | {{PJMoveListRow | Aerial Blazing Serve | (Air) {{qcf}} {{qcf}} {{p}} | 17 | 1 | - | -17 | 31 | All | Blowback on final hit, button changes angle }} | ||
{{PJMoveListRow | Orbit Serve | {{qcb}} {{qcb}} {{p}} | 17 | 87 | - | - | 61 | All | }} | {{PJMoveListRow | Orbit Serve | {{qcb}} {{qcb}} {{p}} | 17 | 87 | - | - | 61 | All | }} | ||
{{MoveListFooter}} | {{MoveListFooter}} | ||
| Line 69: | Line 69: | ||
==Team Up Techniques== | ==Team Up Techniques== | ||
{{PJMoveListHeader}} | {{PJMoveListHeader}} | ||
{{PJMoveListRow | Fight On! | {{lp}} + {{lk}} (or {{hp}} + {{hk}}) | 25 | 49 | - | -23 | 30 | All | Team Up Attack, | {{PJMoveListRow | Fight On! | {{lp}} + {{lk}} (or {{hp}} + {{hk}}) | 25 | 49 | - | -23 | 30 | All | Team Up Attack, Guts Up type }} | ||
{{PJMoveListRow | Nekketsu Daisharin | {{p}} + {{p}} + {{k}} (or {{k}} + {{k}} + {{p}}) | 20 | 30 | - | -6 | 100 | All | Party Up Attack | {{PJMoveListRow | Nekketsu Daisharin | {{p}} + {{p}} + {{k}} (or {{k}} + {{k}} + {{p}}) | 20 | 30 | - | -6 | 100 | All | Party Up Attack }} | ||
{{MoveListFooter}} | {{MoveListFooter}} | ||
Revision as of 17:23, 7 May 2021
Introduction
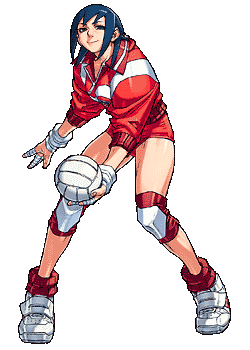
Natsu is the volleyball star of Gorin High, meaning she has spent years perfecting her ability to slap stuff really hard.
Natsu is one of the more technical characters in Project Justice, sporting a decent ranged presence with a variety of projectiles, a strong aerial presence and pokes with great reach, but slow startup. Neutral can be a little awkward to navigate with this character, but that's okay, because once you find your opening, her true strength shines through: she is a combo monster, with some of the game's highest meterless damage thanks to the only Rival Launcher that can naturally be worked into textbook combos, making her punish game exceptionally scary.
Normal Moves
Command Normals
Universals/Generics
Throws
Special Moves
Burning Vigor Attacks
Team Up Techniques
Combos
- st.LP,LP > st.HP xx dp+K, j.LK,LK > j.HP > j.HK xx j.qcb+P
- df+HP/st.LP,LP > st.HP xx qcb+LP, j.LK,LK, [j.LP,LP > j.HP]x2, j.LP,LP > j.HP > j.HK xx j.qcb+P
For Natsu's Rival Launcher combo, drift backwards on the first j.HP, drift forwards on the second j.LP,LP, keep a neutral input on the second j.HP. Refer to the video below at 0:45 for a visual reference.
For all combos, forgo the final j.HK if you want to combo into super.
Videos
Skip to 0:34


