Street Fighter 2: Champion Edition/Balrog (boxer): Difference between revisions
| Line 581: | Line 581: | ||
===Serious Disadvantage Matchups=== | ===Serious Disadvantage Matchups=== | ||
==Vs. Ryu== | ==Vs. Ryu== | ||
A tough matchup for Balrog. Ryu has better range on most of his quicker attacks with your only decent one being cr. HK and not the best speed. Can just crouch most of your attacks. Once he starts throwing fireballs it's hard to stop him unless you preemptively jumping over it knowing he will do another one(Chances are you'll be eating a shoryuken instead). If you are cornered by fireballs all you can do is block and wait if they do something else(Not likely though). Only way to win this matchup is a great deal patience, and getting lucky with random TAPs, and landing any headbutts. | A tough matchup for Balrog. Ryu has better range on most of his quicker attacks with your only decent one being cr. HK and not the best speed. Can just crouch most of your attacks. Once he starts throwing fireballs it's hard to stop him unless you are preemptively jumping over it knowing he will do another one(Chances are you'll be eating a shoryuken instead). If you are cornered by fireballs all you can do is block and wait if they do something else(Not likely though). Only way to win this matchup is a great deal patience, and getting lucky with random TAPs, and landing any headbutts. | ||
==Vs. Ken== | ==Vs. Ken== | ||
Revision as of 00:11, 12 June 2016


Introduction
Color Options
| Start | Default |
 |

|
Moves List
Normal Moves
Headbutt: close, f + MP or HP
Special Moves
Turn Punch: Hold all three Punches or Kicks for at least 2 secs then release
Final Punch: Above move and hold for 60 secs and release
Dash Punch: b~f + Punch
Dash Uppercut: b~f + Kick
The Basics
Anti-Airs: Dash Upper,crouching High Punch,standing Medium Punch
High Pokes: standing Medium Punch,standing High Punch
Low Pokes: crouching Short Kick, crouching Roundhouse Kick
Advanced Strategy
Hitboxes
Standing Normals
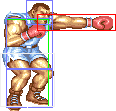
- Standing LP:
| Damage | 4 |  |
 |

|
| Stun | 1~7 | |||
| Stun Timer | 40 | |||
| Chain Cancel | Yes | |||
| Special Cancel | Yes | |||
| Frame Advantage | +5 | |||
| Frame Count | 3 | 4 | 5 | |
| Frame Count | 1+3 | 4 | 5 | |
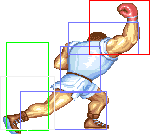
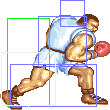
- Standing MP:
| Damage | 14 |  |
 |
 |
 |

|
| Stun | 5~11 | |||||
| Stun Timer | 60 | |||||
| Chain Cancel | No | |||||
| Special Cancel | No | |||||
| Frame Advantage | +6 | |||||
| Frame Count | 3 | 3 | 4 | 3 | 4 | |
| Frame Count | 1+6 | 4 | 7 | |||
- Standing HP:
| Damage | 22 |  |
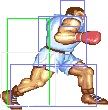 |
 |
 |

|
| Stun | 11~17 | |||||
| Stun Timer | 80 | |||||
| Chain Cancel | No | |||||
| Special Cancel | No | |||||
| Frame Advantage | +2 | |||||
| Frame Count | 5 | 3 | 6 | 9 | 6 | |
| Frame Count | 1+8 | 6 | 15 | |||
- Standing LK:
| Damage | 4 |  |
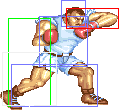 |

|
| Stun | 1~7 | |||
| Stun Timer | 40 | |||
| Chain Cancel | Yes | |||
| Special Cancel | Yes | |||
| Frame Advantage | +5 | |||
| Frame Count | 3 | 4 | 5 | |
| Frame Count | 1+3 | 4 | 5 | |
- Standing MK:
| Damage | 14 | 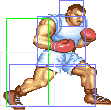 |
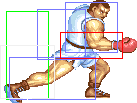 |

|
| Stun | 5~11 | |||
| Stun Timer | 60 | |||
| Chain Cancel | Yes | |||
| Special Cancel | Yes | |||
| Frame Advantage | +8 | |||
| Frame Count | 5 | 4 | 7 | |
| Frame Count | 1+6 | 4 | 7 | |
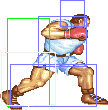
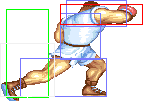
- Standing HK:
| Damage | 22 |  |
 |
 |
 |

|
| Stun | 11~17 | |||||
| Stun Timer | 80 | |||||
| Chain Cancel | No | |||||
| Special Cancel | No | |||||
| Frame Advantage | +2 | |||||
| Frame Count | 5 | 3 | 6 | 9 | 6 | |
| Frame Count | 1+8 | 6 | 15 | |||
Close Standing Normals
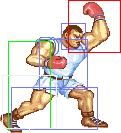
- Close MP:
| Damage | 16 |  |
 |

|
| Stun | 1~7 | |||
| Stun Timer | 40 | |||
| Chain Cancel | Yes | |||
| Special Cancel | Yes | |||
| Frame Advantage | +6/+5 | |||
| Frame Count | 5 | 4 | 7 | |
| Simplified | 1+5 | 4 | 7 | |
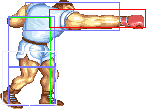
- Close HP:
| Damage | 24 |  |
 |
 |
 |

|
| Stun | 1~7 | |||||
| Stun Timer | 40 | |||||
| Chain Cancel | Yes | |||||
| Special Cancel | Yes | |||||
| Frame Advantage | +6/+5 | |||||
| Frame Count | 5 | 3 | 6 | 9 | 6 | |
| Simplified | 1+8 | 6 | 15 | |||
- Close MK:
| Damage | 16 |  |
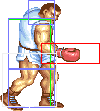 |

|
| Stun | 1~7 | |||
| Stun Timer | 40 | |||
| Chain Cancel | Yes | |||
| Special Cancel | Yes | |||
| Frame Advantage | +6/+5 | |||
| Frame Count | 4 | 4 | 7 | |
| Simplified | 1+4 | 4 | 7 | |
- Close HK:
| Damage | 24 |  |
 |

|
| Stun | 1~7 | |||
| Stun Timer | 40 | |||
| Chain Cancel | Yes | |||
| Special Cancel | Yes | |||
| Frame Advantage | +6/+5 | |||
| Frame Count | 6 | 6 | 15 | |
| Simplified | 1+6 | 6 | 15 | |
Close standing Forward and close standing Roundhouse share the same animation.
Crouching Normals
- Crouching LP/LK:
| Damage | 6 |  |
 |
 |
 |

|
| Stun | 1~7 | |||||
| Stun Timer | 40 | |||||
| Chain Cancel | Yes | |||||
| Special Cancel | Yes | |||||
| Frame Advantage | +6/+7 | |||||
| Frame Count | 1 | 2 | 4 | 2 | 2 | |
| Simplified | 1+3 | 4 | 4 | |||
- Crouching MP:
| Damage | 14 |  |
 |
 |
 |

|
| Stun | 5~11 | |||||
| Stun Timer | 60 | |||||
| Chain Cancel | No | |||||
| Special Cancel | No | |||||
| Frame Advantage | +9/+8 | |||||
| Frame Count | 3 | 2 | 4 | 3 | 4 | |
| Simplified | 1+6 | 4 | 7 | |||
- Crouching HP:
| Damage | 20 |  |
 |
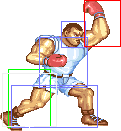 |
 |

|
| Stun | 11~17 | |||||
| Stun Timer | 80 | |||||
| Chain Cancel | No | |||||
| Special Cancel | No | |||||
| Frame Advantage | +1,+2 | |||||
| Frame Count | 4 | 2 | 6 | 9 | 6 | |
| Simplified | 1+4 | 8 | 15 | |||
- Crouching LK:
See Crouching LP.
- Crouching MK:
| Damage | 14 |  |
 |
 |
 |

|
| Stun | 5~11 | |||||
| Stun Timer | 60 | |||||
| Chain Cancel | No | |||||
| Special Cancel | No | |||||
| Frame Advantage | +9/+8 | |||||
| Frame Count | 3 | 2 | 4 | 3 | 4 | |
| Simplified | 1+5 | 4 | 7 | |||
The same frame and attack data as cr.Strong, except with less range and lower hit/hurt boxes.
- Crouching HK:
| Damage | 20 |  |
 |
 |
 |

|
| Stun | 11~17 | |||||
| Stun Timer | 80 | |||||
| Chain Cancel | No | |||||
| Special Cancel | No | |||||
| Frame Advantage | KD/+2 | |||||
| Frame Count | 2 | 4 | 6 | 9 | 6 | |
| Simplified | 1+6 | 6 | 15 | |||
Aerial Normals
- Neutral/Diagonal Jumping LP/LK:
| Damage | 10 |  |
 |
 |
 |

|
| Stun | 1~7 | |||||
| Stun Timer | 40 | |||||
| Frame Count | 1 | 30 | 3 | 3 | ∞ | |
| Simplified | 1 | 30 | ∞ | |||
- Neutral/Diagonal Jumping MP/MK:
| Damage | 14/16 |  |
 |
 |
 |

|
| Stun | 5~11 | |||||
| Stun Timer | 50 | |||||
| Frame Count | 2 | 15 | 3 | 3 | ∞ | |
| Simplified | 2 | 15 | ∞ | |||
- Neutral/Diagonal Jumping HP/HK:
| Damage | 18/20 |  |
 |
 |
 |

|
| Stun | 11~17 | |||||
| Stun Timer | 60 | |||||
| Frame Count | 3 | 8 | 3 | 3 | ∞ | |
| Simplified | 3 | 8 | ∞ | |||
Throws
- Headbutt: (←/→ + Strong or Fierce)
| Damage | 22+(4*n) | 
|
| Duration | 300 | |
| Stun | 1~7 | |
| Stun Timer | 60 | |
| Range (from axis) | 64 | |
| Range advantage | 36 |
Special Moves
- Dashing Straight: (Charge ←, →, P) [charge time: 69f]
| Damage (Jab) | 22 |  |
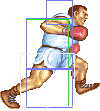 |
  |
 |

|
| Damage (Strong) | 24 | |||||
| Damage (Fierce) | 26 | |||||
| Random dmg table | 0x080 | |||||
| Stun | 13~19 | |||||
| Stun Timer | 120 | |||||
| Frame Advantage | +5 | |||||
| Frame Count | 1~8/1~16/1~24 | 3 | 8 | 6 | 4 | |
| Simplified | 4~11/4~19/4~27 | 8 | 10 | |||
Startup is 4 frames for all versions point blank, stronger punches can travel further (and thus can have longer startup).
Japanese Versions of Champion Edition have a better hitbox.
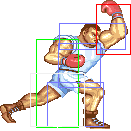
- Dashing Uppercut: (Charge ←, →, K) [charge time: 39f]
| Damage (Short) | 20 |  |
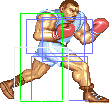 |
 |

| |
| Damage (Forward) | 22 | |||||
| Damage (Roundhouse) | 26 | |||||
| Random dmg table | 0x080 | |||||
| Stun | 13~19 | |||||
| Stun Timer | 120 | |||||
| Frame Advantage | +9 | |||||
| Frame Count | 1~8/1~16/1~24 | 3 | 8 | 6 | ||
| Simplified | 4~11/4~19/4~27 | 8 | 6 | |||
Startup is 4 frames for all versions point blank, stronger kicks can travel further (and thus can have longer startup). VERY short charge time, also amazing frame advantage.
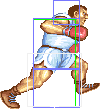
- Turn Around Punch (lvl 1 & 2): Hold all 3 Punch or Kick buttons for at least 30f (lvl1) or 120f (lvl2), then release.
Startup
 |
 |
 |
 |
 |
 |
 |
| |
| Frame Count | 4 | 4 | 4 | 7 | 2 | 2 | 2 | 2 |
| Simplified | 27 | |||||||
Active/Recovery
| Damage (lvl1) | 22 |  |
 |

|
| Damage (lvl2) | 28 | |||
| Random dmg (lvl1) | 0 | |||
| Random dmg (lvl2) | 6 | |||
| Stun | 13~19 | |||
| Stun Timer | 120 | |||
| Frame Advantage | +1 | |||
| Frame Count | 12 | 6 | 4 | |
| Simplified | 12 | 10 | ||
Level 2 TAP has higher overall damage (22 vs 34), and slightly more range.
- Turn Around Punch (lvl 3,4,5,6,7,final): Hold all 3 Punch or Kick buttons for at least 240f (lvl3), 480f (lvl4), 960f (lvl5), 1440f (lvl6), 1920f (lvl7), or 2400f (final), then release.
Active/Recovery
Japanese versions of SF2 Champion Edition have Level 3 and above TAPs can charge and had higher levels that travels further, and do more damage.
Misc Animations
| Walk back | Neutral | Walk Fwd | Crouch |
 |
 |
 |

|
- Standing reel:
 |
 |

|
- Standing gut reel:
 |
 |

|
- Crouching reel:
 |
 |

|
- Dizzy:
 |
 |

|
Combos
- j.HP,cr.LK,s.LK,b charge f+K,s.HP
- cr.LP,s.LP,b chage f+P
- (Zangief Only)cl.MP, st. MP, st. MP
- (Zangief Only)cl.MK, Cr. MP, st. MP
- (Opponent in Corner)cl.MK, St. HP
Match-Ups
Serious Advantage Matchups
Balrog has no match-ups where he is at a serious advantage
Advantage Matchups
Balrog has no match-ups where he is at an advantage
Fair Matchups
Vs. E.Honda
Vs. Boxer
Vs. Zangief
Vs. Blanka
Disadvantage Matchups
Vs. Dhalsim
Vs. Claw
Vs. Chun Li
Serious Disadvantage Matchups
Vs. Ryu
A tough matchup for Balrog. Ryu has better range on most of his quicker attacks with your only decent one being cr. HK and not the best speed. Can just crouch most of your attacks. Once he starts throwing fireballs it's hard to stop him unless you are preemptively jumping over it knowing he will do another one(Chances are you'll be eating a shoryuken instead). If you are cornered by fireballs all you can do is block and wait if they do something else(Not likely though). Only way to win this matchup is a great deal patience, and getting lucky with random TAPs, and landing any headbutts.
Vs. Ken
Pretty much the same as Ryu except Ken can travel way further with his shoryukens, and does even more damage if you make a mistake.
Vs. Guile
Vs. Sagat
Vs. Dictador
| General | Game Mechanics | Strategy | Tiers | |
| The Characters | Balrog (Boxer) | Blanka | Chun-Li | Dhalsim | E. Honda | Guile | Ken | M. Bison (Dictator) | Ryu | Sagat | Vega (Claw) | Zangief |
