
Dr. Doom
In a nutshell
Doom is a keepaway character with some sneaky ways to get in close and inflict damage. He has the best beam projectile in the game, and his fast startup Molecular Shield can really help keep would-be attackers off of him. His ability to {{#motion:airdashcancel}} many of his air normals gives him excellent mixups after blocked Dive Kicks, and his throws can lead to big damage combos. If a strong keepaway character with sneaky close range tricks is your style, join Doom's army.
Attributes
Doom's health is slightly above average, weighing in at an admirable 1,000,000 hit points. His walk speed is the worst of all characters in the game bar Chris Redfield, Thor, Dormammu and Haggar, with all of whom he is tied. His damage output (average damage of all Doom's normals) is above average at 78,000, falling just short of the hard-hitters like Tron-Bonne and thus crowning him king of the middle division. Despite having quite a tall frame and posture, his hitbox is very average--again labelling him a very middle-of-the-road character. His poor speed is compensated for by an 8-way air dash (into and out of which almost all of his air normals can cancel) and a ground dash that can be cancelled into by most of his ground normals.
Video Walkthrough
Move List
Assist Types
Normal Moves
Damage scales by 0.9
Cancels only into THC
Mash for up to 8 missiles
Damage scales by 0.9
Special Moves
113,600 (20,000 x 8) m
143,000 (20,000 x 12) h
111,800 (15,000 x 5 (close range) + 25,000 x 4) m
118,900 (15,000 x 7 (close range) + 25,000 x 4) h
Hyper Moves
Damage scales by 0.95
91,400 (10,000 x 12) Indirect
Apprentice Combos
Strategy
Tips and Tricks
- Both versions of his dive kick can be canceled into an air dash for additional pressure and mixups. The H version can be canceled into an air dash at a low height, while the S version has a much higher height requirement, and therefore cannot be dash canceled after hitting a standing opponent. Doing an air dash downward after slamming the opponent down allows you to OTG with s.{{#motion: h}}.
- Doom gets the combo of his choice after a forward throw in the corner, but he gets a huge combo starting with standing Medium off of his backward throw even midscreen. Be cautious about pressing back and Heavy if you are unsure, as the Hidden Missiles move could come out and leave you wide open.
- Doom can only use his Photon Array once per jump. As such, his dominance is much more suited to ground play. Make sure you mix in Plasma Beams and his Heavy Gun to keep people guessing when you do jump.
- When using Doom's Hidden Missiles, call an assist to cover him.
- When using Doom's Hidden Missiles assist, try calling him from full screen and then dashing in so the camera zooms a bit. Doom will be left off screen and your opponent wont even see the missiles coming!
- Though Doom's dash isn't cancelable, you can cancel any of his ground attacks into a front or back dash. This can help you continue the pressure or retreat. If you jump cancel the dash, you can even combo.
- Doom's assists are really good in this game, each with their own optimum context. His Plasma Beam assist is a great slow-startup beam useful for keepaway and setting up cross up unblockables. The Hidden Missiles assist is a great one for just throwing out when it's safe as it does the full 8 shots and is his most damaging assist of all, coupled with a massive delay between firing and hitting giving you a lot of time to start a combo or teleport etc. His molecular shield has really quick startup and is good for those get-the-hell off me situations, but does the least damage of the three.
- While his slow speed and robotic feel would suggest otherwise, Dr Doom is a total combo machine. This is mainly due to the massive amount of relaunch potential from his hugely dash-cancellable air normals and 2 great OTG ground normals. A popular technique is to launch, throw out 2x {{#motion: m}} and a {{#motion: h}} Foot Dive, cancel with a {{#motion: df}} air-dash and hit with one more {{#motion: m}} before landing. This leaves you in a perfect condition to juggle and re-launch with his Hard Kick launcher without having to OTG. This is great because it does great damage and works mid-screen all of the time, unlike doing a standard 2x {{#motion: m}}, {{#motion: s}} in the air and OTGing with standing {{#motion: m}} or {{#motion: h}} which only works in the corner. It also cuts out the extra damage and hitstun scaling that comes with an OTG relaunch.
Combos
Corner only: j.{{#motion: f + h}}, {{#motion: df + atk + atk}}, c.{{#motion: m}}, c.{{#motion: h}}, {{#motion: s}}, j.{{#motion: f + h}}, j.{{#motion: s}}, {{#motion: d + atk + atk}}, s.{{#motion: h}} (2 hits), {{#motion: s}}, j.{{#motion: m}} (2 hits), j.{{#motion: m}} (2 hits), j.{{#motion: f + h}}, j.{{#motion: s}}, {{#motion: d + atk + atk}}, s.{{#motion: h}} (2 hits), {{#motion: dp + h}}, {{#motion: dp + atk + atk}} or {{#motion: qcf + atk + atk}} - 760,000~ damage with level 1 ender, 999,000~ damage with level 3 ender
Basic Strategy
Doctor Doom's goal is to push an opponent into the corner. His corner combos/mixups are truly frightening when compared to his midscreen options. However, this isn't an easy task since you will have to deal with projectiles, rushdown, & your opponents' assists thrown your way. You will have to make use of his zoning moves, normals, throws, dash-cancels, jump-cancels into airdashes, & airdash cancels to push the opponent in the corner.
Overall, his best moves are:
Plasma Beam {{#motion: L}} and/or {{#motion: H}}: Two excellent beams. The {{#motion: H}} version is the strongest beam in the game. Use the {{#motion: L}} version for anti-air purposes and if you want to zone mid-range since the {{#motion: H}} version does have huge startup.
Air Plasma Beam {{#motion: L}} and/or {{#motion: H}}: Good for chip damage while trying to be unpredictable with your airdash-based offense.
Molecular Shield {{#motion: H}}: Although not as dominant as they were in MvC2, the rocks are still useful. They have faster startup than Plasma Beam. Plus, the shield sends out 4 rocks towards the opponent, so you can forge ahead.
Super-Jump Forward Photon Shot {{#motion: L}}: A very good way to start your air offense. You can airdash down-forward after the beams hit the opponent.
Foot Dive: Amazing move and the staple to Doom's goal. The move has good priority and it excels when combined with dash-cancels & jump-cancels. Combine this with a lockdown assist and you can add a lot of pressure. After a blocked Foot Dive, you can air-dash forward with air {{#motion: M}} or air-dash down-forward and do a mixup of tri-jump cr. {{#motion: L}}, instant air dash {{#motion: M}}, or throw. You can also throw out air Plasma Beams, Photon Shots, or go into Flight after a blocked Foot Dive. You can cancel a Foot Dive midway into an air Photon Shot, air Plasma Beam, or Flight.
Airdash {{#motion: M}}: Another staple to Doom's goal. It hits twice and must be blocked high. The move does come out decently quick if you do it, instant-overhead style. If you have a low-hitting assist (i.e. Wesker Samurai Edge), then you can do unblockables.
Hard Kick: A good anti-air and also another launcher. The move also has good priority.
Hidden Missiles: The move is still useful. Just throw out at most 2-3 missiles. Even one missile can change the course of a match.
Air {{#motion: H}}: Good for mid-range annoyance and if you want to mix up your air options. Decent at stopping jump-in attempts by your opponent.
Be sure to learn his loops. There are two midscreen loops worth learning: the Buktooth loop (http://www.youtube.com/watch?v=oN0Wg2xbfSM) & another loop which consists of foot-dives, which looks to be MUCH better (but a bit more difficult to perform) in pushing someone to the corner. The 2nd loop is:
Cr. {{#motion: L}}, cr.{{#motion: M}}, cr.{{#motion: H}}, {{#motion: S}}, sj.{{#motion: f + H}}, {{#motion: S}}, {{#motion: df + atk atk}}, Land, {{#motion: f + atk atk}}, St.{{#motion: H}}(OTG 1 or 2 Hits), {{#motion: S}}, sj. {{#motion: f + H}}, {{#motion: S}}, {{#motion: df + atk atk}}, Land, {{#motion: f + atk atk}}, St. {{#motion: H}}(OTG 1 or 2Hits), {{#motion: S}}, sj.{{#motion: S}}, {{#motion: df + atk atk}}, Land, St.{{#motion:H}}(OTG 2 Hits)
Doom's options are very varied. Experiment to see what works and you may find the character very rewarding. Once you get the opponent in the corner, Doom may prove to be a fun and valuable asset on your team.
Advanced Strategy
Dash-Canceling vs. Advancing Guard
- Coming Soon**
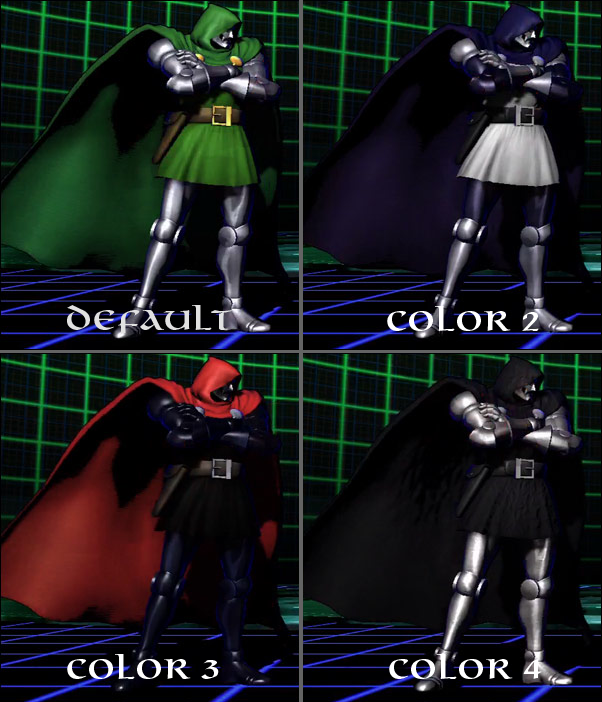
Alternate Colors

